When I've tried the "Package for CD" method when music has been inserted as a CD audio track, which you can do in PowerPoint by going to "Insert", "Movies and Sounds", "Play CD Audio Track" it hasn't worked. If you've inserted music in your presentation by that method, you will see an icon of a CD with music notes next to it in the slide where you've inserted the music (see Example 1). I would recommend using "Insert", "Movies and Sounds", then "Sound from File". You will then be prompted to locate the sound file you wish to insert. For instance, if you have albums stored in your "My Music" folder under your "My Documents" folder, you might browse to "My Documents\My Music\Unknown Artist\Unknown Album (11-30-2005 3-40-35 PM)" and select "Track 11". You should then see a small yellow speaker icon appear in the slide where you inserted the music track (see Example 2). You can right-click on the speaker icon and select "Custom Animation". You wil see "Track " appear at the right side of your PowerPoint window. You can right-click on it and pick effect options. You can click on the "Effect" tab and choose "After" under "Stop playing" and then specify after which slide the music should stop. You can click on the "Sound Settings" tab and check "Hide sound icon during slide show", so that it doesn't appear during the slide show.
If, at another point in the presentation, you wish to add another music file, you would go through the same process. E.g., perhaps you might wish to add Track 15 from "My Documents\My Music\Unknown Artist\Unknown Album (12-1-2005 8-10-48 AM)", so you would browse to it when prompted to specify the music file location.
Note, if you wish to have your presentation loop continuously until the escape key is pressed, from the PowerPoint menubar, choose "Slide Show" and then "Set Up Show". Then under "Show options", check "Loop continuously until 'Esc'". If you want it to end after the last slide, leave this option unchecked.
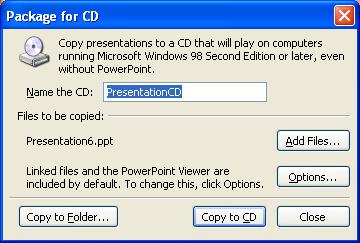
Now for the steps to actually put your presentation on a CD that can be used in another system. To use the "Package for CD" option, when you have finalized your presentation, click on "File" from PowerPoint's menu and then select "Package for CD". A "Package for CD" window will open.
You will see a "Name the CD" field with a default name of "PresentationCD". You can change the name to anything you like, e.g. "HolidayParty05", or just use the default name. You can then put a blank CD in your CD writer. You may see Windows "CD Drive" window open stating "Windows can perform the same action each time you insert a disk or connect a device with this kind of file" when you insert a blank CD. You will be prompted as to what you want to do, such as "Burn new CD", "Open writable CD folder", "Burn a CD", or "Take no action". You can just click on "Cancel" or close that window, since it isn't associated with the "Package for CD" function.
If you want to require a password to view the presentation, you can click on the "Options" button and specify a password. To start the copy process, click on "Copy to CD".
When "Package for CD" has finished creating the CD, you should see a window stating "The files were successfully copied to the CD. Do you want to copy the same files to another CD?" If you don't need to create other copies of the presentation on CD, select "No". You can then click on the "Close" button on the "Package for CD" window.
With the "Package for CD" feature, you don't even need PowerPoint on the destination system, since PowerPoint Viewer software is included on the CD. When the CD is inserted in the destination system, the PowerPoint Viewer program should open automatically. You may see a window asking whether you accept the license for the viewer software the fist time it is run. You can click on the "Accept" button. Within a minute or two the presentation should open automatically from the CD (if the presentation is fairly large give it a few seconds to open). You can also open it by double-clicking on the CD drive icon under "My Computer".
References:
