Backing Up Files to DVD with Sonic RecordNow!
The steps to take to backup files on your hard disk to a DVD using
Sonic's RecordNow! software. These steps were written for version 6,
but may apply to other versions as well.
- Click on Start.
- Click on All Programs.
- Select Sonic.
- Select RecordNow!.
- Click on the RecordNow! icon.
- If you are prompted to register, if you wish to register, you
can click on one of the register buttons, such as Register via
Web. Otherwise, click on Cancel.
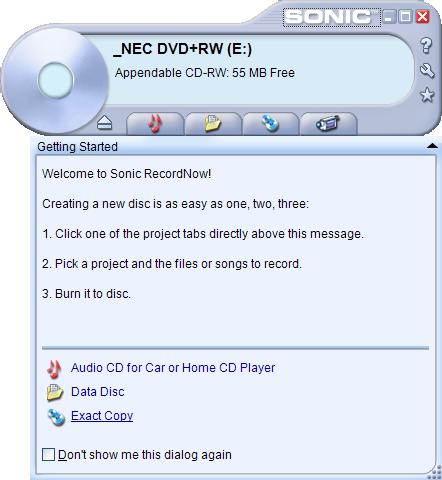
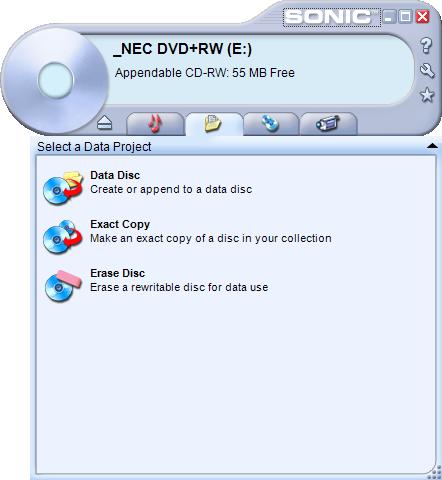
- When the RecordNow! program opens click on Data Disc,
which appears in the bottom portion of the window.
- In the field next to the blue disc in the window that opens,
type a label for your DVD, e.g. "Backup 12-10-05".
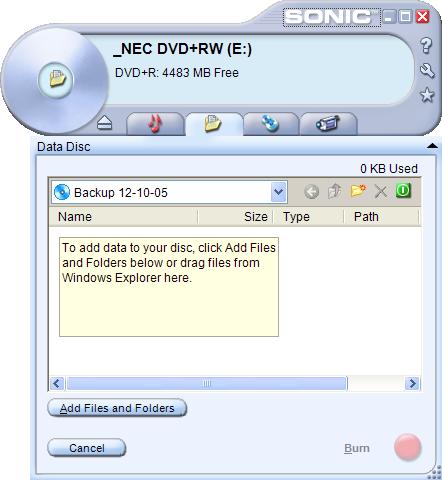
- Browse to a folder you want to add to the backup by clicking on
the Add Files and Folders button.
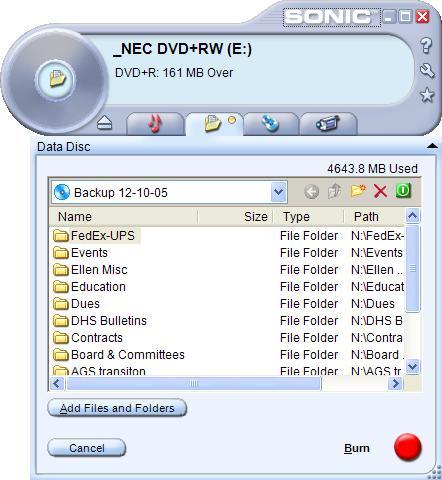
- Click on the Add button when you've found a folder or
file you wish to add. You can add multiple folders or files by
holding down the Ctrl key while clicking on those you wish to
select. When the files have been added, you will see the amount
of MegaBytes (MB) used displayed above the folders and files
you have selected. Remember a single-layer DVD can hold 4.7 GB,
which is equivalent to 4,812.8 MB. If the amount used is greater
than 4,812.8 MB you will need to remove some files and folders
to get the amount below that amount. The amount of data you can
actually put on the disc will be somewhat less than that amount
because of other information stored on the disc when you create
it. You will need to right-click
on some folders or files and choose Remove to bring
the amount below 4.7 GB, if you initially go over the limit.
-
Click on the Burn button when you are ready to start
creating, i.e. "burning", the DVD.
- If you see the message "The disc you have inserted does not
contain enough free space", then you will need to delete additional
files.
-
You may see a window stating that "Based on current RecordNow!
settings, the DVD you are about to create will let you
record multiple sessions to the same disc. Because of hardware
and software incompatibilities, this type of disc may not be
compatible with all computers." You will be asked if you are
sure you want to continue. With a multi-session disc, you can
write to the disc and then later reinsert the disc in the same
system or another system and write additional information to the
disc. Some systems with older operating systems may not be able
to read a multi-session disc. If you will be reading the disc
in a Windows 2000 or XP system, clicking on "Yes" shouldn't
cause any problems.
-
The program will go through a "checking files" phase before it
starts writing the files to the DVD. Be patient while it completes
this phase.
-
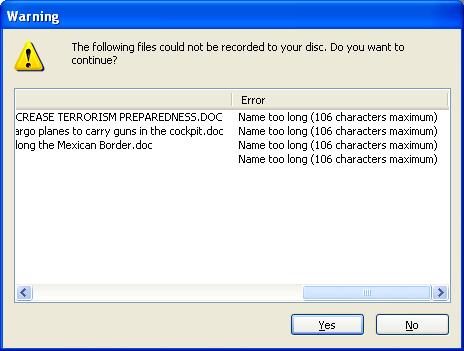
You may see a warning "The following files could not be recorded
to your disc. Do you want to coninue?" This can occur if the
name of a file is too long to be stored on the DVD, e.g. you
may see "Name too long (106 characters maximum)". This can occur
because the format used for the DVD is not the same as that for the
hard disk and so the disc may not be able to accomodate long file names
that you have used for files on the hard disk. You can click
on Yes to continue despite the error. If you want
to see the full file name, move the cursor to the vertical bar
that appears between the File and Error field at
the top of thw warning window. When you see a double-headed arrow,
drag the "Error" column header to the right, so you can see more
of the file name.
- As the burning process proceeds, you will be shown an "
estimated time remaining" value. When the process has completed,
you should see the message "Your disc was created successfully.
You can make another disc with the same data at this point or
click on Done, if you don't need to make another copy
of the data. The disc should be automatically ejected for you.
-
You can click on the button with a white "X" in a red box at the
upper right-hand corner of the RecordNow! to close the program,
if you don't need to create other DVDs.
-
You can now write identifying information on the DVD. I would
recommend an "Extra Fine Point" Sharpie permanent marker
or other marker specifically for writing on CDs and DVDs.
Other marking devices, such as pens, may damage the DVD and/or
may not write clearly on the DVD.