Creating an Alias Email Address on Exchange 2003 Server
If you need to set up an alias for a user account, e.g. sales@intorcol.com,
which points to a user's Exchange mailbox, e.g. jsmith@intorcol.com, you
can do so using the following steps:
- Click on Start.
- Select All Programs.
- Select Administrative Tools.
- Select Active Directory Users and Computers.
- Under Users for the domain, right-click on a username and
choose Properties. If you are using a
Small Business Server (SBS) system, you may need to locate the user
account within the domain by selecting MyBusiness then
Users then SBSUsers.
- Click on the E-mail Addresses tab.
- Click on the New button.
- Select SMTP Address.
- Click on the OK button.
- Place the alias, e.g. sales@intorcol.com in the E-mail address
field.
- Click on OK.
- You will be returned to the Properties window for the account.
Click on the OK button.
- Send a test message to the alias address to ensure it is working.
Any email sent to sales@intorcol.com should now go to jsmith@intorcol.com,
if you used an alias of sales@intorcol.com to point to J. Smith's existing
account, JSmith, on the Exchange server.
If you need the "sales" alias to route email to multiple accounts, you
can provide that capability by creating a new group, e.g. "sales", by
taking the following steps:
- Click on Start.
- Select All Programs.
- Select Administrative Tools.
- Select Active Directory Users and Computers.
- Under the domain, right-click on Users and
choose New then Group.
- In the New Object - Group window put the alias you want
to use, e.g. Sales in the group name field. Leave the group
scope set to "Global" and change the group type to "Distribution".
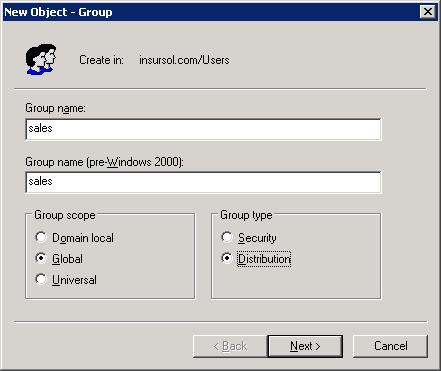
- Click on the Next button.
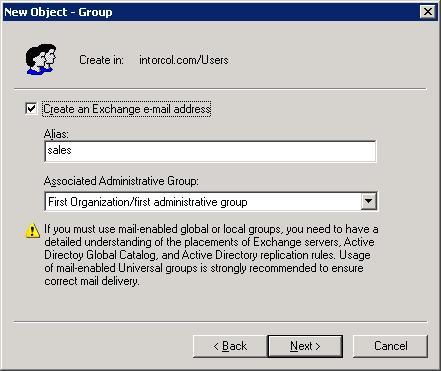
- At the next window, click on the checkbox next to "Create an
Exchange e-mail address then click on Next.
- The next window will state "When you click Finish, the following
object will be created" and will list the new object, e.g. "Full name: Sales".
Click on the Finish button.
- Right-click on the new group in the left-pane of the Active
Directory Users and Computers window and select Properties.
- Click on the Members tab.
- Click on the Add button.
- In the "Enter the object names to select" field, type the names of
the accounts that should receive email addressed to the new group.
Separate them with semicolons, e.g.
jim; danielle.
- Click on the Check Names button to verify the account names
you have entered.
- When the names have been verified, click on OK.
- Click on OK to close the Properties window for the
group.
- Send a test email message to the alias to verify it is working.
Reference:
-
Alias email addresses
December 3, 2001
MSD2D.com
