
The developer's website is located at www.sysresccd.org/. The rescue CD can be downloaded as an ISO image, which can be "burned" to a CD or DVD.
After booting an infected Dell system running Microsoft Windows
7 Professional from a SystemRescueCD, once the boot process was complete,
I typed startx to get a GUI. I then ran GParted, which you can find
on the menu bar at the bottom of the screen, which showed
me the partitions on the internal hard disk drive
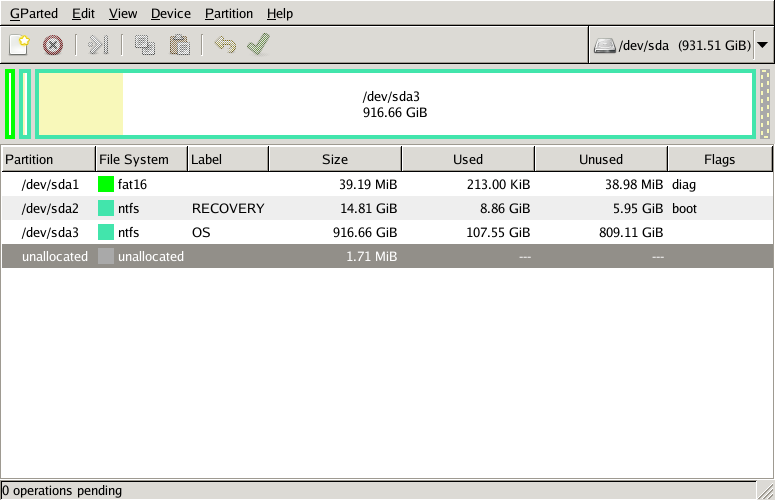
(image). I saw 3 partitions:
| Partition | File System | Label | Size | Used | Unused | Flags |
|---|---|---|---|---|---|---|
| /dev/sda1 | fat16 | 39.19 MiB | 213.00 KiB | 38.98 MiB | diag | |
| /dev/sda2 | ntfs | RECOVERY | 14.81 GiB | 8.86 GiB | 5.95 GiB | boot |
| /dev/sda3 | ntfs | OS | 916.66 GiB | 107.55 GiB | 809.11 GiB | |
| unallocated | unallocated | 1.71 MiB | --- | --- |
Note: what follows are the steps I took to backup partitions on the system to files on an external drive. If you wish to backup an entire drive to another drive the SystemRescueCD supports that option as well or you can use Clonezilla as covered in Cloning a Drive with Clonezilla.
By clicking on GParted on the GParted progam's menu and
selecting, Devices, I could see that the external drive was
/dev/sdb (931.51 GiB).
From a Terminal window, I typed mount /dev/sdb1 /mnt/backup
to mount the external drive under the directory
/mnt/backup.
root@sysrescd /root % mount /dev/sdb1 /mnt/backup
root@sysrescd /root %
I then backed up the partition table information for the internal drive.
root@sysrescd /root % sfdisk -d /dev/sda > /mnt/backup/sda.ptab
root@sysrescd /root %
I then backed up the Master Boot Record (MBR), which resides in
the first sector (512 bytes) of the hard disk to sda.mbr and the
MBR plus the Bootloader (the first 63 blocks) to sda.vbr.
root@sysrescd /root % dd if=/dev/sda of=/mnt/backup/sda.mbr bs=512 count=1
1+0 records in
1+0 records out
512 bytes (512 B) copied, 0.00058397 s, 877 kB/s
root@sysrescd /root % dd if=/dev/sda of=/mnt/backup/sda.vbr bs=512 count=63
63+0 records in
63+0 records out
32256 bytes (32 kB) copied, 0.290328 s, 111 kB/s
root@sysrescd /root %
Since the Microsoft Windows operating system was installed on the third
partition, sda3, I examined that partition with
ntfsresize.
root@sysrescd /root % ntfsresize --info /dev/sda3
ntfsresize v2014.2.15 (libntfs-3g)
Device name        : /dev/sda3
NTFS volume version: 3.1
Cluster size       : 4096 bytes
Current volume size: 984258441728 bytes (984259 MB)
Current device size: 984258445312 bytes (984259 MB)
Checking filesystem consistency ...
100.00 percent completed
Accounting clusters ...
Space in use       : 115480 MB (11.7%)
Collecting resizing constraints ...
You might resize at 115479420928 bytes or 115480 MB (freeing 868779 MB).
Please make a test run using both the -n and -s options before real resizing!
root@sysrescd /root %
I then backed up that partition to the external USB-attached disk drive
with ntfsclone.
root@sysrescd /root % ntfsclone --save-image --output /mnt/backup/windows.ntfsclone /dev/sda3
ntfsclone v2014.2.15 (libntfs-3g)
NTFS volume version: 3.1
Cluster size       : 4096 bytes
Current volume size: 984258441216 bytes (984259 MB)
Current device size: 984258445312 bytes (984259 MB)
Scanning volume ...
100.00 percent completed
Accounting clusters ...
Space in use       : 115480 MB (11.7%)
Saving NTFS to image ...
100.00 percent completed
Syncing ...
root@sysrescd /root %
The Windows partition was the critical one I needed backed up on the drive,
but after the backup of that partition completed, I backed up the other two
partitions as well. Since the diag partition, /dev/sda1
was a
FAT16
rather than an NTFS partition, I couldn't use
ntfsclone to copy it, since that utility only handles partitions
with the NTFS file system. Since that partition was small, I made an image
backup of it with the dd utility.
root@sysrescd /root % ntfsclone --save-image --output /mnt/backup/recovery.ntfsclone /dev/sda2
ntfsclone v2014.2.15 (libntfs-3g)
NTFS volume version: 3.1
Cluster size       : 4096 bytes
Current volume size: 15902699520 bytes (15903 MB)
Current device size: 15902703616 bytes (15903 MB)
Scanning volume ...
100.00 percent completed
Accounting clusters ...
Space in use       : 9514 MB (59.8%)
Saving NTFS to image ...
100.00 percent completed
Syncing ...
root@sysrescd /root % dd if=/dev/sda1 of=/mnt/backup/diag.img
80262+0 records in
80262+0 records out
41094144 bytes (41 MB) copied, 2.59411 s, 15.8 MB/s
root@sysrescd /root %
The SystemRescueCD will start an
SSH server service
when it boots, which you can see by using the netstat -a
command, but you will need to assign a password to the root account before
you can establish an SSH connection to the system, which you can do by issuing
the command passwd from a Terminal window.
root@sysrescd /root % passwd root
Changing password for root
Enter the new password (minimum of 5 characters)
Please use a combination of upper and lower case letters and numbers.
New password:
Re-enter new password:
passwd: password changed.
I checked the IP address the system had received via
DHCP from a Terminal window with ifconfig -a. The
IP address will be in a line starting with inet. I was then
able to establish an SSH connection to that IP address from another system.
With an SSH connection you can remotely run backup operations and reboot
the system remotely when they have completed.
If you would like to take screen shots, the xwd utility is
in /usr/bin. You can find information on the command by
typing man xwd at a shell prompt. To store a screen shot
to a file use the command xwd -out outfile, where
outfile is the name of the output file. I was able to capture a
screenshot of the GParted window displaying the partition information
by using the command xwd -out screenshot.xwd. When I hit
Enter after typing the command, the mouse pointer changed to a crosshair,
i.e., "+". I was then able to click on the relevant window for which I wanted
a screenshot and the file was saved to disk. You will, of course,
need to save the file somewhere it can be retrieved after rebooting
or, if you can ssh into the system, you can use scp
to copy the file from the system running the SystemRescueCd software.
 scp root@192.168.0.83:screenshot.xwd .
Password:
screenshot.xwd                                100% 1517KB   1.5MB/s   00:00
You will need some utility, such as the GNU Image Manipulation Program (GIMP) that understands the format used by xwd for its output files to view the screenshot and, if you wish, convert it to another format, such as JPG or PNG. Another alternative is to upload the image to Convert image to PNG to have the image converted for you for free. You can simply upload the file and click on the convert file button. The file will be automatically converted and a PNG file created for you to download.
You can reboot the system remotely with the reboot command, but
if you do, if the system is configured to attempt to boot from the CD/DVD drive
fist, it will simply reboot from the SystemRescueCd again with the
SystemRescueCd default boot options.
References:
![]()
Created: Wednesday December 10, 2014