
I configured Sendmail to use those blacklists by putting the following lines
in /etc/mail/sendmail.mc:
FEATURE(`blacklist_recipients')dnl
FEATURE(`dnsbl', `sbl.spamhaus.org', `550 Spam Block: mail from $&{client_addr} refused - See http://www.spamhaus.org/sbl/')dnl
FEATURE(`dnsbl', `psbl.surriel.com', `550 Spam Block: mail from $&{client_addr} refused - see http://psbl.surriel.com/')dnl
FEATURE(`dnsbl',`dnsbl.sorbs.net',`550 Spam Block: mail from $&{client_addr} refused - see http://dnsbl.sorbs.net/')dnl
FEATURE(`dnsbl',`dnsrbl.swinog.ch',`550 Spam Block: mail from $&{client_addr} refused - see http://antispam.imp.ch/spamikaze/remove.php')dnl
FEATURE(`enhdnsbl', `bl.spamcop.net', `"Spam blocked see: http://spamcop.net/bl.shtml?"$&{client_addr}', `t')dnl
If you add those lines to the Sendmail configuration file, you need to
regenerate /etc/mail/sendmail.cf with the command m4
/etc/mail/sendmail.mc > /etc/mail/sendmail.cf. Then restart sendmail
with service sendmail restart.
Still, despite those multiple anti-spam blacklists, a lot of spam is getting through to accounts on the mail server. So I decided to install Free Antispam for Mail Servers (FRAMS) from Bitdefender, which describes the software thusly:
Bitdefender Free Antispam for Mail Servers provides essential features for increased productivity in any organization by blocking spam on Linux-based mail servers. Bitdefender's award winning antispam engines provide antiphishing, content and attachment filtering. It's extremely easy to install and administrators have an easy to use web-based interface and powerful command line management.
After downloading the software, the following installation instructions can be used to install it from the root account.
For
Red Hat based distributions of Linux, such as
Red Hat Enterprise Linux or CentOS, which is compatible with RHEL, and
Fedora, which use the
RPM Package Manager
, the format for the install command is sh
BitDefender-Antispam-Mail-{os}-{arch}.rpm.run. For
Debian based distributions, such as
Ubuntu, you download a .deb.run file, instead, and the format for the
install command is sh
BitDefender-Antispam-Mail-{os}-{arch}-deb.run.
So for a CentOS system, the command below can be used to start the installation of the software:
sh BitDefender-Free-Antispam-for-Mail-Servers-linux-amd64.rpm.run
Note: if you normally use yum to install packages, the next time you use yum to install a package, you will see the message "Warning: RPMDB altered outside of yum."
When the installation starts, you will see the following prompt:
Please choose from the list below how the install
process shall proceed:

1. Install 'BitDefender Free Antispam for Mail Servers'
2. Abort

Enter an option or a list of space separated options:
Hit 1 and then Enter to proceed with the installation. You will then have the opportunity to page through the license agreement by hitting the spacebar until you reach the end of the agreement where you will see the following prompt:
Please enter 'accept' if you agree to the License Agreement.
Enter anything else if you don't agree to the terms in the License Agreement
and the installation process will stop.
Type accept and hit Enter to proceed with the installation
of the software. You will then be asked the following question:
BitDefender Security now has support for e-mail notifications for new versions
and patches. For more information about E-mail Notifications, please consult the
BitDefender Documentation.

Do you want to enable E-Mail Notifications on new versions and patches? (Y/n)
I would recommend hitting Y to ensure that you are notified of new versions and patches to the installed version. You will next see the following prompt:
Please enter the address of the SMTP server (default: 127.0.0.1)
The default IP address listed, 127.0.0.1, is the localhost address, i.e., a local IP address for the system itself, which should suffice in most cases, so, unless you have a need to use a different IP address, you can just hit Enter. The next prompt is for the port number used by the email software on the system. This will normally be the well-known port 25 used for the Simple Mail Transfer Protocol (SMTP), so just hitting enter will work in most cases, unless you've configured your email server software to run on an alternate port.
Please enter the port where the SMTP server listens (default: 25)
You will next be asked for the email address to which notifications should be sent. The default address is postmaster@localhost, which will likely be the root account on the system, so you can change the email address, if you would prefer that notifications be sent to another email address.
Address which receives the notifications (default: postmaster@localhost)
If you are using Sendmail, you can use the sendmail -bv
command to see where email addressed to postmaster@localhost will be delivered.
# sendmail -bv postmaster@localhost
root... deliverable: mailer local, user root
#
At the next step, a check is made for the Mail Transfer Agent (MTA) in use on the server:
Please select from the list below which MTA you are running
in order to integrate BitDefender with it

1. Communigate Pro
2. Courier
3. Postfix-SMTP Proxy
4. Postfix-milter
5. qmail
6. Sendmail-milter
7. SMTP Proxy - works with any Mail Transfer Agent

Enter your option (Detected: 6):
In this case, the server is using Sendmail for email processing and
I have the sendmail-milter package installed, so the installation procedure
selected option 6 as the default option. You can check on whether the
sendmail-milter package is installed on a CentOS or other Red Hat based
Linux distribution with the command rpm -qi sendmail-milter.
# rpm -qi sendmail-milter
Name        : sendmail-milter
Version     : 8.14.7
Release     : 4.el7
Architecture: x86_64
Install Date: Fri 03 Jun 2016 05:22:45 PM EDT
Group       : System Environment/Libraries
Size        : 71087
License     : Sendmail
Signature   : RSA/SHA256, Fri 04 Jul 2014 12:58:42 AM EDT, Key ID 24c6a8a7f4a80eb5
Source RPM  : sendmail-8.14.7-4.el7.src.rpm
Build Date  : Mon 09 Jun 2014 04:02:55 PM EDT
Build Host  : worker1.bsys.centos.org
Relocations : (not relocatable)
Packager    : CentOS BuildSystem <http://bugs.centos.org>
Vendor      : CentOS
URL         : http://www.sendmail.org/
Summary     : The sendmail milter library
Description :
The sendmail Mail Filter API (Milter) is designed to allow third-party
programs access to mail messages as they are being processed in order to
filter meta-information and content.

This package includes the milter shared library.
#
A milter
is an extension to Sendmail and
Postfix that allows administrators to add mail filters for filtering spam
or viruses in the mail-processing chain. The sendmail-milter package can
be installed with yum install sendmail-milter.
When I hit enter, I then saw the following:
Your option: milter
Looking for installation in '/etc/mail' ...
Checking if the file '/etc/mail/sendmail.cf' exists...
It does.
Checking if the file '/etc/mail/sendmail.mc' exists...
It does.
Found installation at /etc/mail
Ok, the file is now cleaned up
Trying to send SIGHUP to any running sendmail instances
An attempt to send SIGHUP to sendmail was made, but in some cases is necessary to restart manually!
Now you must also restart BitDefender.

Do you want to enable RBL ? (Y/n)
An RBL is a Real-time Blackhole List or DNSBL, a list of IP addresses most
often used to publish addresses linked to spamming. I typed Y and
hit Enter and then saw the following:
Please enter a RBL server to use (or ENTER to finish):
I hit Enter to proceed. The next step is to provide a license key, which you should have received by email when you registered to download the software.
Please enter a 'BitDefender Free Antispam for Mail Servers' registration key
or press <ENTER> in order to continue using the trial version
After entering the key, you will see the following information (x's have been substituted for the actual key):
Checking the key for BitDefender Security for Mail Servers
License key           : xxxxxxxxxxxxxxxxxxxx
License status        : valid (free)
License covers        : 1 user
License days remaining: 365

Do you wish to use this key? (Yes/No)
The software will provide a web server interface that you can use for configuring the software. At the next prompt, I was presented with the opportunity to change the port number the software will use for web server access. The default port was 8139, which I chose to retain by hitting Enter.
Setting up the Remote Admin HTTP server

Bind address (127.0.0.1:8139) :
Once the software installation is completed, you can make configuration
changes to it by putting the specified IP address and port number in your
browser, e.g. https://127.0.0.1:8139. The software will then
create a
Secure Sockets Layer (SSL) certificate for encrypted
HTTPS access
and you will be prompted for a password for the administrator account for the
software.
Creating the bdradmind SSL certificate ...OK:
-r--------. 1 root root 1889 Jul 30 21:21 /opt/BitDefender//etc/certs/bdradmin.pem

Detected FQDN: example.com. If you'll access the radmin server using another name, please regenerate the certificate:
	/opt/BitDefender/bin/bdcertgen.sh --fqdn <FQDN> --force
Dont't forget to restart the radmin service afterwards.


Setting up the 'administrator' account

Password:
When you enter the password and hit Enter you will be prompted to re-enter it to ensure there are no typos. Then the FRAMS process will be started.
Re-enter password:
Stopping . done
BitDefender radmin package was successfully set up.
Starting BitDefender Registry:                             [  OK  ]
Starting BitDefender Logger:                               [  OK  ]
Starting BitDefender Scanning Engine:                      [  OK  ]
Starting BitDefender Mail Daemon:                          [  OK  ]
Starting BitDefender SNMP Daemon:                          [  OK  ]
Starting BitDefender Monitor:                              [  OK  ]
Starting BitDefender Live! Update:                         [  OK  ]
Starting BitDefender Milter agent:                         [  OK  ]
Starting radmin ...
Starting BitDefender Remote Admin:                         [  OK  ]

install completed
You have new mail in /var/spool/mail/root
#
You can then access the web-based management interface to the software
using the IP address and port number previously chosen, e.g.,
https://127.0.0.1:8139. Your browser may warn you about the
self-signed certificate that was generated during the installation
process for HTTPS access to the web management interface with a message
such as "This Connection is Untrusted", but you can proceed in this case
and add an exception in your browser, if needed, since the warning is
just due to the fact that the certificate is self-signed rather than
being signed by a Certificate Authority (CA). You should then see the
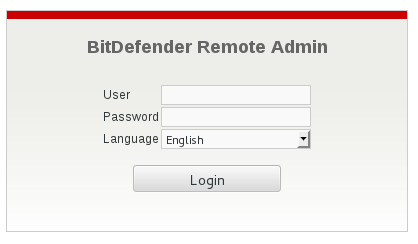
BitDefender Remote Admin login window.
If you examine the message headers of incoming email, you will see lines like the following have been added:
X-BitDefender-CF-Stamp: none
X-BitDefender-SpamStamp: Build: [Engines: 2.15.6.911, Dats: 429312,
    Stamp: 3], Multi: [Enabled, t: (0.000027,0.001551)], BW: [Enabled,
    t: (0.000020,0.000001)], RBL DNSBL: [Enabled, Score: 0(0),
    t: (0.000016)], APM: [Enabled, Score: 500, t: (0.041108),
    Flags: 85D2ED72; NN_BEGIN_TAG_NOT_OK; NN_NO_LINK_NMD;
    NN_SUMM_TP_BWLE_ADN; NN_SUMM_TH_BWLE_ADN], SGN: [Enabled,
    t: (0.099863)], URL: [Enabled, t: (0.000019)], RTDA: [Enabled,
    t: (5.487112), Hit: No, Details: v2.3.10; Id: 2m1gghu.1aohcdt3l.4r9id],
    total: 0(775)
X-BitDefender-Spam: No (0)
Most email clients hide such message header lines by default, so you might have to configure the email client program, such as Microsoft Outlook, etc., to show such headers, if you wish to see them. E.g., see Viewing Message Headers in Outlook 2002.
When I checked the /etc/mail/sendmail.mc file after the
installation had completed, I found the following lines had been added to
the file:
dnl # Added by BitDefender, do not remove!
define(`_FFR_MILTER', `true')
INPUT_MAIL_FILTER(`BitDefender', `BitDefender, S=unix:/opt/BitDefender/var/run/bdmilterd.sock, F=T, T=S:60s;R:60s;E:10m')
dnl # End of added lines
The software stores the following log files in
/opt/BitDefender/var/log.
# ls /opt/BitDefender/var/log
error.log      mail.log      spam.log      update.log
error.log.ctl  mail.log.ctl  spam.log.ctl  update.log.ctl
You can change the location of the log files through the web management interface, if you wish.
You can start the BitDefender Free Antispam for Mail Servers (FRAMS)
with the command /opt/BitDefender/bin/bd start.
# /opt/BitDefender/bin/bd start
Starting BitDefender Registry:
Starting BitDefender Logger:
Starting BitDefender Scanning Engine:
Starting BitDefender Mail Daemon:
Starting BitDefender SNMP Daemon:
Starting BitDefender Monitor:
Starting BitDefender Live! Update:
Starting BitDefender Milter agent:
#
You can check its status with bd status.
# /opt/BitDefender/bin/bd status
BitDefender Registry (bdregd) (pid(s) 2246) running... for 16d 6h 50m 31s
BitDefender Logger (bdlogd) (pid(s) 1310) running... for 0d 0h 7m 1s
BitDefender Monitor (bdmond) (pid(s) 3283) running... for 16d 6h 49m 25s
BitDefender Scanning Engine (bdscand) (pid(s) 2607) running... for 16d 6h 50m 29s
BitDefender Live! Update (bdlived) (pid(s) 3294) running... for 16d 6h 49m 25s
BitDefender Mail Daemon (bdmaild) (pid(s) 1317) running... for 0d 0h 7m 0s
BitDefender SNMP Daemon (bdsnmpd) (pid(s) 3271) running... for 16d 6h 49m 26s
BitDefender Milter agent (bdmilterd) (pid(s) 3312) running... for 16d 6h 49m 25s
#
You can obtain detailed information on the version of software components,
the location of spam and malware directories, etc. using the bd info
command.
# /opt/BitDefender/bin/bd info
BitDefender Security for Linux 3.10.0-229.7.2.el7.x86_64 x86_64

Package versions:
 - bitdefender-common : 3.1.6
 - bitdefender-mail   : 3.1.6
 - bitdefender-radmin : 3.1.6
BitDefender Core Components             BitDefender Agents
 - bdregd      : 3.10.0.151209 (3208000000000003.10.0.150724 (31355) - bdcgated   : 3.10.0.140118 (27810)
 - bdlogd      : 3.10.0.150724 (31355)    - bdcourier  : 3.10.0.150725 (31362)
 - bdlived     : 3.10.0.151221 (3234000000000003.10.0.140729 (29018) - bdmilterd  : 3.10.0.150409 (30786)
 - bdmond      : 3.10.0.140729 (29018)    - bdqmail    : 3.10.0.140729 (29018)
 - bdscand     : 3.10.0.160118 (3242000000000003.10.0.140729 (29018) - bdsmtpd    : 3.10.0.140729 (29018)
 - bdsnmpd     : 3.10.0.140729 (29018)
 - bdmaild     : 3.10.0.150323 (30597)
 - bdemagentd  : 3.10.0.140729 (29018)
 - bdemclientd : 3.10.0.140729 (29018)
Licenses
 - bdmaild    : status: valid (free), type: user, days remaining: 346
Live! Update
 - Last check  : Thu, 18 Aug 2016 17:03:40 -0400 (EDT)
 - Last update : Thu, 18 Aug 2016 14:01:07 -0400 (EDT)
BitDefender quarantine directories
 - deferred   :   0 bytes (    0 files) in /opt/BitDefender/var/quarantine/deferred
 - spam       :   25.74MB (  431 files) in /opt/BitDefender/var/quarantine/spam
 - malware    :   0 bytes (    0 files) in /opt/BitDefender/var/quarantine/malware
#
You can view statistics regarding the amount of spam and malware detected
by the software using bd stats.
# /opt/BitDefender/bin/bd stats
+---------------------------------------+
|     M A I L   S t a t i s t i c s     |
+-------------------+-------------------+
|           Scanned | 4190              |
|          Infected | 0                 |
|       Disinfected | 0                 |
|       Quarantined | 1733              |
|          Rejected | 0                 |
|           Ignored | 122               |
|           Dropped | 1733              |
|              Spam | 1855              |
|          Filtered | 0                 |
+-------------------+-------------------+
#
You can see the port that is being used for remote administration with the command below:
# /opt/BitDefender/bin/bdsafe registry getkey /BDUX/Radmin/Host
127.0.0.1:8139
#
You can start and stop the Bitdefender Remote Admin portion of the software
with the bradmin command. If you enter the command with no
arguments on the command line, you will see the arguments it accepts.
# netstat -an | grep 8139
# /opt/BitDefender/bin/bdradmin
Usage: /opt/BitDefender/bin/bdradmin <option>
Where <option> can be one of:
  start                       Create a daemon process
  stop                        Stop the daemon process
  restart                     Restart the daemon process
# /opt/BitDefender/bin/bdradmin start
Starting BitDefender Remote Admin:                         [  OK  ]
[root@moonpoint Documents]# netstat -an | grep 8139
tcp        0      0 127.0.0.1:8139          0.0.0.0:*               LISTEN
#