Installing SNMP Under Windows XP
To intall Simple Network
Management Protocol (SNMP) support on a Windows
XP system, take the following steps:
- Put the Windows XP installation CD in the systems CD-ROM drive.
- Logon as an administrator.
- Click on the Start button.
- Select Control Panel.
- Double-click on Add or Remove Programs.
- Click on Add/Remove Windows Components.
- Select Management and Monitoring Tools.
- Click on Next.
- Click on Finish.
- Close the Add or Remove Programs window.
The above process installs SNMP support. By default, the
system will then accept queries on the default SNMP port,
UDP
port 161. A system issuing SNMP queries to the system on which you
installed SNMP support can use public as the read-only community
string, which is similar to a password for SNMP. Since that community
string is a widely known default value, you should change it to make
the system more secure. You can configure the community strings to use
and other SNMP options by following the steps below.
- Click on the Start button.
- Select Control Panel.
- Double-click on Administrative Tools.
- Double-click on Services.
- Scroll down to SNMP Service and double-click on it.
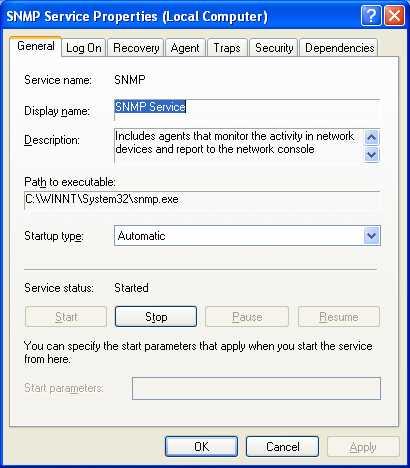
- Click on the Security tab.
- Click on the Edit button to edit the community string
to be used for "Read Only" SNMP queries and change it from
public to be whatever you wish and then click on
OK.
- If you want to allow changes to be made to the system via
SNMP, you can add a "Read Write" community string by clicking
on Add then choosing READ WRITE for
"community rights" and then putting whatever you want to
use for the "read write" community name, e.g.
1234ABC1234 in the "community name field.
Click on the Add button when finished.
- By default the system will accept SNMP packets from
any system. For additional security, you can specify that
only specific IP addresses can access the system via
SNMP by selecting "Accept SNMP packets from these hosts"
rather than the default of "Accept SNMP packets from any
hosts". If you want to accept packets only from specific hosts,
you then have to click on the Add button, and specify
a host name, e.g.
example.com or an IP or IPX address for a
system from which SNMP packets will be accepted.
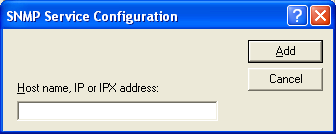
If you want to have the system send SNMP traps to another system
in addition to responding to SNMP quries, click on the Traps
tab. Type a community string in the community name field and
click on the add to list button. Then click on the Add
button under Trap destinations and type a host name or IP
or IPX address in the SNMP Service Configuration window and
then click on the Add button.
Click on the Agent tab and add a contact name
and location for the system in the Contact and
Location fields, if you wish to have that information
accessible by SNMP. Then click on OK.

Created: Thursday, October 14, 2010
