View Hidden and System Files
If the Windows Explorer is using the default folder settings, you won't
be able to locate files that are marked as hidden or which are system
files or which are within folders marked as hidden. The Windows search
utility, which you can access by clicking on "Start" and "Search" won't
be able to find them for you either. In order to be
able to access such files and folders, take the following steps:
Windows XP
Windows 7
Windows 8
Windows 10
Windows XP
-
Open the Windows Explorer or just double-click on "My Computer".

-
Then click on "Tools" and select "Folder Options".

-
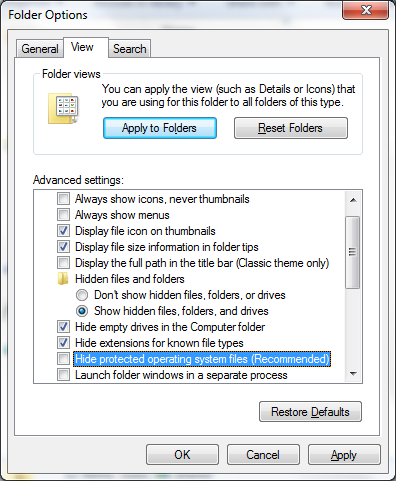
Click on the "View" tab, and then under "Hidden files and folders"
select "Show hidden files and folders" by clicking on it. Also
uncheck "Hide protected operating system files (Recommended)." Then
click on "OK".

-
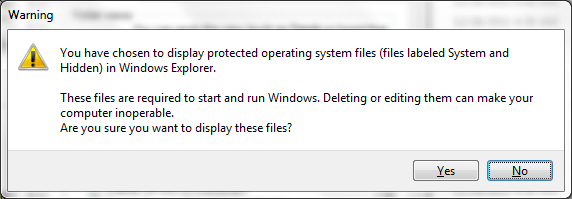
When you deselect "Hide protected operating system files, the following
warning message will appear:
You have chosen to display protected operating sytsem files (files labeled
System and Hidden) in Windows Explorer.


These files are required to start and run Windows. Deleting or editing them
can make your computer inoperable. Are you sure you want to display these
files?

Click on "Yes".
-
Click on "OK" again to close the "Folder Options" window.
Windows 7
To see the location of hidden and system files and folders under Windows
7, you need to take the following steps to make them visible.
- Click on the Windows Start button
 at
the lower, left-hand corner of your screen.
- Select Computer.
- Click on Organize.
- Select Folder and search options.
- Click on the View tab.
- Under the Hidden files and folders entry, check
"Show hidden files, folders, and drives".
- Below the above entry, you will see an entry for
"Hide protected operating system files (Recommended)"; uncheck it.
You will see a warning that
"These files are required to start and run Windows. Deleting or editing them
can make your computer inoperable. Are you sure you want to display these
files?" Click on Yes.

- Click on OK to apply the changes.

Windows 8
-
Right-click on the Windows Start button and select File Explorer.
-
Click on View near the top of the window.

-
Select Options.

-
In the Folder Options window that then opens, click on the View
tab.
-
Select "Show hidden files, folders, and drives.

-
Click on OK.
Windows 10
-
Right-click on the Windows
Start button in the lower, left-hand corner of the screen and select
File
Explorer.

-
Click on the View tab and select Options, which you should
see near the top, right side of the window.

-
Click on the View tab in the Folder Options window and change
the "Hidden files and folders" setting from "Don't show hidden files, folders,
or drives" to "Show hidden files, folders, and drives" and also uncheck the
check box next to "Hide protected operating system files (Recommended)".

-
You will see a warning window appear noting "You have chosen to display
protected operating system files (files labeled System and Hidden) in File
Explorer" which also notes "These files are required to start and run
Windows. Deleting or editing them can make your computer inoperable." Click
on the Yes button to confirm you want to display these files.

- Click on OK.
You can follow a similar process to reverse the changes to hide the files
again after you've accessed the files you need to access to protect yourself
from accidentally modifying any system files.
You will now be able to view hidden and system files. If you want to
revert to the previous setting, which protects novice users from
inadvertently deleting important system files, you can go through
the same procedure to reset the folder options.


