
plugin\putty directory, which is within the directory where
you installed Bart's PE Builder.
When you boot from the Bart's Preinstalled Environment (BartPE) bootable live windows CD/DVD disc you create, you can then click on Go, select Programs, and then Putty (SSH).
If you wish to use the PSFTP program that comes with PuTTY,
you will need to modify the putty.inf and
putty_nu2menu.xml files that you will find in the
plugin\putty directory before you build the ISO file or
burn a disc.
The default entries in putty.inf are as follows:
; putty.inf
; PE Builder v3 plug-in INF file for Putty
; Created by Bart Lagerweij
[Version]
Signature= "$Windows NT$"
[PEBuilder]
Name="PuTTY"
Enable=0
Help="putty.htm"
[WinntDirectories]
a="Programs\putty",2
[SourceDisksFiles]
putty.exe=a,,1
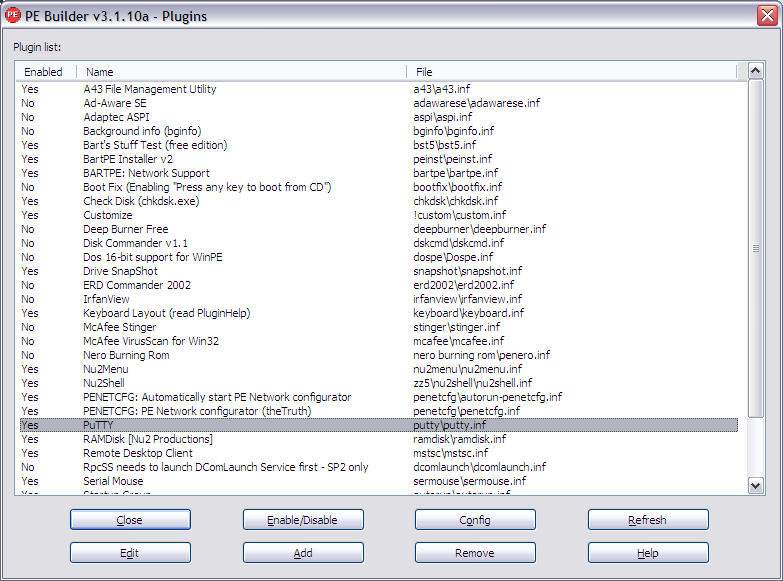
[Append]
nu2menu.xml, putty_nu2menu.xmlIn the PEBuilder section change Enable=0
to Enable=1 to enable the use of PuTTY as a plugin on the
disc you will create. In the SourceDisksFiles directory,
you need to add psftp.exe=a,,1 and similar lines for plink
and pscp, so that the section is as follows:
[SourceDisksFiles]
putty.exe=a,,1
psftp.exe=a,,1
plink.exe=a,,1
pscp.exe=a,,1
For an explanation of the syntax, you can refer to
the pluginformat.htm file that you will find in the
help directory within the directory where you installed
PE Builder,
Plugin
file format or
Create or Modify
PE Builder plugins.
You also need to modify putty_nu2menu.xml, which is in the
same directory as putty.inf. The default
entries in that file are as follows:
<!-- Nu2Menu entry for putty -->
<NU2MENU>
	<MENU ID="Programs">
		<MITEM TYPE="ITEM" DISABLED="@Not(@FileExists(@GetProgramDrive()\Programs\putty\putty.exe))" CMD="RUN" FUNC="@GetProgramDrive()\Programs\putty\putty.exe">Putty (SSH)</MITEM>
	</MENU>
</NU2MENU>
You need to add an MITEM line for PSFTP. The new version of
the file should be as follows:
<NU2MENU>
<MENU ID="Programs">
<MITEM TYPE="ITEM" DISABLED="@Not(@FileExists(@GetProgramDrive()\Programs\putty\putty.exe))" CMD="RUN" FUNC="@GetProgramDrive()\Programs\putty\putty.exe">Putty (SSH)</MITEM>
<MITEM TYPE="ITEM" DISABLED="@Not(@FileExists(@GetProgramDrive()\Programs\putty\psftp.exe))" CMD="RUN" FUNC="@GetProgramDrive()\Programs\putty\psftp.exe">Putty (SFTP)</MITEM>
</MENU>
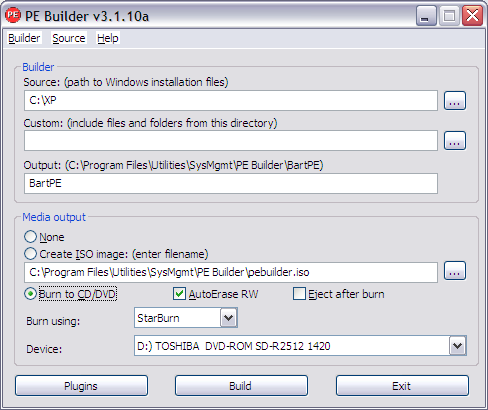
</NU2MENU>Once the putty.inf and putty_nu2menu.xml files
have been modified you can build a BartPE boot disc that will allow you
to use both PuTTY for SSH
connections and PSFTP for
SFTP
connections by selecting them from the BartPE menu.
The pscp and plink programs are command line
programs, so I don't add them to the BartPE menu. They will be located
in the Programs\putty directory on the BartPE disc you
build and can be run from a command prompt.
References: