
You can determine if the application is already installed using the which command.
$ which gimp
/bin/gimp
$
If it isn't installed, on systems that use the
yum package management tool, such as
CentOS, you
can use the command yum install gimp from the root
account to install it. On Linux distributions that use the
Advanced
Packaging Tool (APT) for package management, e.g.,
Ubuntu, you can use sudo apt-get install gimp.
To take a snapshot of a window or an area of the screen, take the following steps:
For the single window screen shot, you can chose whether to "include window decoration". If you don't want to capture the border around a window, scrollbars for the window, and any application menu at the top of the window, uncheck "Include window decoration. If you choose to take a screenshot of a single window, the cursor will change to resemble a plus sign, i.e., "+". Move the cursor over the appropriate window and that window will be pasted into a GIMP window when you click on the window. Make sure you don't have any windows overlapping the one you wish to capture, otherwise you may see a portion of an overlapping window in the screenshot.
For the entire screen option, you can choose whether you wish to include the mouse pointer in the screen shot.
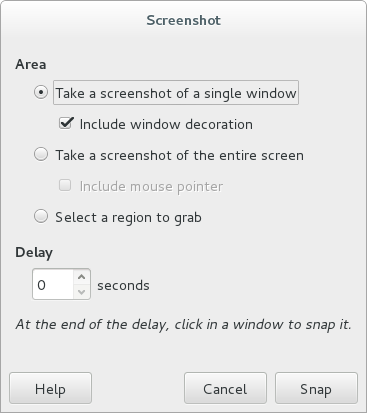
You can also specify a delay in seconds prior to the picture being snapped.
The delay option can be useful when you wish to grab a region of the
screen from a window behind the GIMP window. E.g., I can specify a 5 second
delay, switch to the relevant window, and, when the mouse pointer changes to
a plus sign, i.e., +, I can then click in one corner of the area
I wish to capture and drag the mouse pointer to a diagonally opposite corner
and then release the mouse button to capture the selected area of a window.
Once you have the screen shot, you can create a GIF, JPG, PNG, etc. image file from the screenshot by clicking on File and selecting Export.
