Mon, Jul 13, 2026 4:52 pm
Installing Discord on an Ubuntu Linux system
To install Discord on
an Ubuntu Linux system,
you can install it as a
Snap package through Ubuntu's App Center.
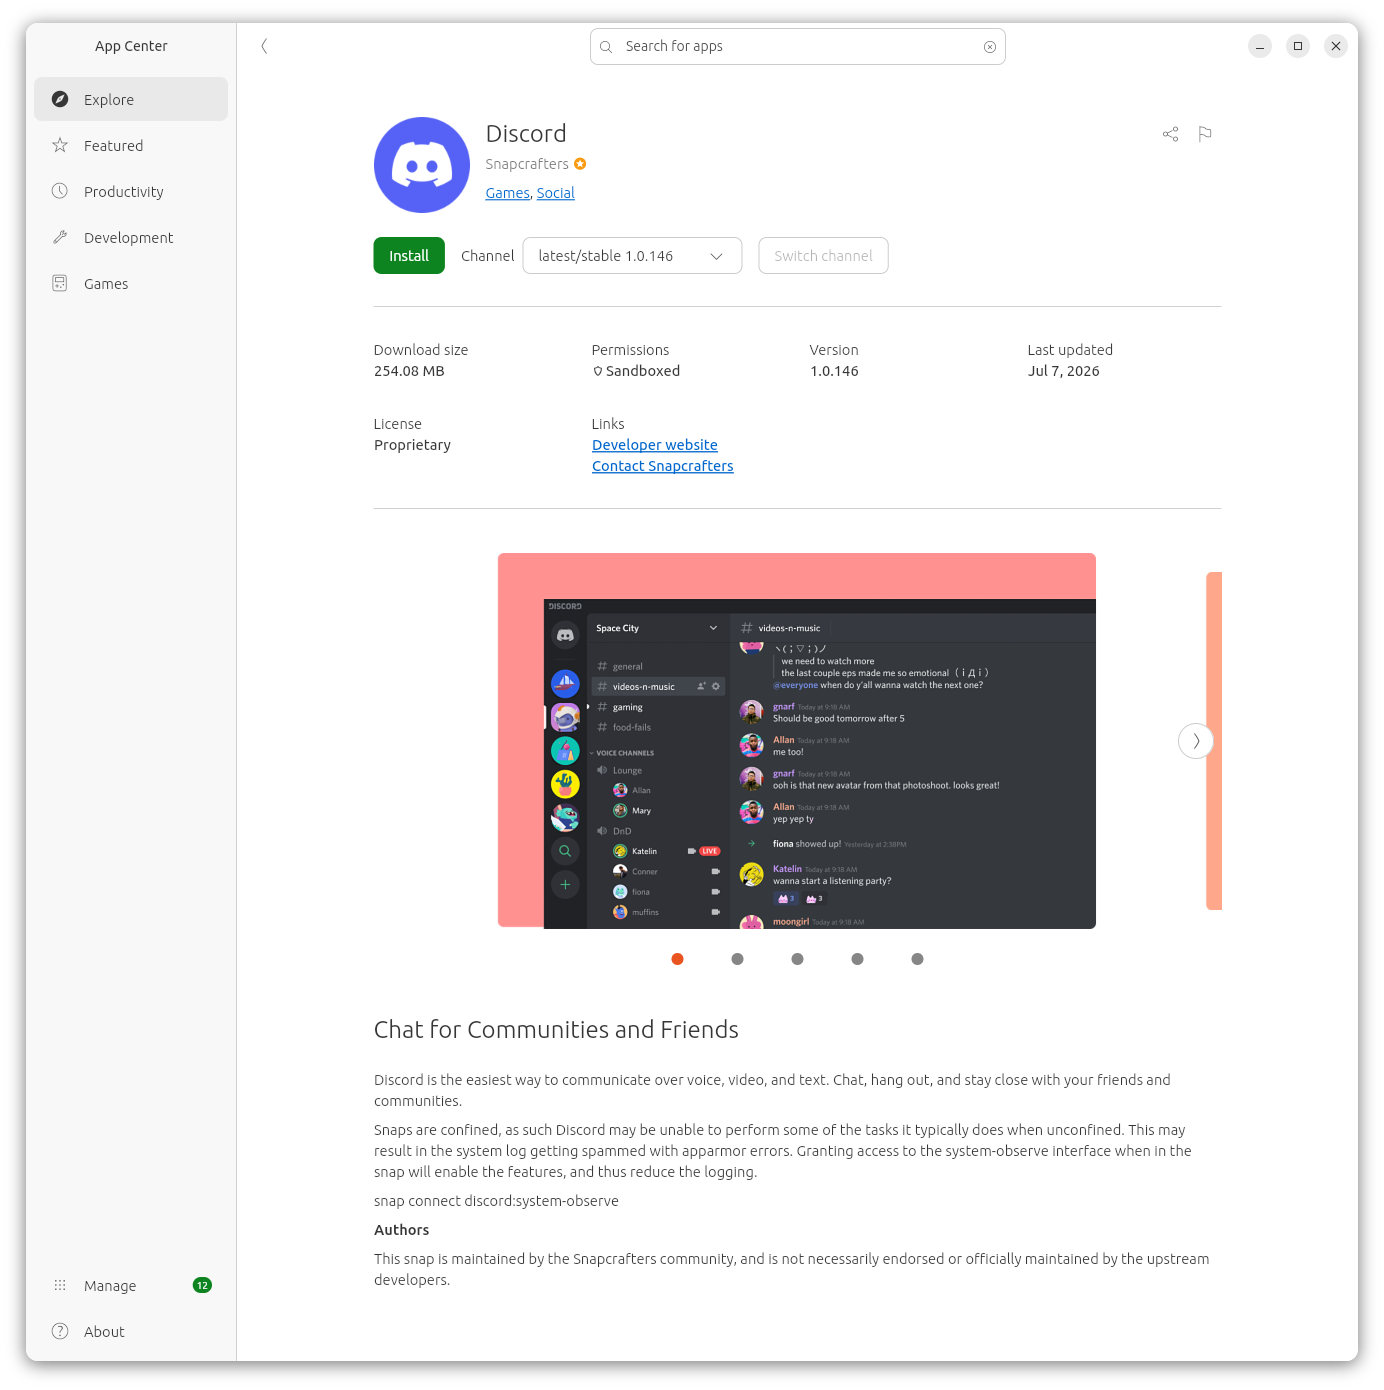
At the install screen, I saw the message below:
Snaps are confined, as such Discord may be unable to perform some
of the tasks it typically does when unconfined. This may result in the
system log getting spammed with apparmor errors. Granting access to the
system-observe interface when in the snap will enable the features, and
thus reduce the logging.
snap connect discord:system-observe
AppArmor is a
Linux kernel
security module that provides system administrators the capability to
restrict the access programs have to the system on which they run.
[ More Info ]
[/os/unix/linux/ubuntu]
permanent link
Thu, Jul 02, 2026 9:42 pm
DVDFab 13 - Unload debugger
My wife had been using
DVDFab 13 under Microsoft
Windows 11 and wanted to continue to use it for
ripping DVDs after we
converted her desktop PC to
Ubuntu Linux. DVDFab 13
seemed to be working fine after I installed it using
Wine until after I
updated Wine to version 11.0 (you can see which version of Wine is present
by issuing the command wine --version in a
Terminal window).
When I tried to run DVDFab afterwards, though, I saw the message
“A debugger has been found running in your system. Please, unload
it from memory and restart your program.”
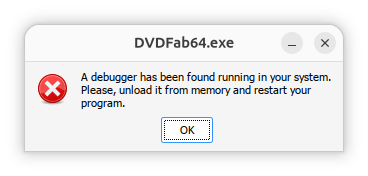
When I queried
ChatGPT about the
issue, it replied “This error is usually not caused by an actual
debugger running on Ubuntu. DVDFab contains anti-debugging / anti-tamper
checks, and under Wine or Proton those checks can sometimes incorrectly
conclude that a debugger is attached.” It also stated that, for
DVDFab 13 specifically, there is an issue when trying to run the program on
later versions of Wine with the problem appearing with version 10.3 or
later. The problem occurs on newer versions, even when no
debugger is running.
I decided to install the application under Bottles, which I had previously
installed on the system with Flatpak, to see if the problem might not occur
if I tried to run the application under
Bottles, but the problem still occurred. I.e., I saw the "A debugger
has been found running in your system. Please, unload it from memory and
restart your program.” message. It took me a considerable amount of time
to resolve the problem, but I was finally able to fix the issue by disabling
DXVK and VKD3D in the settings for the DVDFab bottle.
[ More Info ]
[/os/unix/linux/ubuntu/DVDFab]
permanent link
Sun, Jun 28, 2026 3:16 pm
Determining the default file manager application under Ubuntu
The file command
can be used on a Linux
system to determine what type of data a file holds, e.g.,
file Untitled.png. You can determine the
media type, aka
MIME type, by using
the --mime-type option for the file command. E.g.,
file --mime-type Untitled.png. You can determine which application
is the default application for opening files of that
file type using the
xdg-mime
command — the
xdg-mime program is a command line tool that can be used to determine
what application handles a particular file type. E.g., xdg-mime
query default image/png — you need to specify the filetype
in the "minor/major" format that xdg-mime expects, which is what you see
in the output of the file --mime-type command.
$ file Documents/Untitled.png
Documents/Untitled.png: PNG image data, 597 x 113, 8-bit/color RGBA, non-interlaced
$ file Documents/tea.html
Documents/tea.html: ASCII text, with very long lines (6229)
$ file --mime-type Documents/Untitled.png
Documents/Untitled.png: image/png
$ xdg-mime query default image/png
org.gnome.Loupe.desktop
$ file --mime-type Documents/Cocoa-Lead.odt
Documents/Cocoa-Lead.odt: application/vnd.oasis.opendocument.text
$ xdg-mime query default application/vnd.oasis.opendocument.text
libreoffice-writer.desktop
$
The default file
manager for Ubuntu
Linux is GNOME Files.
You can make another application the default file manager, if you like.
Some alternatives are
Thunar,
Nemo,
Krusader, or
Dolphin.
You can determine which application is the default file manager with the
command xdg-mime query default inode/directory. You can set
the default file manager with the command xdg-mime default
fmgr.desktop where fmgr is the filemanager you wish to
use.
[ More Info ]
[/os/unix/linux/ubuntu]
permanent link
Sun, Jun 14, 2026 10:43 pm
Application failed to initialize NO_ANSWER_FROM_MAKEMKVCON
I had installed
MakeMKV from source files on an Ubuntu Linux system . It had been
working then, but when I tried to run the program today, I saw the
message "Application failed to initialize NO_ANSWER_FROM_MAKEMKVCON".
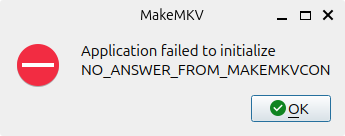
I had updated the operating system and other applications on the system
in the intervening months, so I knew it was possible that the upgrade changed or
removed libraries that makemkvcon depends on. I had upgraded the operating
system from Ubuntu
25.10 (Questing Quokka) to 26.04
LTS (Resolute Racoon). The error means the MakeMKV graphical
user interface (GUI) can't communicate with its backend console
process, makemkvcon. I.e., the GUI is waiting for a response from
makemkvcon and that process isn't starting or is crashing, possibly because
of a missing required dependency such as a missing or changed library file.
To try to determine if that was the case and, if so, which library might be
associated with the problem, I ran makemkvcon from a terminal window.
alice@Wonderland:~$ which makemkvcon
/usr/bin/makemkvcon
alice@Wonderland:~$ makemkvcon
makemkvcon: error while loading shared libraries: libavcodec.so.61: cannot open shared object file: No such file or directory
alice@Wonderland:~$
I was able to resolve the problem by reinstalling
MakeMKV from the source files. When I did
that and re-registered the application, it started normally.
[ More Info ]
[/os/unix/linux/ubuntu/MakeMKV]
permanent link
Fri, Jun 12, 2026 1:55 pm
Thunar on Ubuntu
My wife was dissatisfied with the default
file manager,
GNOME Files, aka
Nautilus, on her Ubuntu
Linux desktop system. You can determine the default file manager from a
terminal window
by issuing the command xdg-mime query default inode/directory,
which will show you what application opers directories.
$ xdg-mime query default inode/directory
org.gnome.Nautilus.desktop
$
You can also check on whether one of several common file managers, such
as Nautilus, Thunar,
Dolphin, or
Nemo, which is a
fork of
Nautilus, is currently running with ps aux | grep -E
'nautilus|thunar|dolphin|nemo'. I saw that I had previously
installed the Krusader file manager when I checked for file manager
desktop entries with grep -l "inode/directory"
/usr/share/applications/*.desktop.
$ grep -l "inode/directory" /usr/share/applications/*.desktop
/usr/share/applications/org.gnome.baobab.desktop
/usr/share/applications/org.gnome.Nautilus.desktop
/usr/share/applications/org.kde.krusader.desktop
$
But I didn't think the
Krusader interface would appeal to her as she wanted a file manager
that provided an interface more similar to the one for the Windows Fle Explorer
that she had on her Windows 11 system, so I issued the command
sudo apt update and then sudo apt install thunar,
which installed thunar 4.20.7 — after installation, you can check the
version of Thunar with thunar --version.
I then made Thunar the default file manager with
xdg-mime default thunar.desktop inode/directory. If you run
the command xdg-mime query default inode/directory, you should
see thunar listed when it has been made the default handler for directories.
$ xdg-mime default thunar.desktop inode/directory
$ xdg-mime query default inode/directory
thunar.desktop
$
I then unpinned the GNOME Files (Nautilus) app by right-clicking on the
icon for it and selecting Unpin. I then pressed the
Super
key along with the "A" key, and typed thunar in the "Type to
search" filed and then right-clicked on thunar when I saw it returned
and selected "Pin to Dock" so she could open it the way she was opening
GNOME Files.
To make the left pane of the Thunar window act like Explorer on Microsoft
Windows operating systems, I configured it to expand a directory to show
subdirectories if she clicked on it. To do so, I changed Thunar's
sidebar style from the default "Shortcuts" to "Tree, which can be done
by selecting View, then Side Pane and then selecting
Tree, which changes the left pane to provide an expandable
directory tree. As with the Windows File Explorer, you can toggle
the display of hidden files. I turned that option on by pressing the
Ctrl and H keys simultaneously — the option can
be toggled off again by using the same key combination.
[ More Info ]
[/os/unix/linux/ubuntu]
permanent link
Sun, Mar 29, 2026 8:58 pm
Installing MakeMKV on a Ubuntu Linux system
After trying unsuccessfully to get the
Snap package of
MakeMKV working on
an
Ubuntu Linux system
(see
Installing the MakeMKV
Snap Package on a Ubuntu Linux system), I uninstalled the Snap version
and installed the software from the
source code.
Though installing the application from source code involved more steps,
I was able to successfully install and then rip a couple of discs in far
less time than I spent trying to get the Snap version to work.
[ More Info ]
[/os/unix/linux/ubuntu]
permanent link
Tue, Mar 24, 2026 9:15 pm
Could not initialise OpenGL support
I downloaded a YouTube
video on a Ubuntu Linux
with yt-dlp.
When I tried to view the downloaded
WebM file with the default
video application, Videos, also known as Totem, which is an application for
playing videos that is provided with Ubuntu, I saw the message below:
Ⓧ
An error occurred
Could not initialise OpenGL support
OK
When I opened the video with
VLC, which I had
previously installed, I heard audio, but no video was displayed. I checked
to see if the Nvidia
driver was up-to-date since the system had an Nvidia graphics card, but they
were up-to-date. You can check that by clicking on the Show Apps
button at the lower-right-hand corner of the screen Ubuntu desktop. Then type
Software Updates in the "Type to search" field. Click on
Software & Updates and then click on the Additional
Drivers.
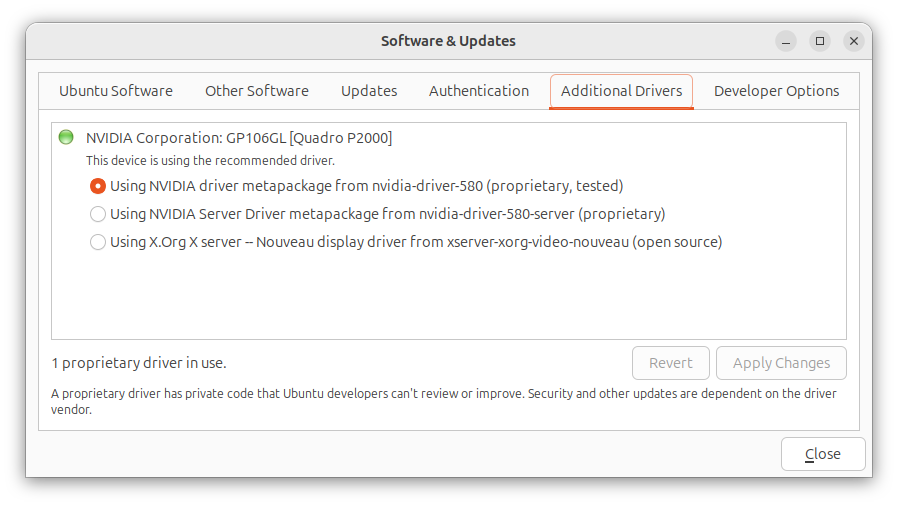
To resolve the problem, I added the following line to the
/etc/environment file with a
text editor:
GDK_GL=gles
When I rebooted the system, I was then able to view the video with
the default Videos application, though when I tried playing it in
VLC I could hear audio, but did not see video.
[/os/unix/linux/ubuntu]
permanent link
Sun, Mar 01, 2026 10:55 pm
Controlling whether a scrollbar appears in a tab in a Terminal window
I needed to scroll back through a tab I had open in a
Terminal window on
an
Ubuntu Linux system,
but there was no
scrollbar on the right side of the tab in which I had run the command,
though a scrollbar was open in other Terminal tabs. I was able to get the
scrollbar to appear by clicking on the icon with 3 horizontal bars at
the top of the Terminal window and then selecting
Preferences.
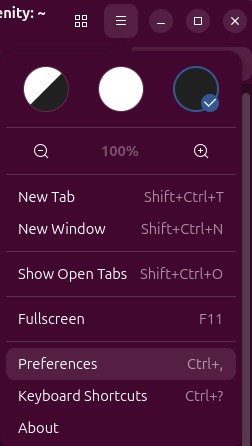
Then from the Behavior tab, I changed the setting from
Follow System to Always, which resulted in the
scrollbar appearing where it had been missing, but I could not scroll
back any further than the text that had been appearing in the tab
before I changed the settiing and that remained the same whenever
I issued another command and text moved upwards, so that I could no
longer see it or scroll back to see it, so I closed the tab.
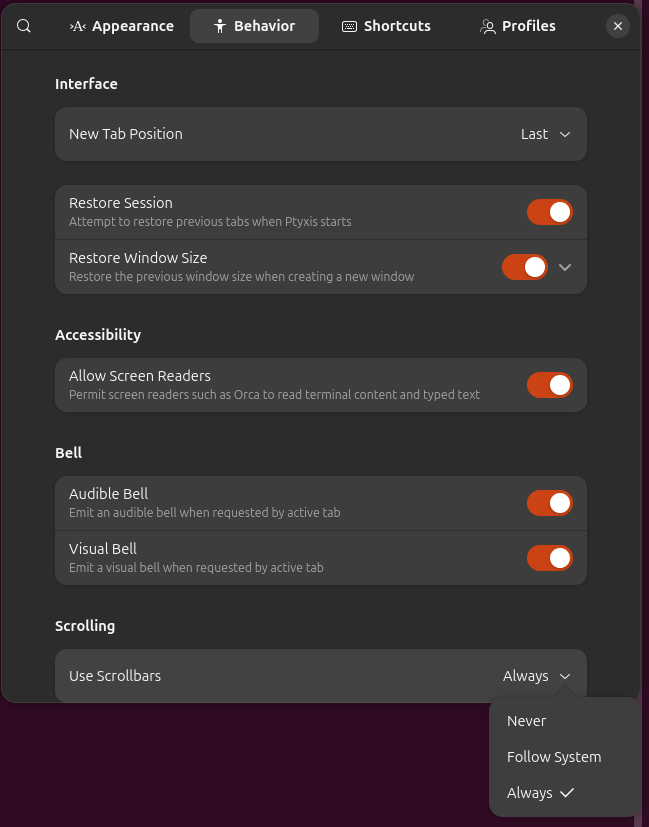
When I opened another tab, the scrollbar was there and operated
as expected.
[/os/unix/linux/ubuntu]
permanent link
Sun, Feb 22, 2026 3:38 pm
Running the Big Fish Games Manager on an Ubuntu system
You can run the Big
Fish Games Game Manager on an
Ubuntu Linux system
under Steam.
You can install Steam as a
Snap package
from the Ubuntu App Center.
Steps:
-
Download the Big Fish Games App (Game Manager) for PC
-
In Steam on the Ubuntu system, click on Add a Game, which is
at the lower, left-hand corner of the Steam window, then
select Add a Non-Steam Game, then browse to where you downloaded
the .exe installer for the game manager, click on it, and then
click on Add Selected Programs.
-
You should then see the Big Fish Game Manager in the "Uncategorized" list
of games at the left side of the Steam window, e.g., you may see
bfginstaller32_s1_l1.exe listed. Right-click on it and then select
Properties, then Compatibility, and then, from the
drop-down list that becomes available, select Proton Experimental
or the latest stable version — I selected Proton Experimental.
-
You can then close the Compatibility window by clicking on the
"X" at the upper, right-hand corner.
-
Then with the Big Fish Game Manager selected in the Uncategorized
list, click on the Play button to launch the Big Fish Game Manager
Setup and agree to the License Agreement when you see it appear.
When I started the install process, the installation appeared to hang at
"Execute: C:\Program Files (x86)\bfglient\epoch.exe". When I clicked on the
title bar for the window, I saw "About Wine", so it appeared to be using
Wine, which I had
previously installed on the Ubuntu system.
But I waited and eventually the installation succeeded, though I think it
took over 15 minutes. I closed the window and then went back to the
Steam window, I saw bfginstaller32_s1_l1.exe was still there. This time
when I clicked on it, the Big Fish window where I could sign in to Big
Fish Games opened fairly quickly.
Note: if the window goes blank or displays just a white background,
minimize it by clicking on the "-" in the upper, right-hand corner of
the Big Fish window and then switch to it again, which you can do with
Alt+Tab — continue to press the Tab key while
continuing to hold down the Alt key to cycle between open open
windows until you get to the Big Fish window.
Initially, you will see "No games to play," but if you have already
purchased games that you've played on another system, you can click
on Purchase History and install them on the Linux system.
When I installed the Big Fish Games Manager under Steam, I had my wife
check one of her games, Aquascapes, and that ran fine. I then closed
the Big Fish window and the Steam window and reopened it. Note: if
you want to change the name that appears for Big Fish Games in the
Uncategorized list, you can right-click on the entry, e.g.,
bfginstaller32_s1_l1.exe, and choose Properties and then change
the "Shortcut" value to something you prefer, such as "Big Fish Games".
When I reopened Steam and started Big Fish Games, I saw the Aquascapes
game under "My Games".
[ More Info ]
[/os/unix/linux/ubuntu]
permanent link
Sat, Feb 21, 2026 10:37 pm
Mounting a network drive under Ubuntu Linux
To access a directory that is shared from a Microsoft Windows system in a
Windows domain, you
can take the following steps on a
Ubuntu Linux system.
Note: you will need to have a package installed that provides
Server Message
Block (SMB) support. If the libsmclient0 package is installed, you should be
able to use these steps. You can check if it is installed by opening
a Terminal window and
issuing the command dpkg -s libsmbclient0.
If it is not installed, you can install it with sudo apt install
libsmbclient0.
alice@Wonderland:~$ dpkg -s libsmbclient0
Package: libsmbclient0
Status: install ok installed
Priority: optional
Section: libs
Installed-Size: 259
Maintainer: Ubuntu Developers <ubuntu-devel-discuss@lists.ubuntu.com>
Architecture: amd64
Multi-Arch: same
Source: samba
Version: 2:4.22.3+dfsg-4ubuntu2.2
Replaces: libsmbclient
Provides: libsmbclient (= 2:4.22.3+dfsg-4ubuntu2.2)
Depends: samba-libs (= 2:4.22.3+dfsg-4ubuntu2.2), libbsd0 (>= 0.0), libc6 (>= 2.38), libndr6 (>= 2:4.17.2), libtalloc2 (>= 2.0.4~git20101213), libtevent0t64 (>= 0.15.0)
Breaks: libsmbclient (<< 2:4.22.3+dfsg-4ubuntu2.2)
Description: shared library for communication with SMB/CIFS servers
 This package provides a shared library that enables client applications
 to talk to Microsoft Windows and Samba servers using the SMB/CIFS
 protocol.
Homepage: https://www.samba.org
Original-Maintainer: Debian Samba Maintainers <pkg-samba-maint@lists.alioth.debian.org>
alice@Wonderland:~$
[ More Info ]
[/os/unix/linux/ubuntu]
permanent link

Privacy Policy
Contact

