
cometchat_UNZIP_FIRST.zip file from
the CometChat website. Within
it, you will see the following files:
cometchat.zip
README.pdf
smf.zip

smf.zip
, then click on the Upload Button.


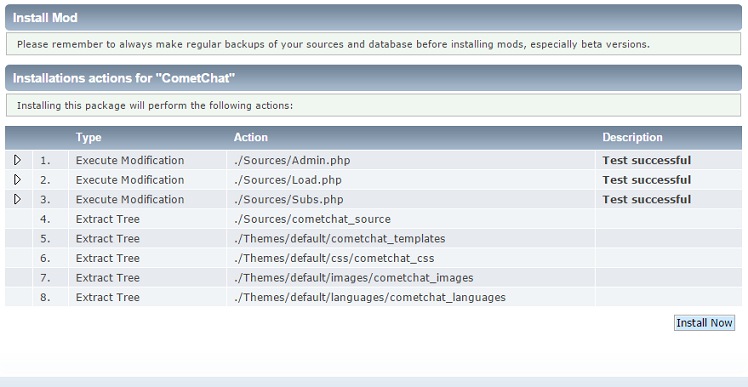
Click on the Install Mod link.
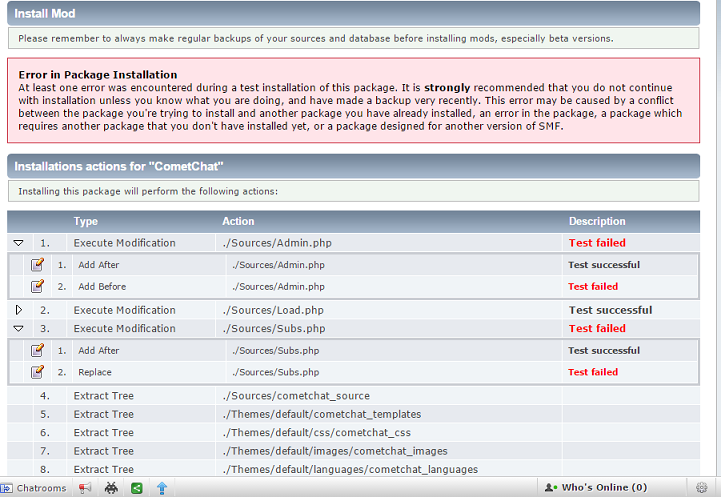
In this case, a test for insertion of code after the following line in
./Sources/Admin.php failed (
Details ):
So I examined the contents of the Admin.php file
in the Sources directory for the forum. Within that file, I
found the following code:
				),
'current_theme' => array(
					'label' => $txt['theme_current_settings'],
So the line was present in the file. Sometimes extra spaces, tabs, etc.,
which might have been placed in a file by the installation of some other mod,
can cause the installation procedure for a mod not to locate a line for which it
is searching. Or sometimes tabs, etc, which the install process is searching for
have been removed. In this case I could easily manually insert the needed
code. First I backed up the existing Admin.php file with the
cp command preserving its
permissions with the -a option.
# cp -a Admin.php Admin.php.old
But rather than just manually inserting the needed code in the appropriate
spot in the file, I extracted the contents of the smf.zip file
and examined the modifications.xml file to see exactly what
the installation procedure was expecting to find. Within it, I saw the
following code:
			<search position="after"><![CDATA[
				'current_theme' => array(
]]></search>
It appeared that there were several tabs before 'current_theme'
when I examined the file with the
vi editor. I used the od
command to view the characters that were being searched for in
hexadecimal format. Using that command and
piping
its output into the grep
command to isolate just the line with "current" on it, I saw the following:
#  od -A x -t x1z -v modifications.xml | grep current
000280 54 41 5b 0a 09 09 09 09 27 63 75 72 72 65 6e 74  >TA[.....'current<
Examining an ASCII table
and comparing the
hexadecimal values shown by the od command for the relevant
line, I saw there were four hexadecimal "09" characters before the
"27", which represents the single quote character and the "63" which is the
hexadecimal equivalent of a lowercase "c".
You can also use the xxd command to view the contents of a file in hexadecimal and ASCII characters. E.g.:
# xxd modifications.xml | grep current
0000280: 5441 5b0a 0909 0909 2763 7572 7265 6e74  TA[.....'current
To fix the issue with the Admin.php file, I deleted everything
on the 'current_theme' => array( line up to the opening single
quote then hit the tab key 4 times. Note: if you use the
vi editor on a
Linux or OS X system, you can use it to
view a line in hexadecimal by
calling xxd from within vi. I then saved the file, hit the back
button on the browser I was using and then clicked on Install Mod
again. This time, there was no error message for Admin.php,
only a "Test failed" message for one test
for Subs.php . So I then clicked on the icon showing a piece of paper
with a pencil over it for the
./Sources/Subs.php failed test.
As with the issue with the other file, I first made a backup copy of
the relevant file with cp -a Subs.php Subs.php.old. Again, it
appeared the code being searched for by the installation procedure was
actually present in Sources.php. I.e., I saw the following
lines in the file:
                        foreach (array_reverse($context['template_layers']) as $layer)
                loadSubTemplate($layer . '_below', true);
Examining the modifications.xml file from smf.zip
with xxd, I saw the following:
# xxd modifications.xml | grep "foreach"
0000930: 4344 4154 415b 0a09 666f 7265 6163 6820  CDATA[..foreach
The lowercase "for" is 66 6F 72 in hexadecimal. I see a
0a, which is a newline character followed by 09, which is
the tab character. So then I checked that line in the
Subs.php file in the Sources directory. I saw
the following when I edited it in vi and
called xxd from within vi to
view that line:
0000000: 0909 0966 6f72 6561 6368 2028 6172 7261  ...foreach (arra
0000010: 795f 7265 7665 7273 6528 2463 6f6e 7465  y_reverse($conte
0000020: 7874 5b27 7465 6d70 6c61 7465 5f6c 6179  xt['template_lay
0000030: 6572 7327 5d29 2061 7320 246c 6179 6572  ers']) as $layer
0000040: 290a                                     ).
I could see that there were 3 tab characters, i.e., 090909
before the "foreach", so I deleted everything up to the foreach and inserted
one tab character. I then save the file and hit the back button in my
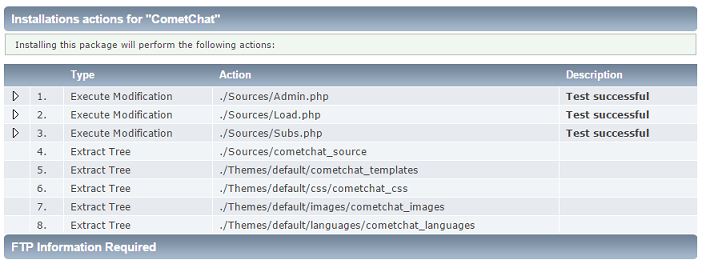
browser and clicked on Install Mod again. This time all tests
passed and I could click on the Proceed button at the bottom of
the page.
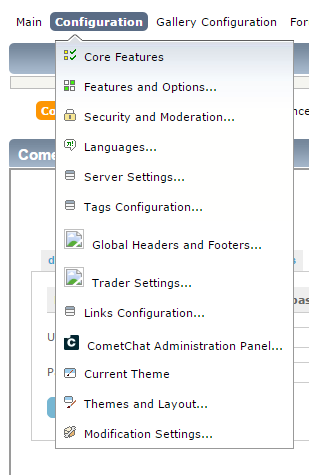
You can access the CometChat Administration Panel in the future by
going to Admin, then Features and Options, then
selecting Configuration and then selecting CometChat
Administration Panel from the dropdown menu.
If you have forgotten the userid and password, look for lines similar to
the following ones in cometchat/config.php.
/* ADMIN START */
define('ADMIN_USER','CometChatAdmin');
define('ADMIN_PASS','ASecretPass');
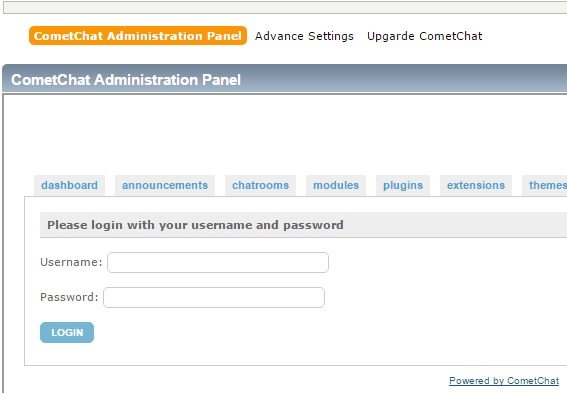
/* ADMIN END */To log into the CometChat Administration Panel, you can enter those in the username and password fields and click on Login.
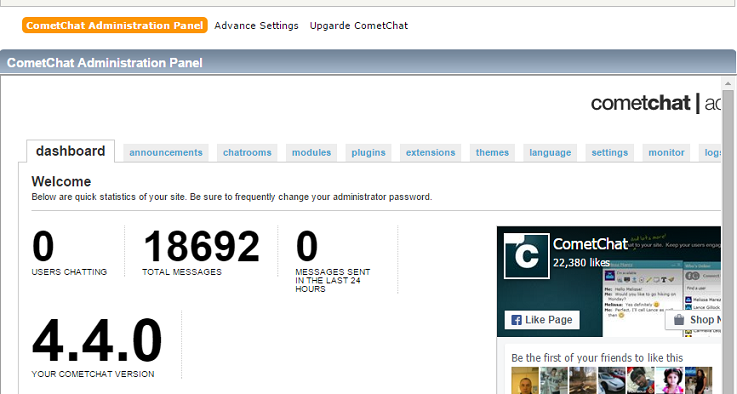
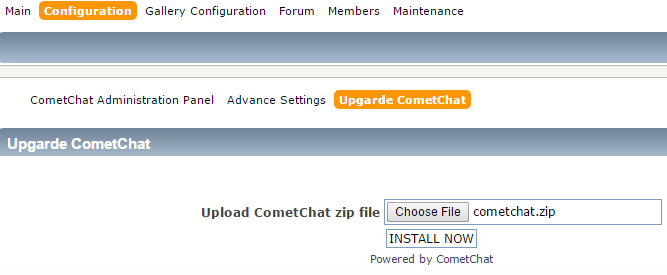
When you click on "Upgarde CometChat", if you are prompted for another
password, it will be for the forum administratorpassword for the
forum. You will be taken to a page where you will be prompted to "Upload
CometChat zip file". Click on the Choose File button to browse to
the location of cometchat.zip and select that file, which
you previously extracted from cometchat_UNZIP_FIRST.zip.
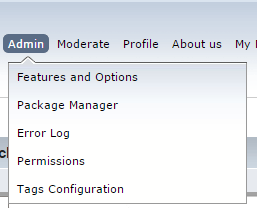
When I check the forum's error log, which is accessible by clicking on Admin then selecting Error Log, I see two entries for each installation attempt:
http://example.com/index.php?action=admin;area=CometChat;sa=upgrade_cc; <text snipped>
8: Undefined index: title

File: /home/jdoe/public_html/mysite/Themes/default/cometchat_templates/CometChat.template.php (generic_menu_dropdown_above sub template - eval?)
Line: 291
That error log entry is always followed by the following one:
http://example.com/index.php?action=admin;area=CometChat;sa=upgrade_cc; <text snipped>
8: Undefined index: description

File: /home/jdoe/public_html/mysite/Themes/default/cometchat_templates/CometChat.template.php (generic_menu_dropdown_above sub template - eval?)
Line: 303
While checking the error log, I noticed the time stamps on log entries were off by one hour; I corrected that by changing the forum's timezone .