Determining the Version of CentOS or Redhat Linux
To determine what version of
CentOS
or
Red Hat Linux is running on a system
look at the contents of
cat /etc/redhat-release.
References:
-
How To Determine CentOS or Red Hat Version
Posted by Jeff
Date: March 10, 2009
rackAID - Linux Server Management
Services for Small Business
[/os/unix/linux/centos]
permanent link
Turbo Lister Postage Warning
When she tried to upload an item she intended to sell on eBay with Tubo Lister
version 8.7.101.2, my wife received the error message below:
Warning - The postage cost will be calculated based on dimensional
weight, not the actual weight of your package. Please check the weight
and dimensions of your package.
She had specified the dimensions and weight of the item and both domestic
and international shipping options, so it wasn't apparent to either of us
why she received the message. Apparently, the warning can be ignored, though.
I found someone else,
exdwh
posting the following at
Re: error code: 21916962 on July 9, 2010.
That's only an informational warning.
The only way to 'get rid of this error' would be to substitute the
dimensional weight as calculated by the shipping carrier.
A better solution is to filter out the warnings you don't care about.
When she ignored the message and uploaded the item for sale with Turbo
Lister, the item looked fine on eBay.
[/os/windows/software/auction]
permanent link
Determining Who Voted for Which Option in an SMF Poll
If you are using polls in a
Simple Machines Forum (SMF) forum, it is possible to determine
who voted for which option in a poll by using
phpMyAdmin or by entering
MySQL commands.
[More
Info ]
[/network/web/forums/smf]
permanent link
Installing phpMyAdmin on a CentOS System Running Apache
To install
phpMyAdmin on a
CentOS system running an
Apache webserver, login as
root and issue the command
yum install phpmyadmin from a command
prompt.
Note: you may have to install the Remi Repository or the RPMForge Repository
to be able to locate and install phpMyAdmin. Instructions for configuring
yum to use one of those repositories can be found via the links
below.
Remi Repository
RPMForge
Repository
After installing the software you will need to restart Apache, which you
can do with apachectl restart or service httpd restart
. You can then try accessing phpMyAdmin by
http://example.com/phpmyadmin substituting your domain name or
IP address for example.com.
If you receive a "403 Forbidden" error with the message
"You don't have permission to access /phpmyadmin on this server.", it is
likely because you are attempting to access the software from outside of
the server itself. The orginal phpmyadmin.conf file contains the lines below:
#
#  Web application to manage MySQL
#

<Directory "/usr/share/phpmyadmin">
  Order Deny,Allow
  Deny from all
  Allow from 127.0.0.1
</Directory>

Alias /phpmyadmin /usr/share/phpmyadmin
Alias /phpMyAdmin /usr/share/phpmyadmin
Alias /mysqladmin /usr/share/phpmyadmin
The Deny from all line states that the default behavior
is to prevent any IP address from accessing phpMyAdmin. The next line,
Allow from 127.0.0.1 provides for the exception of accessing
the software from the server itself, i.e., the "localhost" address
127.0.0.1. You could change the "deny from all" to "allow from
all" to allow access from anywhere or put a "#" at the beginning of the line
to comment it out. Or, you could add additional IP addresses or
FQDN's after the
127.0.0.1 to allow access to phpMyAdmin from other systems.
E.g. you could change the line to Allow from 127.0.0.1 192.168
to also allow access from any IP address beginning with 192.168. Restart
Apache again.
If you then try accessing phpMyAdmin, e.g., you might use
http://192.168.0.10/phpmyadmin, if 192.168.0.10 was your
webserver's IP address, but get the error message The
configuration file now needs a secret passphrase (blowfish_secret).
then you need to edit /usr/share/phpmyadmin/config.inc.php.
Look for the following lines:
/*
 * This is needed for cookie based authentication to encrypt password in
 * cookie
 */
$cfg['blowfish_secret'] = ''; /* YOU MUST FILL IN THIS FOR COOKIE AUTH! */
Place a password between the two single quotes, e.g., you could have a
password of SomeGoodPassword with the following:
$cfg['blowfish_secret'] = 'SomeGoodPassword';
If you refresh the webpage, you should then see a phpMyAdmin login window
where you are prompted to enter a username and password, which should be
the mysql root account and it's password.
For further information on phpMyAdmin and MySQL, there is a book
by Marc Delisle,
Mastering phpMyAdmin for Effective MySQL Management.
References:
-
phpMyAdmin
-
RPMForge Packages and Yum Priorites
Date: May 3, 2008
MoonPoint Support
-
Remi Repository
Antoine Solutions Development A Free PHP IDE built on Open Source Software
-
Quick 'n' Easy LAMP Server For CentOS/RHEL
By: olddocks
Date: May 28, 2008
HowtoForge - Linux Howtos and Tutorials
[/network/web/tools/phpmyadmin]
permanent link
Restricting Access to an Apache Virtual Host
To restrict access to an Apache Virtual Host
by IP address, you will need to have the
mod_authz_host module loaded in the Apache configuration file
httpd.conf, which can usually be found at
/etc/httpd/conf/httpd.conf on
a Linux system. To determine if it is loaded, look for a line similar to the
following in the configuration file:
LoadModule authz_host_module modules/mod_authz_host.so
You can restrict access to a website that is set up as a virtual host by
including information on what IP addresses should have access to documents
on the website in a directory section Directory as shown below.
<VirtualHost *:80>
    ServerName example.com
    ServerAlias www.example.com
    ServerAdmin webmaster@example.com
    DocumentRoot /home/www/example
    ErrorLog /home/www/example/logs/error.log
    CustomLog /home/www/example/logs/transfer.log common
    <Directory /home/www/example>
      Order Deny,Allow
      Deny from all
      Allow from 192.168 127.0.0.1
    </Directory>
</VirtualHost>
In the case above, access to the document root of the website, i.e., all
documents on the website, is restricted to allow access only from IP addresses
beginning with 192.168 and 127.0.0.1, which is the "localhost" address, meaning
the address of the server itself. Anyone trying to access example.com
from any other IP address would see the default webpage for the server, if any,
not the example.com website.
References:
-
Access Control
The Apache HTTP Server Project
-
Apache Module mod_authz_host
The Apache HTTP Server Project
-
Learn how to configure Apache
Date: September 29, 2003
TechRepublic Articles
[/network/web/server/apache]
permanent link
Configuring Outlook 2003 to Check a Gmail Account
Microsoft Office Outlook can be configured to download email from
a Gmail account by following
these steps.
[/os/windows/office/outlook]
permanent link
Exporting a Gmail Contact List For Use in Microsoft Outlook
To export a Gmail contact list for use in Microsoft Outlook, take
the following steps:
- Log into your Gmail account.
- On the left side of the webpage for your Gmail account, you should
see Contacts; click on Contacts.
- Under Export, you will see "Who do you want to export",
select the contact list you wish to export by using the dropdown list
provided.
- For "Which export format", select "Outlook CSV format (for importing
into Outlook or another application)"
- Click on the Export button.
- Save the .csv file wherever you wish to place it on your system.
Now that you've saved the Comma Separated Value (CSV) file on your system,
you can import it into Microsoft Outlook. To do so in Outlook 2003, take
the following steps:
- Select Contacts.
- If you wish to create a new separate Outlook contact list for the
Gmail contact list, click on File, select New, then
Folder. In the Name field, type
a name for the Folder. Leave "Folder contains" set to "Contact Items",
then click on OK.
- Click on File.
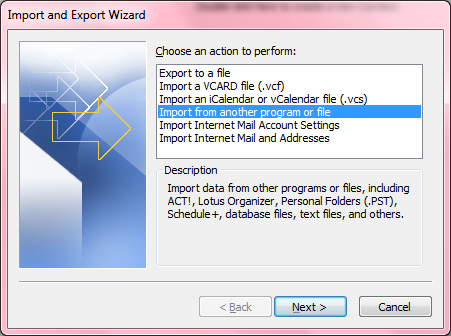
- Select Import and Export
- For the action to perform, select "Import from another program or file.

- Click on Next.
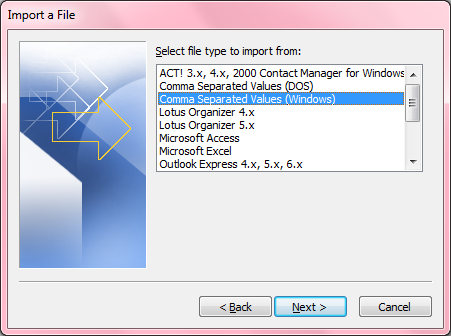
- For "Select file type to import from", select
"Comma Separated Values (Windows)".

- Click on Next.
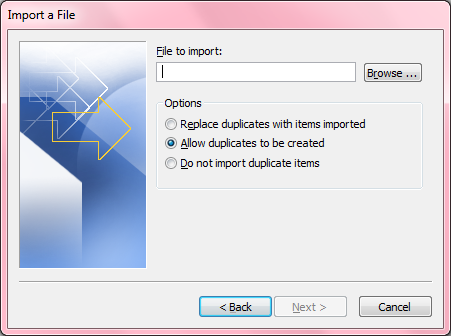
- For "file to import", you have 3 options:
Replace duplicates with items imported
Allow duplicates to be created
Do not import duplicate items
The selection you make among those 3 options is a matter of personal
preference. If you aren't importing into an existing contact list in
Outlook, but will, instead, be using the new one you just created, then it
doesn't matter much which option you select. If you're importing into an
existing list, e.g., you are updating an Outlook contact list again from one
you've previously imported into Outlook, you probably don't want to
have duplicate entries, so wouldn't want to select the second option
to allow duplicates to be created. If the Gmail list is the more
up-to-date one, you probably want to select "Replace duplicates with
items imported."

- Click on the Browse button and browse to the location
of the .csv file you created from the Gmail contact list. When you've
selected the file, click on Next.
- For "Select destination folder", choose the main contact list or
the one you created previously, then click on Next.
- Click on the Finish button.
[/os/windows/office/outlook]
permanent link
CD and DVD Preferences under Mac OS X
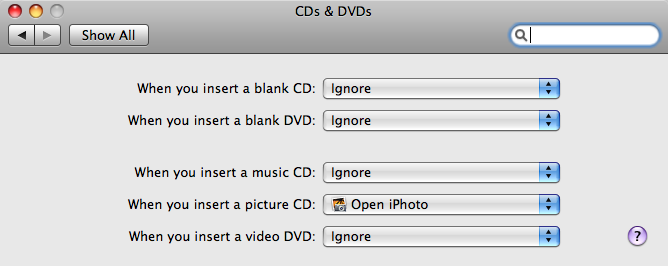
If you put a blank disc in the disc drive in a Mac OS X system, but
you don't see an icon appear on the desktop representing that disc, you
may need to change the
System Preferences settings for CDs and
DVDs. If the configuration is set to "ignore", then you won't see an icon
representing the blank disc appear on the desktop. To change the settings, take
the following steps:
- Click on the Apple icon at the top left of your screen and select
System Preferences.
- Select CDs & DVDs.
- Check the settings for "When you insert a blank CD" and "When you
insert a blank DVD." If they are set to "ignore", then that explains why
no icon appears on the desktop when you insert a blank disc.

- You can choose from the following options:
- Ask what to do
- Open Finder
- Open iTunes
- Open Disk Utility
- Open other application...
- Run script...
- Ignore
- You can choose Open Finder to have an icon appear on the
desktop for the disc, e.g., "Untitled CD" for a blank CD. When you've changed
the setting, you can close the CDs & DVDs window.
-
References:
-
Mac OS X 10.2, 10.3: You put in a blank disc, but it doesn't appear
Last Modified: January 8, 2007
Article: TA22349
Apple - Support
[/os/os-x]
permanent link


