Reorganizing Items under All Programs for Windows 7
If you want to add or reorganize programs and folders under
All Programs, which you see when you click on the Windows
Start button, you will first need to log into an account
that has administrator privileges then
display hidden and system files and folders. Once you've done that,
use the Windows Explorer to navigate to the location for the
ProgramData folder, which will, typically, be
C:\ProgramData. Navigate to
C:\ProgramData\Microsoft\Windows\Start Menu\Programs.
Within this directory you will see the folders and programs that appear
when you view the items within
All Programs after you click on
the Windows
Start button.
You can then move folders and shortcuts
about or right-click and choose New to create a new folder.
Some entries you see under All Programs may be under
C:\Users\Username\AppData\Roaming\Microsoft\Windows\Start
Menu\Programs
, where Username is the relevant user account,
instead. E.g., if you are logged into the account
Jane, some of entries may be under
C:\Users\Jane\AppData\Roaming\Microsoft\Windows\Start Menu\Programs
. These are entries that appear under All Programs just
for that account, whereas those under
C:\ProgramData\Microsoft\Windows\Start Menu\Programs apply
to all accounts on the system.
[/os/windows/win7]
permanent link
Transferring Live Messenger Winks
I set up a new laptop for a user who uses Microsoft's Live Messenger for
chatting with friends and relatives. In addition to transferring her
documents and pictures, she also wanted me to transfer
winks, which are
Flash-based animated files used by Live Messenger to display short animated
clips of actions, such as blowing a kiss, throwing a snowball, etc., which
a user can pick from when sending a mesage to someone.
[
More Info ]
[/network/chat/live_messenger]
permanent link
Viewing Hidden and System Files and Folders Under Windows 7
To see the location of hidden and system files and folders under Windows
7, you need to take the following steps to make them visible.
- Click on the Windows Start button
 at
the lower, left-hand corner of your screen.
- Select Computer.
- Click on Organize.
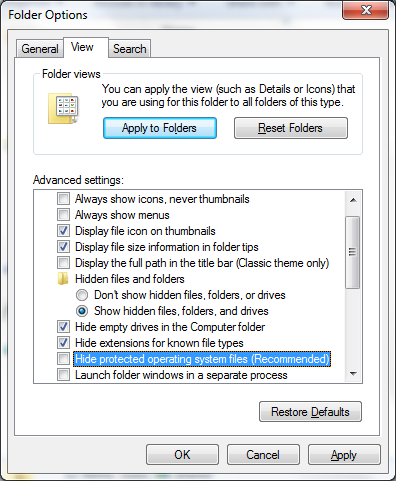
- Select Folder and search options.
- Click on the View tab.
- Under the Hidden files and folders entry, check
"Show hidden files, folders, and drives".
- Below the above entry, you will see an entry for
"Hide protected operating system files (Recommended)"; uncheck it.
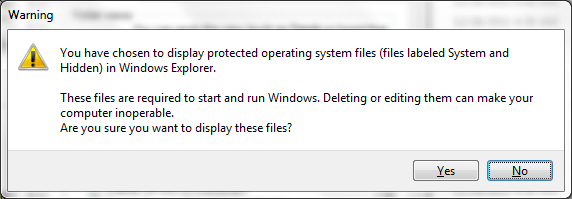
You will see a warning that
"These files are required to start and run Windows. Deleting or editing them
can make your computer inoperable. Are you sure you want to display these
files?" Click on Yes.

- Click on OK to apply the changes.

You can follow a similar process to reverse the changes to hide the files
again after you've accessed the files you need to access to protect yourself
from accidentally modifying any system files.
[/os/windows/win7]
permanent link
Spbyot - You are missing administrator rights
After installing
Spybot
Search & Destroy 1.6.2 through
allmyapps, I started Spybot and attempted to peform an immunization,
but saw the following error, even though I was logged into an account
in the administrator group when I started Spybot.
Error
You are missing administrator rights to perform this action.
If you need to do this, please run this application
elevated as an administrtor.
When I started Spybot by right-clicking on its shortcut and choosing
"Run as administrator", the immunization performed successfully.
[/security/spyware/spybot]
permanent link
Configuring a Mac OS X 10.6 System to Provide VNC Access
Note: These notes have been tested on systems running
OS X 10.6, aka
"Snow Leopard", but may apply to other versions as well.
I needed to configure a Mac system running OS X 10.6.3 to support remote
access from a Virtual Network
Computing (VNC) client on a Microsoft Windows system. VNC is a graphical
desktop sharing system that
uses the RFB protocol
to remotely control another computer. It transmits the keyboard and mouse
events from one computer to another, relaying the graphical screen updates
back in the other direction, over a network. There are many free VNC clients,
such as TightVNC, the free
edition of RealVNC, etc.
Mac OS X
Snow Leopard (version 10.6) comes with AppleVNCServer software.
To configure the Mac OS X system for VNC access, take the following
steps:
- Click on the Apple icon at the top left of the screen.
- Select System Preferences.
- Under Internet and Wireless, select Sharing.
- Ensure Remote Management is checked.
Note: if the lock icon at the lower, left-hand corner of the screen
is showing a locked padlock, you will need to click on the padlock to
unlock it, which will present you with a window where you can provide
the account name and password for an account with adminstrator access
for the system.
- For "allow access for", select either "All users" or "Only these users.
If you select "Only these users", click on the plus sign, i.e., "+", and
click on a user account which should be granted remote management access, then
click on the Select button. You will then have the opportunity
to grant specific permissions from among the following:
- Observe
- Control
- Show when being observed
- Generate reports
- Open and quit applications
- Change settings
- Delete and replace items
- Start text chat or send messages
- Restart and shut down
- Copy items
Pick the permissions you wish to grant, then click on OK.
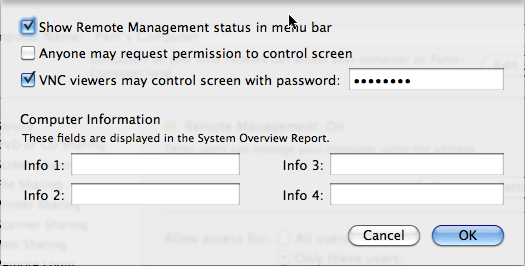
- Click on Computer Settings.
- In the "VNC viewers may contrl screen with password" field, place a
password to be used for VNC access.
- Click on OK.
- You will be prompted for the password of an account with administrator
privileges to complete the changes. Provide an appropriate account name
and password, then click on OK.

Information on the service can be obtained from the command line by obtaining
a shell prompt by running the Terminal program under
/Applications/Utilities then
issuing the command launchctl list com.apple.ScreenSharing.server.
$ launchctl list com.apple.ScreenSharing.server
{
	"Label" = "com.apple.ScreenSharing.server";
	"LimitLoadToSessionType" = "Aqua";
	"OnDemand" = true;
	"LastExitStatus" = 0;
	"TimeOut" = 30;
	"Program" = "/System/Library/CoreServices/RemoteManagement/AppleVNCServe
r.bundle/Contents/MacOS/AppleVNCServer";
	"EnableTransactions" = true;
	"TransactionCount" = -1;
};
If you don't see it listed try launchctl list | grep -i Screen.
The program listens by default on
TCP
port 5900.
[/os/os-x]
permanent link


