Changing the default value for "Read It" in Book Collector
After I updated
Book Collector,
the book management database from
Collectorz.com that I use to track
my book collection, from 21.0 build 3 to 21.1 build 1 today, I noticed that
books I entered afterwards were being assigned a value of "Yes" for "Read
It" by default—that value appears under the "Personal" fields for a book
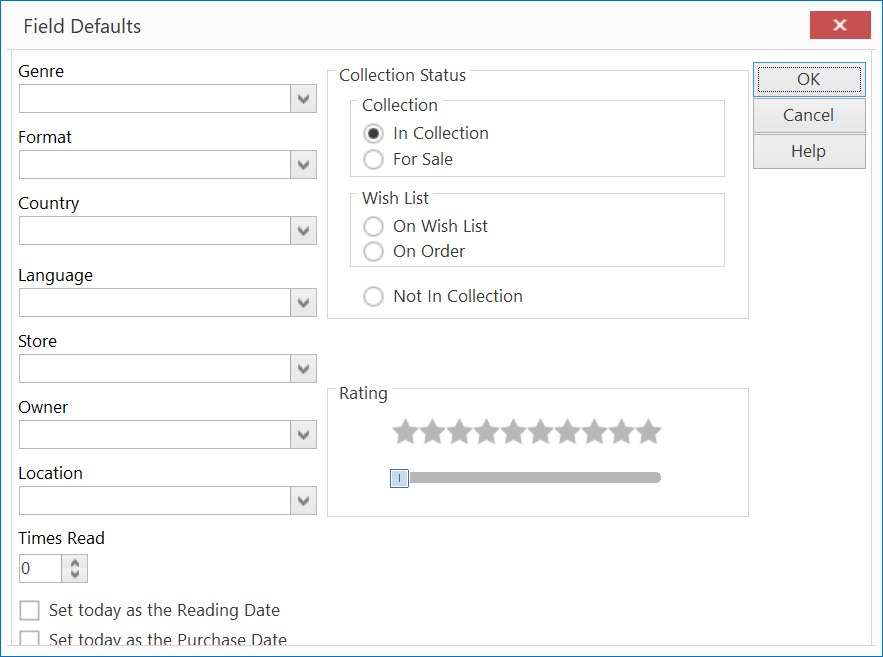
entry. I was able to change the default value to "No" by clicking on
Tools
on the main menu, selecting "Field Defaults" and changing the "Times
Read" value from "1" to "0"; after I made that change new books I entered
were given a "Read It" value of "No" by default.

[/software/database/collectorz]
permanent link
Deleting entries from Book Collector CLZ Cloud account
The March 4, 2021 version of Book Collector, version 21.0.3, allows you to
remove all entries from the CLZ Cloud account from within the program.
I needed to do that because the cloud account contained entries from my
wife's book database that would be added to my database if I synched the
accounts—I wanted to keep the two book lists separate.
The steps for wiping the copy of the database stored in the CLZ cloud
from the Windows version of the program are listed below:
-
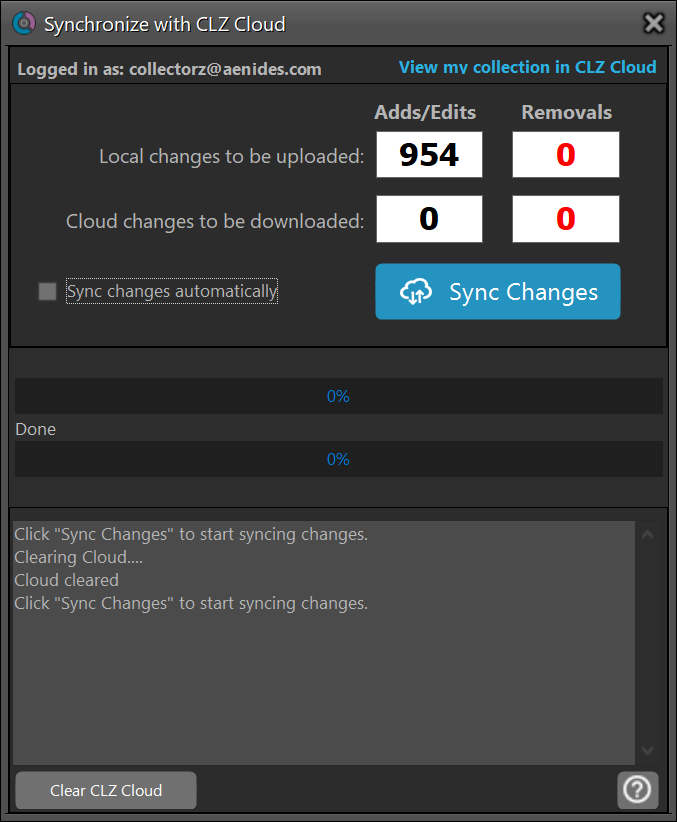
Within the Book Collector program, click on Clz Cloud on the menu
bar at the top of the program window.
- Select Synchronize.
-
Click on View my collection in CLZ Cloud if you wish to view
the books stored in the copy of the database in the CLZ Cloud in a
webpage in your default browser before deleting everything
in that version, then click on the Clear CLZ Cloud button
at the bottom of the program window to remove all book
entries from the version of the database stored in the cloud.
-
You should then see zero cloud changes to be downloaded.

If you wish to then synchronize your local copy of the database to
a copy stored in the cloud, you can click on Sync Changes.
When you do so you should see "sending items to cloud." Be prepared to
wait a few minutes for the synchronization operation to complete if you have a
large number of books in your Book Collector database. You will see the
number of "Adds/Edits" decrease to zero as books are uploaded. When the process
is complete you will see the message "Finished syncing changes. Would you
like to view your collection in CLZ Cloud?"
[/software/database/collectorz]
permanent link
Obtain Monitor Manufacturer Information Using PowerShell
I wanted to be able to obtain information on a monitor attached to a
Windows 10 desktop system, including the manufacturer,
model number, serial number, and date of manufacture, from a
command-line
interface (CLI). One way to do that is by using
PowerShell, which
Microsoft provides as part of its Windows operating system. You can open
a PowerShell window on a Microsoft Windows 10 system by typing
PowerShell in the "Type here to search" field at the bottom
of the Windows display. You should see the Windows PowerShell app listed as
an option you can click on to open a PowerShell window. If you type
gwmi WmiMonitorID -Namespace root\wmi at the prompt and hit
enter, you will see information similar to the following output displayed.
PS C:\> gwmi WmiMonitorID -Namespace root\wmi


__GENUS                : 2
__CLASS                : WmiMonitorID
__SUPERCLASS           : MSMonitorClass
__DYNASTY              : MSMonitorClass
__RELPATH              : WmiMonitorID.InstanceName="DISPLAY\\HPN360C\\5&2c03a83e&0&UID262_0"
__PROPERTY_COUNT       : 9
__DERIVATION           : {MSMonitorClass}
__SERVER               : YTTERBIUM
__NAMESPACE            : root\wmi
__PATH                 : \\YTTERBIUM\root\wmi:WmiMonitorID.InstanceName="DISPLAY\\HPN360C\\5&2c03a83e&0&UID262_0"
Active                 : True
InstanceName           : DISPLAY\HPN360C\5&2c03a83e&0&UID262_0
ManufacturerName       : {72, 80, 78, 0...}
ProductCodeID          : {51, 54, 48, 67...}
SerialNumberID         : {67, 78, 75, 48...}
UserFriendlyName       : {72, 80, 32, 51...}
UserFriendlyNameLength : 13
WeekOfManufacture      : 12
YearOfManufacture      : 2020
PSComputerName         : YTTERBIUM


PS C:\>[More Info ]
[/os/windows/PowerShell]
permanent link
Changing the AutoRecover frequency for Microsoft Excel 2007
Microsoft Excel 2007 crashed on a laptop running Windows 10 that I was using.
When I restarted Excel, I found that, unfortunately, I had lost all of the
recent changes I had made to a spreadsheet, even though Excel put
"(version 1).xlsb [Autosaved]" in the title of the spreadsheet I had been
working on when I restarted Excel—-it crashed when I attempted to
paste a webpage URL into a Hyperlink field. The crash and loss of my
recent work was aggravating, so I decided to change the frequency with
which Excel auomatically saves a file in an AutoRecover version that will
allow you to automatically recover a document if if the program hangs
or crashes. To change that setting for Excel 2007 on a Windows system,
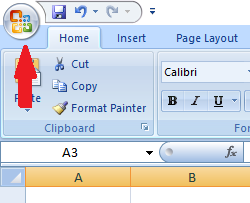
you can click on the Office Button at the top, left-hand corner of the
Excel window (it is to the left of the "Home" tab as shown below).

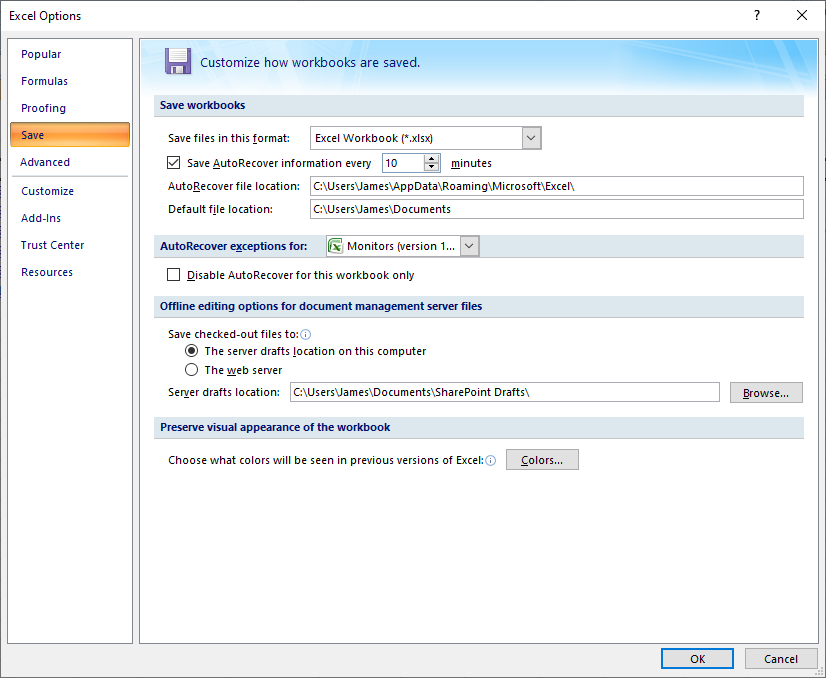
Then click on the Excel Options button and select the Save
option. The checkbox for "Save AutoRecover information every" should be
checked. You can then change the frequency from 10 minutes to a more frequent
number; I chose to have Excel automatically save a document every 5 minutes.

[/software/office/excel]
permanent link


