←February→
| Sun |
Mon |
Tue |
Wed |
Thu |
Fri |
Sat |
| 1 |
2 |
3 |
4 |
5 |
6 |
7 |
| 8 |
9 |
10 |
11 |
12 |
13 |
14 |
| 15 |
16 |
17 |
18 |
19 |
20 |
21 |
| 22 |
23 |
24 |
25 |
26 |
27 |
28 |
| ←2026→| Months |
|---|
| Jan |
Feb | Mar |
| Apr |
May |
Jun |
| Jul |
Aug |
Sep |
| Oct |
Nov |
Dec |
|
Thu, Nov 08, 2012 9:41 pm
Verifying a Windows 2003 SBS System is Functioning as a VPN Server
To ensure a Microsoft Windows Small Business Server (SBS) 2003 system
is functioning as a
VPN
server, take the following steps:
- Click on Start.
- Choose All Programs.
- Choose Administrative Tools.
- Choose Routing and Remote Access.
- Right-click on the server name and choose
Properties.
- Under the General tab, ensure check "Remote
access server" is checked.
- Click on OK.
- You can then close the Routing and Remote Access
window.
You can also verify that the systems is functioning as a VPN server by
obtaining a command prompt and issuing the command netstat -a | find
"pptp". You should see a "LISTENING" line displayed indicating the
system is listening on the
Point-to-Point Tunneling Protocol (PPTP) connection.
C:\>netstat -a | find "pptp"
  TCP    ANDY:pptp              ANDY.example.lan:0    LISTENING
TCP
port 1723 is used for PPTP, which you can see if you use netstat -an
instead of netstat -a, so that numbers are displayed
rather than text descriptions for ports. If a VPN connection is active
at the time you issue the command, you will see the remote IP address
displayed.
C:\>netstat -an | find "1723"
  TCP    0.0.0.0:1723           0.0.0.0:0              LISTENING
  TCP    192.168.0.8:1723       74.125.228.67:49359    ESTABLISHED
  UDP    0.0.0.0:21723          *:*
If you wish to monitor VPN connections on the SBS 2003 sever, see
Checking User
VPN Connections on SBS 2003.
[/os/windows/server2003]
permanent link
Wed, May 07, 2008 6:00 pm
Remote Web Workplace Users
A user in a domain with a Windows Small Business Server (SBS) 2003
domain controller told me that she could establish a
VPN from home
by entering her userid, password, and domain information, but then
when she opened her browser and pointed it to the SBS 2003 server
and tried to establish a "Remote Web Workplace" connection, her
userid and password wouldn't be accepted, though she was using
the same ones as for the VPN connection. She would see the error
message below:
The user name or password is incorrect. Verify that CAPS LOCK
is not on, and then retype the current user name and password.
If you receive this message again, contact your system
administrator to ensure that you have the correct permissions to
use the Remote Web Workplace.
In checking on the problem, I found her account was not a member
of the "Remote Web Workplace Users" group. The procedure for adding
an account to that group is listed below.
- Click on Start.
- Select Administrative Tools.
- Select Activer Directory Users and Computers.
- Under the domain name, select My Business, Users,
SBSUsers, and then the user's account or, under the domain name,
select Users and the user's account, if it is located there
instead.
- Right-click on the user's account and select Properties.
- Click on the Member Of tab.
- The user should already be a member of Domain Users. You need
to click on the Add button.
- In the "Enter the ojbect names to select" field, type Remote
Web Workplace.
- Click on the Check Names button. You should then see
"Remote Web Workplace Users" appear in the field underlined.
- Click on OK.
- Click on OK again to close the "Properties" window for the
user's account.
[/os/windows/server2003]
permanent link
Thu, Mar 15, 2007 1:05 am
Checking User VPN Connections on SBS 2003
If you need to check on who is logged into a Windows
Small Business (SBS) 2003 server via a VPN connection
you can do so by using
Routing and Remote Access
under
Start then
Administrative Tools.
For analyzing the log files for information on VPN logins
through the SBS 2003 server, Microsoft offers the iasparse
tool, which can be found on Disc # 2 of the installation CDs.
But the shareware tool,
IAS Log Viewer, is better at displaying the data in a more
manageable fashion.
[ More Info ]
[/os/windows/server2003]
permanent link
Fri, Apr 14, 2006 5:42 pm
Moving ClientApps Folder
There are a number of steps you can take to free disk space on a Windows
Small Business Server (SBS) 2003 system drive, if you are running low
on disk space. You can remove the uninstall folders for hotfixes, compress
folders, etc. A step that may give you back 750 MB to a GB of space is
to move the ClientApps folder.
[ More Info ]
[/os/windows/server2003]
permanent link
Wed, Mar 22, 2006 11:56 pm
Compressing ClientApps Folder on an SBS 2003 Server
I found the free space on the C: drive on a Windows Small Business
Server (SBS) 2003 system was almost depleted. By compressing the
ClientApps folder I was able to gain another 300
MB of space.
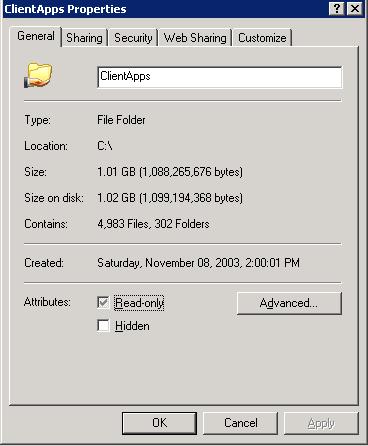
I found the C:\ClientApps folder was taking about 1 GB of disk space,
so I chose to compress it, which you can do by the following procedure.
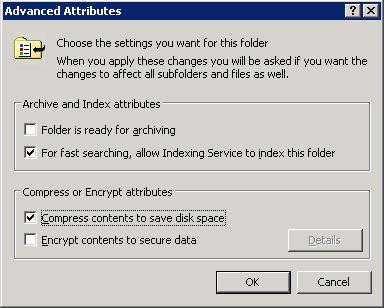
- Right-click on "ClientApps" folder.
- Select "Properties".

- Click on the "Advanced" button and select "Compress contents to
save disk space.

- Click on "OK".
- Click on "OK" again to close the "ClientApps Properties" window.
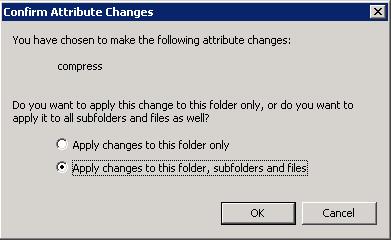
- When the "Confirm Attribute Changes" window appears, leave "Apply
changes to this folder, subfolders and files checked and click on "OK".

When I started the compression, Windows estimated the process would take
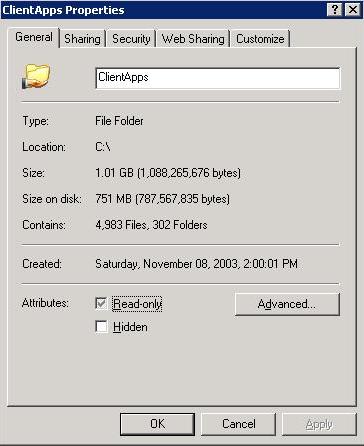
23 minutes, but it actually only took a few minutes. It gave me about 300 MB
more of disk space. When I right-clicked on the folder afterwards and selected
"Properties", the file size was still listed as about 1 GB, but the size on
disk was only 751 MB.

For other steps for freeing disk space, see
Freeing Disk Space.
[/os/windows/server2003/free-disk-space-sbs2003]
permanent link
Sun, Feb 05, 2006 11:00 pm
Logical Disk Manager Not Responding
I removed an external 120 GB USB disk drive from a Windows Server 2003 for Small
Business Server (SBS) system. The drive in the external USB 2.0 enclosure was
full and I replaced it with a new 200 GB drive I just purchased. I plugged
the USB external drive enclosure back into the server. I then tried to
create a partition on the drive. But when I chose
Manage Computer
and then selected
Disk Management, I got the message below:
Logical Disk Manager
The service did not respond to the start or control request in a timely fashion.
When I tried diskpart from the command line, I got the message
The disk management services could not complete the operation.
When I checked the Services on the system, I saw the following:
| Name | Description | Status | Startup Type |
|---|
| Logical Disk Manager | Detects and monitors new hard disk drives and sends disk volume information to Logical Disk
Manager Administrative Service for configuration. If this service is stopped, dynamic disk status and configuration information
may become out of date. If this service is disabled, any services that explicitly depend on it will fail to start. |
Started | Automatic |
| Logical Disk Manager Administrative Service | Configures hard disk drives and volumes. The service only runs for
configuration processes and then stops. |
Stopped | Manual |
| Virtual Disk Service | Provides software volume and hardware volume management service. |
Stopped | Manual |
All of the above service states appear to be normal
The last entry I saw in the System Event Log is shown below:
Event Type:	Error
Event Source:	Service Control Manager
Event Category:	None
Event ID:	7000
Date:		2/5/2006
Time:		7:00:18 PM
User:		N/A
Computer:	S
Description:
The Logical Disk Manager Administrative Service service failed to start due to the following error:
The service did not respond to the start or control request in a timely fashion.

For more information, see Help and Support Center at http://go.microsoft.com/fwlink/events.asp.
I also saw the following entry appearing several times during the period I
was trying to set up the new drive:
Event Type:	Error
Event Source:	Service Control Manager
Event Category:	None
Event ID:	7000
Date:		2/5/2006
Time:		7:13:02 PM
User:		N/A
Computer:	S
Description:
The Virtual Disk Service service failed to start due to the following error:
The service did not respond to the start or control request in a timely fashion.

For more information, see Help and Support Center at http://go.microsoft.com/fwlink/events.asp.
I stopped and started the Logical Disk Manager service, but still got the same results.
The system does not have Service Pack 1 installed. I see a lot of diskpart
related fixes listed for Service Pack 1 at
Windows Server 2003
Service Pack 1 as well as references to fixes for Logical Disk Manager
problems.
I rebooted the system and the problem no longer existed afterwards.
References:
-
You receive an error message when you use the Diskpart.exe command-line tool to perform storage management on a Windows Server
2003-based computer
Only4Gurus
Date: August 20, 2004
-
You receive an error message when you use the Diskpart.exe command-line tool to perform storage management on a Windows Server 2003-based computer
Microsoft Help and Support
Date: August 20, 2004
-
Windows Server 2003 Service Pack 1 list of updates
Microsoft Help and Support
Date: February 3, 2006
[/os/windows/server2003]
permanent link
Wed, Mar 16, 2005 11:59 pm
OpenSSH Server on SBS 2003 Problem
After installing OpenSSH for
Windows on a Windows Small Business Server 2003 system using the binary
installer provided for that program, I found that it was not installed as
a service. It took me quite awhile to manually install it as a service and
then get it to work, but after looking at the source code for the installer
I was able to see the needed steps.
[ More
Info ]
[/os/windows/server2003]
permanent link
Mon, Jul 19, 2004 8:47 pm
Allowing VPN Access for a User Under Windows Small Business Server 2003
First you must configure Windows Small Business Server 2003 to
function as a VPN server, which you can do by running
the Routing and Remote Access Server Setup Wizard. Once you have
done that, you can modify the properites for a user's account
to allow the user to connect using a VPN client on his or
her computer. To do so, take the following steps:
- Click on Start
- Click on Administrative Tools
- Click on Server Management
- Click on Users
- Right-click on a username and select Properties
- Click on the Dial-in tab
- Click on Allow access
- Click on OK
- Click on File then Exit to exit Server Management
If the user doesn't have permission for VPN access, the user
will see a window appear with the following error message when
he or she attempts to establish a VPN connection:
Verifying username and password...
Error 649: The account does not have permission to dial in.
[/os/windows/server2003]
permanent link
Sun, Mar 14, 2004 8:44 pm
Configuring Telnet Server Service on Windows Small Business Server 2003
Starting the Telnet Service
- Click on Start
- Select Administrative Tools
- Select Services
- Scroll down until you find the Telnet service
- Double-click on Telnet
- Change the startup type to Automatic
- Click on Apply
- Double-click on Start
- Click on OK
- Close the Services window by selecting File then Exit
Configuring the Telnet Service for NT Authentication
Normally the telnet service will allow transmission of passwords in
plaintext, i.e. in unencrypted format. Someone with a sniffer can learn
the userid and password if unencrypted passwords are allowed. So ensure
that only NT authentication is used, which will prevent plaintext
passwords from being used to make the connection.
- Click on Start
- Select All Programs
- Select Accessories
- Select Command Prompt
- Type tlntadmn config sec=-passwd and hit the Enter key. You should see "The
settings were successfully updated."
- You can check the settings by typing tlntadm. For "authentication mechanism" you
should see only NTLM
Note: If you wish to see other options for the tlntadm command you can type
tlntadm /?
Specifying Telnet Clients
Under Windows Small Business Server 2003, you must also stipulate which userids are allowed to make
Telnet connections to the server. To do so, take the steps below.
- Click on Start
- Select All Programs
- Select Administrative Tools
- Select Active Directory Users and Computers
- In the right pane, double-click on Telnet Clients
- Click on the Members tab
- Click on Add
- Under Enter the object names to select, put in the userids for which you wish
to allow access
- You can click on Check Names to check the validity of names you have entered
- Click on OK when finished
- Click on OK again at the TelnetClients Properties window
- Click on File then Exit at the Active Directory Users and Computers window
References:
-
Description of the Telnet Server Service Administration Tool
[/os/windows/server2003]
permanent link

Privacy Policy
Contact


