Creating a dropdown list in Microsoft Excel
In the Microsoft Excel spreadsheet program, if you wish to create a dropdown
list where a user can select options from the list for a cell's value, you can
take the steps below:
-
Highlight the cells where you wish to have the the dropdown list appear, e.g.,
by clicking in a cell and dragging downwards through a column where a user
should select from the dropdown list.
-
Click on Data on the menu bar at the top of the Excel window
-
Click on Data Validation.
-
If you see 3 options under Data Validation, i.e., Data Validation,
Circle Invalid Data, and Clear Validation Circles, select Data
Validation.
-
You will then see a window where you can change settings. In the "Allow"
field for validation criteria, select List.
-
You will then be given an option to provide the items for the list in
the source field. If you have just a couple of options for the list
that won't change, you can type them separated by a comma.
-
Click on OK.
In cells where you have chosen to present a dropdown list to a user,
when the user clicks on the cell or tabs into it, he/she will see a
small box with a downward pointing arrowhead appear to the right of
the cell. The user can then either type a value in the field or he/she
can chose a value from the dropdown list by clicking on the small
box with the downard pointing arrowhead. If the user types a value
that isn't in the list rather than selecting from the dropdown list,
when the user hits enter or moves the cursor out of the cell, he/she
will see the message "The value you entered is not valid. A user has
restricted values that can be entered in this cell."
[ More Info ]
[/software/office/excel]
permanent link
Comparing Keepass database entries by modification times
I needed to compare two
KeePass Password Safe
(version 2.45) databases, since one was copied to a laptop where I thought
it might have been updated after it was copied with the original also
being updated, so the two files no longer matched. I needed to add any
new entries from the laptop to the original database. I knew there should
at most only be a few additions on the laptop. You can see modification
timestamps by clicking on an individual entry and then selecting the
History tab for that entry, but I didn't want to go through every entry
in the database that way to determine new entries, since it would have
taken many hours. There is a way to speed the process by clicking on
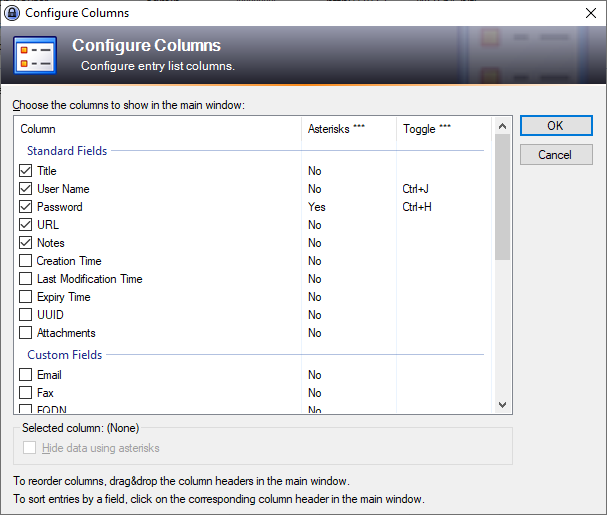
View from the KeePass menu bar which will give you the option
to select
Configure Columns.

Check the check box next for Last Modification Time, then
click on OK. You will then see a "Last Modification Time" column
for each entry, so you don't have to open each entry, though you will have
to go through each group you've created to check the last modification time
for entries, but you can click on the column header for "Last Modification
Time" to sort them by time. You can sort them from oldest to newest or newest
to oldest by clicking on the column header multiple times to toggle the
display. By then viewing a list of entries under each group within KeePass
on the laptop, I could see that nothing had been added, so I didn't need
to add any entries to the original database to ensure synchronization of
any updates made to the copy with the original file.
[/software/security/keepass]
permanent link


