Customizing the Start Menu on a Windows 7 System
To change the items that appear when you click on the
Start button

on a Windows 7 system, take the following steps:
- Right-click on the Start button.
- Select the Start Menu tab.
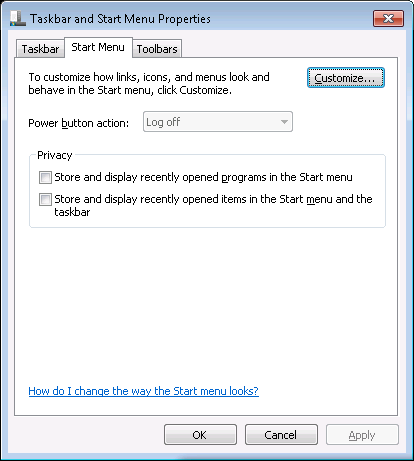
- Click on the Customize button.
-
You can then select which items, such as "Computer", "Documents",
etc. that you wish to be displayed.
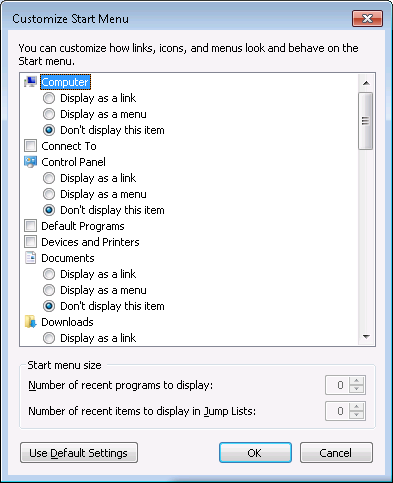
If you want to use the default settings, click on the button labeled
Use Default Settings. E.g., you might want to choose that option if
some items have disappeared from the Start Menu. The default settings are
listed below:
Computer (default: "Display as a link)
Connect To (default: checked)
Control Panel (default: "Display as a link")
Default Programs (default: checked)
Devices and Printers (default: checked)
Documents (default: "Display as a link)
Downloads (default: "Don't display this item")
Help (default: checked)
Highlight newly installed programs (default: checked)
Homegroup (default: unchecked)
Music (default: "Display as a link")
Network (default: unchecked)
Personal folder (default: "Display as a link")
Pictures (default: "Display as a link")
Recent Items (default: unchecked)
Recorded TV (default: "Don't display this item)
Run command (default: unchecked)
Search other files and libraries (default: "Search with public folders")
Search All Programs menu by name (default: checked)
System administrative tools (default: unchecked)
Use large icons (default: checked)
Videos (default: "Don't display this item)
Start menu size
Number of recent programs to display (default: 10)
Number of recent items to display in Jump Lists (default: 10)
-
When you are finished click on OK then OK again.
[/os/windows/win7]
permanent link
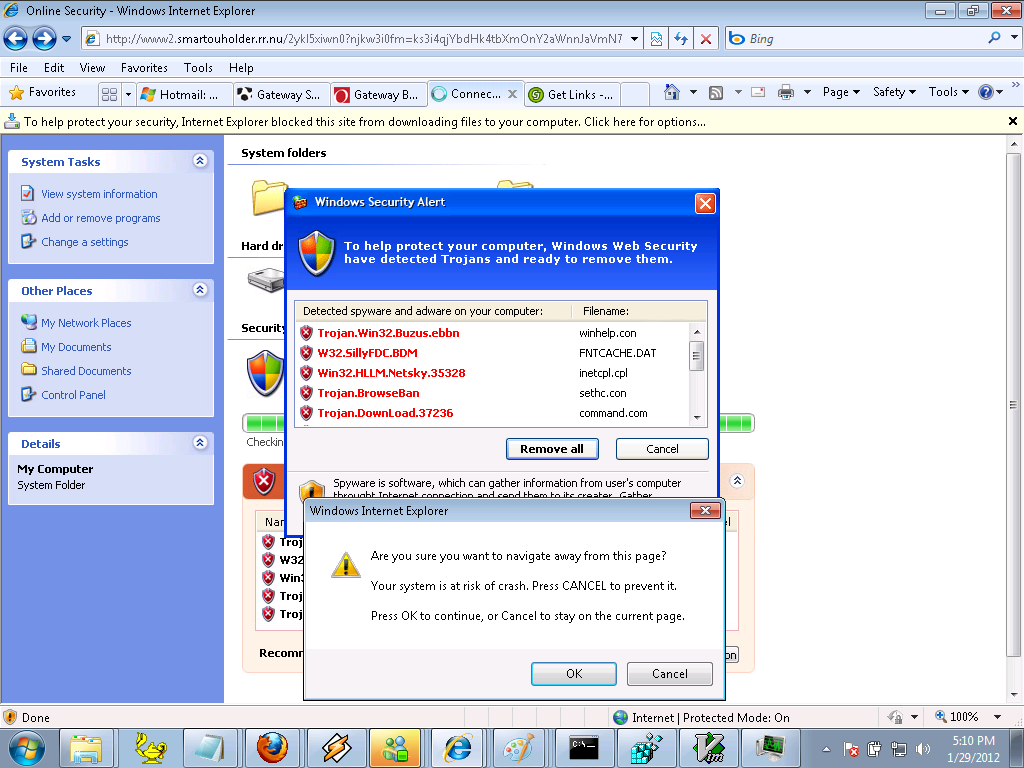
Redirection to Rogue rr.nu Site
While searching for a power adapter, I found a link for the part number of
the power adapter for which I was searching that redirected me to
www2.smartouholder.rr.nu. That site displayed a fake virus scan
(see
image),
which reportedly was finding malware on the system from which I was searching,
but was really just a ruse to try to lure unsuspecting users into buying
rogue antivirus software, i.e.,
scareware. If I tried
to navigate away from the site, I would receive a "Are you sure you want
to navigate away from this page?" message.
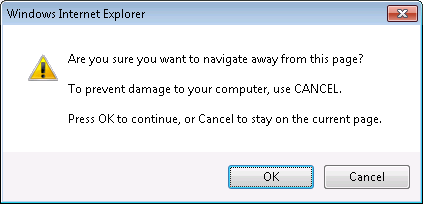
No matter which option I selected from "OK" or "Cancel", I was left at the
scareware webpage. After finally getting back to a prior Google search page,
I checked the site's reputation at
Norton™ Safe Web.
It did not list the site www2.smartouholder.rr.nu, stating it had not
been tested yet, but
it did list rr.nu.
Norton Safe Web reported the following for the rr.nu site:
rr.nu
Summary
| •Computer Threats: |
|
1 |
| •Identity Threats: |
|
0 |
|
•Annoyance factors:
|
|
0
|
|
|
|
| Total threats on this site: |
|
1 |
| |
|
|
|
•Community Reviews:
|
|
5
|
Norton Safe Web listed "Drive-By Downloads" as the threat from the site.
After I was able to navigate away from the site, I added an entry to
the /Windows/system32/drivers/etc/hosts file to ensure that
the system would not be able to contact the site again. I put the following
2 lines at the bottom of that file:
# Inserted on 2012-01-29. Site is attempting to download rogue antivirus software

127.0.0.1	www2.smartouholder.rr.nu
When a Windows system attempts to find an IP address for a website name,
such as www.example.com, it will first check the hosts file
to see if an IP address is listed there for the
fully qualified domain name. If
not, then it will perform a
Domain Name System (DNS) query to obtain the IP address associated with
the name. By associating the name with 127.0.0.1, which is the
loopback address
for the local system, you can ensure that a system on which the entry has
been put in the hosts file will see the name as pointing to its own address and
thus will never be able to reach the actual site.
Note: if you edit the hosts file with the Windows Notepad
editor, be sure you save the file as hosts, not
hosts.txt. The file may be marked as read-only, also, so in
order to save the file. you will need to take off the read-only attribute
temporarily and put the attribute back on after you have saved the file.
You can do so by right-clicking on the hosts file, choosing
Properties and unchecking the read-only attribute. Or you can
use the following two commands from the command line to take the attribute
off the file and put it back on after you've edited the file.
attrib -r C:\Windows\System32\drivers\etc\hosts

attrib +r C:\Windows\System32\drivers\etc\hosts
You will need to run the commands from an administrator account to do so.
You will also need to run Notepad from an administrator account to edit the
file. If you are logged in as another user, you can use the "runas" command
from the command line to run Notepad or the attrib command from the
administrator account.
E.g., you can use
runas /user:administrator cmd to open another command prompt
under the administrator account to run the attrib commands or
runas /user:administrator notepad to run Notepad from the
administrator account. Alternatively, for the attrib command you could use
runas /user:administrator
"attrib -r C:\Windows\System32\drivers\etc\hosts"
. If you are using a
domain administrator account you would use
runas /user:domainname\administrator.
[/security/malware]
permanent link

