←July→
| Sun |
Mon |
Tue |
Wed |
Thu |
Fri |
Sat |
| |
|
|
1 |
2 |
3 |
4 |
| 5 |
6 |
7 |
8 |
9 |
10 |
11 |
| 12 |
13 |
14 |
15 |
16 |
17 |
18 |
| 19 |
20 |
21 |
22 |
23 |
24 |
25 |
| 26 |
27 |
28 |
29 |
30 |
31 |
|
|
|
Thu, Aug 28, 2025 6:33 pm
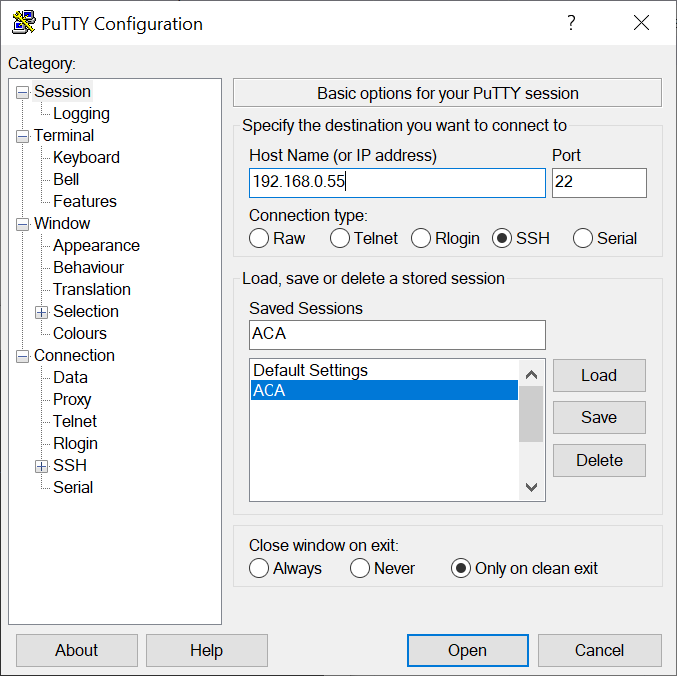
Copying and pasting in a Putty window
I installed the free and open-source
PuTTY terminal emulator
program on a laptop running Microsoft Windows 11 to use as a
SSH client.
On a system running Microsoft Windows, I would normally use Ctrl-C to copy
text from one window into the Windows
clipboard
and then use Ctrl-V to paste the copied text into another window. But that
doesn't work with PuTTY. Nor did the Shift-Insert key combination work.
But you can paste text into the PuTTY window after you have copied it into
the clipboard by left-clicking in the PuTTY window where you wish to place
the text after you've copied the text and then right-clicking. Using that
method, I was able to paste text from the Windows clipboard into a a file
I was editing with the
Vi text editor on a Linux server.
[/network/ssh/putty]
permanent link
Wed, Oct 27, 2021 9:54 pm
Changing the background color in PuTTY
To change the background color for a terminal session using the
PuTTY ssh and telnet
program, take the following steps:
-
If you wish to change the color for a saved session, load the session then
click on "Colours," which is beneath "Window," in the left hand pane of the
PuTTY Configuration window.
-
Click on "Default Background"; you should then see the default
Red Green Blue
(RGB) values with values of 0,0,0 representing black and 255, 255, 255
representing white. You can use an
RGB Color Codes
Chart, such as the one at RapidTables.com to select a color and then
obtain its numerical RGB value. For instance, if I wanted the background to
be a dark gray, I could use a value of 64 for red, green, and blue.

-
You can then click on the Open button to open a session using the
new background color or click on "Session" and save the session with the
new setting, if you wish to make the setting permanent before opening the
session.
[/network/ssh/putty]
permanent link
Tue, Jan 23, 2018 9:42 pm
Using key pairs with SSH
The
Secure Shell (SSH) protocol provides a means one can use for
secure, encrypted connections between systems for logins or file transfers.
One can use a username and password to login from an SSH client to an SSH
server or one can use a
public and private key combination where a public
key for a user's account is stored on a remote SSH server while a corresponding
private key is stored on the system from which the user will initiate the
SSH or SFTP connection. On
Linux systems,
private keys are normally stored in the .ssh directory
beneath the home directory for your account. If you haven't created
any keys yet, the directory may only contain a known_hosts
file that contains public keys for servers you've previously logged into
via SSH.
[ More Info ]
[/network/ssh]
permanent link
Sun, Oct 16, 2016 10:10 pm
Checking a server's public host key on the server
If you receive a message from a
Secure
Shell (SSH) or
Secure File
Transfer Protocol (SFTP) application regarding the host key of the server
to which you are attempting to connect being unknown or changed, such as
the message from WinSCP below, you can check the server's public host key on the
server itself, if it is a
Linux server, using the
ssh-keygen utility.
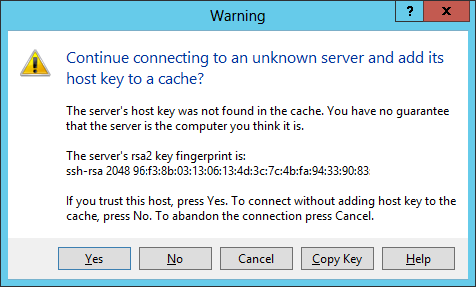
$ ssh-keygen -l -f /etc/ssh/ssh_host_rsa_key.pub
2048 96:f3:8b:03:13:06:13:4d:3c:7c:4b:fa:94:33:90:83   (RSA)
$
The -l option shows the fingerprint of a specified public key file.
Private RSA1 keys are also supported. For
RSA
and DSA keys, ssh-keygen tries to find the matching public key
file and prints its fingerprint. If the -l option is combined
with -v, an ASCII art representation of the key is supplied with
the fingerprint. The -f filename option allows you to
specify the file name of the key file.
The ssh-keygen -l -f /etc/ssh/ssh_host_rsa_key.pub command isn't
showing the key itself, but instead shows the
"fingerprint" for
the key, which is a sequence of 32
hexadecimal
digits. You can see the much larger key value itself by issuing the
command cat /etc/ssh/ssh_host_rsa_key.pub.
[/network/ssh]
permanent link
Sat, Jul 02, 2016 9:57 pm
SFTP received message too long error
I was able to log into a Microsoft Windows 7 system running
CopSSH via
Secure
Shell (SSH) using
PuTTY, but when I attempted to transfer a file to the
system via the
SSH File Transfer Protocol (SFTP) using
WinSCP, I received the
error message below:
Received too large (1298752370 B) SFTP package. Max supported package size
is 1024000 B.
The error is typically caused by message printed from startup script (like
.profile). The message may start with "Micr".
Cannot initialize SFTP protocol. Is the host running a SFTP server?
[ More Info ]
[/network/ssh]
permanent link
Thu, May 26, 2016 11:53 pm
Running a command on a remote system using SSH
The
Secure Shell (SSH) protocol allows you to interactively log into remote
systems. Once logged into a remote system, you have a shell prompt where you
can enter commands on the remote system. But you can use an SSH client to
execute a command on a remote system without logging into that system and
obtaining a shell prompt on the remote system. E.g., if you wanted to
get a
command line interface (CLI) on the remote system, you
might enter a command similar to the following one:
But, if you just were logging in to enter one command, say you wanted
to find the hardware platform of the remote system using the
uname
command uname --hardware-platform, you could simply append that
command to the end of the above ssh command you would have used to log into
the remote system. E.g.:
$ ssh jdoe@example.com uname --hardware-platform
jdoe@example.com's password:
x86_64
$ uname --hardware-platform
i386
In the example above, issuing the same command on the local system, i.e.,
the one on which the SSH command is being issued shows that the result returned
when the uname command was issued at the end of the ssh command line returned
a result from the remote system.
You may even be able to use a text-based editor, such as the
vi editor, though you may see
error messages like the ones below:
$ ssh jdoe@example.com vi temp.txt
jdoe@example.com's password:
Vim: Warning: Output is not to a terminal
Vim: Warning: Input is not from a terminal
When you enter an ssh command in the form ssh
user@host the remote system allocates a
pseudo-tty (PTY), a
software abstraction used to handle keyboard input and screen
output. However, if you request SSH to run a command on the remote
server by appending that command after ssh user@host, then
no interactive terminal session is required and a PTY is not allocated, so
you see the error messages when you use a screen-based program intended for
use with a terminal, such as the vi editor.
For such cases you should inclde the -t option to the SSH
command.
| -t |
Force pseudo-tty allocation. This can be used to execute arbitrary
screen-based programs on a remote machine, which can be very useful,
e.g. when implementing menu services. Multiple -t options force tty
allocation, even if ssh has no local tty. |
E.g.:
$ ssh jdoe@example.com -t vi temp.txt
[/network/ssh]
permanent link
Mon, May 16, 2016 7:12 am
Break out of SSH session
Sometimes after I've established an SSH connection to an SSH server, I
encounter a situation where the remote system isn't responding to keyboard
input and I want to terminate the SSH session and return to a command prompt.
E.g., often when I've connected to a Microsoft Windows system running SSH
software from my Ubuntu Linux laptop, I find that I'm in a situation where
after I've entered a command at the Windows system's command prompt the
remote system no longer seems to be accepting keyboard input from the
Linux system. Sometimes it seems to occur when I've mistyped a Windows
command and the Windows system may be waiting for further input, but doesn't
seem to accept what I type. In such cases, rather than close the Terminal
tab on the Linux system to terminate the connection, which then requires me
to open a new tab and establish a new SSH session, I'd prefer to break out
of the current SSH session and return to the shell prompt on the Linux
system where I can re-establish the SSH connection. In such cases,
Ctrl-C,
Ctrl-D, and
Ctrl-Z don't help me.
But there is an
escape sequence
that will allow me to terminate the current SSH session. Hitting the
three keys listed below will allow me to terminate the session.
↲ Enter, ~, .
[ More Info ]
[/network/ssh]
permanent link
Mon, Apr 18, 2016 11:15 pm
Keeping an SSH connection alive
If you need to keep a
SSH connection alive, e.g., when you won't be
entering any commands for awhile after logging into the remote system via
SSH, you can use the
-o option with
ServerAliveInterval
. You can specify the interval in seconds which will be used by the SSH
client to send
keepalive packets with
-o ServerAliveInterval x
where
x is the frequency for sending the keepalive packets. E.g.,
if I wanted the SSH client to send keepalive packets every minute (60 seconds)
to the remote SSH server, I could use a command like the one below when
establishing the SSH session:
$ ssh -o ServerAliveInterval=60 jdoe@example.com
By using this option, you should be able to reduce the likelihood that
your SSH connection will get dropped after a certain amount of time due to
no activity for the session.
You can also use the
ServerAliveCountMax
parameter with ServerAliveInterval to drop the connection, if the SSH
client hasn't received a response from the server to the prior "heartbeat"
signal when the time comes to send another keepalive packet. E.g., ssh
-o ServerAliveInterval=60 -o ServerAliveCountMax=1 jdoe@example.com
would result in the connection being dropped if the client was awaiting
a response to even one outstanding keepalive packet.
There is also a TCPKeepAlive option in
OpenSSH.
That option is used to recognize when a connection is no longer active due
to some problem such as the SSH client application crashing or a prolonged
network outage. If the SSH server never recognizes that the client is no
longer communicating with it, it will continue to allocate resources,
such as memory, for the connection. The option is turned on by default
in the OpenSSH configuration file /etc/ssh/sshd_config. You
will see the following line in that file:
#TCPKeepAlive yes
You don't need to uncomment the line by removing the pound sign, since
"yes" is the default value. The option causes
Transmission Control Protocol (TCP) to periodically
transmit keepalive messages. If it doesn't receive responses within the
expected time, it returns an error to the sshd process, which will then
shut down the connection. The purpose of this option is to prevent half-dead
connections building up over time and consuming more and more system
resources as the number grows. The keepalive interval is typically in the
order of hours rather than minutes to minimize the network load for the
server. If the keepalive period was made shorter, that would affect all TCP
connections on the system, not just the SSH ones, potentially increasing the
network load unnecessarily and also causing connections to be dropped even
for transient issues, such as a short and temporary network issue.
The TCPKeepalive option is for dealing with longer term issues for a
connection rather than the loss of connectivity due to firewall, proxying, or
Network Address Translation (NAT) timeouts.
You can specify the option on the command line at the SSH client end as
follows:
$ ssh -o TCPKeepAlive=yes joe@example.com
References:
-
SSH, The Secure Shell: The Definitive
Guide
By: Daniel Barrett, Richard Silverman, Robert Byrnes
[/network/ssh]
permanent link
Thu, Jan 14, 2016 11:09 pm
OpenSSH Roaming Vulnerability
Ars Technica published an article today
titled
Bug that can leak crypto keys just fixed in widely used OpenSSH which
explained how a compromise of a
SSH server running
OpenSSH software could
lead to the server being used to capture data from the memory of systems
that have connected to the server via SSH including private keys for users
connecting to the server.
The vulnerability resides only in the version end users use to connect to
servers and not in versions used by servers. A maliciously configured server
could exploit it to obtain the contents of the connecting computer's memory,
including the private encryption key used for SSH connections. The bug is the
result of code that enables an experimental roaming feature in OpenSSH
versions 5.4 to 7.1
"The matching server code has never been shipped, but the client code was
enabled by default and could be tricked by a malicious server into leaking
client memory to the server, including private client user keys," OpenSSH
officials wrote in an advisory published Thursday. "The authentication of the
server host key prevents exploitation by a man-in-the-middle, so this
information leak is restricted to connections to malicious or compromised
servers."
The roaming feature was intended to allow users to resume broken SSH
connections, even though the feature was disabled in OpenSSH server software
years ago. E.g., when I connected to a server I have running OpenSSH server
software, I saw the folowing:
$ ssh -v jdoe@127.0.0.1 2>&1 >/dev/null | grep -i 'roaming'
debug1: Roaming not allowed by server
The Red Hat article on the vulnerability
OpenSSH: Information-leak
vulnerability (CVE-2016-0777) notes:
Since version 5.4, the OpenSSH client supports an undocumented feature called
roaming. If a connection to an SSH server breaks unexpectedly, and if the SSH
server supports roaming as well, the client is able to reconnect to the server
and resume the interrupted SSH session. The roaming feature is enabled by
default in OpenSSH clients, even though no OpenSSH server version implements
the roaming feature.
For affected products, the article also notes:
Red Hat Enterprise Linux 7 since version 7.1 has provided OpenSSH 6.6 for
which the default configuration is not affected by this flaw. OpenSSH 6.6 is
only vulnerable to this issue when used with certain non-default ProxyCommand
settings. Security update
RHSA-2016-0043
corrects this issue.
So CentOS 7 systems using a
default OpenSSH configuration should be unaffected, since CentOS is derived from
Red Hat
Enterprise Linux.
On a Linux system, you can check the version of SSH installed with
ssh -V.
$ ssh -V
OpenSSH_6.6.1p1, OpenSSL 1.0.1e-fips 11 Feb 2013
On a CentOS Linux system using the
RPM Package Manager
you can also use rpm -qi openssh | grep Version.
$ rpm -qi openssh | grep Version
Version     : 6.6.1p1
On a CentOS system, you can update the software from the command line, aka a
shell prompt, using the command yum update openssh.
If you are using a vulnerable OpenSSH client, you can also specify the
-oUseRoaming=no parameter on the command line to ensure that
a malicious server can't take advantage of the vulnerability. E.g.
ssh -oUseRoaming=no jdoe@example.com. Or the feature can
be disabled for all users on a system by putting UseRoaming no in
/etc/ssh/ssh_config or by an individual user for his account
by adding the line to ~/.ssh/config.
echo 'UseRoaming no' >> /etc/ssh/ssh_config
References:
-
Bug that can leak crypto keys just fixed in widely used OpenSSH
Date: January 14, 2016
Ars Technica
-
Fixing The New OpenSSH Roaming Bug
By: ScriptRock
ScriptRock Blog
-
OpenSSH: Information-leak vulnerability (CVE-2016-0777)
Updated: January 14, 2016
Red Hat Customer Portal
-
Security OpenSSH Security Bug CVE-2016-0777 & CVE-2016-0778
Date: January 4, 2016
[/network/ssh]
permanent link
Tue, Jun 30, 2015 10:09 pm
Transferring files with scp through a bastion host on an OS X system
I need to transfer files through a
bastion host
periodically. To edit files on a webserver, I need to first establish a
Secure Shell (SSH)
connection to the bastion host, logging in using an
RSA SecurID token.
Once I've provided my login credentials, the bastion host prompts me for
the system to which I want to connect to from it, which in this case
is the web server. So my ssh login to the webserver is
tunneled through the bastion host.
I normally go through the process once a month from my MacBook Pro laptop
running the OS X operating system when I need to place a monthly newsletter on
the web server. I use an SSH command similar to the following to log into
the bastion host where gold.example.com is the
fully qualified domain name (FQDN) of the web server and
bastion1.example.com is the bastion host.
ssh -L 22001:gold.example.com:22 jasmith1@bastion1.example.com
The -L option specifies I want to tunnel a local port on
my laptop, in this case I chose 22001, to port 22 on the web server,
gold.example.com. A tunnel is set up from my laptop to the web server
through the bastion host by using that option once my login is completed
to the bastion host.
Then, to transfer a file via
secure copy from my laptop to the web server, I can use a command like
the following one to transfer a file named July.txt from the laptop
to the web server:
$ scp -P 22001 July.txt jasmith1@127.0.0.1:/data/htdocs/clubs/groot/newsletter/2015/.
jasmith1@127.0.0.1's password:
The -P option to the scp command specifies I want to use
TCP
port 22001, since that is the port for the end of the tunnel on my laptop.
The 127.0.0.1 address I'm specifying is the
localhost, aka
"loopback", address on my laptop. I.e., I'm connecting to port 22001 on
the laptop itself. The tunnel I set up earlier results in any connection
to that port being forwared through the tunnel to the web server, so
I'm specifying my userid for the web server and the password prompt I
receive is for the web server. The file July.txt will thus be placed
in the directory /data/htdocs/clubs/groot/newsletter/2015
on the web server with the same name, July.txt.
If I wanted to pull a file from the webserver via the tunnel, I could
use a command such as the following:
scp -P 22001 jasmith1@127.0.0.1:/data/htdocs/clubs/groot/July.html .
That command would retrieve the file July.html from the web server and
place it on the laptop with the same name.
[/network/ssh]
permanent link

Privacy Policy
Contact

