SNMP Tester
If you need an SNMP test tool for a Windows system,
Paessler, a company that produces
network monitoring software, offers
SNMP Tester for
free. There is no installation process for the software other than
extracting the files in the downloaded zip file to a directory of your
choice and running
snmptest.exe.
After extracting the files to a directory under
Program Files using an administrator account, I tried running the
program from a normal user account. The program didn't appear to open, though
I could see it running when I used the Task Manager to check on
running processes, although the CPU utilization for it stayed at 0. So I
right-clicked on snmptest.exe and chose "Run as administrator".
The program then opened. I found that I could extract the files to a folder
in the My Documents directory of the regular user account and
run it from there. The issue I first encountered when attempting to run the
program from the Program Files directory was that the program
wants to update an snmp.ini file in the directory from which it
runs and that account didn't have write access to the Program Files
subdirectory within which it was located.
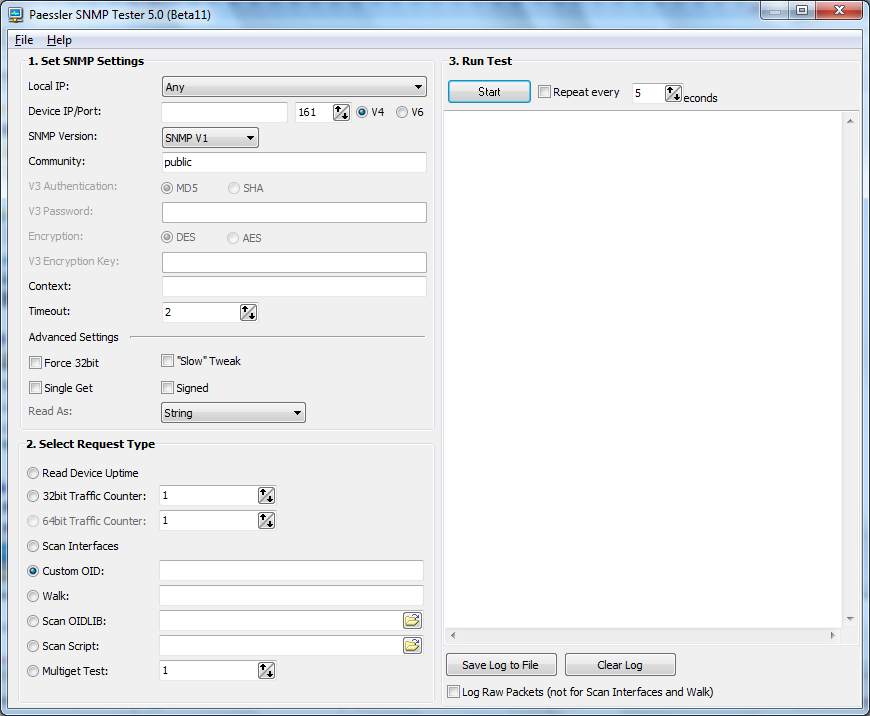
When you run the program, place the IP address of the system you wish to
scan in the
Device/IP field; if the SNMP port has been changed from the default
value of port 161, change that also. Specify the community string in the
Community field. If you want to see the uptime of the device to
just verify the device is responding to SNMP queries, leave
"Read Device Uptime" selected under Select Request Type. Then click
on the Start button to initiate the scan.
You can also put an
OID, such as 1.3.6.1.2.1 in the
Walk field, select the Walk radio button and click on
Start to "walk" through a sequence of OIDs or specify a particular
OID, e.g.,1.3.6.1.2.1.1.5.0 in the Custom OID field.
[/os/windows/software/network/snmp]
permanent link
Using the SSH Client on a Chromebook to Establish a Socks Proxy Connection
The
Chrome OS on a
Chromebook contains
a
Secure Shell
(SSH) client application. To access it, hit the
Ctrl-Alt-T
keys simultaneously, which will open a terminal window as a tab in the
Chrome browser. Type
ssh at the "crosh>" prompt to access
the ssh client.
Welcome to crosh, type 'help' for a list of commands.
crosh> ssh
Within the ssh application, typing help will show you a list of the available commands.
ssh> help
connect - connect
dynamic-forward port - dynamic socks proxy (-D)
forward port:host:port - static port forward (-L)
help - this
host <hostname> - remote hostname
key <file> - sets private key to use (-i)
nocmd - don't execute command (-N)
port <num> - port on remote host (-p)
server-alive-interval <num> - set ServerAliveInterval option
exit - exit ssh subsystem
user <username< - username on remote host
Note that this program can only bind local ports in the range
8000-8999, inclusive.
ssh>
To establish the SOCKS
proxy connection via SSH, type dynamic-forward port
where port is the port number you wish to use
for the SOCKS proxy. E.g., dynamic-forward 8000. Note:
the help information for the SSH client states "that this program
can only bind local ports in the range 8000-8999, inclusive." Then
type host fqdn where fqdn is the fully qualified domain name
or IP address of the system to which you wish to connect followed by
user username where username
is the account under which you wish to log into the SSH server. They
type connect to establish the connection.
ssh> dynamic-forward 8000
ssh> host example.com
ssh> user jdoe
ssh> connect
You will be prompted for the password for the login once the Chromebook
connects to the remote SSH server.
To now change the proxy settings of the Chrome browser, take the
following steps:
- Click the network icon
 in the lower-right
corner of your screen.
in the lower-right
corner of your screen.
- Select Settings and find the "Internet
connection" section on the Settings page that appears.
- You will need to check the "Allow proxies for
shared networks" check box if the network is shared with all users of
the Chromebook. If checked, all profiles on your Chrome device will use the proxy
settings set for a network. If this box isn't checked and the network is
shared for all users of the Chromebook, you won't be able to configure the
proxy settings, as they will be grayed out, until you check this box.
- Click the network for which you're using the proxy settings.
- Select the Proxy tab in the window that displays
the network options.
- Configure your proxy settings by selecting
the "Manual proxy configuration" option and then entering the proxy
settings. For the case above, where I'm using a socks proxy created
through the SSH client, I would put
127.0.0.1, which is the
localhost
address, in the SOCKS host field and 8000 in the
port field, since that was the port I chose to use. Putting
127.0.0.1 in the host field tells the browser to establish
the connection via port 8000 on the local system from which you
established the SSH connection.

Then click on the Close button to initiate the use of the socks proxy.
- You can verify that you are
using the socks proxy, by going to a website, such as whatismyip.com that will show you the
IP address from which it sees your connection originating.
[/os/chrome]
permanent link
TeamViewer and Chromebook
The antivirus software on a family member's Microsoft Windows desktop system
was close to expiring and another member of the household had a license for
Norton 360 that would cover 3 systems, so I uninstalled the free
Avast antivirus
software I had placed on the system previously and started the installation
for Norton 360. Because it was going to take more than a half hour for the
download of Norton 360 to complete once I had started the installation, I left
and tried connecting to the system remotely with
TeamViewer, a program that allows you
to remotely control a system from a variety of other systems, which I had
installed on the system previously.
I had used the TeamViewer application on a Microsoft Windows system before
to manage the family member's PC, but since I didn't have access to the
Microsoft Windows desktop system which I had used previously at the moment,
I thought I would try using my Android phone, instead, since TeamViewer provides
an app for it.
I installed the TeamViewer app on my Android phone and remotely connected
to the Microsoft Windows 7 PC. The following gestures can be made on the
Android phone to remotely manage another system.
Mouse interactions:
- Tap to click.
- Tap and hold to click right.
- Drag a finger on the screen for mouse movement.
- Double tap and drag for drag & drop.
- Two-finger drag to scroll.
- Pinch to zoom.
From my phone, I connected to the PC, but I found it difficult to
manage the PC from the phone's small screen. So I tried from a
Chromebook system
running the Google
Chrome OS, instead.
Using the
Chrome browser on
it, I logged into the TeamViewer website. I then could see the system
I wanted to control with TeamViewer. I then was presented the option
to download and install a client program or to use the alternative
Web client. When I clicked on "Download and install", I was taken to a
download page for a Microsoft Windows application, so I went back and
selected the Web client, instead. However, I then received an error
message:
Translate(FlashConnectionError)
TypeError: Object#<HTMLObjectElement> has no
method 'ExternalConnect'
But I was able to proceed past it to a login page to establish the
connection where I was able to put in the email address I had given
for the TeamViewer account and the accompanying password. But I kept getting
"Timeout while connection" messages when I clicked on the Connect to
partner button. I went back to the point where I opted for the Web
client connection and tried again. This time I was able to successfully
establish a connection. The text on the remote Windows system was very tiny,
but I was able to read it well enough to complete the installation of the
antivirus software.
I clicked on View at the top of the webpage displayed for the
connection, then clicked on Quality and changed the setting
from Optimize speed to Optimize quality, which made the
remote display somewhat easier to read. Quicking on View and
changing the scaling to "original" made the display even easier to read,
but I had to scroll the display then to see various parts of the remote
display.
At this point, I would consider managing a Microsoft Windows system
remotely from a Chromebook with TeamViewer acceptable, but I'll have to
experiment with managing a system from the Android phone more before I
can consider it an acceptable means of remotely managing another system
with TeamViewer on it in a situation where I might not have access to
another device to use for remote troubleshooting.
[/os/windows/software/remote-control/teamviewer]
permanent link

