Performing a System Image Backup on a Windows 8 System
Microsoft Windows 8 comes with a utility that will you to perform a system image
backup of a system running Windows 8, but the process for performing an image
backup under Windows 8 isn't readily apparent. To do so, you can follow the
steps
here.
[/os/windows/win8]
permanent link
Adding a Printer by IP Address to an OS X System
To add access to a printer over the network using the
Line
Printer Daemon (LPD) protocol, take the following steps:
-
Cllick on the Apple icon at the top left-hand corner of the screen.
-
Select System Preferences.
-
Select Print & Fax.
-
Click on the "+" underneath the list of printers to add a new printer.
-
Click on the IP icon in the toolbar at the top of the Add
Printer window.
-
Leave the Protocol value set to
Line Printer Daemon - LPD and
put the IP address of the printer in the Address field, e.g.
192.168.0.100. You can leave the Queue value
blank to use the default printer queue. The Name field will
be given the IP address by default. You can change it to something else,
if you like, to make it more recognizable to you. You can also identify
the location, if you like, e.g. "Xerox area". You can specify the print
driver to use, if you wish or use a generic print driver. E.g., if the
printer supports
postscript printing, you could opt for Generic PostScript Printer
in the Print Using field. Or you could choose the
Select Printer Software option for Print Using and
then pick the appropriate printer from the list presented, e.g.
"Xerox 700 Digital Color Press, 2.35.0".
-
Click on the Add button. If you are presented with an
Installable Options window, choose any options you know
are installed then click on Continue when finished.
[/os/os-x]
permanent link
SSH Access to an OS X System
To allow
SSH access to
an Apple OS X system take the following steps:
- Click on the Apple icon on the top left hand corner of
the screen, which will display a menu of options.
- Select System Preferences
- Under the Internet & Network grouping, click on
Sharing
- Click on Remote Login, which is under the
Services
section.
- You will have the choice of permitting SSH access for
"All users" or "Only these users". If you select the latter, specify the
accounts for which you wish to grant SSH access by clicking on the "+"
beneath the two options and then selecting the accounts that will have
SSH access.
- Close the window by clicking on the "X" in the upper
left-hand corner of the window.
When logging in by SSH, use
the "short name" for the account, which can be found by going to
System Preferences, Accounts, then clicking on the
lock icon, and then selecting the account.
Note: written for Mac OS X 10.5.8, but will apply to other versions
as well.
[/os/os-x]
permanent link
Printing to a Shared Windows Printer from OS X
If you need to print from a Mac system running OS X 10.5 or later to a
printer that is shared over a network from a Microsoft Windows system,
you can take these
steps.
[/os/os-x]
permanent link
Using Firefox Cookies with Wget
If you need to use
wget to
access a site that relies on
HTTP cookies
to control access to the site, you can log into the site with Firefox and
use the Firefox add-on
Export Cookies to export all of the cookies stored by Firefox to a
file, e.g.
cookies.txt. After installing the add-on,
restart Firefox. You can then click on
Tools and choose
Export Cookies. Note: you may not get the cookie you need, if
you put Firefox in private browsing mode.
You can then use the cookies file you just exported with wget. E.g. presuming
the cookies file was named cookies.txt and was in the same
directory as wget, you could use the following:
wget --load-cookies=cookies.txt http://example.com/somepage.html
[/network/web/tools/wget]
permanent link
Creating a Filter to Display HTTP Cookies
To create a filter to display
HTTP cookies in
Wireshark, take the
following steps:
-
Open Wireshark and click on Analyze.
-
Select Display Filters.
-
Click on New.
-
For filter name, type
HTTP cookie or whatever name you would
like and for filter string type http.cookie.
-
Click on OK. You should then see only the packets containing
HTTP cookies displayed.
Note: written for Wireshark 1.8.4, but should apply to other versions
as well.
References:
-
cookie and query strings
Wireshark Q&A
[/network/tools/sniffing/wireshark]
permanent link
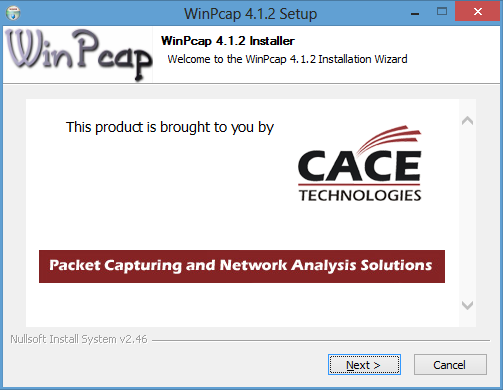
Installing Wireshark 1.8.4 and WinPcap 4.1.2 on a Windows 8 System
I installed Wireshark 1.8.4. When I started it, I was
informed that I hadn't specified an interface on which to perform a
capture. When I tried specifying an interface, I was informed there were
no interfaces on which a capture could be done. I saw "(Unable to load
WinPcap (wpcap.dll); you will not be able to capture packets."
I needed to install WinPcap in order
to utilize Wireshark, so I downloaded
WinPcap 4.1.2. When I ran
the installation program, a Program Compatibility Assistant
window opened stating "This program has compatibility issues." There
were two options: (1) Get help online and (2) Run the program without
getting help. I chose the latter. That resulted in a WinPcap 4.1.2
Setup window opening with the message "This version of Windows is
not supported by WinPcap 4.1.2. The installation will be aborted."
To resolve the problem, the following steps can be taken.
- Right-click on the installation file,
WinPcap_4_1_2.exe and select Properties.
- Click on the Compatibility tab.
-
Check the box next to "Run this program in compatibility mode for" and select
"Windows 7".
- Check the box for "Run this program as an administrator"
under Privilege level.
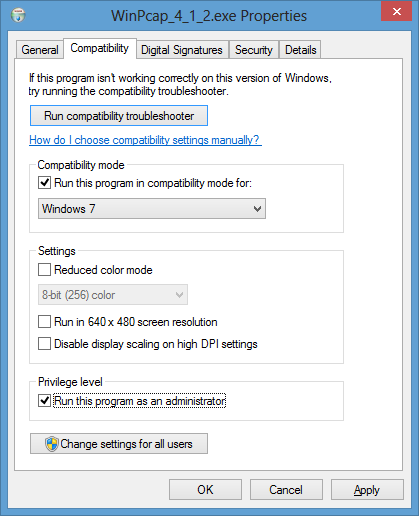
- Click on the OK button.
-
Run the installation program again and allow it to make changes to the system.
-
When the Program Compatibility Assistant window opens informing
you that "This program has compatibility issues", select "Run the program
without getting help". The WinPcap 4.1.2 Setup window should
then open allowing you to proceed with the installation.
References:
-
[Winpcap-users] Windows 8
By Andrew Stewart
Date: July 6, 2012
WinPcap
-
Installing WIRESHARK/WinPCap on Windows 8 RTM
By Kaushal Kumar
Panday
Date: August 7, 2012
Unleashed
[/network/tools/sniffing/wireshark]
permanent link
Creating Application Groups in Windows 8
Windows 8 has a new "metro" user interface which puts applications
on the desktop in tiled groups instead of using groups under
Programs or
All Programs as in prior versions of
Windows. When you have a lot of programs installed on a system, finding
what you want within one large group may be difficult. You can group
tiles in categoris of your own making with Windows 8, however.
[ More Info ]
[/os/windows/win8]
permanent link

