←August→
| Sun |
Mon |
Tue |
Wed |
Thu |
Fri |
Sat |
| |
|
|
|
|
|
1 |
| 2 |
3 |
4 |
5 |
6 |
7 |
8 |
| 9 |
10 |
11 |
12 |
13 |
14 |
15 |
| 16 |
17 |
18 |
19 |
20 |
21 |
22 |
| 23 |
24 |
25 |
26 |
27 |
28 |
29 |
| 30 |
31 |
|
|
|
|
|
|
|
Tue, Aug 18, 2026 7:09 pm
Importing an Outlook PST file into Evolution
My wife wanted to transition from Microsoft Windows to Linux for privacy
and performance reasons, so I installed
Ubuntu Linux on her desktop
system. She had been using
Microsoft Outlook
as an email client. I installed
Evolution, which
is available as a
Debian package, as an alternative to Outlook.
Evolution has the capability to import an Outlook
Personal
Storage Table (PST), though that did not work when I tried the process
with the PST file Outlook was using under Microsoft Windows. But to try
that process, when the Welcome window opens when you start
Evolution, click on Cancel to close it. Then take the following
steps:
- Press the Alt+F keys to view the file menu, then select
Import.
- You can click on Next at the Evolution Import Assistant
window to proceed with the import of the Outlook
Personal Storage
Table (PST) file.
- For the Importer Type, choose "Import a single file"
then click on Next.
- At the Select a File window, navigate to the location of the PST
file and select it. The file type in the file type field should automatically
change to "Outlook personal folders (.pst)" instead of the default file type of
"Berkeley Mailbox (mbox)"
If the option to select Outlook personal folders (.pst) is
not in the drop down list of file types, you may need to install the
plugin that allows Evolution to import .pst files.
To check on the status of the PST plugin on an Ubuntu system, or
another Debian distribution of Linux, use the command sudo apt
install evolution-plugins evolution-plugin-pstimport.
[ More Info ]
[/network/email/evolution]
permanent link
Thu, Aug 13, 2026 7:20 pm
Symlinks on Linux
To create a
symbolic link
(symlink), aka soft link, on a
Linux system, you can
use the ln command with
the -s option, i.e., ln -s, followed by the target
file path and the name you wish to use for the symbolic link. The
-s option specifies that the link should
be "soft" or symbolic (omitting this creates a hard
link). You can view existing symlinks with the ls command with the
-l option and then piping the output through the grep command with the
-l or --long option to obtain more detailed
information. Since the permission string for files or directories will
begin with the letter "l", you can limit the output with ls -l |
grep "^l". E.g.:
alice@Wonderland@Serenity:~/Documents$ ln -s ~/Pictures/Phone/PXL_20260715_202210365.jpg erin.jpg
alice@Wonderland@Serenity:~/Documents$ ls -l | grep "^l"
lrwxrwxrwx  1 alice@Wonderland domain users@ad.moonwillowwoods.com        75 Aug 14 15:03 erin.jpg -> /home/alice@Wonderland/Pictures/Phone/PXL_20260715_202210365.jpg
alice@Wonderland:~/Documents$
You can link an entire directory with a symlink. E.g., you could point a
local logs folder to a folder elsewhere on the system, even one
on another drive. E.g., ln -s /var/log/app_logs ./logs.
If you wish to find all of the symlinks in the current directory and
all its subdirectories, you can use the command find . -type l.
The -type l flag instructs the
find command to look
just for links. To see the full, absolute path of where a specific link points
you can use the
readlink command, e.g.,
readlink -f filename
where filename is the name of the symlink. E.g.:
alice@Wonderland:~/Documents$ readlink -f erin.jpg
/home/alice@Wonderland/Pictures/Phone/PXL_20260715_202210365.jpg
alice@Wonderland:~/Documents$
You can remove a symlink with the unlink command
followed by the symlink name.
alice@Wonderland@Serenity:~/Documents$ unlink erin.jpg
alice@Wonderland:~/Documents$
You could also use the rm
command. E.g., if you created a symlink named shortcut.txt, you could
remove that shortcut with rm shortcut.txt. Never add a trailing
slash (/) when removing a directory symlink, or you risk
deleting the contents inside the actual target directory.
[/os/unix/linux]
permanent link
Tue, Aug 11, 2026 9:14 pm
Changing the horizontal folder display on a Jellyfin server
When you view the media folders on a Jellyfin server, you
will see the folders displayed horizontally, so you have to click on a
rightward-pointing arrowhead to view additional folders. If you wish to
change that behavior so that you see a grid display, instead, you can
change it through CSS.
To do so, take the following steps:
-
Click on the
hamburger button (3 short horizontal lines one below the other)
at the upper-righthand corner of the homepage display for the server when
viewing it from a browser.
-
Select Dashboard.
-
Select Branding.
-
Paste the following code into the "Custom CSS code" field, then click on
Save.
@media all and (min-width: 50em) {
  .homePage .emby-scroller {
    margin-right: 0;
  }
  .homePage .emby-scrollbuttons {
    display: none;
  }
  .homePage .itemsContainer {
    flex-wrap: wrap;
  }
}
When you go back to the home page for the Jellyfin server and refresh
the webpage in your web browser, you should now see a grid display for
all of the folders you created, i.e., rows of folders one beneath the
other. If you don't see the change take effect, try pressing the Ctrl
and the F5 keys, or Cmd, Shift, and R,
depending on your operating system, together to force a refresh that
will apply CSS changes. For an example of how the display of folders
changes, see these "before" and
"after" displays for a server on which 6
folders had been created. Note: the custom CSS injected via the server
dashboard applies to web browser clients and the desktop client, but
dedicated apps, such as
Android TV or
Fire TV
stick, may ignore the web CSS. It does work with the Jellyfin app
under the LG webOS on an
LG TV.
[ More Info ]
[/network/web/server/jellyfin]
permanent link
Thu, Aug 06, 2026 3:29 pm
Registry location for Advanced Diary registration information
The Advanced Diary journaling/diary
program from CSoftLab stores its
license information in the
Windows registry at
HKEY_CURRENT_USER\Software\CSoftLab\Advanced Diary. When you
install the software, you will have a 30-day trial period and the
LicenseCode and LicenseName keys will not have
any values set. You can see the values using the Microsoft Windows registry
editor regedit.exe.
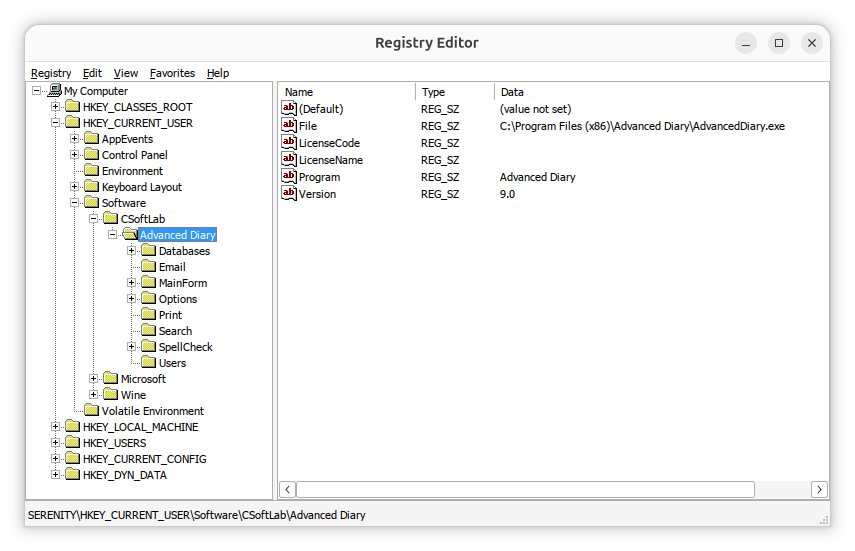
If you need to view the license information, you can navigate to the
HKEY_CURRENT_USER\Software\CSoftLab\Advanced Diary key in
the registry using the registry editor or you can
open a command prompt window and
issue the following reg query commands.
C:\>reg query "HKCU\SOFTWARE\CSoftLab\Advanced Diary" /v LicenseName

HKEY_CURRENT_USER\SOFTWARE\CSoftLab\Advanced Diary
    LicenseName    REG_SZ    John Doe


C:\Users\Lisa>reg query "HKCU\SOFTWARE\CSoftLab\Advanced Diary" /v LicenseCode

HKEY_CURRENT_USER\SOFTWARE\CSoftLab\Advanced Diary
    LicenseCode    REG_SZ    VN37-H79K-28ZZ-XMMUMM9XX9


C:\>
You can extract the information from the registry by right-clicking on the
Advanced Diary entry in the registry and choosing Export
and then saving the information to a .reg registry file. That will save all
of the registry information for Advanced Diary. You can then delete all
but the lines that are like the ones below, if you only need the license
entries in the registry.
Windows Registry Editor Version 5.00
[HKEY_CURRENT_USER\SOFTWARE\CSoftLab\Advanced Diary]
"LicenseName"="John Doe"
"LicenseCode"="VN37-H79K-28ZZ-XMMUMM9XX9"
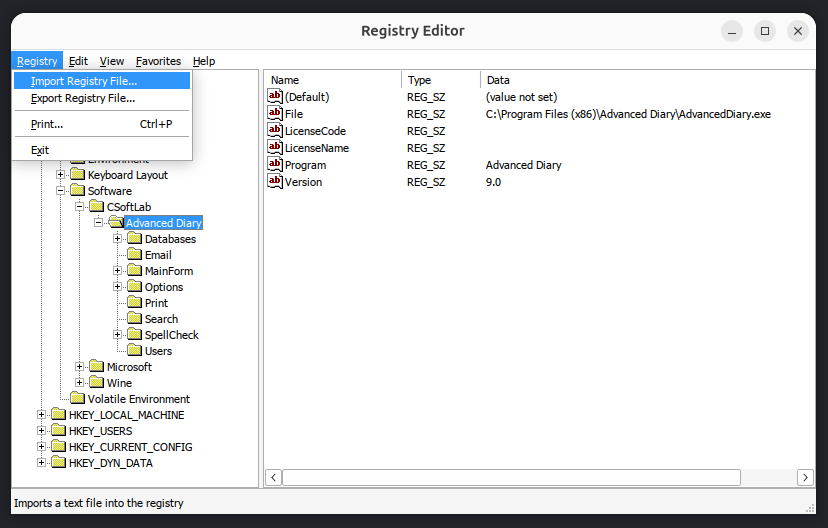
You can then import the registry entries after installing Advanced Diary
on another system. You can import them by opening the registry editor and
choosing Registry and then Import Registry File.
Note: if you are transferring the registry keys to an installation of
Advanced Diary running under Wine on a Linux system, you can run the
registry editor provided by Wine by opening a
terminal window
and then setting the WINEPREFIX environment variable equal to
whatever Wine prefix you have set, if you are using one other than the
.wine one, and then running wine regedit. E.g.:
$ export WINEPREFIX="$HOME/.wine-advdiary"
$ wine regedit
If you have saved the registry values to a .reg file, e.g.
file.reg, and want to import the values from that file from
a command-line
interface (CLI), open a
command prompt window as an administrator and run
reg import "C:\path\to\file.reg". Alternatively, use
regedit /s "C:\path\to\file.reg" to import the file silently
without a confirmation prompt. To import the registry values from a
Windows system into the registry for an instance of Advanced Diary 9.0
running in a Wine prefix named .wine-advdiary on
an Ubuntu Linux system,
I used the commands below in a terminal window to import a .reg file
named AdvancedDiary_LicenseInfo.reg.
$ export WINEPREFIX="$HOME/.wine-advdiary"$ wine regedit /s "$HOME/Documents/AdvancedDiary_LicenseInfo.reg"
$
After doing so, when I clicked on Help and chose About Advanced
Diary, I saw it was registered.
Related articles:
-
Obtaining a command prompt in Windows 11
Date: August 14, 2023
-
Windows Reg Query Command
Date: October 1, 2026
-
Checking Microsoft Windows proxy server
settings
Date: January 7, 2015
-
Installing Advanced Diary on a Linux system with Wine
Date: February 24, 2026
-
Access violation when installing Advanced Diary 9.0 with Wine on a Linux system
Date: August 4, 2026
-
Advanced Diary Active Database and Backup Registry Values
Date: July 18, 2026
[/os/unix/linux/wine/AdvDiary]
permanent link
Wed, Aug 05, 2026 9:21 pm
SSH ServerAliveInterval
If you want to prevent a
Secure Shell (SSH)
connection being dropped when it has been inactive for several minutes, you can
specify a keepalive value.
To specify a keepalive value directly from the command line, use
the -o flag followed by the
ServerAliveIntervaloption
Command Line Syntax
Run the following command to send a keepalive packet every 60 seconds:
ssh -o ServerAliveInterval=60 user@hostname
Advanced Keepalive Control
For more robust protection against drops, combine the interval with ServerAliveCountMax. This defines how many consecutive keepalive messages can go unanswered before the client disconnects.
ssh -o ServerAliveInterval=60 -o ServerAliveCountMax=3 user@hostname
ServerAliveInterval=60: Sends a packet every 60 seconds of inactivity.ServerAliveCountMax=3: Drops the dead connection if the server fails to respond 3 times in a row.
Making It Permanent (Optional)
If you get tired of typing this out every time, you can save it to your local configuration:
[/network/ssh]
permanent link
Tue, Aug 04, 2026 9:27 pm
Access violation when installing Advanced Diary 9.0 with Wine on a Linux system
I needed to install the
Advanced Diary diary/journaling program
from CSoftLab on an Ubuntu
Unix system. The application is developed only for Microsoft Windows,
so to get it to work on an Ubuntu Linux system I used
Wine, which is
free and
open-source software that allows one to run applications developed
for the Microsoft Windows
operating system
(OS) on Linux systems.
I started the installation from a
terminal window after
creating and initializing a Wine
prefix for it. But when I clicked on Install, I saw the
message "Invalid operation in GDI+ (Code: 2)". When I canceled the
installation and closed the window associated with it, I saw an error
window stating "The setup files are corrupted. Please obtain a new copy
of the program." I had encountered the same "Invalid operation in GDI+
(Code: 2)" problem many months ago (the setup file wasn't actually
corrupted, so I could ignore that message) when I installed a previous
version of Advanced Diary, version 8.0, on another system using Wine
— see Installing Advanced
Diary on a Linux system with Wine — and remembered that I
had used a shell
script then to install additional software for Wine that
would alleviate that problem. I needed Winetricks installed, so
I verified I had already installed it on this system with the which command
(you can install it with sudo apt install winetricks,
if it is not installed). I used winetricks to install gdiplus and core
fonts for Windows applications. That resolved the problem with the
"Invalid operation in GDI+ (Code: 2)", but then I saw a
"Access violation at address 75D947DC in module 'qcap.dll'. Read of address
5F505353" message every time I started Advanced Diary.
[ More Info ]
[/os/unix/linux/wine/AdvDiary]
permanent link
Sat, Aug 01, 2026 8:27 pm
Making an optical drive accessible to a guest OS running in VirtualBox
I needed to make an
optical disc drive accessible to a Windows virtual
machine (VM) running in VirtualBox
on an Ubuntu
Linux system. The drive was attached to the host operating system
(OS) via a USB
connection. One way to make a USB optical drive connected to a Linux
host available to a Windows VM is to pass through the host optical
drive. With the VM running, I could select Devices and then
the optical drive connected to the host operating system, "Host Drive
PIONEER BD-RW BDR-XS07U (sr0)". Since I had seen a recommendation to
use a USB passthrough method instead, though, as while passing through
the host optical drive works well for ordinary CD/DVD access, unusual
discs or software that communicates directly with the hardware are less
likely to be problematic if one uses the USB passthrough method, instead,
I chose the USB passthrough option. To do so, I verified that the logged
in user account was in the vboxusers
group by issuing the command grep vboxusers /etc/group in
a terminal
window. If it isn't, you can add the account to that group using
sudo usermod -aG vboxusers $USER. I also verified that
the USB 3.0 Controller option was enabled by selecting the Windows 10
VM in VirtualBox and clicking on Settings and then selecting
USB. I then made the Pioneer Blu-ray drive accessible inside
the Windows VM by clicking on Devices at the top of the running
Windows VM window and then selecting Pioneer Corporation Pioneer
Blu-ray Drive [0100]. I then was able to see the blu-ray drive in
the Windows File
Explorer.
[ More Info ]
[/os/virtualbox]
permanent link

Privacy Policy
Contact