Customizing the Start Menu on a Windows 7 System
To change the items that appear when you click on the
Start button

on a Windows 7 system, take the following steps:
- Right-click on the Start button.
- Select the Start Menu tab.
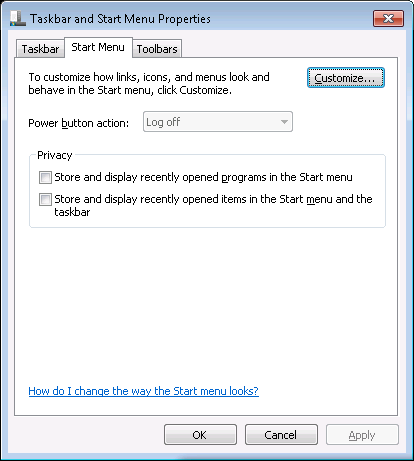
- Click on the Customize button.
-
You can then select which items, such as "Computer", "Documents",
etc. that you wish to be displayed.
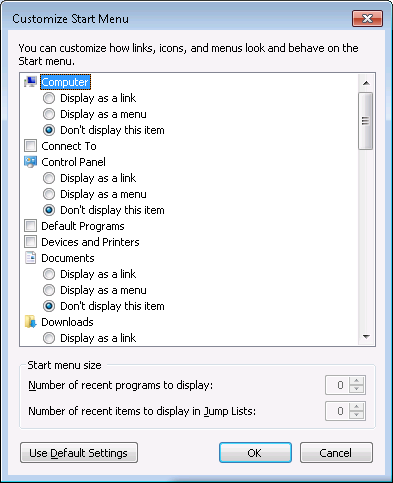
If you want to use the default settings, click on the button labeled
Use Default Settings. E.g., you might want to choose that option if
some items have disappeared from the Start Menu. The default settings are
listed below:
Computer (default: "Display as a link)
Connect To (default: checked)
Control Panel (default: "Display as a link")
Default Programs (default: checked)
Devices and Printers (default: checked)
Documents (default: "Display as a link)
Downloads (default: "Don't display this item")
Help (default: checked)
Highlight newly installed programs (default: checked)
Homegroup (default: unchecked)
Music (default: "Display as a link")
Network (default: unchecked)
Personal folder (default: "Display as a link")
Pictures (default: "Display as a link")
Recent Items (default: unchecked)
Recorded TV (default: "Don't display this item)
Run command (default: unchecked)
Search other files and libraries (default: "Search with public folders")
Search All Programs menu by name (default: checked)
System administrative tools (default: unchecked)
Use large icons (default: checked)
Videos (default: "Don't display this item)
Start menu size
Number of recent programs to display (default: 10)
Number of recent items to display in Jump Lists (default: 10)
-
When you are finished click on OK then OK again.
[/os/windows/win7]
permanent link
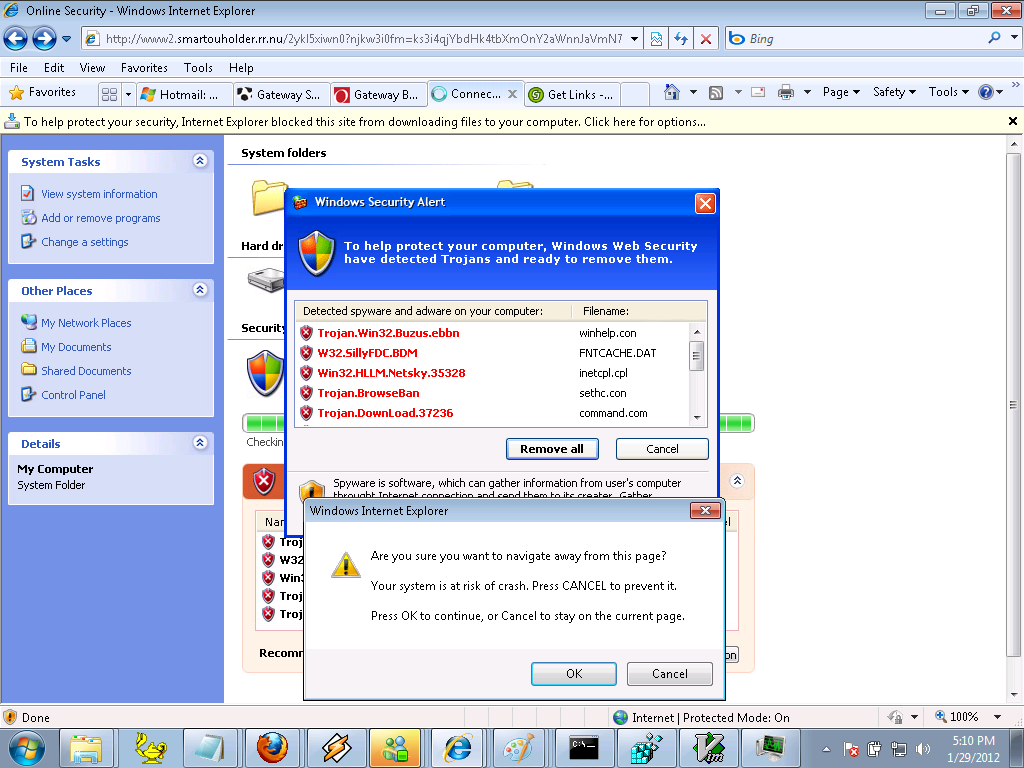
Redirection to Rogue rr.nu Site
While searching for a power adapter, I found a link for the part number of
the power adapter for which I was searching that redirected me to
www2.smartouholder.rr.nu. That site displayed a fake virus scan
(see
image),
which reportedly was finding malware on the system from which I was searching,
but was really just a ruse to try to lure unsuspecting users into buying
rogue antivirus software, i.e.,
scareware. If I tried
to navigate away from the site, I would receive a "Are you sure you want
to navigate away from this page?" message.
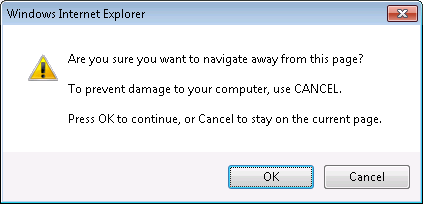
No matter which option I selected from "OK" or "Cancel", I was left at the
scareware webpage. After finally getting back to a prior Google search page,
I checked the site's reputation at
Norton™ Safe Web.
It did not list the site www2.smartouholder.rr.nu, stating it had not
been tested yet, but
it did list rr.nu.
Norton Safe Web reported the following for the rr.nu site:
rr.nu
Summary
| •Computer Threats: |
|
1 |
| •Identity Threats: |
|
0 |
|
•Annoyance factors:
|
|
0
|
|
|
|
| Total threats on this site: |
|
1 |
| |
|
|
|
•Community Reviews:
|
|
5
|
Norton Safe Web listed "Drive-By Downloads" as the threat from the site.
After I was able to navigate away from the site, I added an entry to
the /Windows/system32/drivers/etc/hosts file to ensure that
the system would not be able to contact the site again. I put the following
2 lines at the bottom of that file:
# Inserted on 2012-01-29. Site is attempting to download rogue antivirus software

127.0.0.1	www2.smartouholder.rr.nu
When a Windows system attempts to find an IP address for a website name,
such as www.example.com, it will first check the hosts file
to see if an IP address is listed there for the
fully qualified domain name. If
not, then it will perform a
Domain Name System (DNS) query to obtain the IP address associated with
the name. By associating the name with 127.0.0.1, which is the
loopback address
for the local system, you can ensure that a system on which the entry has
been put in the hosts file will see the name as pointing to its own address and
thus will never be able to reach the actual site.
Note: if you edit the hosts file with the Windows Notepad
editor, be sure you save the file as hosts, not
hosts.txt. The file may be marked as read-only, also, so in
order to save the file. you will need to take off the read-only attribute
temporarily and put the attribute back on after you have saved the file.
You can do so by right-clicking on the hosts file, choosing
Properties and unchecking the read-only attribute. Or you can
use the following two commands from the command line to take the attribute
off the file and put it back on after you've edited the file.
attrib -r C:\Windows\System32\drivers\etc\hosts

attrib +r C:\Windows\System32\drivers\etc\hosts
You will need to run the commands from an administrator account to do so.
You will also need to run Notepad from an administrator account to edit the
file. If you are logged in as another user, you can use the "runas" command
from the command line to run Notepad or the attrib command from the
administrator account.
E.g., you can use
runas /user:administrator cmd to open another command prompt
under the administrator account to run the attrib commands or
runas /user:administrator notepad to run Notepad from the
administrator account. Alternatively, for the attrib command you could use
runas /user:administrator
"attrib -r C:\Windows\System32\drivers\etc\hosts"
. If you are using a
domain administrator account you would use
runas /user:domainname\administrator.
[/security/malware]
permanent link
Floating Left and Right Columns Within a Div
I wanted to have two columns on one section of a web page where the
fist column was all left-aligned on the page, but the second column
was aligned to the right of the page.
I used the DIV
tag to create the two columns. I used <div style="float: left;">
for the left columan and <div style="float: right;">
for the right column. I enclosed both of them in an outer DIV. Since I
wanted to have a top margin of 75 pixels for the outer DIV to separate it from
the material above, I used <div style="margin-top: 75px;">
for it. But when I viewed the page, the material in the two columns wasn't
appearing the way I wanted it to appear. I then tried adding overflow:
auto to the outer DIV as shown below.
<div style="margin-top: 75px; overflow: auto;">

<div style="float: left;">
Stuff in left column
</div>

<div style="float: right;">
Stuff in right column
</div>

</div>

<p>Stuff below</p>
That looked fine when viewed in Firefox, but Internet Explorer showed
the "stuff below" between the two columns.
I was able to resolve the problem by inserting a
complete "cleared" element last in the container as explained at
How To Clear Floats Without Structural Markup By adding another DIV
below the two column DIVs but within the outer DIV, I was able to get the
results I wanted in both Internet Explorer and Firefox. That DIV was just
<div style="clear: both;"></div>.
So I then had the following HTML code for the page.
<div style="margin-top: 75px; overflow: auto;">

<div style="float: left;">
Stuff in left column
</div>

<div style="float: right;">
Stuff in right column
</div>

<div style="clear: both;"></div>

</div>

<p>Stuff below</p>
References:
-
2 Column Div float right and left child divs outside parent
Date: August 31, 2010
Stack Overflow
-
How To Clear Floats Without Structural Markup
By: Big John
Created May 14, 2004
Last updated: July 2, 2008
Position Is Everything
[/network/web/html]
permanent link
MySQL Field Types
I can't remember the ranges for various MySQL numberic data types, such as
TINYINT, SMALLINT, MEDIUMINT, INT, etc. nor how many characters a TEXT field
hods versus a MEDIUMTEXT field and when I need the information it sometimes
takes me a little while to find it again, so I've placed a page listing
those values on this site for ready reference.
[ More Info ]
[/software/database/mysql]
permanent link
Displaying Data from a MySQL Database with PHP
If you have data stored in a MySQL database that you wish to include on
a webpage, PHP provides a mechansim to query a MySQL database to extract
and dispaly the data on a webpage.
[ More Info ]
[/languages/php]
permanent link
Google Chrome for the Mac
Google Chrome is available for Mac OS X systems at
http://www.google.com/chrome/index.html?platform=mac&hl=en.
It is available in
Apple Disk Image
format, i.e., .dmg format as
googlechrome.dmg.
The following window opens when you click on the .dmg file.
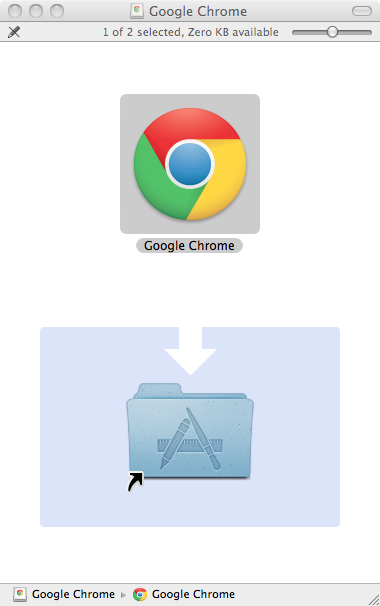
If you double-click on the folder icon in the window, you will have the
option of selecting where Chrome should be insalled. The default location is
the Applications folder where applications are normally stored.
When you then double-click on the "Google Chrome" icon in the window, you will
have the option of installing the software or running it from the disk
image.
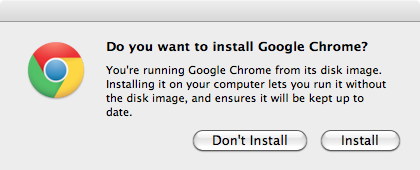
If you don't want to intall it, you can simply run it from the disk image,
since it will then be "mounted" as a drive within the
Finder

[/network/web/browser/chrome/os-x]
permanent link
Removing Specific Cookies from Firefox
Firefox allows you to remove all
HTTP cookies, cookies
for one particular site, or even individual cookies associated with a particular
site which may have placed multiple cookies on your system. To remove cookies,
follow the process below.
Note: this procedure was written for Firefox 3.6, but may apply to other
versions as well.
- Open Firefox.
- Click on Tools and select
Options.
- Click on Privacy.
- There will be a "remove individual cookies"
link in the middle of the Options window; click on it.

- Search or scroll through the list until you
find the relevant website. You can search on a domain name,
e.g., example.com.
- If you want to delete all cookies for a
particular website, highlight its
entry by clicking on it, then click on the Remove Cookies button.
If yo wish to remove only certain cookies for a website, click on the rightward
pointing triangle next to it or double-click on the entry to reveal the
individual cookies associated with the website. Click on one you want removed
to highlight it, then click on the Remove Cookie button.
- Click on the Close button when
you have removed all the cookies you wish to remove.
- Click on the OK button to close the
Options window.
[/network/web/browser/firefox]
permanent link
Resizing an image from the command line
If you have the
ImageMagick package
installed on a Linux system or Mac OS X, you can use the
convert tool
that comes with it to resize an image from a shell prompt. ImageMagick
is also available for Microsoft Windows systems, but I haven't tried it
on a Microsoft Windows system.
To resize an
image, one uses the -sample option for the convert tool as in
the example below, which resizes an image, input.jpg, to 80 pixels wide and
40 pixels high, storing the result in output.jpg.
$ convert -sample 80x40 input.jpg output.jpg
You can also specify percentages of the original file size rather than a
size in pixels.
convert -sample 25%x25% input.jpg output.jpg
Note: when you use the -sample option to specify the size
of the output image in pixels, you may not get the exact sizes you specified
for the width and height of the image. This is because ImageMagick considers
the aspect ratio of the two sides of the image when it is resizing, keeping
the aspect ratio of the new image the same as that of the previous image.
So one of the values may not be the same as the number you put on the
command line.
You can use the
identify utility that comes with ImageMagick to obtain the width and
height of an image (the width value is displayed first followed by the
height).
$ identify example.png
example.png PNG 100x89 100x89+0+0 DirectClass 11kb
In the example above, the image is 100 pixels wide by 89 pixels high.
You can determine if ImageMagick and these associated tools are on
the system by using the which command.
$ which identify
/usr/bin/identify
$ which convert
/usr/bin/convert
References:
-
Graphics from the command line
Flip, size, rotate, and more with ImageMagick
By:
Michael Still, Senior software engineer, Tower Software
Date: July 16, 2003
Linux - Technical resources for Linux programmers and system administrators
[/software/graphics/imagemagick]
permanent link

