The Chrome OS on a Chromebook contains a Secure Shell (SSH) client application. To access it, hit the Ctrl-Alt-T keys simultaneously, which will open a terminal window as a tab in the Chrome browser. Type
ssh at the "crosh>" prompt to access
the ssh client.
Welcome to crosh, type 'help' for a list of commands.
crosh> ssh
Within the ssh application, typing help will show you a list of the available commands.
ssh> help
connect - connect
dynamic-forward port - dynamic socks proxy (-D)
forward port:host:port - static port forward (-L)
help - this
host <hostname> - remote hostname
key <file> - sets private key to use (-i)
nocmd - don't execute command (-N)
port <num> - port on remote host (-p)
server-alive-interval <num> - set ServerAliveInterval option
exit - exit ssh subsystem
user <username< - username on remote host
Note that this program can only bind local ports in the range
8000-8999, inclusive.
ssh>
To establish the SOCKS
proxy connection via SSH, type dynamic-forward port
where port is the port number you wish to use
for the SOCKS proxy. E.g., dynamic-forward 8000. Note:
the help information for the SSH client states "that this program
can only bind local ports in the range 8000-8999, inclusive." Then
type host fqdn where fqdn is the fully qualified domain name
or IP address of the system to which you wish to connect followed by
user username where username
is the account under which you wish to log into the SSH server. They
type connect to establish the connection.
ssh> dynamic-forward 8000
ssh> host example.com
ssh> user jdoe
ssh> connect
You will be prompted for the password for the login once the Chromebook connects to the remote SSH server.
To now change the proxy settings of the Chrome browser, take the following steps:
- Click the network icon
 in the lower-right
corner of your screen.
 - Select Settings and find the "Internet connection" section on the Settings page that appears.
- You will need to check the "Allow proxies for shared networks" check box if the network is shared with all users of the Chromebook. If checked, all profiles on your Chrome device will use the proxy settings set for a network. If this box isn't checked and the network is shared for all users of the Chromebook, you won't be able to configure the proxy settings, as they will be grayed out, until you check this box.
- Click the network for which you're using the proxy settings.
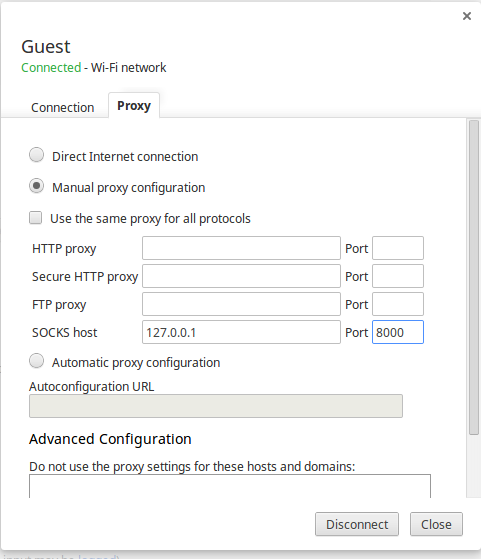
- Select the Proxy tab in the window that displays the network options.
- Configure your proxy settings by selecting
the "Manual proxy configuration" option and then entering the proxy
settings. For the case above, where I'm using a socks proxy created
through the SSH client, I would put
127.0.0.1, which is the localhost address, in the SOCKS host field and8000in the port field, since that was the port I chose to use. Putting127.0.0.1in the host field tells the browser to establish the connection via port 8000 on the local system from which you established the SSH connection.
Then click on the Close button to initiate the use of the socks proxy.
- You can verify that you are using the socks proxy, by going to a website, such as whatismyip.com that will show you the IP address from which it sees your connection originating.

