←August→
| Sun |
Mon |
Tue |
Wed |
Thu |
Fri |
Sat |
| |
|
|
|
|
1 |
2 |
| 3 |
4 |
5 |
6 |
7 |
8 |
9 |
| 10 |
11 |
12 |
13 |
14 |
15 |
16 |
| 17 |
18 |
19 |
20 |
21 |
22 |
23 |
| 24 |
25 |
26 |
27 |
28 |
29 |
30 |
| 31 |
|
|
|
|
|
|
|
|
Mon, Aug 11, 2014 10:37 pm
Creating a WinPE Boot Disc with MustangPEBuilder 2 ADK
I needed to do some troubleshooting on an HP desktop system
running Microsoft Windows 8 that would no longer boot
into Windows. The system has three 2 TB drives configured as a
RAID 5 array
providing 4 TB of storage, but one of the drives had failed. I could
boot the system from Linux rescue CDs, but, since I didn't have an
appropriate driver to access the drives as a 4 TB RAID array, I couldn't
access user files on the system by that method. I could boot into the
Windows recovery environment and choose the advanced options, which
would allow me to get to a command prompt.
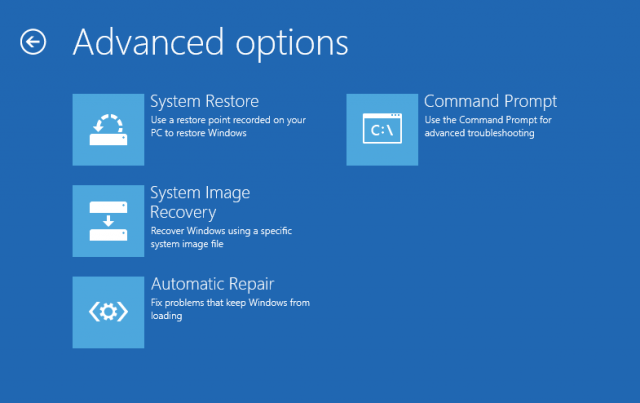
I could then copy files from the drives to an external USB drive using
xcopy, but the user had over 900,000 files in her
My Documents directory and xcopy only copied about 800,000 of
those. I wanted to try another method of copying the files to see if
that would be more successful, but there were no other utilities available
to me from the command prompt that I thought would be more successful.
I created a boot disc on another Windows 8 system using
MustangPEBuilder 2 ADK, which
allowed me to boot into a Windows
GUI,
but without the appropriate driver added I haven't yet been able to
access the data in the user's My Documents directory with it.
I have been able to add Windows applications, such as
IrfanView, but I haven't figured
out yet how to get some other applications I want to use added nor a driver
that will allow me to access the RAID drives.
[/os/windows/mustang]
permanent link
Sat, Aug 09, 2014 3:55 pm
Editing ISO files with Magic ISO Maker
I had an issue with a bootable
Windows PE DVD no longer working as I expected. I thought the problem
was due to the
boot.wim no longer being created correctly.
The .wim file is a
Windows
Imaging Format file and
boot.wim contains a bootable
version of Windows PE. On a Windows 8 system, I was able to use the Windows
Explorer to copy the
boot.wim file from within an
ISO image, but I needed a
way to replace the
boot.wim file in another ISO image file with the
one I copied. To do so, I used the
Magic ISO Maker program, which
provides the capability to create and edit ISO files and extract files
from within ISO files. It also can deal with the BIN disc image format
and
Apple
Disk Image DMG files. MagicISO can open and manipulate just about
any disc image format. Magic ISO Maker can deal with ISO, BIN, IMG,
CIF, FCD, NRG, GCD, PO1, C2D, CUE, CIF, and CD formats.
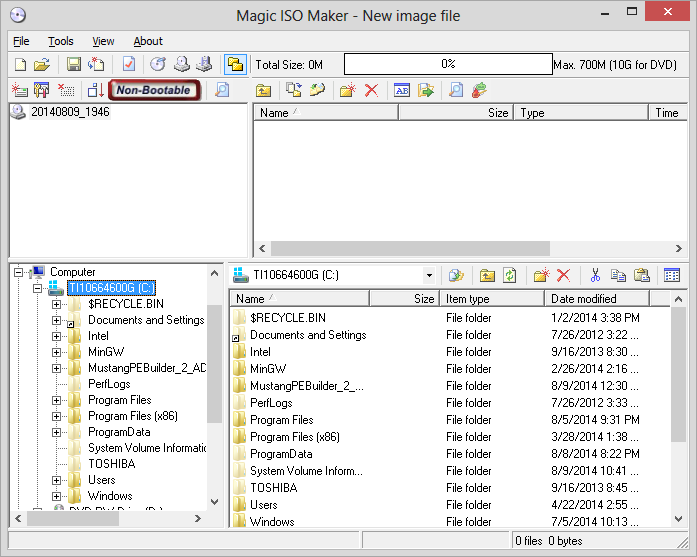
The unregistered version has a limitation preventing you from saving an
image greater than 300 MB, but in my case that was not an issue since the
image size was 175 MB.
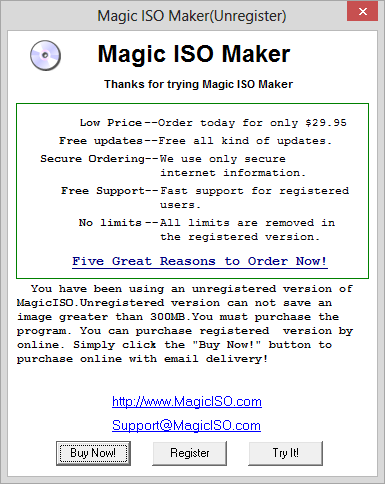
I did purchase the software though, since it worked well and I often deal
with much larger ISO files. When you purchase the software, you will receive
a zip file by email containing a .reg file, which will provide you a
temporary license. Extract the .reg file from the .zip file, and double-click
on it to create the registry entries to register the software. You should
later receive a permanent serial number.
The steps to take to insert or replace a file within an existing ISO file
using MagicISO are listed below:
- Select File.
- Select Open.
- Browse to the location of the ISO file you wish to
modify and open it.
-
If you have a Windows Explorer window open side-by-side with the
Magic ISO Maker window, you can drag the file you want to insert into the
ISO file over into the Magic ISO Maker window and into the directory there
where you wish to insert the copy of the file into the ISO file. If a file
by that name already exists, a "Query for overwriting" window will appear
notifying you that the file already exists and asking if you want to overwrite
it. You can click on the Yes button to overwrite the file.
-
Click on File then Save as to save the update to the ISO file
in a new ISO file, since you can't save to the ISO file you have open within
Magic ISO Maker.
VirusTotal analysis of Setup_MagicISO.exe on 2014-08-09
[/os/windows/utilities/MagicISO]
permanent link
Thu, Aug 07, 2014 10:47 pm
Adding a printer from the command line on an OS X system
While in someone else's office, I needed to add an HP Color LaserJet
CP4025 printer in that office to the list of available printers
on my MacBook Pro laptop. I was able to generate a printout of the
printer's configuration from its front panel to get its IP address. I then
looked for a suitable
Postcript
Printer Description (PPD) file on the laptop. The PPD files can be found in
/Library/Printers/PPDs/Contents/Resources.
$ ls /Library/Printers/PPDs/Contents/Resources | grep -i LaserJet | grep 40
HP Color LaserJet CM4540 MFP.gz
HP Color LaserJet CM6040 MFP.gz
HP Color LaserJet CP4005.gz
HP Color LaserJet CP4020 CP4520 Series.gz
HP LaserJet 400 M401.gz
HP LaserJet 400 M401dne.gz
HP LaserJet 400 MFP M425 Fax.ppd.gz
HP LaserJet 400 MFP M425.gz
HP LaserJet 4000 Series.gz
HP LaserJet 4050 Series.gz
HP LaserJet 4240.gz
HP LaserJet 9040 9050 MFP.gz
HP LaserJet 9040.gz
HP LaserJet M9040 M9050 MFP.gz
HP LaserJet P4010_P4510 Series.gz
The HP LaserJet 4000 Series.gz file seemed appropriate. I
then used the command below to add the printer:
$ lpadmin -p "192.168.234.59" -v "lpd://192.168.234.59/" -D "Matt - HP CP4025" -L "Building 18 Room S188" -P "/Library/Printers/PPDs/Contents/Resources/HP LaserJet 4000 Series.gz" -E
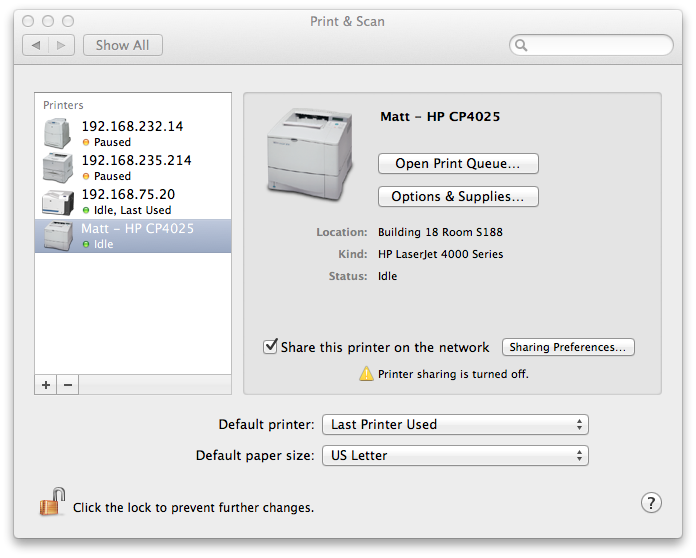
The printer then appeared in the list of available printers under
System Preferences/Print & Scan and I was able to print to it.
The lpadmin command can be used to configure
CUPS printers. CUPS is a
modular printing system often found on Unix and Linux operating systems. Apple's
OS X opertaing system is a Unix-based graphical interface.
The options for the lpadmin command, which can be used to
configure CUPS printers, are
listed below:
    -p = Printer name (queue name if sharing the printer)
    -v = IP address or DNS name of the printer
    -D = Description of the printer (appears in the Printers list)
    -L = Location of the printer
    -P = Path to the printer PPD file to use for the printer
    -E = Enable this printer to accept print jobs
The text specified with the -D option is the description
that I see for the printer when I check Print & Scan under
System Preferences.
[/os/os-x]
permanent link
Wed, Aug 06, 2014 9:00 pm
Command line unrar utility for Microsoft Windows
If you need to extract files from a
.rar file on a Microsoft
Windows system,
RARLAB, which
procues the WinRAR program that provides a
GUI for dealing with RAR files on Microsoft
Windows systems, also provides a free utility,
unrar,
which can be run from a command line on a Windows system. The utility
is available at
WinRAR and
RAR archiver addons.
To use the program, you need to extract the unRAR.exe
file from the file you download. You can do so by simply double-clicking
on the unrarw32.exe file you downloaded. You will then be
prompted for a directory into which the unRAR.exe file
should be extracted.
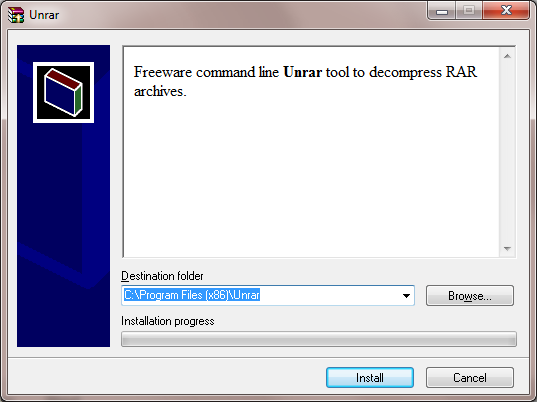
The default installation directory is C:\Program
Files(x86)\Unrar. If you don't have access to install files
in that directory on a system, you can place it anywhere, e.g. in
"My Documents". So you don't need administrator level access to a
system to put the utility on a system or run it on a system.
There is only the one file, Unrar.exe file that you need. to
use the software.
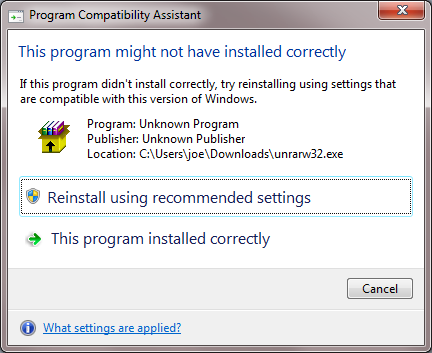
If you see a Program Compatibility Assistant window
appear stating "This program might not have installed correctly, you
can simply click on "This program installed correctly" to have the
Unrar.exe file placed in the directory you chose, if
you have the appropriate access to place files in that directory..
You can see the options availble for the program by typing
unrar at a command prompt in the directory in which you
extracted unrar.exe.
C:\Users\joe\Documents\bin>unrar

UNRAR 5.00 freeware      Copyright (c) 1993-2013 Alexander Roshal

Usage:     unrar <command> -<switch 1> -<switch N> <archive> <files...>
               <@listfiles...> <path_to_extract\>

<Commands>
  e             Extract files without archived paths
  l[t[a],b]     List archive contents [technical[all], bare]
  p             Print file to stdout
  t             Test archive files
  v[t[a],b]     Verbosely list archive contents [technical[all],bare]
  x             Extract files with full path

<Switches>
  -             Stop switches scanning
  @[+]          Disable [enable] file lists
  ac            Clear Archive attribute after compression or extraction
  ad            Append archive name to destination path
  ag[format]    Generate archive name using the current date
  ai            Ignore file attributes
  ap<path>      Set path inside archive
  c-            Disable comments show
  cfg-          Disable read configuration
  cl            Convert names to lower case
  cu            Convert names to upper case
  dh            Open shared files
  ep            Exclude paths from names
  ep3           Expand paths to full including the drive letter
  f             Freshen files
  id[c,d,p,q]   Disable messages
  ierr          Send all messages to stderr
  inul          Disable all messages
  ioff          Turn PC off after completing an operation
  kb            Keep broken extracted files
  n<file>       Additionally filter included files
  n@            Read additional filter masks from stdin
  n@<list>      Read additional filter masks from list file
  o[+|-]        Set the overwrite mode
  oc            Set NTFS Compressed attribute
  or            Rename files automatically
  ow            Save or restore file owner and group
  p[password]   Set password
  p-            Do not query password
  r             Recurse subdirectories
  ri<P>[:<S>]   Set priority (0-default,1-min..15-max) and sleep time in ms
  sl<size>      Process files with size less than specified
  sm<size>      Process files with size more than specified
  ta<date>      Process files modified after <date> in YYYYMMDDHHMMSS format
  tb<date>      Process files modified before <date> in YYYYMMDDHHMMSS format
  tn<time>      Process files newer than <time>
  to<time>      Process files older than <time>
  ts<m,c,a>[N]  Save or restore file time (modification, creation, access)
  u             Update files
  v             List all volumes
  ver[n]        File version control
  vp            Pause before each volume
  x<file>       Exclude specified file
  x@            Read file names to exclude from stdin
  x@<list>      Exclude files listed in specified list file
  y             Assume Yes on all queries

C:\Users\joe\Documents\bin>
To extract the contents of a .rar file, use the e
argument to unrar followed by the name of the rar file.
C:\Users\joe\Documents\bin>unrar e %USERPROFILE%\Downloads\ST0044_9e8d3db5
2aa4e60904a3676eb33f763.rar

UNRAR 5.00 freeware      Copyright (c) 1993-2013 Alexander Roshal


Extracting from C:\Users\joe\Downloads\ST0044_9e8d3db592aa4e60904a3676eb33763.rar

Extracting  ST0044_BlacX Duet 5G Snow Editon_manual_12071201.pdf      OK
All OK
[/software/utilities/file/rar]
permanent link
Tue, Aug 05, 2014 9:12 pm
Session Manager Firefox Add-on
The Firefox add-on
Session Manager created by
Michael Kraft allows you to save a Firefox session at any time. You can
save and restore the state of all or only some Firefox windows and
tabs. The session data saved includes history, text data, and cookies.
All sessions are stored in the sessions folder inside your profile
directory and can be moved around as with any other file.
On a Microsoft Windows 8 system, the sessions folder is in
%APPDATA%\Mozilla\Firefox\Profiles\profiledir\sessions.
You can find the value of %APPDATA% at a command prompt by
issuing the command echo %APPDATA%.
C:\>echo %APPDATA%
C:\Users\JDoe\AppData\Roaming
The value of the
profile beneath the
Profiles
directory will vary. E.g.:
C:\Users\JDoe\AppData\Roaming\Mozilla\Firefox\Profiles\nqp8058i.default\sessions
To get to that folder,
simply select "Open Session Folder" in Session Manager's menu (might not work on
all OSes), which you can get to in Firefox on Microsoft Windows by using the
Alt-T key combination to show the Tools menu, then selecting
Session Manager. Session Manager also allows you to reopen the 10 last
closed windows and tabs. You do not need to restart Firefox after installing
the Session Manager add-on to begin using it.
To save the Firefox session at any time, take the following steps on a
Microsoft Windows system (applies to Firefox 31.0 and Session Manager 0.8.1.5):
-
Use Alt-T key combination to bring up the Tools menu.
Alternatively, you can click on the blue floppy disk icon that is placed on
the Firefox address bar when you install Session Manager. That icon appears
to the left of another icon that is a red cross in a white box which will allow
you to reopen recently closed tabs or windows.

-
Select Session Manager.
-
Select Session Manager again.
-
Select Save Session.
-
A window will open where you can name the session you are about to save.
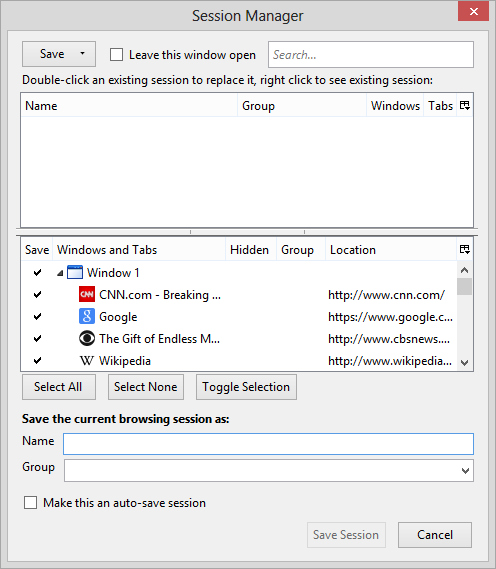
Provide a name for the session you wish to save in the "Name" field, which
could be the date or anything you like. You can uncheck any tabs you don't
want saved for the session.
-
Click on Save Session. Note: when you click on it, it may appear
that nothing is happening, but don't click again, give it a few seconds to
complete the save.
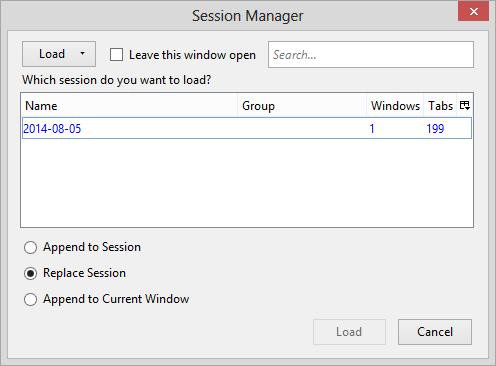
To load a saved session, go through the same steps to bring up Session
Manager, but instead of selecting Save Session select
Load Session. You will then see a list of any saved sessions.
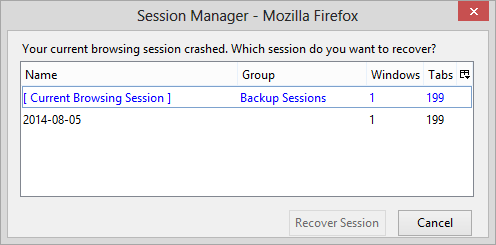
If Firefox crashes or you reboot the system without closing Firefox, you
will see a window like the one below when you open Firefox, which will
give you the option of restoring Firefox to the state it was in when it
crashed or from a prior saved session.
References:
-
Session Manager
Add-Ons
-
Session Manager
mozdev.org
[/network/web/browser/firefox/addons/sessionmgr]
permanent link
Mon, Aug 04, 2014 10:02 pm
Finding a MySQL table entry containing a text string
If you wish to search for an entry in a table in a MySQL database that contains
a text string, such as "Groot", you can use the
LIKE operator.
E.g., for a table named
chatroommessages with a a field named
message, you could search for any occurrences of "Groot" in
a message with the following:
SELECT `message` FROM `chatroommessages` WHERE `message` LIKE '%Groot%';
The percent signs at the beginning and end of the text indicate that any
other text can occur before and after that text, so if a message contained
"I am Groot!", it would be selected. The "%" will match any number of
characters, including zero characters.
You can search for words or phrases with any other text occurring before
or after the text you are seeking:
SELECT `message` FROM `chatroommessages` WHERE `message` LIKE '%only a test%';
If you want to use a wildcard that represents only one character
rather than zero or more characters, you can use the underscore character.
SELECT `message` FROM `chatroommessages` WHERE `message` LIKE '%test_r%';
The above SQL query would look for all messages that contained any
text before "test", followed by any one character, an "r", and then any
number of other characters. So the above query would find any of the following:
Hopefully I don't run out of Testor's Dull coat.
my test results were inconclusive.
I am currently a beta tester.
The case of the text doesn't matter. E.g., it doesn't matter that
I used all lowercase letters in "test" when I issued the SQL query. The
query would find "TEST" with all uppercase letters as well. So the message
contained "Testor" with a capital "T" was also found.
If you need to search for an occurrence of a wildcard character, e.g.,
you need to find "30%", then you would need to use a backslash, \,
as an "escape
character" to take away the special meaning of the percent sign in a query.
SELECT `message` FROM `chatroommessages` WHERE `message` LIKE '30\%';
That will restrict the search to finding only messages containing "30%",
whereas if you used LIKE 30% rather than LIKE 30\%,
the search would also return any messages containing "300", "3000", "30132",
etc.
| String | Description |
|---|
| \% | Matches one “%” character |
| \_ | Matches one “_” character |
References:
-
12.5.1 String Comparison Functions
MySQL Documentation: MySQL Reference Manuals
[/software/database/mysql]
permanent link
Sun, Aug 03, 2014 12:02 pm
Creating shortcuts with XXMkLink
If you need to create shortcuts from the command line or within a batch
file on a Microsoft Windows system, you can use the free
XXMkLink program from
Pixelab, Inc.. The company also produces
free and commercial versions of
XXCLONE,
for cloning disk drives, and
XXCOPY,
a file management utility for copying files.
To use XXMkLink, download the zip file and extract XXMKLINK.EXE from
within it to an appropriate directory on a hard drive. You can then run
that program without any parameters to see options available for it.
C:\>"\Program Files\Utilities\XXMKLINK"

XXMkLink     ver 1.00    (c)2005 Copyright  Pixelab, Inc.


=========== Syntax =======================

xxmklink spath opath [ arg [ wdir [ desc [ mode [ icon[:n] ]]]]] [switches...]

  where  spath     path of the shortcut (.lnk added as needed)
         opath     path of the object represented by the shortcut
         arg       argument string (use quotes with space, see below)
         wdir      path of the working directory (for "Start in")
         desc      description string (shown in Shosrtcut's Properties)
         mode      display mode (1:Normal [default], 3:Maximized, 7:Minimized)
         icon[:n]  icon file [with optional icon index value n]

         Currently, the following switches are supported

         /p        prompts before action
         /q        no output when successful (quiet)

  Note:  Switches (whose first character is always slash) can be placed in
         any position of the command argument.  A string that starts with
         a slash as a non-switch argument must be surrounded by a pair of
         double-quotes (").  It is recommended that the XXMKLINK's switches
         be placed before or after the non-switch arguments for clarity.

         Make sure that each element is surrounded by a pair of
         double-quotes (") if embeded space is present.

         The third field (arg) is for the argument string for the object
         (typically a program that requires command arguments) that must
         be entered as one string here, even if it has many parts that are
         separated by spaces and possibly with double-quote characters.

         When double-quoted string has an embedded double-quote,
         add a backslash in front of each embedded double-qoute.

         Use an empty string (two consecutive double-quotes) as a
         place holder since this command syntax is sensitive to the
         order of the field, optional switches cannot alter the
         pre-determined order as defined by the program.

         When an invalid display mode is specified (not 1, 3 nor 7),
         the default (Normal Window) value will be used.

         When the icon specifier does not point to an existing file,
         the icon field will be ignored.

  E.g.   mklink "c:\Program Files\mydir\My Shortcut.lnk" c:\boot.ini
           (At least two arguments are always needed.)

         mklink c:\myauto c:\autoexec.bat "/q" . "I say \"Hello.\"" "desc..."
           (In this example, the third argument string, "/q" was entered
            as a quoted string.  If it were without the quotation marks,
            it would be treated as the xxmklink switch, /q, not the argment
            string for the object program.)
At a minimum, the following two arguments are needed to the program to
create a shortcut:
spath - path and filename for the shortcut; if you don't add a
.lnk at the end of spath, one will be added automatically, since all
shortcuts must have a .lnk extension.
opath - path and filename of the object represented by the shortcut, i.e.
the location and name for the file or program for which you are creating
the shortcut.
E.g., suppose I wanted to create a shortcut on the desktop for the account
under which I'm currently logged into the system that points to the WinSCP
program, winscp.exe. I could use the following command, if
the xxmklink.exe file is in
C:\Program Files\Utilities and the winscp.exe
program is in c:\program files (x86)\network\SSH\WinSCP\. If I
was logged into the JDoe account, the
environment variable %USERPROFILE% would equate to
C:\Users\JDoe.
C:\>"\Program Files\Utilities\xxmklink" %USERPROFILE%\Desktop\WinScp.lnk "c:\program files (x86)\network\SSH\WinSCP\winscp.exe"

XXMkLink     ver 1.00    (c)2005 Copyright  Pixelab, Inc.

The shortut created as follows

Shortcut path:     C:\Users\JDoe\Desktop\WinScp.lnk
Target object:     c:\program files (x86)\network\SSH\WinSCP\winscp.exe
Arguments;
Working Directory:
Description:
Display Mode:      Normal Window (1)
Icon file:
If I then hit the Windows
key and the "D" key simultaneously, I would then see the WinSCP shortcut on
the desktop.
Security information for current version of XXMkLink, which is 1.00
| File name: | xxmklink.zip |
| SHA256: |
2fe7b3b9c73e6467ba8d4e5157491a4409b44eab359d0320a3cba1e2bbec08ca |
| MD5: |
8f67bd67f4bd752837276caff870e474 |
| VirusTotal dection ratio: |
0/54
|
| Analysis date: | 2014-06-28 |
[/os/windows/utilities]
permanent link
Sat, Aug 02, 2014 10:38 pm
phpMyAdmin SQL History
If you need to see a recent history of SQL commands you've run inside
phpMyAdmin, you can see recently entered commands by clicking on the
SQL icon, which is a box with "SQL" in red letters within it, that
occurs just below "phpMyAdmin" at the upper, left-hand side of the
phpMyAdmin window.

Once you click on that icon, another small window will pop up which
contains a tab labeled SQL history.

Click on that tab to see the recently entered SQL commands
[/network/web/tools/phpmyadmin]
permanent link
Sat, Aug 02, 2014 10:13 pm
Mustang PEBuilder 2 winpe_x86 exists
On a Windows 8 system, I had to kill
Mustang PEBuilder 2 through the
Task Manager due to it
hanging while creating an ISO file. When I restarted it and clicked on
Create WinPE ISO, I saw the error message below:
Folder C:\winpe_x86 exists. Move, rename or delete and try again. Program
will terminate.
When I clicked on OK, the Mustang PEBuilder window
closed. The C:\winpe_x86 directory gets created during the
process by which Mustang PEBuilder 2 creates the .iso file. The directory
and its contents are normally deleted after the ISO file is created. When it
has not been deleted and I had previously seen the error message,
I was able to delete the C:\winpe_x86 folder and all
its contents and restart the process of building an ISO file without a
problem. But this time I received "access denied" messages when attempting
to delete some of the directories and files within it.
The problem was due to the directories and files being owned by
TrustedInstaller. To remedy the problem, I took the following steps:
- Right-click on a directory that can't be deleted and choose
Properties.
- Click on the Security tab.
- Click on the Advanced button.
- The owner will be listed as TrustedInstaller; click on
Change then in the "Enter the object name to select" field, type
Administrators.
- Click on OK.
- Click on the checkbox next to "Replace owner on subcontainers and objects"
to check the box.
- Click on the Apply button.
- In the "Permission entries" list, make sure Administrators have
"Full control".
- Check the checkbox for "Replace all child object permission entries
with inheritable permission entries from this object. When notified that this
will replace explicity defined permissions on all descendants of this
object with inheritable permissions, click on Yes.
- Click on the Apply button.
- You can now close the "Advanced Security Settings" window by clicking on
OK.
- You can click on OK again to close the Properties window
for the directory.
You should now be able to delete the directory and all subdirectories
and files within it.
References:
-
Windows 7 - How to Delete Files Protected by TrustedInstaller
Help Desk Geek
[/os/windows/utilities/diagnostic/mustang]
permanent link

Privacy Policy
Contact


