Services That Run Under Safe Mode with Networking
A list of services that run in
Safe Mode with Networking under Windows XP.

|
| |||||||||||||||||||||||||||||||||||||||||||||||||||||||||
Normally, you will see your default email client and web browser at the top of the start menu. There may also be other items already on the menu.
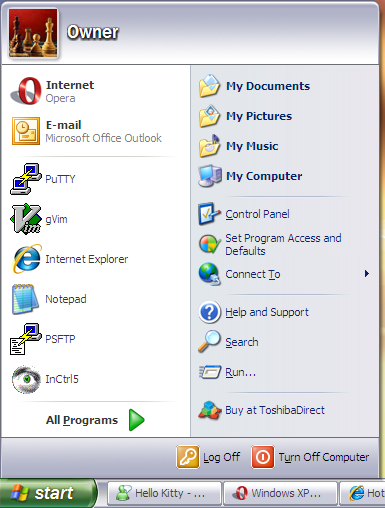
If you want to add another item at the top of the start menu in the same section as the shortcuts for your default email client and web browser, all you need to do is click on Start, select All Programs and then locate the the program you wish to add to the menu. Right-click on that program and select Pin to Start menu. In the example below, Windows Live Messenger has been selected to be added to the Start menu.
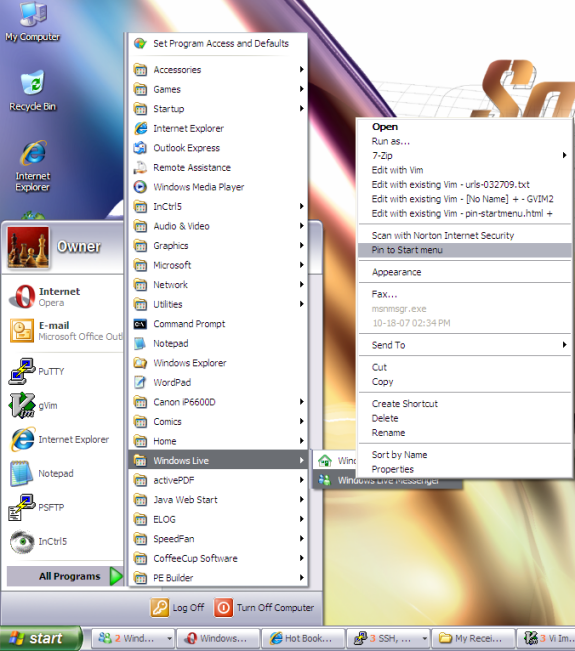
You will then see the program on the upper-left side of the Start menu. You can now run the program by clicking on the Start button and selecting the program from that location.

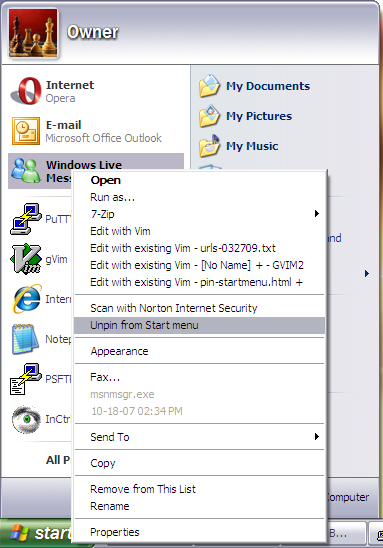
If you ever want to remove the program from the Start menu, click the Start button, right-click on the program, and choose Unpin from the Start menu.
There is a way to create a new installation CD that incorporates the latest service pack into the version that came on your installation CD. The process is called "slipstreaming". There are various tools to help you create a slipstream disc; nLite, is one such tool. For instructions on how to use nLite for such a purpose, see Slipstreaming XP SP 3 with nLite.
$NT*KB* directories showed the following:
C:\TEMP>dir /ah \Windows\$NT*KB*
 Volume in drive C is Sys-WinXP
 Volume Serial Number is B0E3-65A7

 Directory of C:\Windows

01/21/2005  02:34 PM    <DIR>          $NtUninstallKB828741$
01/21/2005  02:38 PM    <DIR>          $NtUninstallKB833987$
01/21/2005  07:37 PM    <DIR>          $NtUninstallKB834707$
01/21/2005  02:36 PM    <DIR>          $NtUninstallKB835732$
01/21/2005  02:36 PM    <DIR>          $NtUninstallKB840987$
01/21/2005  02:36 PM    <DIR>          $NtUninstallKB841356$
01/21/2005  02:37 PM    <DIR>          $NtUninstallKB841533$
01/21/2005  01:21 PM    <DIR>          $NtUninstallKB842773$
02/12/2005  07:59 PM    <DIR>          $NtUninstallKB867282$
01/21/2005  02:38 PM    <DIR>          $NtUninstallKB871250$
02/12/2005  07:59 PM    <DIR>          $NtUninstallKB873333$
01/21/2005  05:13 PM    <DIR>          $NtUninstallKB873339$
01/21/2005  02:37 PM    <DIR>          $NtUninstallKB873339_0$
01/21/2005  02:37 PM    <DIR>          $NtUninstallKB873376$
02/12/2005  07:59 PM    <DIR>          $NtUninstallKB885250$
01/21/2005  05:13 PM    <DIR>          $NtUninstallKB885835$
01/21/2005  02:37 PM    <DIR>          $NtUninstallKB885835_0$
01/21/2005  05:13 PM    <DIR>          $NtUninstallKB885836$
01/21/2005  02:38 PM    <DIR>          $NtUninstallKB885836_0$
01/21/2005  07:37 PM    <DIR>          $NtUninstallKB886185$
02/12/2005  07:59 PM    <DIR>          $NtUninstallKB887472$
02/22/2005  07:22 PM    <DIR>          $NtUninstallKB887742$
01/21/2005  07:37 PM    <DIR>          $NtUninstallKB887797$
02/12/2005  07:59 PM    <DIR>          $NtUninstallKB888113$
02/12/2005  07:58 PM    <DIR>          $NtUninstallKB888302$
01/21/2005  02:37 PM    <DIR>          $NtUninstallKB889293-IE6SP1-20041111.2356
19$
01/07/2006  11:46 AM    <DIR>          $NtUninstallKB890046$
09/02/2005  03:39 PM    <DIR>          $NtUninstallKB890046_0$
02/12/2005  07:58 PM    <DIR>          $NtUninstallKB890047$
01/21/2005  05:13 PM    <DIR>          $NtUninstallKB890175$
01/21/2005  02:38 PM    <DIR>          $NtUninstallKB890175_0$
05/14/2005  07:07 PM    <DIR>          $NtUninstallKB890859$
05/14/2005  07:08 PM    <DIR>          $NtUninstallKB890923$
01/21/2005  02:38 PM    <DIR>          $NtUninstallKB891711$
02/12/2005  07:59 PM    <DIR>          $NtUninstallKB891781$
05/14/2005  07:08 PM    <DIR>          $NtUninstallKB893066$
05/14/2005  07:08 PM    <DIR>          $NtUninstallKB893086$
09/02/2005  03:40 PM    <DIR>          $NtUninstallKB893756$
09/02/2005  03:39 PM    <DIR>          $NtUninstallKB894391$
01/07/2006  11:46 AM    <DIR>          $NtUninstallKB896344$
09/02/2005  03:39 PM    <DIR>          $NtUninstallKB896358$
09/02/2005  03:40 PM    <DIR>          $NtUninstallKB896422$
09/02/2005  03:40 PM    <DIR>          $NtUninstallKB896423$
01/07/2006  11:48 AM    <DIR>          $NtUninstallKB896424$
09/02/2005  03:39 PM    <DIR>          $NtUninstallKB896428$
10/23/2005  10:05 AM    <DIR>          $NtUninstallKB896688$
09/02/2005  03:39 PM    <DIR>          $NtUninstallKB896727$
09/02/2005  03:28 PM    <DIR>          $NtUninstallKB898461$
09/02/2005  03:40 PM    <DIR>          $NtUninstallKB899587$
09/02/2005  03:39 PM    <DIR>          $NtUninstallKB899588$
10/23/2005  10:05 AM    <DIR>          $NtUninstallKB899589$
09/02/2005  03:40 PM    <DIR>          $NtUninstallKB899591$
08/13/2006  09:32 PM    <DIR>          $NtUninstallKB900485$
10/23/2005  10:05 AM    <DIR>          $NtUninstallKB900725$
01/07/2006  11:46 AM    <DIR>          $NtUninstallKB900930$
10/23/2005  10:06 AM    <DIR>          $NtUninstallKB901017$
09/02/2005  03:39 PM    <DIR>          $NtUninstallKB901214$
03/22/2006  07:55 PM    <DIR>          $NtUninstallKB902344$
10/23/2005  10:05 AM    <DIR>          $NtUninstallKB902400$
10/23/2005  10:04 AM    <DIR>          $NtUninstallKB904706$
03/22/2006  07:57 PM    <DIR>          $NtUninstallKB904942$
10/23/2005  10:05 AM    <DIR>          $NtUninstallKB905414$
10/23/2005  10:04 AM    <DIR>          $NtUninstallKB905749$
01/07/2006  11:53 AM    <DIR>          $NtUninstallKB905915$
01/12/2006  10:58 PM    <DIR>          $NtUninstallKB908519$
08/13/2006  09:29 PM    <DIR>          $NtUninstallKB908531$
01/07/2006  11:49 AM    <DIR>          $NtUninstallKB910437$
08/13/2006  09:35 PM    <DIR>          $NtUninstallKB911280$
08/13/2006  09:32 PM    <DIR>          $NtUninstallKB911562$
03/22/2006  07:56 PM    <DIR>          $NtUninstallKB911564$
03/22/2006  07:55 PM    <DIR>          $NtUninstallKB911565$
08/13/2006  09:29 PM    <DIR>          $NtUninstallKB911567$
03/22/2006  07:55 PM    <DIR>          $NtUninstallKB911927$
03/22/2006  07:57 PM    <DIR>          $NtUninstallKB912475$
01/07/2006  11:53 AM    <DIR>          $NtUninstallKB912919$
03/22/2006  07:57 PM    <DIR>          $NtUninstallKB912945$
03/22/2006  07:56 PM    <DIR>          $NtUninstallKB913446$
08/13/2006  09:29 PM    <DIR>          $NtUninstallKB913580$
08/13/2006  09:30 PM    <DIR>          $NtUninstallKB914388$
08/13/2006  09:29 PM    <DIR>          $NtUninstallKB914389$
04/20/2007  10:10 AM    <DIR>          $NtUninstallKB914440$
04/20/2007  10:11 AM    <DIR>          $NtUninstallKB915865$
08/13/2006  09:29 PM    <DIR>          $NtUninstallKB916595$
08/13/2006  09:32 PM    <DIR>          $NtUninstallKB917159$
08/13/2006  09:30 PM    <DIR>          $NtUninstallKB917344$
08/13/2006  09:30 PM    <DIR>          $NtUninstallKB917422$
08/13/2006  09:36 PM    <DIR>          $NtUninstallKB917734_WMP10$
08/13/2006  09:30 PM    <DIR>          $NtUninstallKB917953$
03/21/2007  10:32 AM    <DIR>          $NtUninstallKB918118$
08/13/2006  09:30 PM    <DIR>          $NtUninstallKB918439$
08/13/2006  09:30 PM    <DIR>          $NtUninstallKB918899$
09/15/2006  07:32 PM    <DIR>          $NtUninstallKB919007$
01/12/2007  02:35 PM    <DIR>          $NtUninstallKB920213$
08/13/2006  09:35 PM    <DIR>          $NtUninstallKB920214$
04/20/2007  09:53 AM    <DIR>          $NtUninstallKB920342$
08/13/2006  09:30 PM    <DIR>          $NtUninstallKB920670$
08/13/2006  09:29 PM    <DIR>          $NtUninstallKB920683$
09/15/2006  07:32 PM    <DIR>          $NtUninstallKB920685$
09/15/2006  07:32 PM    <DIR>          $NtUninstallKB920872$
08/13/2006  09:31 PM    <DIR>          $NtUninstallKB921398$
12/29/2007  08:03 PM    <DIR>          $NtUninstallKB921503$
08/13/2006  09:35 PM    <DIR>          $NtUninstallKB921883$
09/15/2006  07:32 PM    <DIR>          $NtUninstallKB922582$
08/13/2006  09:35 PM    <DIR>          $NtUninstallKB922616$
10/16/2006  09:54 AM    <DIR>          $NtUninstallKB922819$
10/16/2006  09:51 AM    <DIR>          $NtUninstallKB923191$
10/16/2006  09:54 AM    <DIR>          $NtUninstallKB923414$
01/12/2007  02:36 PM    <DIR>          $NtUninstallKB923689$
01/12/2007  02:35 PM    <DIR>          $NtUninstallKB923694$
01/12/2007  02:37 PM    <DIR>          $NtUninstallKB923980$
10/16/2006  09:54 AM    <DIR>          $NtUninstallKB924191$
01/12/2007  02:37 PM    <DIR>          $NtUninstallKB924270$
10/16/2006  09:53 AM    <DIR>          $NtUninstallKB924496$
03/21/2007  10:34 AM    <DIR>          $NtUninstallKB924667$
01/12/2007  02:37 PM    <DIR>          $NtUninstallKB925398_WMP64$
01/12/2007  02:38 PM    <DIR>          $NtUninstallKB925454$
10/07/2006  01:29 PM    <DIR>          $NtUninstallKB925486$
04/20/2007  07:47 PM    <DIR>          $NtUninstallKB925720$
04/20/2007  09:54 AM    <DIR>          $NtUninstallKB925876$
04/20/2007  09:36 AM    <DIR>          $NtUninstallKB925902$
04/20/2007  09:59 AM    <DIR>          $NtUninstallKB926239$
01/12/2007  02:35 PM    <DIR>          $NtUninstallKB926255$
03/21/2007  10:33 AM    <DIR>          $NtUninstallKB926436$
03/21/2007  10:34 AM    <DIR>          $NtUninstallKB927779$
03/21/2007  10:34 AM    <DIR>          $NtUninstallKB927802$
05/31/2007  11:08 PM    <DIR>          $NtUninstallKB927891$
03/21/2007  10:32 AM    <DIR>          $NtUninstallKB928090$
03/21/2007  10:34 AM    <DIR>          $NtUninstallKB928255$
03/21/2007  10:31 AM    <DIR>          $NtUninstallKB928843$
12/29/2007  08:00 PM    <DIR>          $NtUninstallKB929123$
03/21/2007  10:33 AM    <DIR>          $NtUninstallKB929338$
04/20/2007  07:45 PM    <DIR>          $NtUninstallKB929399$
01/12/2007  02:37 PM    <DIR>          $NtUninstallKB929969$
04/20/2007  09:36 AM    <DIR>          $NtUninstallKB930178$
05/12/2007  03:04 PM    <DIR>          $NtUninstallKB930916$
04/20/2007  09:36 AM    <DIR>          $NtUninstallKB931261$
04/20/2007  09:37 AM    <DIR>          $NtUninstallKB931784$
03/21/2007  10:33 AM    <DIR>          $NtUninstallKB931836$
04/20/2007  09:35 AM    <DIR>          $NtUninstallKB932168$
09/17/2008  11:37 AM    <DIR>          $NtUninstallKB932823-v3$
12/29/2007  08:03 PM    <DIR>          $NtUninstallKB933729$
12/29/2007  07:54 PM    <DIR>          $NtUninstallKB935839$
12/29/2007  07:54 PM    <DIR>          $NtUninstallKB935840$
12/29/2007  08:03 PM    <DIR>          $NtUninstallKB936021$
12/29/2007  08:03 PM    <DIR>          $NtUninstallKB936357$
12/29/2007  07:53 PM    <DIR>          $NtUninstallKB936782_WMP11$
12/29/2007  08:04 PM    <DIR>          $NtUninstallKB937894$
09/17/2008  11:37 AM    <DIR>          $NtUninstallKB938464$
12/29/2007  08:03 PM    <DIR>          $NtUninstallKB938828$
12/29/2007  08:03 PM    <DIR>          $NtUninstallKB938829$
12/29/2007  07:55 PM    <DIR>          $NtUninstallKB939683$
12/29/2007  07:55 PM    <DIR>          $NtUninstallKB941202$
12/29/2007  07:55 PM    <DIR>          $NtUninstallKB941568$
12/29/2007  07:59 PM    <DIR>          $NtUninstallKB941569$
01/15/2008  07:12 PM    <DIR>          $NtUninstallKB941644$
12/29/2007  07:59 PM    <DIR>          $NtUninstallKB942763$
12/29/2007  08:04 PM    <DIR>          $NtUninstallKB943460$
01/15/2008  07:12 PM    <DIR>          $NtUninstallKB943485$
12/29/2007  07:53 PM    <DIR>          $NtUninstallKB944653$
09/17/2008  11:44 AM    <DIR>          $NtUninstallKB946648$
09/17/2008  11:37 AM    <DIR>          $NtUninstallKB950749$
09/17/2008  11:40 AM    <DIR>          $NtUninstallKB950762$
09/17/2008  11:41 AM    <DIR>          $NtUninstallKB950974$
09/17/2008  11:39 AM    <DIR>          $NtUninstallKB951066$
09/17/2008  11:40 AM    <DIR>          $NtUninstallKB951072-v2$
09/17/2008  11:45 AM    <DIR>          $NtUninstallKB951376-v2$
09/17/2008  11:41 AM    <DIR>          $NtUninstallKB951698$
09/17/2008  11:38 AM    <DIR>          $NtUninstallKB951748$
12/18/2008  10:16 PM    <DIR>          $NtUninstallKB952069_WM9$
09/17/2008  11:40 AM    <DIR>          $NtUninstallKB952287$
09/17/2008  11:44 AM    <DIR>          $NtUninstallKB952954$
09/17/2008  11:44 AM    <DIR>          $NtUninstallKB953839$
09/17/2008  11:37 AM    <DIR>          $NtUninstallKB954154_WM11$
09/17/2008  11:41 AM    <DIR>          $NtUninstallKB954156_WM9L$
11/08/2008  10:42 AM    <DIR>          $NtUninstallKB954211$
12/18/2008  10:12 PM    <DIR>          $NtUninstallKB954600$
11/21/2008  11:23 AM    <DIR>          $NtUninstallKB955069$
12/18/2008  10:15 PM    <DIR>          $NtUninstallKB955839$
11/08/2008  10:43 AM    <DIR>          $NtUninstallKB956391$
12/18/2008  10:12 PM    <DIR>          $NtUninstallKB956802$
11/08/2008  10:43 AM    <DIR>          $NtUninstallKB956803$
11/08/2008  10:41 AM    <DIR>          $NtUninstallKB956841$
11/08/2008  10:43 AM    <DIR>          $NtUninstallKB957095$
11/21/2008  11:24 AM    <DIR>          $NtUninstallKB957097$
11/08/2008  10:40 AM    <DIR>          $NtUninstallKB958644$
02/14/2009  10:34 AM    <DIR>          $NtUninstallKB958687$
02/14/2009  10:34 AM    <DIR>          $NtUninstallKB960715$
               0 File(s)              0 bytes
             187 Dir(s)  46,294,913,024 bytes free
After I ran Remove Hotfix Backups, Windows Explorer
reported "Free space: 46,308,824 bytes 43.1 GB" and checking for
$NT*KB* directories showed the following:
C:\TEMP>dir /ah \Windows\$NT*KB*
 Volume in drive C is Sys-WinXP
 Volume Serial Number is B0E3-65A7

 Directory of C:\Windows

01/21/2005  02:34 PM    <DIR>          $NtUninstallKB828741$
01/21/2005  02:38 PM    <DIR>          $NtUninstallKB833987$
01/21/2005  02:36 PM    <DIR>          $NtUninstallKB835732$
01/21/2005  02:36 PM    <DIR>          $NtUninstallKB840987$
01/21/2005  02:36 PM    <DIR>          $NtUninstallKB841356$
01/21/2005  02:37 PM    <DIR>          $NtUninstallKB841533$
01/21/2005  01:21 PM    <DIR>          $NtUninstallKB842773$
01/21/2005  02:38 PM    <DIR>          $NtUninstallKB871250$
01/21/2005  02:37 PM    <DIR>          $NtUninstallKB873339_0$
01/21/2005  02:37 PM    <DIR>          $NtUninstallKB873376$
01/21/2005  02:37 PM    <DIR>          $NtUninstallKB885835_0$
01/21/2005  02:38 PM    <DIR>          $NtUninstallKB885836_0$
01/21/2005  02:37 PM    <DIR>          $NtUninstallKB889293-IE6SP1-20041111.2356
19$
09/02/2005  03:39 PM    <DIR>          $NtUninstallKB890046_0$
01/21/2005  02:38 PM    <DIR>          $NtUninstallKB890175_0$
01/21/2005  02:38 PM    <DIR>          $NtUninstallKB891711$
08/13/2006  09:36 PM    <DIR>          $NtUninstallKB917734_WMP10$
01/12/2007  02:37 PM    <DIR>          $NtUninstallKB925398_WMP64$
09/17/2008  11:37 AM    <DIR>          $NtUninstallKB932823-v3$
12/29/2007  07:53 PM    <DIR>          $NtUninstallKB936782_WMP11$
09/17/2008  11:40 AM    <DIR>          $NtUninstallKB951072-v2$
09/17/2008  11:45 AM    <DIR>          $NtUninstallKB951376-v2$
12/18/2008  10:16 PM    <DIR>          $NtUninstallKB952069_WM9$
09/17/2008  11:37 AM    <DIR>          $NtUninstallKB954154_WM11$
09/17/2008  11:41 AM    <DIR>          $NtUninstallKB954156_WM9L$
               0 File(s)              0 bytes
              25 Dir(s)  46,308,941,824 bytes free
I also removed the $NTServicePackUninstal directory under
C:\Windows, which was using 338 MB (355,138,581 bytes) of disk
space and holding 2,457 files, by holding down the Shift key to
ensure the folder wouldn't go into the Recycle Bin, but, instead
would be permanently removed, selected Delete. When asked to confirm
the deletion of an exe file I chose "Yes to All" to avoid further prompts for
the removal of executable files in the directory.
References:
C:\WINDOWS\Downloaded Program Files. You can view
the information through Windows Explorer, or if you want to view
information on what is in that folder from the command line, you can use
show-downloaded-program-files.vbs, which you can run from the command
line with cscript /nologo show-downloaded-program-files.vbs.
[ More Info ]
[ More Info ]
powercfg.cpl. Note: if you aren't logged
into an administrator account when you run it, you can
run it with administrator privileges by obtaining a command
prompt and then taking the following steps:
runas /user:administrator cmd to obtain a command
prompt under the administrator account. Note: you may have to use
owner or some other account in the administrator group,
depending on your particular system, instead of the administrator
account.powercfg.cpl in the new command prompt window that
opens for the administrator account.runas /user:administrator powercfg.cpl. If you try that,
you will get the message " powercfg.cpl is not a valid Win32 application."
For a list of of Control Panel tools and how to run them from the command line, see How to run Control Panel tools by typing a command.
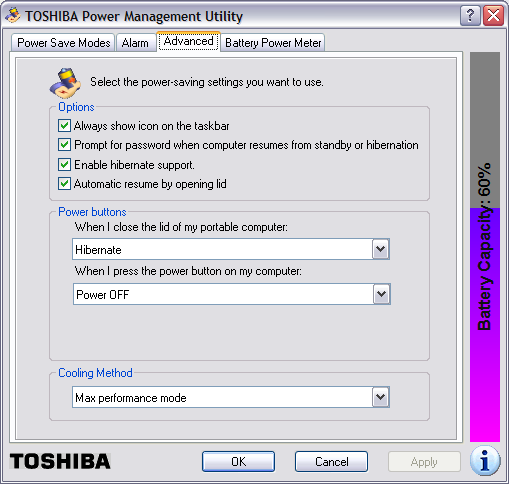
Note: in order to enable hibernate support, you will
need enough free space on the hard drive to hold
the contents of the system's memory. You can determine
the amount of memory in the system by clicking on
Start, selecting Run, typing
winver and hitting Enter.
In the window that then opens, you will see
a value for "Physical memory available to Windows".
You will need that amount of disk space free on the
hard drive, because the contents of memory are written
to the file hiberfil.sys, usually in
c:\hiberfil.sys when the system is put
into hibernation mode. If you don't have at least that amount
of disk space free, you won't be able to enable hibernation
support.
Once hibernation support is enabled, you can put the system into hibernation by clicking on Start, selecting Turn Off Computer, moving the mouse pointer over Stand By, and then hitting the Shift key. The Stand By option should then change to Hibernate, which you can click on to hibernate the computer.
runas command, but there were
times when I also wanted to be able to switch to that account and use it
with a GUI interface,
so I decided to "unhide" the account.
You can use regedit, which provides a
GUI interface for editing the registry or you can use the reg
command at a command prompt to query and modify the registry.
Since I was logged in under an unprivileged account, i.e. one not
in the Administrators group, I first opened a command prompt under
that account and then used the runas command to open another
command prompt under an account in the Administrators group, in
this case the "Owner" account on the laptop.
C:\>runas /user:owner cmd
I then used the reg query command to check the current
registry entry applying to the "owner" account that kept it from being
visible at the welcome screen for Windows XP.
C:\>reg query "hklm\software\microsoft\windows nt\CurrentVersion
\Winlogon\SpecialAccounts\UserList" /v Owner

! REG.EXE VERSION 3.0

HKEY_LOCAL_MACHINE\software\microsoft\windows nt\CurrentVersion\Winlogon\Special
Accounts\UserList
    Owner       REG_DWORD       0x0
A value of zero in the key HKLM\software\microsoft\windows
nt\CurrentVersion\Winlogon\SpecialAccounts\UserList\userid
means the account represented by userid won't be visible at the
Welcome Screen. If you put a value of one there, then the account will be
visible.
I then changed the value with the reg add command. Note: when
using the reg add command, if a value already exists in the
registry for a key, you will be prompted as to whether you want to override
it unless you use the /f option with the command.
C:\>reg add "hklm\software\microsoft\windows nt\CurrentVersion\W
inlogon\SpecialAccounts\UserList" /v Owner /t REG_DWORD /d 1
Value Owner exists, overwrite(Y/N)? y

The operation completed successfully

C:\>reg query "hklm\software\microsoft\windows nt\CurrentVersion
\Winlogon\SpecialAccounts\UserList" /v Owner

! REG.EXE VERSION 3.0

HKEY_LOCAL_MACHINE\software\microsoft\windows nt\CurrentVersion\Winlogon\Special
Accounts\UserList
    Owner       REG_DWORD       0x1
I was then able to use the Windows logo key + L to obtain the welcome screen where I could now see the "Owner" account listed as one of those I could select.
I used the runas command to run the following command
under an administrator account on the system. In this case the "owner"
account was in the administrators group on the system.
C:\>runas /user:owner "RunDLL32 shell32.dll,Control_RunDLL
%SystemRoot%\system32\TIMEDATE.cpl"
That command opened the Date and Time Properties window. When I clicked on the Time Zone tab, I found the time zone set to "GMT-8:00 Pacific Time (US & Canada)", whereas it should have been set to "GMT-5:00 Eastern Time (US & Canda)". I could now change the timze zone.
The time zone can also be specified on the command line rather than
changing it through the Date and Time Properties window.
E.g. the command C:\>runas /user:owner
"RunDLL32 shell32.dll,Control_RunDLL %SystemRoot%\system32\TIMEDATE.cpl,,/Z US
Eastern Standard Time" would allow one to change the time zone to
"(GMT-5:00) Indiana (East)". Of course, you don't need the runas
/user:owner, if you are already logged into the system as an
administrator.
NOTE: You do not encapsulate the time zone string in quotation (") marks.
I have quotation marks around the entire rundll32 command
for entering a command with spaces in it to the runas command.
You can see what the values are that you should use on the command line for
your specific time zone by running regedit and navigating
to HKEY_LOCAL_MACHINE\Software\Microsoft\Windows NT\Current Version\Time
Zones\.
In this case, I needed to use RunDLL32 shell32.dll,Control_RunDLL
%SystemRoot%\system32\TIMEDATE.cpl,,/Z Eastern Standard Time rather
than using "US Eastern Standard Time" to have the time zone be
"(GMT-5:00) Eastern Time US & Canada". The value that appears under the
Time Zone tab in the Date and Time Properties window is what
is listed for the display value under each time zone within
the HKEY_LOCAL_MACHINE\Software\Microsoft\Windows NT\Current
Version\Time Zones\ registry key.
When I changed the time zone, the time changed also to match the time zone
change. I needed to reset it, which I did by opening a command window from
the "owner" administrator account using runas /user:owner cmd.
I then used the time command to reset the time.
References:
![]()
