Thu, Nov 30, 2006 9:10 am
Rdesktop for x86/Solaris 10
Rdesktop for Solaris 10 on the Intel platform is available from
sunfreeware.com at
Freeware for
Solaris.
rdesktop-1.5.0-sol10-x86-local.gz Rdesktop is a client for
Windows terminal servers - installs in /usr/local. You will also need to
install
libiconv,
openssl-0.9.8d, and to obtain /usr/local/lib/libgcc_s.so.1 you will need
to have installed
libgcc-3.4.6 or
gcc-3.4.6 or higher.
rdesktop-1.5.0.tar.gz Source Code.
[Details]
When I checked for libiconv on my Solaris 10 system, I did not find evidence
of its presence.
# find / -name libiconv\*
When I checked which version of OpenSSL I had on the system, I found
I had an older version than the one recommended.
# /usr/sfw/bin/openssl version
OpenSSL 0.9.7d 17 Mar 2004
I also found an older version of libgcc than the one recommended.
# find / -name libgcc\* -print
/usr/sfw/lib/amd64/libgcc_s_amd64.so
/usr/sfw/lib/amd64/libgcc_s.so.1
/usr/sfw/lib/libgcc_s.so
/usr/sfw/lib/libgcc_s.so.1
/usr/sfw/lib/gcc/i386-pc-solaris2.10/3.4.3/amd64/libgcc.a
/usr/sfw/lib/gcc/i386-pc-solaris2.10/3.4.3/amd64/libgcc_eh.a
/usr/sfw/lib/gcc/i386-pc-solaris2.10/3.4.3/libgcc.a
/usr/sfw/lib/gcc/i386-pc-solaris2.10/3.4.3/libgcc_eh.a
I found gcc in /usr/sfw/bin, but it was version 3.4.3, not version 3.4.6
as recommended.
# pkgchk -l -p /usr/sfw/bin/gcc
Pathname: /usr/sfw/bin/gcc
Type: linked file
Source of link: ../../../usr/sfw/bin/i386-pc-solaris2.10-gcc-3.4.3
Referenced by the following packages:
        SUNWgcc
Current status: installed
Since
libgcc-3.4.6 or
gcc-3.4.6
was recommended for libiconv, I installed gcc version 3.4.6 first.
References:
-
Freeware for Solaris
(x86/Solaris 10)
[/os/unix/solaris]
permanent link
Thu, Nov 30, 2006 12:30 am
Printing Problem for Excel Workbooks with Multiple Worksheets Using Acrobat
If you are experiencing problems printing all of the worksheets
in a Microsoft Excel workbook to one PDF file using Adobe Acrobat,
the problem is likely caused by a variation in the "print quality"
setting for the worksheets in the Excel workbook.
You can verify this is the source of the problem by clicking
"File", then selecting "Page Setup" in Excel. With the "Page" tab
selected, you will see the "Print Quality"
setting for the currently selected worksheet. Let's say it
is "300 dpi". But if you select the second worksheet titled "Page 2", when
you take the same steps to view the print quality setting and don't see
the print quality specified or it is different, then the variation in
print quality settings is the source of the problem.
When the print quality settings vary between worksheets in the workbook,
Adobe Acrobat will attempt to create multiple PDF files, one for each
worksheet in the workbook, which is why it will prompt you multiple times
for a file name. If you enter different filenames at each prompt, it will
put each worksheet in a separate file.
To rectify the problem, make the print quality settings the same for each
worksheet. In the case above, you could specify a print quality setting
of 300 dpi for the "Page 2" worksheet as well.
You can change the print quality settings one by one for each worksheet
in the workbook or you can select all of the worksheets at once by
holding down the Ctrl key while clicking on the tabs at the bottom of the Excel
window for the other worksheets one by one to select all of them, if you are working on
a Windows system (you would use the Shift key on an Apple system).
When all the worksheets are selected,
you can release the Ctrl key then click on "File" and "Page Setup"
to specify the print quality settings for all of the worksheets at once.
The minimum dpi for a laser printer is normally 300 dpi and is
probably adquate for most spreadsheets you will print. Adobe uses
600 dpi as the default setting for Adobe Acrobat and Distiller and
recommends that setting, but you can make the setting whatever you
like. The output you will get when printing will depend on whether
the printer selected can actually support the dpi value you've
selected, though.
Once, you have set the print quality settings to be the same for
all worksheets, take the following steps to print the workbook.
- Click on "File".
- Select "Print".
- Select "Adobe PDF" as the printer.
- In the "Print what" section, select "Entire workbook".
You should now have one PDF file containing all of the worksheets.
References:
-
More than one PDF file is created from an Excel workbook (Acrobat 5.0-6.x on Windows or Mac OS)
Adobe Systems Incorporated
[/os/windows/software/pdf]
permanent link
Wed, Nov 29, 2006 9:01 pm
remsh and rsh
The remsh and rsh commands, which are shorhand for "remote shell", can be used
to login to a remote system or execute a command on a remote system. The syntax
for the commands is as follows:
     rsh [-n] [-l username] hostname command

     rsh hostname [-n] [-l username] command

     remsh [-n] [-l username] hostname command

     remsh hostname [-n] [-l username] command

     hostname [-n] [-l username] command
On Solaris systems, rsh and remsh can be used
equivalently. If you are using a Linux system, the rsh command
may be available, but not the remsh command. The Remote Shell
service is even available for Windows systems from Microsoft's Resource
Kit (see
Adding R* to Windows NT by Robert Flannigan). Or commercial
versions are available for Windows 95 and later from
Denicomp Systems (you can download
a time-limited evaluation version).
The following options are supported for rsh and remsh:
     -l username
           Uses username as the remote username instead  of  your
           local  username.  In  the  absence of this option, the
           remote username is the same as your local username.

     -n    Redirects the input of rsh to /dev/null. You sometimes
           need  this  option  to  avoid unfortunate interactions
           between rsh and the shell which invokes it.  For exam-
           ple,  if  you  are running rsh and invoke a rsh in the
           background without redirecting its input away from the
           terminal, it will block even if no reads are posted by
           the remote command.  The -n option will prevent this.
The remsh and rsh commands connect to the specified hostname and
execute the specified command. If no command is entered, i.e.
you use rsh hostname or remsh hostname, you will
be logged into the remote system. The type of remote shell (bash, sh, rsh, or
other) is determined by the user's entry in the file /etc/passwd on the
remote system.
If you have an account on the remote system with the same userid as the
account you are currently using on the local system, you will be prompted
for the password for the remote system and, when the correct password is
supplied, will receive a shell prompt on the remote system where you can enter
commands on the remote system.
bash-2.03$ remsh 192.168.1.6
Password:
Last login: Tue Oct 10 17:07:07 on console
Sun Microsystems Inc.   SunOS 5.10      Generic January 2005
You have new mail.
-bash-3.00$
If you include a command to be executed, then you must have permission to
remotely execute commands. Otherwise you will get a "permission denied"
response from the remote system.
bash-2.03$ remsh 192.168.1.6 uname -a
permission denied
To grant permission for the remote command execution, you can create a
.rhosts file in the home directory of the user account on the remote
system that specifies the hostnames of the systems from which
remote commands can be submitted. For instance, you could put a line with the
hostname mypc.abcd.com in the .rhosts file, if you wanted
to allow commands to be remotely submitted from the system mypc.abcd.com. If
you want to allow connections from multiple systems, put them on separate lines.
-bash-3.00$ cat .rhosts
mypc.abcd.com
mac2.abcd.com
With the above .rhosts file on the remote system, you will be able
to login to the remote system from either mypc.abcd.com or mac2.abcd.com or
submit commands remotely with rsh remotesys or remsh
remotesys given that the remote system you want to log into is named
remotesys and you have the same userid on both systems. You won't need to
enter a password, even if the password on the local system differs from
the password for the remote system.
You can also execute commands on the remote system and see the output on
the local system.
E.g.
bash-2.03$ remsh 192.168.1.6 uname -a
SunOS hofud 5.10 Generic i86pc i386 i86p
Be sure to use the command chmod 600 .rhosts after you
create the .rhosts file so that others can not view its contents.
Shell
metacharacters that are not quoted are interpreted on the local host;
quoted metacharacters are interpreted on the remote host.
E.g.
remsh remotehost cat remotefile >> localfile
will append the remote file remotefile to the local file
localfile, while the command line
remsh remotehost cat remotefile ">>" otherremotefile
appends remotefile to the remote file otherremotefile.
If you wish to login using a different userid, e.g. jsmith on the remote system,
then you can use the -l option to specify a userid other than
the one you are logged in under on the local system. You will be prompted for
the password for that account.
# remsh -l jsmith 192.168.1.6
Password:
You won't be able to remotely execute commands, however, if you are using
an account that doesn't match the userid on the remote system even with the
-l option, if that account is not listed in the
.rhosts file. You will get a "permission denied" error.
# remsh -l jsmith 192.168.1.6 uname -a
permission denied
You can fix that problem by adding the account to the rhosts file. For instance,
suppose I am logged into the root account on the local system, but I want to
execute a command on the remote system as the user jsmith. I can edit the
.rhosts file on the remote system to contain the following 2 lines.
-bash-3.00$ cat .rhosts
mypc.abcd.com
mypc.abcd.com root
Now, supposing I have a userid jsmith on both systems that is my regular
user account, I can execute commands while logged into the local system as
jsmith or root. The first line in the .rhosts file doesn't have
any username specified, so it will cover instances where the userid matches
on both systems. The second line will allow me to specify commands to be
run under the jsmith account on the remote system while I am logged into
the local root account as shown below.
# remsh -l jsmith 192.168.1.6 pwd
/home/jsmith
As an alternative to using an .rhosts file in the home directory
of an individual account on the remote system, you can create a
hosts.equiv account in the /etc directory of the remote
system, if you have root access on that system. Again, you should change
the protection on the file after you have created it with
chmod 600 /etc/hosts.equiv, so that not everyone on the system
can read its contents.
You would use the same type of entries in that file as in the .rhosts
file. E.g., to allow user jsmith to connect from mypc.abcd.com, you would
would have the following /etc/hosts.equiv file.
# cat /etc/hosts.equiv
mypc.abcd.com jsmith
When you use rsh or remsh to remotely login to
a system, you will be connected to
TCP port 513.
E.g., if you issued the command
remsh 192.168.1.6 from the system with IP address 192.168.1.1,
you would see the following connection established.
-bash-3.00$ netstat -an | grep 51[34] | grep ESTABLISHED
192.168.1.6.513      192.168.1.1.1023      8760      0 49640      0 ESTABLISHED
The source system is 192.168.1.1 and it has a connection to port 513 on
192.168.1.6. The source port on 192.168.1.1 is 1023.
If you are specifying a command with the rsh or remsh
commands, then a TCP connection is established to port 514 on the remote system.
You can confirm that connection by using the sleep command.
# remsh -l jsmith 192.168.1.6 sleep 180
The above command will execute the sleep command on the remote
system using the jsmith account to execute the command. The argument of
180 tells the sleep command to suspend execution for 180 seconds. I.e. it
justs pauses for 3 minutes.
If you were logged into the remote system in another window, you could then
check network connections. This time, instead of a connection to port 513,
there is one to TCP port 514. Again the source system from which the
sleep command was submitted is 192.168.1.1 and the remote system is 192.168.1.6.
bash-3.00$ netstat -an | grep 51[34] | grep ESTABLISHED
192.168.1.6.514      192.168.1.1.1023      8760      0 49640      0 ESTABLISHED
Keep in mind that rsh and remsh don't encrypt
any of the data flows. Though you may not be entering passwords when you
have access permitted through an .rhosts or /etc/hosts.equiv
file, the input and output is in clear text, i.e. can possibly be viewed by
others on the network. The SSH
and scp commands
are secure alternatives, since they encrypt userids, passwords, and all data
between the remote and local systems.
References:
-
rsh or remsh Command
-
Unix Manual Page for remsh
-
Configuring .rhosts
-
hosts.equiv, rhosts
-
remsh(1)
-
hosts.equiv(4)
-
remsh and the port number ?
-
UNIX Shell
Metacharacters
-
Adding R* to Windows NT
By Robert Flanagan
[/os/unix/commands]
permanent link
Tue, Nov 28, 2006 10:08 pm
Creating a Socks Proxy Server with SSH
If you would like to browse the web without revealing your actual IP address
to the websites you visit, you can use
SSH to set up a
SOCKS proxy server.
Many web browsers, e.g. Internet Explorer, Mozilla, etc., can be configured
to use a SOCKS proxy server. Other network applications which support the
SOCKS protocol can also be configured to route their communications through
a SOCKS proxy server.
By tunneling the SOCKS connections through an SSH connection, though, you can
encrypt network traffic between the applications using SOCKS on your client
system and the SOCKS proxy server so that others on the same network as your
client system can not observe the traffic.
To set up a SOCKS server tunnel with SSH, issue the command ssh -ND
n user@server where "n" is the port number you wish to use and
"user@server" is a userid for your account on "server", which is an SSH
server. For instance, ssh -ND 1080 jsmith@abcd.com would
establish a SOCKS proxy server on
TCP
port 1080 on the SSH server abcd.com where you are logging in with the account
jsmith. When you issue the command, you will be prompted for the password for
the jsmith account. After you enter the password, you won't get a shell
prompt from abcd.com, but you should then be able to configure your web
browser to use the SOCKS proxy server running on abcd.com on port 1080. Port
1080 is the default port for the SOCKS protocol, but you can use any port
(it will have to be a port above 1024, if you are not the root user). For
instance ssh -ND 5555 jsmith@abcd.com would work just as well.
You simply have to specify the selected port when configuring the applications
that will use the SOCKS connection, such as your web browser. When the SOCKS
proxy server is set up on abcd.com, only you will be able to use it through
your tunneled SSH connection.
Configuring Browsers to Use SSH SOCKS Proxy Server
Internet Explorer 6.0
Firefox 2.0
Mozilla 1.7
If you want to verify that your web browser is now routing its communications
through the SOCKS proxy server you can go to a website that will show the
IP address websites are seeing for your system. For instance,
www.showmyip.com will show your IP
address. It should now show the IP address of abcd.com.
When you want to stop routing your browsers communications through the
SOCKS proxy server, you can simply revert to the previous browser configuration.
Note: though your browser will now be receiving content from websites you visit
through the SOCKS proxy server running on abcd.com and transmitting any input
you provide to those websites through the SOCKS proxy server also, your
client system, i.e. the system on which you ran the ssh -ND 1080
jsmith@abcd.com will still be looking up IP addresses for the websites
you visit through the DNS servers specified on the client system when the
SOCKS version 4 protocol is used. E.g., if
you run the ssh command from mypc.mycompany.com, if you visit www.xyz.org, any
content on the website www.xyz.org will be encrypted
between the client system, mypc.mycompany.com and the SOCKS server, abcd.com,
so no one else at mycompany.com will be able to observe the traffic using
a sniffer. All that any
network administrator will know is that you have a connection to abcd.com.
However, mypc needs to translate the name www.xyz.org to its IP address. So
mypc will need to query a local name server, e.g. mycompany.com name servers,
to perform that translation. So someone sniffing traffic from/to mypc would
see it perform a lookup of the IP address for www.xyz.org.
I've found this procedure works when the SSH server is running
OpenSSH, even
OpenSSH for Windows.
It also worked when I tried connecting to a Sun Solaris 2.7 system running
Sun_SSH_1.1.
References:
-
SOCKS
Wikipedia
-
Tunnel Everything through SSH
By Julius Plenz
March 2, 2006
[/network/proxy]
permanent link
Tue, Nov 28, 2006 7:13 pm
Determine Microsoft Office Version Via Script
I needed to determine which version of Microsoft Office is present on multiple
computers in order to determine whether the systems have Microsoft Access
installed on them. Access is present in the "Professional" and "Premium"
versions of Microsoft Office, but not the "Small Business Edition".
I used a VBScript,
office_versions.vbs to query the systems
to determine which version of Office is installed on them. A limitation of
the script is that it can only be expected to work on Windows XP systems.
[ More Info ]
[/os/windows/office]
permanent link
Tue, Nov 21, 2006 3:18 pm
HP Color LaserJet 3500 Doesn't Support Postscript
I wanted to be able to print from my Solaris system to an HP Color LaserJet
3500 printer. HP's website states that the HP Color LaserJet 1500, 2600n,
3500, and 3550 series printers are "host based" printers and don't support
HP's
PCL nor the
postscript language. What this means is that HP has simplified the design
of the printers to reduce their cost by not incorporating support for those
common printer languages in those printers. Instead, the host is expected
to rasterize the output of applications so that those printers essentially
receive an image, i.e. a bitmapped or raster image, of what is to be printed.
Thus most of the processing needed to print information is expected to be done
in the host, i.e. the system sending the print job to the printer, rather
than in the printer itself.
HP states the following in regards to host-based printing:
Host-based printing requires a software print engine in the host operating
system, and unlike a PDL (Printer Description Language) printer, cannot accept
ASCII text direct from a computer. This means that the Host based printer will
only work in the Windows and Macintosh environments that are specifically
supported with the print engine written for that environment. Users of
unsupported Windows and Macintosh environments, as well as users of Linux, Unix,
OS/2 should consider a PDL printer like the HP Color LaserJet 2550 or CLJ3700.
The HP Color LaserJet 3500 printer I wanted to use belongs to someone else.
When I looked at it, it appeared to be a hefty printer; I didn't realize it
was a low-end printer until I checked on whether it supported postscript.
On its
HP Color LaserJet 1500, 2600n, 3500 and 3550 Series Printers -
Host-based Printing Strategy webpage, HP states in the "Limitations of
Host-Based Printing" section that "Host-based printers are
excellent small workgroup printers suitable for Windows and limited Mac printing
to include internet and typical office printing but NOT EPS file printing."
References:
-
HP Color LaserJet 1500, 2600n, 3500, and 3550 Series Printers - PCL and
Postscript Printer Language Support on Host Based Printers
-
HP Color LaserJet 1500, 2600n, 3500 and 3550 Series Printers -
Host-based Printing Strategy
[/os/unix/solaris]
permanent link
Thu, Nov 16, 2006 5:52 pm
Resetting the Root Password on a Solaris System
If you have forgotten the password for the root account on a Solaris system, as
I did, you can hit the
Stop and
A keys to get to the Open
Boot Prompt (OBP) and then use
boot cdrom -s to boot from
a Solaris boot CD. You can then mount the root partition of the boot disk and
edit the /etc/shadow file to temporarily remove the password from the
account.
[ More Info ]
[/os/unix/solaris]
permanent link
Sat, Nov 11, 2006 2:35 pm
Backup Failure Because of 4 GB File Size Limitation
I found this morning that a backup I had run to backup the Exchange
Information Store on a Windows server had failed because I was backing
up the data to an external
USB
drive that was formatted with the
FAT32 filesystem rather than the
NTFS filesystem. The Exchange
Information Store .edb file was about 18 GB in size, but FAT32 volumes don't
support files sizes greater than 4 GB.
[ More
Info ]
[/os/windows/utilities/backup/ntbackup]
permanent link
Tue, Nov 07, 2006 10:56 am
Palm Won't HotSync
I periodically have problems HotSyncing my Palm
PDA with my Windows
Small Business (SBS) 2003 server via a
USB connection. I plug the USB
charging/synchronizing device into a USB port on the system and plug the
Palm into the other end of the cable. The green light on the Palm lights and
it charges, but it won't synchronize. It is as if the Palm wasn't really
connected when I try to synchronize it.
I've found I can get synchronization to work again by going into the Device
Manager and then disabling the Standard Enhanced PCI to USB Host
Controller and then re-enabling it. You can do so by the following
procedure:
- Click on Start.
- Type devmgmt.msc and hit enter.
- Within the Device Manager, scroll down to the Universal Serial
Bus controllers section and click on the "+" sign to the left of
that section to expand it.
- Right-click on Standard Enhanced PCI to USB Host Controller
and choose Disable.
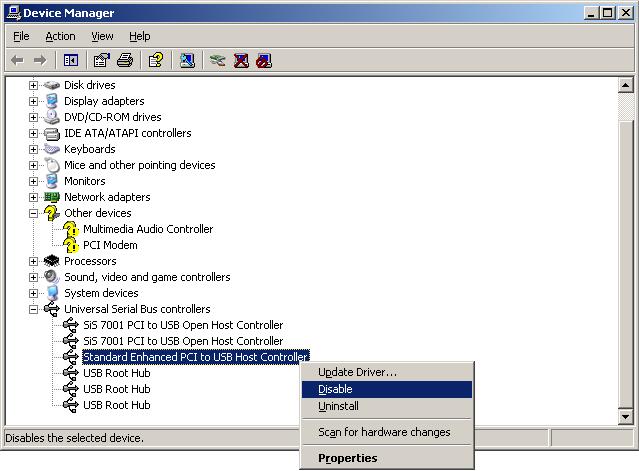
- You will see a warning that "Disasbling the device will cause it to
stop functioning." Click on Yes to disable it.
- After the entry shows a red "X" through it indicating it is disabled,
right-click on it again and select, Enable.
I've found that once I've disabled and re-enabled the USB controller, I can
then successfully HotSync from the Palm.
[/pda/palm]
permanent link
Sun, Nov 05, 2006 10:55 pm
Displaying the Modification Time for a Webpage with PHP
You can display the last time a webpage was modified by including the
following PHP code on a webpage:
<?php

$thisfile = pathinfo($_SERVER['PHP_SELF']);

echo "Last modified: ".date("l jS F Y g:ia",
filemtime($thisfile["basename"]));

?>
Note: your webpage must have a .php extension rather than .htm or .html
and your webserver must provide
PHP support in order for the code to work.
The above code would display the date and time the webpage was modified in
the format below:
Last modified: Sunday 5th November 2006 8:57pm
The options to the PHP date function above are encluded in parentheses.
Within the parentheses the first argument is the date format to be used,
which is followed by a comma and then the time value to be formatted. In this
case the time value to be formatted is the file modification time,
filemtime of the webpage.
The lowercase "L" will display the day of the week, e.g. "Sunday". The lowercase
"j" displays the day of the month without leading zeros, e.g. "5". Putting the
"S" immediately after it displays two characters for the English ordinal suffix
for the day of the month. In the case above it causes the "th" to be put after
the "5". The "F" displays the full month name, e.g. "November" and the "Y"
displays the year as 4 digits, e.g. "2006". The "g" displays the hour in 12
hour format without leading zeros, e.g. "8" in the above case. It is followed
by a colon and then the "i" displays the minutes with leading zeros, e.g.
"07" or in this case "57". The "a" displays a lowercase "am" or "pm" as the
case may be.
The characters you can use to control the display of the date are as
follows:
| a |
'am' or 'pm' |
| A |
'AM' or 'PM' |
| B |
Swatch Internet time |
| d |
day of the month, 2 digits with leading zeros; i.e. '01' to
'31' |
| D |
day of the week, textual, 3 letters; i.e. 'Fri' |
| F |
month, textual, long; i.e. 'January' |
| g |
hour, 12-hour format without leading zeros; i.e. '1' to '12' |
| G |
hour, 24-hour format without leading zeros; i.e. '0' to '23' |
| h |
hour, 12-hour format; i.e. '01' to '12' |
| H |
hour, 24-hour format; i.e. '00' to '23' |
| i |
minutes; i.e. '00' to '59' |
| I (capital i) |
'1' if Daylight Savings Time, '0' otherwise. |
| j |
day of the month without leading zeros; i.e. '1' to '31' |
| l (lowercase 'L') |
day of the week, textual, long; i.e. 'Friday' |
| L |
boolean for whether it is a leap year; i.e. '0' or '1' |
| m |
month; i.e. '01' to '12' |
| M |
month, textual, 3 letters; i.e. 'Jan' |
| n |
month without leading zeros; i.e. '1' to '12' |
| r |
RFC 822 formatted date; i.e. 'Thu, 21 Dec 2000 16:01:07 +0200'
(added in PHP 4.0.4) |
| s |
seconds; i.e. '00' to '59' |
| S |
English ordinal suffix, textual, 2 characters; i.e. 'th',
'nd' |
| t |
number of days in the given month; i.e. '28' to '31' |
| T |
Timezone setting of this machine; i.e. 'MDT' |
| U |
seconds since the epoch |
| w |
day of the week, numeric, i.e. '0' (Sunday) to '6' (Saturday) |
| Y |
year, 4 digits; i.e. '1999' |
| y |
year, 2 digits; i.e. '99' |
| z |
day of the year; i.e. '0' to '365' |
| Z |
timezone offset in seconds (i.e. '-43200' to '43200'). The
offset for timezones west of UTC is always negative, and for those east
of UTC is always positive. |
For another example, using the following code woulld display
the same date as above as Sunday November 5, 2006 8:57 PM
instead.
<?php

$thisfile = pathinfo($_SERVER['PHP_SELF']);

echo "Last modified: ".date("l F j, Y g:i A",
filemtime($thisfile["basename"]));

?>
You can put the code in a PHP file that can be included in every webpage,
so that if you decide to change the format of the displayed date, you don't
have to modify every web page that you have on your website. For instance,
I include a "footer.php" file in webpages using
incfile.
References:
-
php displaying last modification time
thescripts developer community
July 17, 2005
-
PHP:date - Manual
The PHP Group
September 28, 2006
-
PHP Date()
W3Schools
-
Date Format php for month day year and time formatting
Plus2net
-
Including Files in a Web Page with PHP
MoonPoint Support
February 8, 2006
[/languages/php]
permanent link

Privacy Policy
Contact

