←June→
| Sun |
Mon |
Tue |
Wed |
Thu |
Fri |
Sat |
| |
1 |
2 |
3 |
4 |
5 |
6 |
| 7 |
8 |
9 |
10 |
11 |
12 |
13 |
| 14 |
15 |
16 |
17 |
18 |
19 |
20 |
| 21 |
22 |
23 |
24 |
25 |
26 |
27 |
| 28 |
29 |
30 |
|
|
|
|
|
|
Wed, Apr 22, 2020 4:44 pm
Disabling the execution of JavaScript in Foxit Reader
If you are concerned about malicious
JavaScript
being hidden inside a PDF file, you can upload the file to Google's
VirusTotal site which will scan
the file with many antimalware programs. The scan results will show if
any of the dozens of antivirus programs the site uses in its scans have
detected malware in the file. However, for additional security, you may
want to know if the file contains code that will automatically be executed
when you open the file in a PDF viewer or if it contains embedded JavaScript.
The VirusTotal site will provide that information. For PDF files, you will
see "pdf" displayed in a gray oval underneath the file that was scanned. If
there is code within the PDF file that will automatically be executed when
you open the file, next to that oval will be another one with "autoaction"
in it. Embedded JavaScript is denoted by an oval with "js-embedded" within
it. Just because you see "autoaction" or "js-embedded" doesn't mean the
JavaScript is malicious, but if you want to ensure any malicious JavaScript
isn't executed, if you are using the
Foxit Reader
program to view PDF files, you can disable its execution of JavaScript.
To disable the execution of JavaScript in Foxit Reader Version 5.3.1.0606,
take the following steps:
- From the menu at the top of the Foxit Reader window,
click on Tools and select Preferences.
-
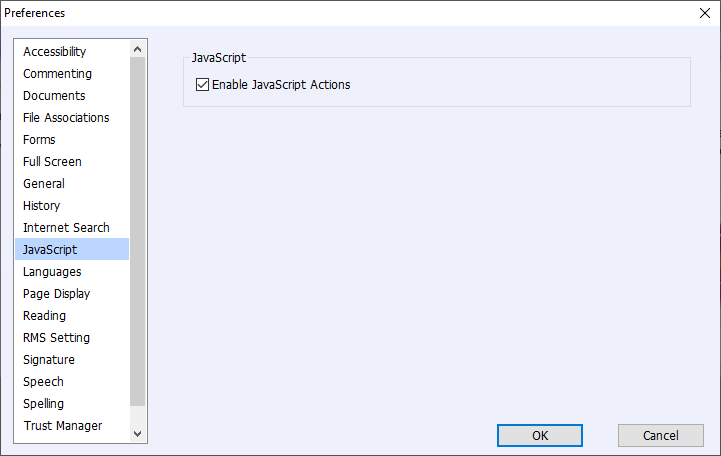
Click on JavaScript on the left side of the Preferences
window that will open and then uncheck the check box for "Enable JavaScript
Actions."
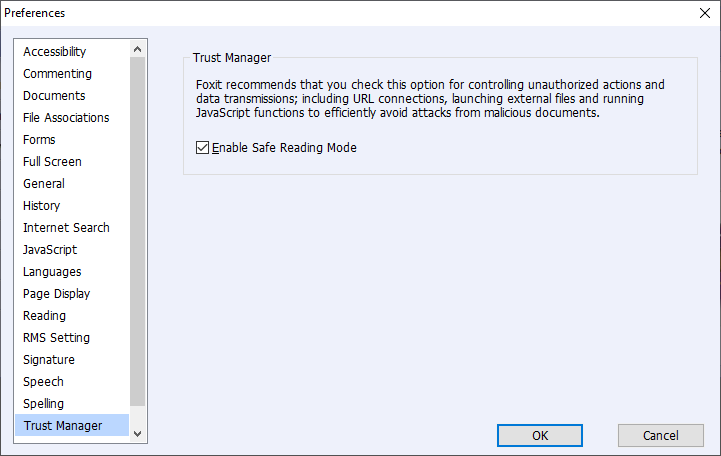
Also click on Trust Manager from the Prferences menu
and make sure that the "Enable Safe Reading Mode" check box is checked.
In the description of that setting, you will see "Foxit recommends that you
check this option for controlling unauthorized actions and data transmissions;
including URL connections, launching external files and running JavaScript
functions to efficiently avoid attacks from malicious documents."
[/os/windows/software/pdf/Foxit]
permanent link
Sat, Jun 11, 2016 10:59 pm
FreePDF Printer Driver
Microsoft Windows versions prior to version 10 don't come with a built-in
printer driver to create Portable Document Format (PDF) files from any
application. You can find many free PDF printer driver programs on the Internet
for Microsoft Windows systems, but you need to be very careful when installing
many of them, since they come bundled with adware, though, if you choose a
custom installion when installing the software, you may be able to avoid
the adware being installed along with the software you want. E.g., the
February 8, 2014 article
Controversial Advertising Program Now Being Embedded in More Software
mentions that
PrimoPDF,
which I've used in the past, is bundled with
OpenCandy, adware
software that many antivirus programs will flag. If you are careful during the
installation, you should be able to avoid having any OpenCandy software
installed as well as the PDF printer driver, though. PrimoPDF is not the
only printer driver utility for Microsoft Windows systems that comes bundled
with adware, though. The August 20, 2014 article by Justin Pot titled
7 Best Tools To
Print To PDF lists other tools that will allow you to print to PDF from
any application on a Microsoft Windows system that also come with
adware, aka "crapware", e.g.
CutePDF, which I've also used previously. Again, if you are careful
during installation, you should be able to avoid installing the other sofware,
though.
If you would like to avoid having to worry about inadvertently installing
adware with such a tool, though, Stefan Heinz offers a free program,
FreePDF, which I've used on a Microsoft
Windows 8 system, that provides a printer driver that will allow you
to print from any application run under Microsoft Windows to a PDF
file. Unlike much of the other free PDF printer driver software, you
don't need to worry about adware being installed with the software. The
developer states at What
is FreePDF:
Freepdf.exe really is free - no hidden costs and no advertising. No spyware, no
automatic updates. Simply because I also do not like this in other "freeware".
[ More Info ]
[/os/windows/software/pdf]
permanent link
Sun, Apr 03, 2016 8:47 pm
Sending an Email from Adobe Acrobat DC using Thunderbird
Yesterday, someone reported to me that she was unable to send a document
she had scanned from within Adobe Acrobat using Thunderbird, which is
the email client she uses on her Microsoft Windows 10 desktop system. She
said she had contacted Adobe support and followed the instructions given
to her by the support person, but those instructions had not resolved
the problem and she still could not send email from within Adobe Acrobat.
I found the problem was due to Acrobat attempting to use the default mail
application on the system, which was Microsoft Outlook, which she didn't
use, so was likely not even configured for an email account. After I made
Thunderbird the default mail application on her system, she was able to
send a file she had open in Acrobat via email from within Adobe Acrobat
using Thunderbird.
[ More Info ]
[/os/windows/software/pdf/acrobat]
permanent link
Sun, Mar 01, 2015 9:56 pm
Adobe Acrobat - Import trusted certificates from prior version
When I upgraded Adobe Reader on a user's Microsoft Windows 7 system from
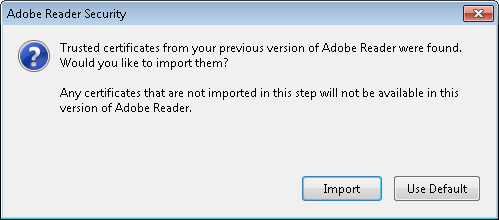
version X (10.1.12) to XI (11.0.10), I saw an Adobe Reader Security
window open with the following prompt when I started Adobe Reader 11
from the administrator account after upgrading the software:
Trusted certificates from your previous version of Adobe Reader were found.
Would you like to import them?
Any certificates that are not imported in this step will not be available in
this version of Adobe Reader.
At
Security (Digital Signatures), I found the following explanation in
the Addressbook Import section:
The address book stores data for certificates used in digital signature and
certificate encryption workflows. During a major upgrade (e.g. 10.x to 11.x),
the product looks for existing address books on each user machine. Prior to
install, you should decide whether to deploy a generic, enterprise address book
or let the existing address book on each machine be imported into the new
product. By default, when end users first launch the product, the application
prompts them to import any discovered address book. The application looks for
existing addressbooks from previous product versions by searching directories
in this order.
- (root)\AppData\Roaming\Adobe\Acrobat\11.0\addressbook.acrodata
- (root)\AppData\Roaming\Adobe\Acrobat\10.0\addressbook.acrodata
- (root)\AppData\Roaming\Adobe\Acrobat\9.0\addressbook.acrodata
- (root)\Program Files (x86)\Adobe\Acrobat {current version such as
11.0}\Acrobat\Replicate
I checked to see if any of the files existed from prior versions for the
administrator account, but didn't see any.
C:\>echo %APPDATA%
C:\Users\Administrator\AppData\Roaming

C:\>dir %APPDATA%\Adobe\Acrobat\11.0\addressbook.acrodata
 Volume in drive C is OS
 Volume Serial Number is 4445-F6ED

 Directory of C:\Users\Administrator\AppData\Roaming\Adobe\Acrobat\11.0

File Not Found

C:\>dir %APPDATA%\Adobe\Acrobat\10.0\addressbook.acrodata
 Volume in drive C is OS
 Volume Serial Number is 4445-F6ED

 Directory of C:\Users\Administrator\AppData\Roaming\Adobe\Acrobat\10.0

File Not Found

C:\>dir %APPDATA%\Adobe\Acrobat\9.0\addressbook.acrodata
The system cannot find the file specified.

C:\>
I didn't see any for the administrator's account, so then checked the
user's account, but did not see any there, either.
C:\>dir \Users\Pamela\AppData\Roaming\Adobe\Acrobat\9.0\addressbook.acrodata
 Volume in drive C is OS
 Volume Serial Number is 4445-F6ED

 Directory of C:\Users\Pamela\AppData\Roaming\Adobe\Acrobat\9.0

File Not Found

C:\>dir \Users\Pamela\AppData\Roaming\Adobe\Acrobat\10.0\addressbook.acrodata
 Volume in drive C is OS
 Volume Serial Number is 4445-F6ED

 Directory of C:\Users\Pamela\AppData\Roaming\Adobe\Acrobat\10.0

File Not Found

C:\>dir \Users\Pamela\AppData\Roaming\Adobe\Acrobat\11.0\addressbook.acrodata
The system cannot find the file specified.

C:\>
Since the system had Adobe Acrobat 9.0 on it for creating PDF files as well
as now having Adobe Reader 11.0, I checked the last directory in the list of
possible locations as well, but didn't see anything there, either.
C:\>dir "c:\program files (x86)\Adobe\Acrobat 9.0\Acrobat\Replicate"
 Volume in drive C is OS
 Volume Serial Number is 4445-F6ED

 Directory of c:\program files (x86)\Adobe\Acrobat 9.0\Acrobat

File Not Found

C:\>
So it seems the prompt may appear even if there are no prior certificates
to import. I clicked on the Import button anyway, though.
[/os/windows/software/pdf/acrobat]
permanent link
Wed, Dec 12, 2012 10:24 pm
Configure Presets for Scanning With Adobe Acrobat X
If you have a scanner attached to your system,
Acrobat X Standard
provides the capability to scan documents directly
into PDF files. To do so, take the following steps:
- Open Adobe Acrobat.
- Click on File.
- Select Create.
- Select PDF from Scanner.
- You can then choose whether you want to scan in
color or black and white or have the software "Autodetect Color Mode".
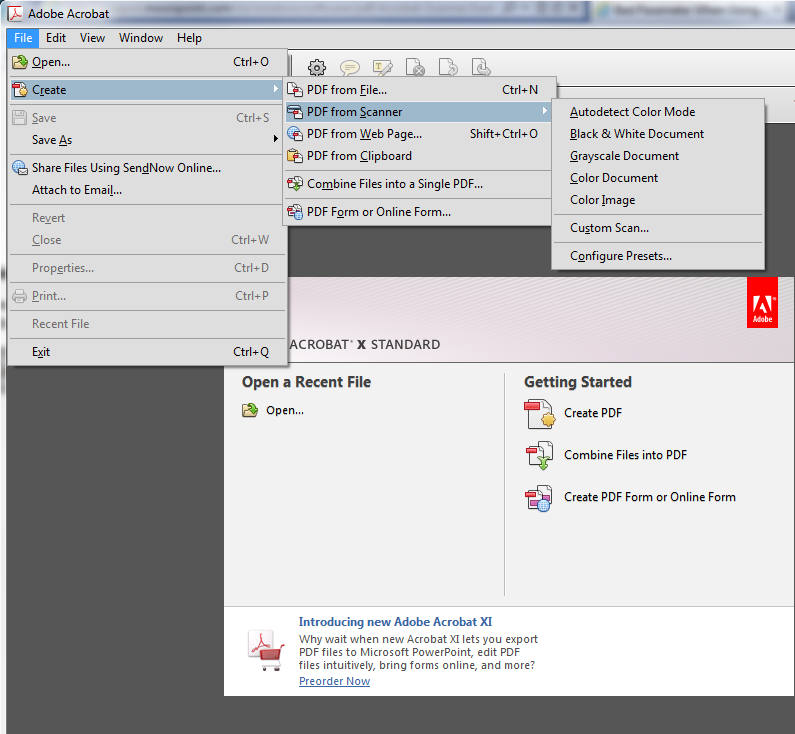
Acrobat has some preset configurations from which you can choose. The choices
available to you are as follows:
- Autodetect Color Mode
- Black & White Document
- Grayscale Document
- Color Document
- Color Image
If you wish to adjust the settings for any of those preset scan configuration
optsions for certain scans you perform regularly, follow the above steps, but
instead of picking the color mode at the last step above, choose
Configure Presets.
That will open a Configure Presets window where you can
adjust settings for a particular color mode choice. You can change the
resolution, the quality of scanned images (higher quality equates to
larger file size), whether you are prompted for scanning more pages into
one PDF document, etc. E.g., if you wanted to have 300 DPI, the highest
available image quality, have Acrobat prompt you for scanning
more pages, but not run Optical Character Recognition (OCR), you would select
settings as shown below:

When you have adjusted the settings appropriately, click on
Save and then Close.
Reference:
-
Scan a paper document to PDF
Date: February 3, 2012
[/os/windows/software/pdf/acrobat]
permanent link
Wed, Dec 12, 2012 10:15 pm
Dealing with the bad parameter message when attempting to scan with Acrobat
When I attempted to use
Acrobat X Standard to scan a document
from an HP LaserJet 3052 scanner, I received a "bad parameter" error message.
I've posted the steps
here
for dealing with the issue.
I needed to use the Adobe Acrobat X software for scanning rather than the
Windows® Fax and Scan utility that came with Microsoft Windows 7 because
that software doesn't provide the capability to scan multiple pages into
one file nor even provide the capability to save the scanned image to
a PDF file. It also doesn't allow one to create presets where you select
a preset configuration, e.g., color and 200 dpi, for certain documents you
may scan regularly, whereas Adobe Acrobat X does provide that capability.
I was able to scan documents using Adobe Acrobat X and the HP LaserJet
3052 printer/scanner/copier, however, unlike with the Windows® Fax
and Scan utility, they always looked garbled when scanned on the Windows
7 system.
[/os/windows/software/pdf/acrobat]
permanent link
Mon, Aug 11, 2008 6:33 pm
Password Protecting a PDF File in Adobe Acrobat
Acrobat supports public/private key encryption, but if you don't have
a security certificate for another party to whom you are going to provide
the encrypted document, then you need to use the
"shared secret", i.e. password, approach for encrypting a PDF file where
you specify a password for the document and give that password to the
other party by some means other than email, e.g. by phone.
You can use the method outlined by Adobe in
Set passwords for PDFs to password protect PDF files that you
will then email to others.
The article mentions that PDF documents can have two types of passwords:
- User, aka "document open", password
- Pemissions, aka "master", password, which provides access controls for the
PDF document
To keep unauthorized individuals from viewing a PDF file, employ a "user"
password. The other type of password, which you might also want to use in
some cases, controls what recipients can do with a document.
Note: there are low-cost tools readily available online to remove that
type of password from a PDF file. There are also low-cost programs readily
available to defeat the first type of password unless you pick a strong
password, i.e. one that is not a dictionary word, car name, sports team,
person's name, etc. There are plenty of password dictionaries available to
allow people to crack weak passwords. Any password protection scheme is
virtually worthless, if someone picks a weak password. A strong password
should have at least 8 characters with a combination of characters from
at least 3 character sets. Character sets include those below:
- Upper case letters
- Lower case letters
- Numbers
- Special characters, such as "!", "-", "_", "$", etc.
Open the file you want to protect in Adobe Acrobat and follow the instructions
below for encrypting and password protecting the file.
- Click the secure button
 in the Tasks
toolbar and choose Password Encrypt.
in the Tasks
toolbar and choose Password Encrypt.
- Click on Yes when prompted "Are you sure you want to change
the security on this document?" If necessary, type the Permissions password
that lets you change security settings. If you don't know the password, contact
the author of the PDF file.
- In the Password Security - Settings dialog box set the security options
as desired. For the Compatibility setting, "Acrobat 5.0 or later"
is the default option. That will provde 128-bit
RC4 encryption. Selecting
"Acrobat 3.0 or later", instead, will mean that users of older versions of
Acrobat will be able to open the file, if they know the password, but I
would strongly advise against choosing that option, if you need to guarantee
that only someone who has been given the password can open it.
If that option is selected, a 40-bit encryption scheme is used instead of
128-bit encryption. Even with a strong password, if you use 40-bit encryption,
there are plenty of low-cost programs available online for anyone to easily
break the password protection. With 128-bit protection, you can be confident
that the protection will likely remain unbreakable for years to come (eventually
increases in computing speeds, or the development of
quantum computers,
will likely render even that level of encryption breakable).
- Specify a password, click OK and then OK again.
- Save the file
Note: these instructions were written specifically for Adobe Acrobat
8 Standard edition, but will likely be similar for other versions.
[/os/windows/software/pdf]
permanent link
Wed, Feb 13, 2008 3:41 pm
PrimoPDF Producing Zero Byte Files
I installed
PrimoPDF 3.0 on a system.
PrimoPDF provides free PDF converter software that will allow you to
"print" documents to a PDF file. After installing the software,
I could print to PDF files without a problem from the administrator account
from which I installed the software, but when I printed to a PDF file using
the PrimoPDF "printer", I would receive the error message below:
| Adobe Reader |
Adobe Reader could not open 'http.pdf' because it
is either not a supported file
type or because the file has been damaged (for example, it was sent as an
email attachment and wan't correctly decoded).
OK
|
When I checked the PDF files produced by PrimoPDF, I found they were always
zero bytes in size. When the files were being produced I would hear an
error beep.
An
Error after converting posting at the
PrimoPDF Forums, suggested giving the
Users group on the system full control of the directory into which PrimoPDF
is installed.
From the Windows Explorer, I right-clicked on the directory under
Program Files into which I had installed PrimoPDF and chose
Properties. I saw that the Users group had only read access, i.e. only
the read & execute, list folder contents, and read permissions were granted
to the Users group for that folder.
Note: you can use the cacls command to check permission from
the command line, e.g. cacls "\program files\primopdf", if
the installation directory was \program files\primopdf. You
will see BUILTIN\Users:(OI)(CI)R. The R at the
end indicates that the Users group on the system, to which all normal user
accounts belong, has only read access to that directory.
If you are logged into an account that is a member of the Administrators
group on the system, you can right-click on the directory and choose
Properties to reset the security permissions. Click on the
Security tab, then select the Users group under "group or user
names", then grant Full Control.
Since I was logged into a normal user account at the time I encountered
the problem and had a lot of windows open and didn't want to have to close
all of them, logoff, logon as an administrator, logoff, logon to my user
account again, and then reopen all of the applications and files I previously
had open, I used the cacls command to reset the permissions.
To use that method, you need to take the following steps, if you are currently
logged into an unprivileged user account.
- Open a command prompt window as the Administrator. On Windows XP systems,
you can do so by going to
C:\WINDOWS\system32\ and right-clicking
on cmd.exe while holding down the shift key (if you don't hold
down the shift key at the same time, you won't see the "run as" option). Then
select Run as. Click on The following user and put in
Administrator, or some other account with administrator access, for
the user name, and enter the appropriate password. Then hit Enter
or click on OK. A command prompt window will open with Administrator
credentials.
- Enter the command
cacls "\program files\primopdf" /E /G Users:F
to give all users of the system full control of the directory where you
installed PrimoPDF, presuming that you installed it in \program
files\primopdf. Granting full control of the directory means
they can add or delete files in that directory. The Users group will still
only have "read" access to the dll and exe files in the directory, though.
The /E means "edit the existing Access Control List (ACL)
rather than creating a new one and the /G grants access
for the account or accounts specified as a parameter. The F
at the end grants "full" access. You can enter cacls /?
for help with the cacls command. You will see something
like "processed dir: C:\program files\PrimoPDF", if the
command is successfully executed.
[/os/windows/software/pdf]
permanent link
Thu, Aug 30, 2007 10:11 pm
Print Last Page First in Adobe Acrobat
To reverse page printing order, i.e. to print the last page of a document
first, in Adobe Acrobat 6.0, take the following steps:
- Click on File.
- Select Print.
- Check Reverse pages.
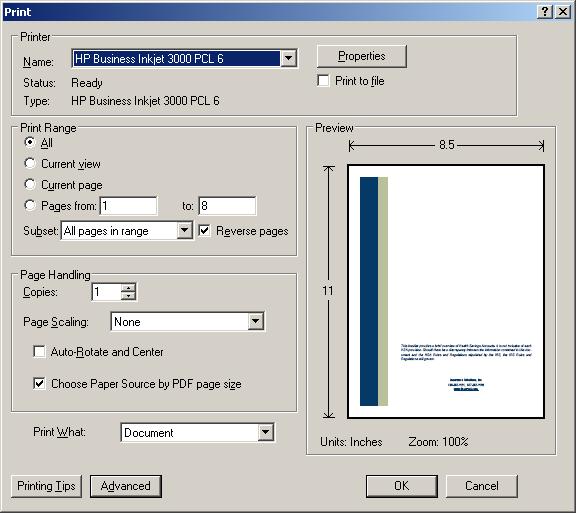
- Click on OK.
References:
-
Options in the Print dialog box
Adobe Systems Incorporated
[/os/windows/software/pdf]
permanent link
Thu, Nov 30, 2006 12:30 am
Printing Problem for Excel Workbooks with Multiple Worksheets Using Acrobat
If you are experiencing problems printing all of the worksheets
in a Microsoft Excel workbook to one PDF file using Adobe Acrobat,
the problem is likely caused by a variation in the "print quality"
setting for the worksheets in the Excel workbook.
You can verify this is the source of the problem by clicking
"File", then selecting "Page Setup" in Excel. With the "Page" tab
selected, you will see the "Print Quality"
setting for the currently selected worksheet. Let's say it
is "300 dpi". But if you select the second worksheet titled "Page 2", when
you take the same steps to view the print quality setting and don't see
the print quality specified or it is different, then the variation in
print quality settings is the source of the problem.
When the print quality settings vary between worksheets in the workbook,
Adobe Acrobat will attempt to create multiple PDF files, one for each
worksheet in the workbook, which is why it will prompt you multiple times
for a file name. If you enter different filenames at each prompt, it will
put each worksheet in a separate file.
To rectify the problem, make the print quality settings the same for each
worksheet. In the case above, you could specify a print quality setting
of 300 dpi for the "Page 2" worksheet as well.
You can change the print quality settings one by one for each worksheet
in the workbook or you can select all of the worksheets at once by
holding down the Ctrl key while clicking on the tabs at the bottom of the Excel
window for the other worksheets one by one to select all of them, if you are working on
a Windows system (you would use the Shift key on an Apple system).
When all the worksheets are selected,
you can release the Ctrl key then click on "File" and "Page Setup"
to specify the print quality settings for all of the worksheets at once.
The minimum dpi for a laser printer is normally 300 dpi and is
probably adquate for most spreadsheets you will print. Adobe uses
600 dpi as the default setting for Adobe Acrobat and Distiller and
recommends that setting, but you can make the setting whatever you
like. The output you will get when printing will depend on whether
the printer selected can actually support the dpi value you've
selected, though.
Once, you have set the print quality settings to be the same for
all worksheets, take the following steps to print the workbook.
- Click on "File".
- Select "Print".
- Select "Adobe PDF" as the printer.
- In the "Print what" section, select "Entire workbook".
You should now have one PDF file containing all of the worksheets.
References:
-
More than one PDF file is created from an Excel workbook (Acrobat 5.0-6.x on Windows or Mac OS)
Adobe Systems Incorporated
[/os/windows/software/pdf]
permanent link

Privacy Policy
Contact

