Tue, Aug 25, 2009 9:23 pm
Obtaining an IP Address via DHCP with Pump on a Knoppix System
To obtain an IP address via the Dynamic Host Configuration Protocol (DHCP)
on a Knoppix Linux system, you can use
pump. As root, you can
issue the commands below:
ifconfig eth0 up

pump -i eth0
The options available for pump are shown below:
root@Knoppix:~# pump --help
Usage: pump [OPTION...]
  -c, --config-file=STRING     Configuration file to use instead of
                               /etc/pump.conf
  -h, --hostname=hostname      Hostname to request
  -i, --interface=iface        Interface to configure (normally eth0)
  -k, --kill                   Kill daemon (and disable all interfaces)
  -l, --lease=hours            Lease time to request (in hours)
  -L, --leasesecs=seconds      Lease time to request (in seconds)
  --lookup-hostname            Force lookup of hostname
  -r, --release                Release interface
  -R, --renew                  Force immediate lease renewal
  -v, --verbose                Log verbose debug info
  -s, --status                 Display interface status
  -d, --no-dns                 Don't update resolv.conf
  --no-gateway                 Don't set a gateway for this interface
  --no-setup                   Don't set up anything
  --no-resolvconf              Don't set up resolvconf
  --no-bootp                   Ignore non-DHCP BOOTP responses
  --script=STRING              Script to use
  --win-client-ident           Set the client identifier to match Window's

Help options:
  -?, --help                   Show this help message
[/os/unix/linux/knoppix]
permanent link
Sun, Aug 23, 2009 4:42 pm
Checking User Acccounts with the dscl Command Utility
On an Apple OS X system, a user's account is distinguished from
other accounts by a
User Identifier (UID), which is a unique
number that identifies a particular user on a system having
a particular login ID. A UID identifies the owner of a file and
controls users' access to files.
OS X assigns some UIDs for special purposes
| Number | Use |
Comment |
|---|
| UID 0 | Reserved for the root user |
Should not be deleted or modified except to change the password
of the root user. |
| UIDs below 100 | Reserved for system use |
Should not be deleted or modified. |
| UIDs 500 - 2,147,483,648 | Users |
Should be unique on the system. If modified, the ownership of files and
directories for the user must be changed. |
A user's name and UID can be viewed with
the dscl command utility.
To list users, within the terminal type:
dscl . list /users
To read a user account, within the terminal type:
dscl . read /users/
[/os/os-x]
permanent link
Sun, Aug 23, 2009 3:20 pm
Services That Should Normally be Disabled
To increase security on an Apple OS X system, the following services should
normally be disabled, unless you have a definite need for them:
- Windows File Sharing (SMB) - allows Windows™
users to access shared folders on your computer
- Personal Web Sharing / Hypertext Transfer Protocol (HTTP) - lets
users of other computers view web pages in the sites folder on your
computer
- Remote Login (SSH) - lets users of other computers access your
computer using Secure Shell (SSH) and allows connection with Simple File
Transfer Protocol (SFTP)
- File Transfer Protocol (FTP Access) - lets users of other computers
exchange files with your computer using FTP applications and provides users
access to all files on the Mac for which they have privileges. FTP transmits
userids and passwords as cleartext, so can could allow someone else on
the network on which your system resides to learn a userid and password for
your system.
- Remote Apple Events - allows applications on other Mac OS X
computers to send Apple Events to your computer
- Printer Sharing / Line Printer Request (LPR) - lets other people
use printers connected to your computer
[/os/os-x]
permanent link
Sun, Aug 23, 2009 3:00 pm
Changing Firewall Settings
The firewall settings can be chaned on a MAC OS X system by taking
the following steps:
- Select the Apple menu
- Select the System Preferences option
- Select the Security option
- Select the Firewall tab
- Review and select options
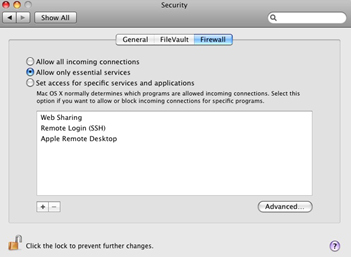
Turning on a service automatically reconfigures the built-in firewall to open
the appropriate port(s) necessary for that service.
[/os/os-x]
permanent link
Sun, Aug 23, 2009 2:49 pm
Sudo on OS X
The
sudo command is used in the Terminal to execute a command with the
privileges of another user, such as root. On Mac OS X, those with
administrative privileges are allowed to use the sudo command.
On Unix and Linux systems, the su command is used to assume the identity of
another user, typically root. Since the root account is normally disabled
on Mac OS X systems, su will not work. As an alternative to enabling the
root account, you can use sudo to run individual
commands as root, one at a time. If you need a root shell, you can get one by
running sudo -s. The sudo command requires an
administrator password.
[/os/os-x]
permanent link
Tue, Aug 18, 2009 9:59 pm
Gpg4win 2.0.0
If you want a graphical user interface (GUI) for the
GNU Privacy Guard
(GPG) program for Windows, you can use
Gpg4win
[ More Info ]
[/security/encryption/gnupg]
permanent link
Mon, Aug 17, 2009 10:04 am
Importing Data from an Access Database in Microsoft Excel
You can import data from a Microsoft Access database in Microsoft Excel 2007,
even if you don't have Microsoft Access on the system. To do so, take the
steps below:
- Open Excel.
- Create a new blank workbook or open an existing one that you wish to
use.
- Click on Data.
- Select Import External Data.
- Select Import Data.
- Browse to the location of the Access .mdb file
- You will then be prompted to select the table in the Access database
that you wish to import into an Excel spreadsheet. Select the table you wish
to use by clicking on it and then clicking on OK.
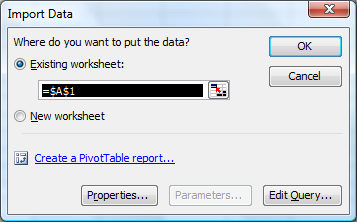
- An Import Data window will open asking you where you wish
to place the data in the Excel spreadsheet. The default location will be column
A row 1. If that is where you want the data to go, click on OK, otherwise
specify the location you wish to use.
References:
-
Import Microsoft Access Data Into Excel
Mysticgeek's Realm ::
Your Guide Through the Cyber Galaxy!
[/os/windows/office/excel]
permanent link
Sun, Aug 16, 2009 1:00 pm
Wii Network Traffic When Powered On
I've been troubleshooting a problem with a Wii not having network
connectivity this weekend. The Wii was plugged into a switch that showed
the link was up. The Wii wasn't working when I had it configured for a
fixed IP address, gateway address, and DNS server addresses. I tried DHCP,
instead, but that didn't work, either. With a sniffer, I could observe the
Wii sending out DHCP requests, but I never saw any response coming back
from the DHCP server. Yet, I could see other network traffic reaching
the Wii. I plugged the cable going into the Datel USB network adapter
I was using with the Wii into my laptop and it would get an IP address
from the DHCP server, so all of the network cabling seemed to be good. I
even installed a driver for the Datel USB to Ethernet network adapter
into my laptop and loaded a driver for that adapter on the Windows Vista
laptop. That worked as well.
I was able to resolve the problem by putting a small 5-port hub between
the switch and the Wii. Everything worked fine then, but I don't know
why that worked. I thought there might a problem with autonegotiation
of the duplex and speed settings, but on the switch side I tried all
possible settings for the duplex setting, i.e. auto, full, and half,
with all possible combinations of the speed setting, i.e. auto, 100 Mbs,
10 Mbs, but none of the nine combinations worked.
When I did get the Wii's Internet connectivity working, I captured
the traffic from/to it, so I would have a better idea of how it determines
whether it has Internet connectivity. I've recorded my notes
here.
[/gaming/wii]
permanent link
Wed, Aug 12, 2009 4:26 pm
Clearing Space on /var
On a Solaris 7 system, I found there wasn't sufficient space
in
/var to allow me to install software.
# gunzip libidn-1.14-sol7-sparc-local.gz
# pkgadd -d ./libidn-1.14-sol7-sparc-local

The following packages are available:
  1  SMClibidn     libidn
                   (sparc) 1.14

Select package(s) you wish to process (or 'all' to process
all packages). (default: all) [?,??,q]:

Processing package instance <SMClibidn> from </tmp/libidn-1.14-sol7-sparc-local>

libidn
(sparc) 1.14
Simon Josefsson et al
Using </usr/local> as the package base directory.
## Processing package information.
## Processing system information.
   20 package pathnames are already properly installed.
## Verifying disk space requirements.
WARNING:
    The /var filesystem has 0 free blocks. The current installation requires 152
 blocks, which includes a required 150 block buffer for open deleted files. 152
more blocks are needed.

Do you want to continue with the installation of <SMClibidn> [y,n,?] n

Installation of <SMClibidn> was terminated due to user request.
No changes were made to the system.
When I checked the contents of /var/log, I found the
following:
# ls -l
total 139882
-rw-------   1 root     sys      26576205 Aug 12 15:11 authlog
-rw-------   1 root     other    14635403 Aug 12 15:41 maillog
-rw-r--r--   1 root     root     6605320 Aug 12 15:44 named_querylog
-rw-r--r--   1 root     root     5538180 Jul 11 06:23 named_querylog.0
-rw-r--r--   1 root     root        3651 Jun 15 16:58 named_querylog.1
-rw-r--r--   1 root     other     794523 Jun 15 15:39 named_querylog.2.gz
-rw-------   1 root     other    4106078 Jun 24 18:04 poplog
-rw-------   1 root     other    13249096 Aug 12 14:50 sshd.log
-rwxrwxrwx   1 root     other        240 Jul 27  2000 sysidconfig.log
I moved authlog, maillog, and sshd.log
to a a directory under /home, recreated the files in
/var/log with touch, set the permissions
to 600, and changed the group to what it had been
previously on authlog.
# touch authlog.log
# touch maillog.log
# touch sshd.log
# chmod 600 authlog
# chmod 600 maillog
# chmod 600 sshdlog
# chgrp sys authlog
# ls -l
total 33402
-rw-------   1 root     sys            0 Aug 12 15:52 authlog
-rw-------   1 root     other          0 Aug 12 15:49 maillog
-rw-r--r--   1 root     root     6610244 Aug 12 15:54 named_querylog
-rw-r--r--   1 root     root     5538180 Jul 11 06:23 named_querylog.0
-rw-r--r--   1 root     root        3651 Jun 15 16:58 named_querylog.1
-rw-r--r--   1 root     other     794523 Jun 15 15:39 named_querylog.2.gz
-rw-------   1 root     other    4106078 Jun 24 18:04 poplog
-rw-------   1 root     other          0 Aug 12 15:55 sshd.log
-rwxrwxrwx   1 root     other        240 Jul 27  2000 sysidconfig.log
I then restarted the syslog daemon so it would use the new files.
# /etc/init.d/syslog stop
# /etc/init.d/syslog start
syslog service starting.
When I then checked the free space for /var, 94% of
the capacity was used, whereas it had been 100% previously.
# df -k
Filesystem            kbytes    used   avail capacity  Mounted on
/proc                      0       0       0     0%    /proc
/dev/dsk/c0t0d0s0    2052750 1646775  344393    83%    /
fd                         0       0       0     0%    /dev/fd
/dev/dsk/c0t0d0s3    1015542  893738   60872    94%    /var
/dev/dsk/c0t0d0s4    5058110 4968663   38866   100%    /home
swap                  269872    6728  263144     3%    /tmp
References:
-
Moving Sendmail's Maillog
File
Date: August 10, 2005
MoonPoint Support
[/os/unix/solaris]
permanent link
Mon, Aug 10, 2009 12:27 pm
Proxychains and Knoppix
If you are using a Knoppix Linux system behind a
SOCKS proxy server,
you can use the
proxychains package to enable applications that don't natively understand
how to use a SOCKS proxy to work through the SOCKS proxy.
The proxychains program forces any tcp connection made by any given TCP client
to go through the specified proxy server (or proxy chain). It is a kind of
proxifier. It acts like sockscap / premeo / eborder driver (intercepts TCP
calls). Proxychains supports SOCKS4, SOCKS5 and HTTP CONNECT proxy servers.
Different proxy types can be mixed in the same chain.
Since Mozilla Firefox understands how to use SOCKS proxies, you can configure
it to go through the SOCKS proxy. You can configure it to use a SOCKS proxy
by clicking on Edit, then Preferences, and then the
Network tab. Click on Settings and then select
Manual proxy configuration. For a SOCKS proxy, put the address of
the SOCKS proxy server in the SOCKS Host field and the port that
is being used on that server in the Port field.
If I establish a SOCKS proxy server using the ssh command,
e.g. ssh -D 8055 jdoe@192.168.1.1, then I'm tunneling connections
to the SOCKS proxy through the encrypted SSH connection and I will use
127.0.0.1 in the SOCKS host field and 8055
in the Port field, rather than the default SOCKS proxy port of
1080.
After downloading the proxychains package with Mozilla Firefox, aka iceweasel,
I used dpkg to install it.
root@Knoppix:/home/knoppix# dpkg --install proxychains_2.1-5_i386.deb
Selecting previously deselected package proxychains.
(Reading database ... 0 files and directories currently installed.)
Unpacking proxychains (from proxychains_2.1-5_i386.deb) ...
dpkg: dependency problems prevent configuration of proxychains:
 proxychains depends on libc6 (>= 2.3.2.ds1-21); however:
  Package libc6 is not installed.
dpkg: error processing proxychains (--install):
 dependency problems - leaving unconfigured
Errors were encountered while processing:
 proxychains
Proxychains looks for its configuration file in the following order:
- ./proxychains.conf
- $(HOME)/.proxychains/proxychains.conf
- /etc/proxychains.conf
I copied the sample file /etc/proxychains.conf.dpkg-new
to /etc/proxychains.conf.
root@Knoppix:/home/knoppix# cp /etc/proxychains.conf.dpkg-new /etc/proxychains.conf
The following default information appears in that file:
# ProxyList format
#       type  host  port [user pass]
#       (values separated by 'tab' or 'blank')
#
#
#        Examples:
#
#               socks5  192.168.67.78   1080    lamer  secret
#               http    192.168.89.3    8080    justu   hidden
#               socks4  192.168.1.49    1080
#               http    192.168.39.93   8080
#
#
#       proxy types: http, socks4, socks5
#        ( auth types supported: "basic"-http  "user/pass"-socks )
#
http    10.0.0.5 3128
http    10.0.0.3 3128
http    10.0.0.5 3128
#socks5 192.168.1.4 1080
#socks4 10.5.81.143 1080
#http   192.168.203.18 8080
I commented out the http lines with the 10.0.0.5
address by placing a "#" at the beginning of the line. I then removed
the "#" from the socks5 line and changed the address
from 192.168.1.4 to 127.0.0.1, since I was establishing a socks proxy
using the ssh command. I changed the port from the default SOCKS port of 1080
to the one I used when I established the SOCKS proxy with
ssh -D 8055 jdoe@192.68.1.1, i.e. port 8055.
I then had the following lines in proxychains.conf.
# http  10.0.0.5 3128
# http  10.0.0.3 3128
# http  10.0.0.5 3128
socks5 127.0.0.1 8055
#socks4 10.5.81.143 1080
#http   192.168.203.18 8080
I also commented out "random_chain" and "chain_len" and uncommented
"strict_chain".
I was then able to use proxychains with gpg to
import a public key for a package repository into the public keyring for the
root account.
root@Knoppix:/home/knoppix# proxychains gpg --keyserver wwwkeys.eu.pgp.net --rec
v-keys 9AA38DCD55BE302B
gpg: requesting key 55BE302B from hkp server wwwkeys.eu.pgp.net
ProxyChains-2.1 (http://proxychains.sf.net)
random chain (1):....127.0.0.1:5555....194.171.167.98:11371..OK
gpg: /root/.gnupg/trustdb.gpg: trustdb created
gpg: key 55BE302B: public key "Debian Archive Automatic Signing Key (5.0/lenny)
<ftpmaster@debian.org>" imported
gpg: no ultimately trusted keys found
gpg: Total number processed: 1
gpg:               imported: 1  (RSA: 1)
I was also able to use proxychains for apt-get update
by using proxychains apt-get update.
References:
-
ProxyChains - README (HowTo) TCP and DNS through proxy server, HTTP and
SOCKS
ProxyChains
[/os/unix/linux/knoppix]
permanent link
Sun, Aug 09, 2009 6:25 pm
Using dpkg and apt-get with BitDefender Rescue CD
The
dpkg utility can be used to add additional software
once you have booted a system with a BitDefender Rescue CD, but first
you need to create a few directories and files.
root@Knoppix:~# mkdir /var/lib/dpkg
root@Knoppix:~# mkdir /var/lib/dpkg/info
root@Knoppix:~# mkdir /var/lib/dpkg/updates
root@Knoppix:~# touch /var/lib/dpkg/status
root@Knoppix:~# touch /var/lib/dpkg/available
Alternatively, you can use the apt-get utility to download
and install the packages you wish to use - see
Using
apt-get with BitDefender Rescue CD
[ More Info ]
[/security/antivirus/bitdefender/rescuecd]
permanent link
Sun, Aug 09, 2009 10:23 am
Debian Version
Knoppix is vased on the Debian distribution of Linux. You can find the
particular version of Debian on which it is based by checking
/etc/debian_version.
root@Knoppix:~# cat /etc/debian_version
lenny/sid
[/os/unix/linux/knoppix]
permanent link
Thu, Aug 06, 2009 9:39 pm
Dell Latitude D505 Display Power Problem
I had to replace the motherboard on a Dell Latitude D505 laptop.
The display would blank unless pressure was put on the center control
cover near the power button.
[ More Info ]
[/pc/hardware/dell]
permanent link
Sun, Aug 02, 2009 10:39 pm
BitDefender Rescue CD 2.0.0
BitDefender provides free rescue CD
software that you can use to scan a Windows system. The rescue CD is based
on
Knoppix Linux. As of August 2, 2009,
BitDefender Rescue CD 2.0.0 uses Knoppix 2.6.19. You can download
an
ISO file for the
rescue CD from
http://download.bitdefender.com/rescue_cd/.
To use the rescue CD, boot the system from the CD. You may need to configure
the system's Basic Input Output
System (BIOS) to attempt to boot from a CD before attempting to boot
from the hard drive or hit a key that allows you to select the drive from
which you want to boot. When you system starts booting from the CD, you
will see an initial startup nenu.
Start knoppix in English (US)
Start knoppix in French
Start knoppix in console mode
Memory test
Boot from first hard disk
BitDefender Rescue CD
based on Knoppix
You must hit Enter when the menu appears or move the cursor up or down
or the system will be booted from the hard drive rather than the
boot process continuing from the CD.
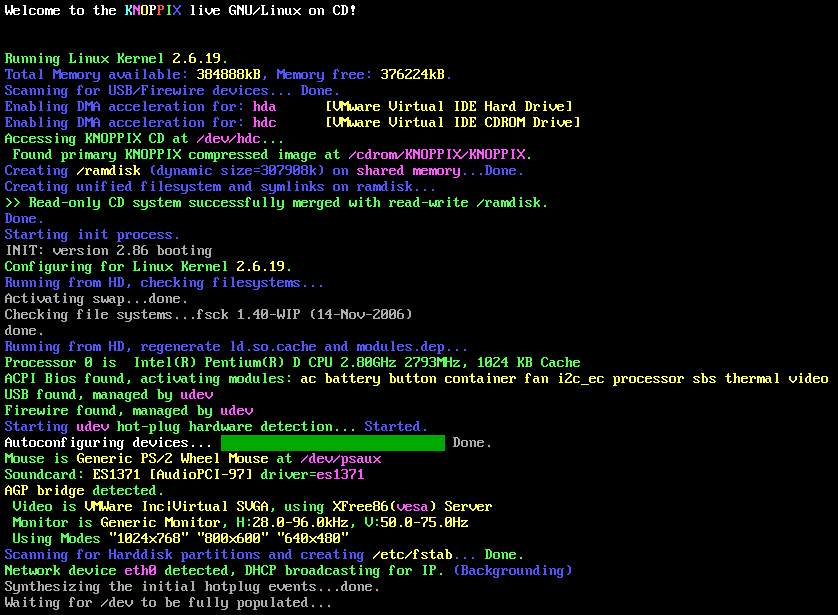
Click on the image to enlarge it
During the boot process, the virus definitions will be updated, if the
system has an Internet connection. If the software has a problem updating
the definitions it will hang for awhile at the stage where it tries
to update the virus definitions and then you will see the message
"Trying to update BitDefender-scanner...fail..check your network ?"
When the BitDefender Rescue CD completes booting, you will
have a Graphical User Interface (GUI).
A BitDefender AntiVirus Scanner for Unices program will
start automatically and start scanning the hard drive in the
system.
By default, all partitions detected on the hard drive will be scanned.
When the scan completes, you'll have to choose what actions to take on the
infected file(s). You can choose one action for all files or select an action
for each item.
If you right-click somewhere on the desktop, you will see a list
of applications on the CD. You can get a terminal window by selecting
Terminal or Terminal (as root) by selecting from the
menu that appears when you right-click on the desktop. Don't pick
Exit from this menu, until you are ready to shut down the system.
I.e., wait until the scan has completed and you've chosen what to do with
any infected files detected
[/security/antivirus/bitdefender/rescuecd]
permanent link

Privacy Policy
Contact

