Tue, May 31, 2016 9:27 pm
Establishing a SOCKS proxy using an SSH client
You can establish a
Socket Secure (SOCKS) server on a
Secure Shell (SSH)
server using the
-D option to the ssh client command.
     -D [bind_address:]port
             Specifies a local “dynamic” application-level port forwarding.
             This works by allocating a socket to listen to port on the local
             side, optionally bound to the specified bind_address.  Whenever a
             connection is made to this port, the connection is forwarded over
             the secure channel, and the application protocol is then used to
             determine where to connect to from the remote machine.  Currently
             the SOCKS4 and SOCKS5 protocols are supported, and ssh will act
             as a SOCKS server.  Only root can forward privileged ports.
             Dynamic port forwardings can also be specified in the configura-
             tion file.

             IPv6 addresses can be specified by enclosing the address in
             square brackets.  Only the superuser can forward privileged
             ports.  By default, the local port is bound in accordance with
             the GatewayPorts setting.  However, an explicit bind_address may
             be used to bind the connection to a specific address.  The
             bind_address of “localhost” indicates that the listening port be
             bound for local use only, while an empty address or ‘*’ indicates
             that the port should be available from all interfaces.
E.g., if I wished to create a SOCKS proxy server at the SSH server end
from an SSH client using the
registered port commonly used as the listening port for a SOCKS proxy, i.e.,
TCP port 1080, I could use the command below, assuming
that I have a jdoe account on the SSH server at example.com.
$ ssh -D 1080 jdoe@example.com
[ More Info ]
[/network/proxy]
permanent link
Sun, May 29, 2016 11:00 pm
RS File Repair Review
After taking a large number of photos yesterday and then transferring the
memory card from her camera to her PC, my wife found that three of the
JPG files on the memory card
were not readable. I tried to open the files using various graphics programs
on her PC, which is running Microsoft Windows 8, to see if any of them might
be able to read the files by right-clicking on a photo and choosing "open
with". I saw the following error messages:
| Application |
Error Message |
|---|
| Paint |
Paint cannot read this file.
This is not a valid bitmap file, or its format is not currently supported.
|
| Photos |
This file can't be opened. The file might be damaged. |
| Windows Photo Viewer |
Windows Photo Viewer can't open this picture because
the file appears to be damaged, corrupted, or is too large |
| Corel PaintShop Pro X7 |
Unable to open the file. Pleae verify that the file
is valid. |
| Adobe Photoshop Elements 13 Editor |
Could not complete your request because an unknown or
invalid JPEG marker type is found. |
Possibly some sectors on the memory card were damaged or the corruption
could have been due to some other reason, but I thought I might be able to
recover the images using a file repair tool. I tried the
RS File Repair
tool, which runs on Microsoft Windows systems, from
Recovery Software, but the repaired
files it generated were not useful.
[ More
Info ]
[/reviews/software/windows/utilities/file]
permanent link
Fri, May 27, 2016 10:53 pm
Tcproute
On Unix, Linux, and OS X systems,
traceroute
sends
UDP datagrams to high-numbered ports with an increasing
time to
live (TTL) value. The first datagram sent has a time to live of 1. Each
network hop, e.g. a
router, along the path of a UDP datagram or
TCP packet to its destination will decrement the TTL value
by 1 and, unless the system is the final destination, will send
an
ICMP error datagram (
11 -
Time Exceeded) back to the source system, if after it decrements the TTL
the TTL value is 0.
As an example, suppose you are performing a traceroute between two computers
with two routers between the source and destination systems as in the diagram
below.
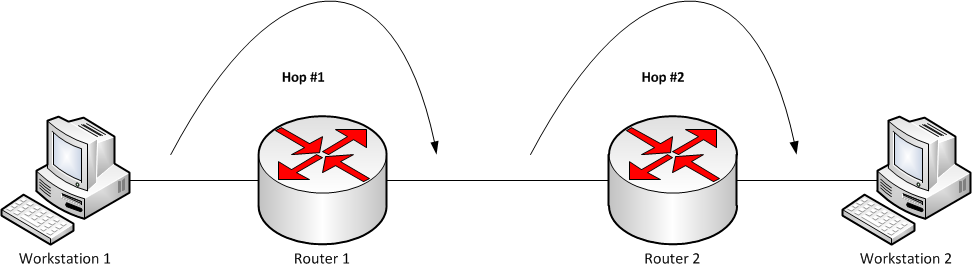
When you issue the command traceroute workstation2, the
traceroute command will first send out a UDP datagram with a TTL of 1.
Router 1 will decrement the TTL, at which point it becomes 0, so router 1 sends
an ICMP "time exceeded" datagram back to workstation 1. Workstation 1 then
sends another datagram to workstation 2, but this time with a TTL of 2. Router
1 is the first hop on the path to workstation 2 and it decrements the TTL
and sends it on to router 2 which also decrements the TTL at which point it
is now 0, so router 2 sends back a "time exceeded" datagram to workstation 1.
Then workstation 1 sends a datagram with a TTL of 3. This time the TTL is
decremented to 2 at router 1 and then to 1 at router 2, which sends the
datagram on to workstation 2, which is the destination system that will send
a reply back to workstation 1. On Microsoft Windows systems, the tracert
command uses a similar process except it sends ICMP echo requests, instead of
UDP packets to a high-numbered port.
Another tool available for use on Microsoft Windows systems is
tcproute.
Tcproute sends TCP packets to port 80 on the destination system, increasing the TTL value by one with each packet sent, so the tool is similar to the process
employed by traceroute on Unix, Linux, or OS X systems, though it is using
TCP rather than UDP and is using a destination port of 80, the default port
used by web servers for
Hypertext
Transfer Protocol (HTTP) traffic.
[ More Info ]
[/os/windows/software/network]
permanent link
Thu, May 26, 2016 11:53 pm
Running a command on a remote system using SSH
The
Secure Shell (SSH) protocol allows you to interactively log into remote
systems. Once logged into a remote system, you have a shell prompt where you
can enter commands on the remote system. But you can use an SSH client to
execute a command on a remote system without logging into that system and
obtaining a shell prompt on the remote system. E.g., if you wanted to
get a
command line interface (CLI) on the remote system, you
might enter a command similar to the following one:
But, if you just were logging in to enter one command, say you wanted
to find the hardware platform of the remote system using the
uname
command uname --hardware-platform, you could simply append that
command to the end of the above ssh command you would have used to log into
the remote system. E.g.:
$ ssh jdoe@example.com uname --hardware-platform
jdoe@example.com's password:
x86_64
$ uname --hardware-platform
i386
In the example above, issuing the same command on the local system, i.e.,
the one on which the SSH command is being issued shows that the result returned
when the uname command was issued at the end of the ssh command line returned
a result from the remote system.
You may even be able to use a text-based editor, such as the
vi editor, though you may see
error messages like the ones below:
$ ssh jdoe@example.com vi temp.txt
jdoe@example.com's password:
Vim: Warning: Output is not to a terminal
Vim: Warning: Input is not from a terminal
When you enter an ssh command in the form ssh
user@host the remote system allocates a
pseudo-tty (PTY), a
software abstraction used to handle keyboard input and screen
output. However, if you request SSH to run a command on the remote
server by appending that command after ssh user@host, then
no interactive terminal session is required and a PTY is not allocated, so
you see the error messages when you use a screen-based program intended for
use with a terminal, such as the vi editor.
For such cases you should inclde the -t option to the SSH
command.
| -t |
Force pseudo-tty allocation. This can be used to execute arbitrary
screen-based programs on a remote machine, which can be very useful,
e.g. when implementing menu services. Multiple -t options force tty
allocation, even if ssh has no local tty. |
E.g.:
$ ssh jdoe@example.com -t vi temp.txt
[/network/ssh]
permanent link
Mon, May 23, 2016 11:31 pm
TeslaCrypt master key released
TeslaCrypt is a now
defunct variant of
ransomware. It can now be considered defunct because this month (May 2016)
the TeslaCrypt developer(s) released a master key that will decrypt the files
on any system that were encrypted with TeslaCrypt after Lawrence
Abrams, a security researcher for the IT security company
ESET,
asked for the master decryption key on a TeslaCrypt support site
after noticing that the TeslaCrypt variant of ransomware was being
phased out in favor of another ransomware variant, CryptXXX, though
Abrams rated CryptXXX inferior to TeslaCrypt stating "TeslaCrypt
showed a great deal of experienced coding and knowledge about
cryptography. CryptXXX on the other have had both of their versions
decrypted already."
1
TeslaCrypt underwent improvements in its own coding over time after
first emerging in March 2015. It was
originally developed to encrypt files associated with some computer games
forcing players to pay a ransom in
bitcoins, a preferred
payment method for ransomware developers, because of its anonymity feature.
Once a system was infected the ransomware would search for 185 file extensions
related to 40 different games, including the Call of Duty series, World of
Warcraft, Minecraft and World of Tanks and encrypt files so that players would
be forced to pay a ransom to the TeslaCrypt developer(s) to unlock their
data2. Later the developers expanded the types
of files that were encrypted to include Microsoft Word, PDF, and JPG files
that would likely be found on nongamers' systems. When researchers for
Cisco
Systems Talos Group managed to develop a decryption tool for TeslaCrypt, the
TeslaCrypt developer(s) released a version 2.0 of the ransomware so that
the Talos Group tool could no longer be used to free victims from paying
a $500 USD ransom to decrypt their files.
Later, in November of 2015,
Kaspersky
Lab researchers discovered a flaw in the 2.0 version of TeslaCrypt, which
was corrected by the TelaCrypt developer(s) in a 3.0 release circulating as
of January 2016.
On March 18 of 2016, version 4.0 of the ransomware was discovered.
Researchers for the Danish security firm
Heimdal Security published the security alert
Security Alert: TeslaCrypt 4.0 – Unbreakable Encryption and Worse Data Leakage
regarding enhancements to the malware that made it even harder to
crack. The 4.0 upgrade also fixed a bug that would render files greater than
4 GB permanently unavailable even to those who paid the ransom.
Morten Kjaersgaard, CEO of Heimdal, stated "They're really trying to make it
like a product so when you do pay up you get your money's
worth,"3 since ransomware developers
know they won't be able to get new victims to pay the ransom if
there are widespread reports by prior victims that they couldn't
decrypt files even after paying the ransom. The 4.0 version of the
ransomware also incorporated code to join infected computers into a botnet.
Now, though, with the release of a free, publicly available tool from ESET,
which can be dowloaded from
http://download.eset.com/special/ESETTeslaCryptDecryptor.exe, to
decrypt files encrypted with TeslaCrypt using the master key, victims can
unencrypt their files without paying a ransom.
References:
-
TeslaCrypt authors release master keys, Ransomware Info Day held 19 May
By: Danielle Correa
Date: May 20, 2016
SC Magazine
-
TeslaCrypt
Wikipedia, The Free Encyclopedia
-
TeslaCrypt 4.0 emerges; ransomware features tougher encryption, deeper
penetration
By: Bradley Barth, Senior Reporter
March 21, 2016
SC Magazine
-
Security Alert: TeslaCrypt 4.0 – Unbreakable Encryption and Worse Data Leakage
By: Andra Zaharia
Date: March 18, 2016
Heimdal Security
[/security/ransomware]
permanent link
Sun, May 22, 2016 11:56 pm
Determining the system name for a computer running Windows 10
To determine the system name for a computer running the Microsoft Windows 10
operating system (OS), you can take the following steps:
-
Click on the Windows
Start Button at the lower, left-hand corner of the
screen or hit the Windows key.
- Click on Settings.
-
Click on System.
-
In the System window, click on About. You will see the system name
to the right of "PC name".
[ More Info ]
[/os/windows/win10]
permanent link
Sat, May 21, 2016 10:46 pm
Using Preview to adjust the colors in an image
When I need to work on a piece of new equipment that has a power adapter,
I usually note the model number and part
number for the power adapter in case the adapter should be separated
from the equipment later, so that I can easily determine which
adapter goes with which piece of equipment and so, if a wire within
the cord for the adapter gets broken over years of use, I can easily
locate a source for a replacement if needed. I sometimes
also take a photo of the power adapter, so I know what it looks like if
I'm searching through boxes of adapters for the correct one.
So I took some pictures of the adapter for a new
HP 15-af131dx notebook. I
used a station my wife has in her studio for taking photos that has a
white cloth for a backdrop and lights that are focused on the area to be
photographed. But I used my cell phone to take the photos rather than the
camera she uses. Even though I made some adjustments to the phone's
settings for taking photos so that the images had a white background
when I viewed them on the phone, when I uploaded them from the phone
to a computer I found that the white backdrop looked somewhat gray
when I viewed them on a couple of computers.
On my MacBook Pro laptop, I normally use the
Preview
program, which is found in the Applications directory on OS
X systems, to view images. That application provides color adjustment
capabilites that allowed me to easily adjust the colors in the image so
that I got the whiter background I wanted for the images. After opening
a photo in Preview, I could click on Tools then Adjust
Color to bring up an Adjust Color window where I could change
the following values for an image:
[ More Info ]
[/os/os-x/Preview]
permanent link
Thu, May 19, 2016 10:33 pm
Suspending and resuming a process on OS X
A MacBook Pro laptop with OS X Yosemite (10.10.5) I've been using today had
been performing poorly. When I checked on CPU and memory usage, I found
Firefox 38.7.0 was responsible for most of the memory usage and was consuming
an excessive amount of CPU cycles. The
Activity Monitor application, which is found in
Applications/Utilities, showed that Firefox was consuming about
1/2 of the 16 GB of Random Access Memory (RAM) on the system. The Activity
Monitor was also showing about 100% CPU utilization by Firefox. If a
process is misbehaving, you can kill it with the kill command, but you
can also suspend and resume it with the kill command using
kill
-STOP pid
and
kill -CONT pid where
pid is the process identifier for the process. I used the command
kill -STOP 509 to temporarily suspend execution of Firefox
so I could complete some pressing tasks.
[ More Info ]
[/os/os-x]
permanent link
Tue, May 17, 2016 8:27 am
gnome-screenshot
If you wish to take a screen shot on a Linux system, whether it is a CentOS,
Ubuntu, or other Linux distribution, one tool that may already be on the
system that will allow you to perform a screen capture from a command line
interface, i.e., a shell prompt, is
gnome-screenshot. You can determine if the utility is present on a
system using the
which
command.
$ which gnome-screenshot
/usr/bin/gnome-screenshot
You can obtain help on using the tool to take a screenshot by typing
gnome-screenshot at a shell prompt.
$ gnome-screenshot --help
Usage:
  gnome-screenshot [OPTION...] Take a picture of the screen

Help Options:
  -h, --help                     Show help options
  --help-all                     Show all help options
  --help-gtk                     Show GTK+ Options

Application Options:
  -c, --clipboard                Send the grab directly to the clipboard
  -w, --window                   Grab a window instead of the entire screen
  -a, --area                     Grab an area of the screen instead of the entire screen
  -b, --include-border           Include the window border with the screenshot
  -B, --remove-border            Remove the window border from the screenshot
  -d, --delay=seconds            Take screenshot after specified delay [in seconds]
  -e, --border-effect=effect     Effect to add to the border (shadow, border or none)
  -i, --interactive              Interactively set options
  --display=DISPLAY              X display to use
[ More
Info]
[/os/unix/linux/utilities/graphics]
permanent link
Mon, May 16, 2016 7:12 am
Break out of SSH session
Sometimes after I've established an SSH connection to an SSH server, I
encounter a situation where the remote system isn't responding to keyboard
input and I want to terminate the SSH session and return to a command prompt.
E.g., often when I've connected to a Microsoft Windows system running SSH
software from my Ubuntu Linux laptop, I find that I'm in a situation where
after I've entered a command at the Windows system's command prompt the
remote system no longer seems to be accepting keyboard input from the
Linux system. Sometimes it seems to occur when I've mistyped a Windows
command and the Windows system may be waiting for further input, but doesn't
seem to accept what I type. In such cases, rather than close the Terminal
tab on the Linux system to terminate the connection, which then requires me
to open a new tab and establish a new SSH session, I'd prefer to break out
of the current SSH session and return to the shell prompt on the Linux
system where I can re-establish the SSH connection. In such cases,
Ctrl-C,
Ctrl-D, and
Ctrl-Z don't help me.
But there is an
escape sequence
that will allow me to terminate the current SSH session. Hitting the
three keys listed below will allow me to terminate the session.
↲ Enter, ~, .
[ More Info ]
[/network/ssh]
permanent link
Sun, May 15, 2016 10:30 pm
apt-get resource temporarily unavailable
When I tried to install a package on an Ubuntu Linux system with
apt-get yesterday, I saw the error message below:
$ sudo apt-get install ibmonitor
E: Could not get lock /var/lib/dpkg/lock - open (11: Resource temporarily unavailable)
E: Unable to lock the administration directory (/var/lib/dpkg/), is another process using it?
I saw there was another installation in progress via the
Update
Manager, but the Update Manager update had been running for many days
without successfully completing. I couldn't cancel or kill the Update Manager
update through the graphical user interface (GUI) for the Update Manager, so I
checked for any process identifier (PID) associated with
update-manager.
$ ps -ef | grep -i update-manager | grep -v grep
jdoe      4339     1  0  2015 ?        00:02:24 /usr/bin/python /usr/bin/update-manager --no-focus-on-map
jdoe     14331     1  0 Apr17 ?        00:01:21 /usr/bin/python /usr/lib/update-manager/check-new-release-gtk
jdoe     25428     1  0 May01 ?        00:00:39 /usr/bin/python /usr/lib/update-manager/check-new-release-gtk
I killed all three of the processes I found associated with
"update-manager", but that still did not allow me to successfully run apt-get.
[ More Info ]
[/os/unix/linux/ubuntu]
permanent link
Sat, May 14, 2016 10:54 pm
Creating a simple Debian .deb package
Versions of Linux based on the
Debian distribution, such as
Ubuntu, use
.deb files for the
package management system. Debian .deb packages are
standard
Unix
ar archives
that include two
tar
archives, which may optionally be compressed with
gzip (zlib),
Bzip2, the
Lempel–Ziv–Markov
chain algorithm (LZMA), or
xz (lzma2). One of the two archives holds the
control information and the other contains the program data. At the base
of the software management system is
dpkg; dpkg originally stood
for "Debian package".
dpkg is a low-level tool that is used by other package management tools such
as
Advanced Package Tool (APT). APT was originally designed
as a
front end to dpkg. In turn
aptitude, which allows a user to interactively choose packages to
install or remove, is a front end to apt.
Synaptic provides a
graphical user interface (GUI) for apt.
To install a .deb package with dpkg, you can use dpkg -i debFileName
. You can obtain a list of the installed packages on a system with
dpkg -l or dpkg -l [optional pattern] to filter the
list of packages shown by an optional pattern.
I've never created a .deb package and was curious as to how to do so.
I thought I'd start with something simple by creating a .deb package for
ibmonitor, since the
program is just one Perl script. To build the package, I followed the
instructions in the
How to Build
section of Debian
Packages.
[ More Info ]
[/os/unix/linux/ubuntu]
permanent link
Fri, May 13, 2016 11:00 pm
Monitoring network traffic with ibmonitor
If you want to monitor the traffic on network interfaces on a Linux system,
one tool that will give you real-time statistics on network utilization is
ibmonitor. An
RPM package and the Perl script that constitutes the program and is
contained in
ibmonitor-1.4.tar.gz can be downloaded from
ibmonitor. The program is a
console application
, i.e., a command line program with a text interface. It is written
in the
Perl
programming language. Its features include the following:
- Shows received, transmitted and total bandwidth of each interface
- Calculates and displays the combined value of all interfaces
- Diplays total data transferred per interface in KB/MB/GB
- Values can be displayed in Kbits/sec(Kbps) and/or KBytes/sec(KBps)
- Can show maximum bandwidth consumed on each interface since start of
utility
- Can show average bandwidth consumption on each interface since start of
utility
- The output with all features (max, avg and display in Kbps and KBps) easily
fits on a 80x24 console or xterm
- Can interactively change its output display format depending on key pressed
by user.
[ More Info ]
[/os/unix/linux/network]
permanent link
Tue, May 10, 2016 10:39 pm
Creating a Remote Desktop Connection shortcut on your desktop
To create a
Remote Desktop Connection shortcut on a Microsoft
Windows system to reduce the number of steps you need to take to
establish a connection to a particular remote system using the
Remote Desktop Protocol (RDP), you can take the steps
listed at
Creating a Remote Desktop Connection shortcut on your desktop.
If you need to transfer files between the local and remote systems, you can
take the steps listed at
Transferring Files Via the Remote Desktop.
[/os/windows/software/remote-control/rdp]
permanent link
Mon, May 09, 2016 11:25 pm
Creating a Bash menu
You can create a menu of options for someone to choose from in a
Bash script using the
select construct. E.g., the following
Bash script will present a text-based menu with three choices:
"Option 1", "Option 2", and "Option 3".
#!/bin/bash
# Bash Menu Script Example
PS3='Please enter your choice: '
options=("Option 1" "Option 2" "Option 3" "Quit")
select option in "${options[@]}"
do
case $option in
"Option 1")
echo "You chose option 1"
;;
"Option 2")
echo "You chose option 2"
;;
"Option 3")
echo "You chose option 3"
;;
"Quit")
echo "Quitting the program"
break
;;
*) echo invalid option;;
esac
done
Note: to make a script executable from your account, you must
set the file permissions for the
script to grant execute permission for your account, e.g. with
chmod u+x menu, if the file name for the script was
named menu.
When the script is run, it will display the following text:
1) Option 1
2) Option 2
3) Option 3
4) Quit
Please enter your choice:
If the person running the script types "1", the script will display "You
chose option 1". It will display "You chose option 2", if he/she types "2",
"You chose option 3", if he/she types "3" and, if he/she types "4", will
display "Quitting the program" and then exit from the script. Hitting any
other key will cause the script to display "invalid option" while allowing
the user to type another key for one of the other options.
By setting the PS3 variable you can control the prompt that
is displayed to the user. If it wasn't set, the user would see a default prompt,
which is #?, displayed, instead, as shown below:
1) Option 1
2) Option 2
3) Option 3
4) Quit
#?
The select construct has the following format:
select Word in Array
do
  commands-for-options
done
Word and Array are names of your choosing. If you are
unfamiliar with what an array represents, think of it as a collection of items.
You can think of it as a list, though in computer programming languages those
are not necessarily synonymous. You can find more information at
Bash
Arrays.
In the example above, I chose "Option" for Word and
"Options" for the array name. The array, i.e., the list of options, was created
with the following command:
options=("Option 1" "Option 2" "Option 3" "Quit")
The first element of the array, which contains 4 elements in this case,
is "Option 1", the next "Option 2", etc.
The ${options[@] in select option in "${options[@]}"
returns each item in the array as a separate word.
Between the case $option in and esac
(case reversed), I can insert the commands to be carried out for each option
that is selected. Including a *) allows the script to take some
action when any key not associated with a valid option is typed.
Each clause in the case statement must be terminated with ";;". Each case
statement is ended with the esac statement. For further information on the
case statement, see
Using
case statements in Machtelt Garrels
Bash Guide for
Beginners.
Bash is a common
shell on Unix and Linux systems and is the default shell when you open the
Terminal application
on a Mac OS X system. And even
Microsoft has announced that it will provide a Bash shell in the Windows
10 Anniversary Update, which is expected to be shipped this summer. So you
can create text-based menus using this method on a variety of operating
systems.
[/os/unix/bash]
permanent link
Fri, May 06, 2016 10:10 pm
Producing a sequence of numbers on a Linux or Mac OS X system
If you need to produce a sequence of sequential or random numbers on a Mac OS X
or Linux system among the options available to you are the
seq or
jot
commands, or you can use "brace expansion".
Seq
E.g., if you want to generate the numbers from 1 to 15 in increments of 1,
you could use the seq command below:
$ seq 1 15
1
2
3
4
5
6
7
8
9
10
11
12
13
14
15
[ More Info ]
[/os/unix/commands]
permanent link
Thu, May 05, 2016 10:56 pm
MacBook Pro crash due to kernel panic associated with plugin-container
While I was working on a MacBook Pro laptop running OS X Yosemite (10.10.5)
today, the system crashed. When it restarted I saw the message below:
Your computer restrated because of a problem. Press a key or wait a few
seconds to continue starting up.
Later, when I had time to try to obtain some information on why it
crashed, I checked the time it rebooted with last reboot.
$ last reboot | head -n 1
reboot    ~                         Thu May  5 12:26
When I looked for a crash report at that time in
/Library/Logs/DiagnosticReports, I saw the folllowing
file:
$ ls -l /Library/Logs/DiagnosticReports | grep '12:26'
-rw-rw----@ 1 root  admin     7905 May  5 12:26 Kernel_2016-05-05-122657_GSSLA15122293.panic
So it seemed the cause was a
kernel panic, which
occurs when the operating system detects an internal
fatal system error
from which it can't recover.
At
OS X: When your computer spontaneously restarts or displays "Your
computer restarted because of a problem.", Apple states:
In most cases, kernel panics are not caused by an issue with the
Mac itself. They are usually caused by software that was installed,
or a problem with connected hardware.
To help avoid kernel panics, install all available software updates
until Software Update reports, "Your software is up to date." OS X
updates help your Mac handle the kinds of issues that can cause
kernel panics, such as malformed network packets, or third party
software issues. For most kernel panics, updating your software is
all you have to do.
Apple has information on how to interpret what you find in the crash log
for an Intel-based system, such as a MacBook Pro, at
How to Read the Panic Log from an Intel-Based Mac. That article indicates
that you can determine the task name from which the current thread orginated
from the line that begins with "BSD process name corresponding to current
thread". Examining the crash report, I saw the following:
$ grep "BSD process name corresponding to current thread:" /Library/Logs/Diagnos
ticReports/Kernel_2016-05-05-122657_GSSLA15122293.panic
BSD process name corresponding to current thread: plugin-container
When I checked for any currently running processes associated with
"plugin-container", I saw the following:
$ ps -ef | grep plugin-container | grep -v grep
723184451   982   509   0 12:49PM ??        14:40.67 /Applications/Firefox.app/C
ontents/MacOS/plugin-container.app/Contents/MacOS/plugin-container /Library/Inte
rnet Plug-Ins/Silverlight.plugin -greomni /Applications/Firefox.app/Contents/Res
ources/omni.ja -appomni /Applications/Firefox.app/Contents/Resources/browser/omn
i.ja -appdir /Applications/Firefox.app/Contents/Resources/browser 509 gecko-cras
h-server-pipe.509 org.mozilla.machname.902074418 plugin
$
I was using the Firefox web browser, version 38.7.0, at the moment
the system crashed, so that application appears to have, indeed, been
the culprit for the crash. I had a few Firefox windows and many tabs
open when the system crashed. When I logged in after it rebooted, I
reopened Firefox and chose to restore the prior session, but the system
did not crash again after that today.
[/os/os-x]
permanent link
Wed, May 04, 2016 9:45 pm
DB Browser for SQLite on OS X
If you would like a
graphical user interface (GUI) to view and manage
SQLite
databases, you can use
DB Browser for SQLite, which was
originally developed by Mauricio Piacentini of Tabuleiro Producoes as the Arca
Database Browser. The program was later modified to be compatible with
SQLite 2.x databases and rleased into the
public
domain. In 2014, the project was renamed to "Database Browser
for SQLite" at the request of
Richard Hipp
, the creator of SQLite. The software is available for Microsoft Windows,
Apple OS X, and Linux systems. You can use it to view the records in tables
in existing databases, add new records to tables, etc.
[ More Info ]
[/software/database/sqlite]
permanent link
Tue, May 03, 2016 11:18 pm
ImageMagick Vulnerability
ImageMagick is a free and open-source software suite widely used on
Linux systems for displaying, converting and editing images. It is also
available for many other platforms, including Apple's OS X and iOS operating
systems and Microsoft Windows. A code execution bug was recently found in
the software by
Nikolay Ermishkin.
Another security researcher, Ryan Huber, reports that the bug would allow
a malefactor to create a malformed image file that when uploaded to a web
server that processes images with ImageMagick, e.g., to resize an image
uploaded by a website visitor, can cause the server to execute code
embedded in the image by the malefactor. Huber stated that the exploit is
trivial to implement so one should expect that many malicious individuals will
soon attempt to exploit the vulnerability to compromise websites.
If such individuals can compromise a website, they may then be able to
place code on sites that could infect unsuspecting website visitors with
other malicious software.
Huber advised website owners using ImageMagick for image processing on their
sites to check the
magic number in uploaded image files to
verify that an uploaded file is an image file. Wikipedia provides a list
of common magic numbers at
List of
file signatures. One reason for ImageMagick's popularity is that it
supports a large number of different file formats, supporting over 200 file
formats. You can find a list of the supported file formats at
ImageMagick:
Formats. If you have ImageMagic installed, you can check on which formats
it supports on the installed system by issuing the command identify
-list format.
References:
-
Huge number of sites imperiled by critical image-processing vulnerability
By: Dan Goodin
Date: May 3, 2016
Ars Technica
[/security/vulnerabilities]
permanent link
Mon, May 02, 2016 10:44 pm
Configuring an RDP firewall rule on a MI424WR-GEN2 Router
To configure an Actiontec MI424WR-GEN router/firewall to permit an
RDP connection through to a system behind the firewall, you can take
the steps listed
here
to configure the device for connections on either the standard RDP port of
3389 or a non-standard port of your choosing.
You may want to choose a nonstandard port to reduce the number of
break-in attempts on the port from systems on the Internet or in cases where
you have one public IP address for the outside of the router, but multiple
systems behind the router that need to be accessed by users via RDP.
[/network/routers/actiontec/MI424WR]
permanent link

Privacy Policy
Contact

