Sat, Feb 28, 2015 8:32 pm
Including one HTML file within another with iframe
With PHP, if you wish to pull code into a PHP file from another file,
you can use
include(path/filename);. If you wish to include an HTML file within another HTML file, one way to do it is by using the inline
frame element
IFRAME
. E.g., if I wished to include HTML code from two HTML files and have
the contents of those files appear on the right side of the web page in which
I am including them, I could use the following:
<div style="float: right;">

<iframe src="/dir1/file1.html" height="2000" scrolling="no" style="border: none;"></iframe><br>

<iframe src="/dir2/file2.html" height="1225" scrolling="no" style="border: none;"></iframe>

</div>
You can control both the height and the width of the iframe. E.g., above
the first iframe element is 2,000 pixels long and the second one is 1,225
pixels long. The width was not specified above, but also could be specified with
width=n where n is the width in pixels. If the
frame height isn't long enough and I wanted a scroll bar to appear, I wouldn't
include scrolling="no". A border will appear around the iframe by
default, but can be removed with style="border: none;". I put
a <br> between the two iframes to have them both appear
on the right one beneath the other.
[/network/web/html]
permanent link
Sat, Feb 28, 2015 5:49 pm
Setting span to be the width of a div
I wanted to display the output of a program I ran at a shell prompt on
a Linux system with HTML code rather than a screen shot. I wanted the output
to look like the following with the black background on the header line for
the columns to extend across the width of the div I used to
enclose the HTML code for the display of the output:
Linux Network Bandwidth Monitor $Revision: 1.3 $ on localhost.localdomain

   Interface    Received(Kbps) Transmit(Kbps)     Total(Kbps)
      enp1s4           26.621         960.960         987.581
          lo            0.000           0.000           0.000

         All           26.621         960.960         987.581

System uptime: 5 days 5 hours 41 minutes and 2 seconds
I started the display with <div><pre> and
ended it with </pre></div>.
When I tried enclosing it within a div tag, the
W3C Markup Validation Service
complained that the div wasn't allowed where I had placed it
within the surrounding pre tags, so I tried the following to
stretch the span to the length of the div:
<span style="background-color: black; color: white; width: 100%">
But it produced the following:
Linux Network Bandwidth Monitor $Revision: 1.3 $ on localhost.localdomain

   Interface    Received(Kbps) Transmit(Kbps)     Total(Kbps)
      enp1s4           26.621         960.960         987.581
          lo            0.000           0.000           0.000

         All           26.621         960.960         987.581

System uptime: 5 days 5 hours 41 minutes and 2 seconds
The reason it didn't work was because by default <span> is an inline
element, which means, it does not have a width or height. So setting the CSS
attributes width and height on <span> will not work. I was able to get
it to work by following the tip at
How to Create a Fixed Width Span in HTML/CSS?:
In order to give a height and width to a span, you have to convert it to
a block level element. Setting the style as “display: inline-block”
will make it a block element with width and height, still displaying as
inline element.
When I used the following CSS, I got the result I wanted:
<span style="background-color: black; color: white; display: inline-block; width: 100%"> Interface Received(Kbps) Transmit(Kbps) Total(Kbps)</span>
[/network/web/html/css]
permanent link
Fri, Feb 27, 2015 11:58 pm
Viewing installed Windows updates from a command prompt
If you wish to get a list of the installed updates on a Microsoft Windows
system from the command line, you can use the command
wmic qfe list. You will see something like the following as
output:
C:\Users\JDoe>wmic qfe list | more
Caption                                        CSName      Description      FixC
omments  HotFixID   InstallDate  InstalledBy             InstalledOn  Name  Serv
icePackInEffect  Status
http://go.microsoft.com/fwlink/?LinkId=133041  THELMA-LOU  Update
         KB2849697               NT AUTHORITY\SYSTEM     12/11/2013

http://go.microsoft.com/fwlink/?LinkId=133041  THELMA-LOU  Update
         KB2849696               NT AUTHORITY\SYSTEM     12/11/2013

http://go.microsoft.com/fwlink/?LinkId=133041  THELMA-LOU  Update
         KB2841134               NT AUTHORITY\SYSTEM     12/11/2013

http://support.microsoft.com/                  THELMA-LOU  Update
         KB2670838               NT AUTHORITY\SYSTEM     2/27/2013

http://go.microsoft.com/fwlink/?LinkId=161784  THELMA-LOU  Update
         KB971033                NT AUTHORITY\SYSTEM     11/3/2010

http://support.microsoft.com/?kbid=2305420     THELMA-LOU  Security Update
         KB2305420               NT AUTHORITY\SYSTEM     12/16/2010

http://support.microsoft.com/?kbid=2393802     THELMA-LOU  Security Update
         KB2393802               NT AUTHORITY\SYSTEM     2/10/2011

-- More  --
Since the list may be fairly long, you may want to redirect the output to a
file. E.g.:
C:\Users\JDoe>wmic qfe list >installed_updates.txt

C:\Users\JDoe>
Another alternative that will provide just the "KB" identifier for each
update is to use systeminfo | find ": KB". The list below
is the output from a Windows 7 Professional system [Version 6.1
(Build 7601: Service Pack 1) on February 27, 2015. As you can see the list is
fairly lengthy.
C:\Users\JDoe>systeminfo | find ": KB"
[01]: KB2849697
[02]: KB2849696
[03]: KB2841134
[04]: KB2670838
[05]: KB971033
[06]: KB2305420
[07]: KB2393802
[08]: KB2425227
[09]: KB2475792
[10]: KB2476490
[11]: KB2479628
[12]: KB2479943
[13]: KB2484033
[14]: KB2485376
[15]: KB2487426
[16]: KB2488113
[17]: KB2491683
[18]: KB2492386
[19]: KB2497640
[20]: KB2503658
[21]: KB2503665
[22]: KB2505438
[23]: KB2506014
[24]: KB2506212
[25]: KB2506223
[26]: KB2506928
[27]: KB2507618
[28]: KB2507938
[29]: KB2508272
[30]: KB2508429
[31]: KB2509553
[32]: KB2510531
[33]: KB2511250
[34]: KB2511455
[35]: KB2515325
[36]: KB2518869
[37]: KB2522422
[38]: KB2524375
[39]: KB2525694
[40]: KB2529073
[41]: KB2530548
[42]: KB2532531
[43]: KB2533552
[44]: KB2533623
[45]: KB2534366
[46]: KB2536275
[47]: KB2536276
[48]: KB2539635
[49]: KB2541014
[50]: KB2544893
[51]: KB2545698
[52]: KB2547666
[53]: KB2552343
[54]: KB2555917
[55]: KB2556532
[56]: KB2559049
[57]: KB2560656
[58]: KB2562937
[59]: KB2563227
[60]: KB2563894
[61]: KB2564958
[62]: KB2567053
[63]: KB2567680
[64]: KB2570791
[65]: KB2570947
[66]: KB2572077
[67]: KB2579686
[68]: KB2584146
[69]: KB2585542
[70]: KB2586448
[71]: KB2588516
[72]: KB2603229
[73]: KB2604115
[74]: KB2607576
[75]: KB2607712
[76]: KB2616676
[77]: KB2617657
[78]: KB2618444
[79]: KB2618451
[80]: KB2619339
[81]: KB2620704
[82]: KB2620712
[83]: KB2621440
[84]: KB2631813
[85]: KB2633873
[86]: KB2633952
[87]: KB2639308
[88]: KB2639417
[89]: KB2640148
[90]: KB2641653
[91]: KB2641690
[92]: KB2644615
[93]: KB2645640
[94]: KB2647518
[95]: KB2647753
[96]: KB2653956
[97]: KB2654428
[98]: KB2655992
[99]: KB2656356
[100]: KB2656373
[101]: KB2656411
[102]: KB2658846
[103]: KB2659262
[104]: KB2660075
[105]: KB2660465
[106]: KB2660649
[107]: KB2661254
[108]: KB2665364
[109]: KB2667402
[110]: KB2676562
[111]: KB2677070
[112]: KB2679255
[113]: KB2685811
[114]: KB2685813
[115]: KB2685939
[116]: KB2686831
[117]: KB2688338
[118]: KB2690533
[119]: KB2691442
[120]: KB2695962
[121]: KB2698365
[122]: KB2699779
[123]: KB2705219
[124]: KB2709162
[125]: KB2709630
[126]: KB2709715
[127]: KB2712808
[128]: KB2718523
[129]: KB2718704
[130]: KB2719857
[131]: KB2719985
[132]: KB2724197
[133]: KB2726535
[134]: KB2727528
[135]: KB2729094
[136]: KB2729452
[137]: KB2731771
[138]: KB2731847
[139]: KB2732059
[140]: KB2732487
[141]: KB2732500
[142]: KB2735855
[143]: KB2736233
[144]: KB2736422
[145]: KB2739159
[146]: KB2741355
[147]: KB2742599
[148]: KB2743555
[149]: KB2749655
[150]: KB2750841
[151]: KB2753842
[152]: KB2756822
[153]: KB2756921
[154]: KB2757638
[155]: KB2758857
[156]: KB2761217
[157]: KB2761226
[158]: KB2762895
[159]: KB2763523
[160]: KB2769369
[161]: KB2770660
[162]: KB2773072
[163]: KB2778344
[164]: KB2778930
[165]: KB2779030
[166]: KB2779562
[167]: KB2785220
[168]: KB2786081
[169]: KB2786400
[170]: KB2789645
[171]: KB2790113
[172]: KB2790655
[173]: KB2791765
[174]: KB2798162
[175]: KB2799494
[176]: KB2799926
[177]: KB2800095
[178]: KB2803821
[179]: KB2804579
[180]: KB2807986
[181]: KB2808679
[182]: KB2808735
[183]: KB2813170
[184]: KB2813347
[185]: KB2813430
[186]: KB2813956
[187]: KB2820197
[188]: KB2820331
[189]: KB2829361
[190]: KB2830290
[191]: KB2832414
[192]: KB2833946
[193]: KB2834140
[194]: KB2834886
[195]: KB2835361
[196]: KB2835364
[197]: KB2836502
[198]: KB2836942
[199]: KB2836943
[200]: KB2839894
[201]: KB2840149
[202]: KB2840631
[203]: KB2843630
[204]: KB2844286
[205]: KB2845187
[206]: KB2845690
[207]: KB2846960
[208]: KB2847077
[209]: KB2847311
[210]: KB2847927
[211]: KB2849470
[212]: KB2850851
[213]: KB2852386
[214]: KB2853952
[215]: KB2859537
[216]: KB2861191
[217]: KB2861698
[218]: KB2861855
[219]: KB2862152
[220]: KB2862330
[221]: KB2862335
[222]: KB2862966
[223]: KB2862973
[224]: KB2863058
[225]: KB2863240
[226]: KB2864058
[227]: KB2864202
[228]: KB2868038
[229]: KB2868116
[230]: KB2868623
[231]: KB2868626
[232]: KB2868725
[233]: KB2871997
[234]: KB2872339
[235]: KB2875783
[236]: KB2876284
[237]: KB2876315
[238]: KB2876331
[239]: KB2882822
[240]: KB2883150
[241]: KB2884256
[242]: KB2887069
[243]: KB2888049
[244]: KB2891804
[245]: KB2892074
C:\Users\JDoe>Though 245 are shown above, when I looked at the output of systeminfo
without filtering the output with the find command I saw
the following line immediately before the list of 245 KB numbers.
Hotfix(s): 366 Hotfix(s) Installed.
Another option is to use the free WinUpdatesList (WUL) from NirSoft - see
Checking Installed Updates with WinUpdatesList (WUL).
[/os/windows/commands]
permanent link
Thu, Feb 26, 2015 10:04 pm
Adding a new DNS zone to a Windows Server 2012 DNS server
A Windows Server 2012 Essentials system can function as a Domain Name
System (DNS) server. If the system is functioning as a DNS server you can
add additional zones that are integrated with Active Directory (AD) or you
can add them as file-based zones as you would on a Unix/Linux DNS server.
The Windows DNS server can be configured to support forward or
reverse
lookup zones. A primary, secondary, or stub zone can be added.
[ More Info ]
[/network/dns/windows]
permanent link
Thu, Feb 26, 2015 5:37 pm
Conditional formatting with "and" and "or"
I have a spreadsheet I maintain with Microsoft® Excel® 2008 for Mac
that I use to track work requests. I color code cells in the spreadsheet so
that I can easily identify requests requiring attention or that I need to
keep a closer eye on. I use Excel's conditional formatting capability to
implement the color coding. Excel only provides a maximum of 3 conditions for
conditional formatting, but you can employ formulas using the
logical "and" and "or" connectives to use multiple criteria
for an individual condition to provide additional flexibility with conditional formatting.
E.g., I have an "Expedite" column, column "O", in the spreadsheet
where I place a "Y", if the work request requires an expedited
implementation. The normal implementation time should be within 5
business days, but sometimes requests require a more immediate
implementation. I also have a status column, column "B", that
shows whether a request has been completed or is in some other state,
such as "approved", "pending", "clarification required", etc. In
any case where there is a "Y" in the Expedite column and the value
in the status column doesn't equal "Completed", I want to make the
background of the cell where the "Y" appears in the Expedite column
red, so I can easily spot ones that I need to track closely to
ensure they are completed by the given deadline for the request. I
can easily do that with conditional formatting.
To apply that formatting, I can click on one of the cells in column "O", which
is the "Expedite" column and then click on Format and
select Conditional Formatting and set a formula for the cell.
E.g., if I've selected the first row in the spreadsheet, I can use the
formula below:
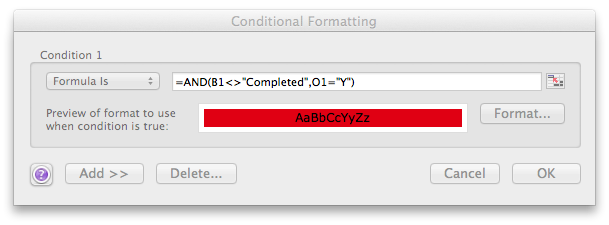
=AND(B1<>"Completed",O1="Y")
The formula specifies that if cell B1 doesn't contain the text "Completed"
and cell O1 contains "Y", then the condition is met. I can click on
the Format button and then pick the color I want to apply
to the cell background, in this case I want it colored red. Conditions that
form the logical
conjunction are separated by commas.
You can also apply
conditional formatting with an "or" condition and copy the conditional
formatting to other cells as explained there.
[/os/windows/office/excel]
permanent link
Wed, Feb 25, 2015 11:22 pm
Where PuTTY Stores SSH port forwarding information
You can configure
PuTTY, a free telnet/SSH client program, to port forward connections over
an SSH connection by going to "SSH" then "Tunnels" when configuring a session.
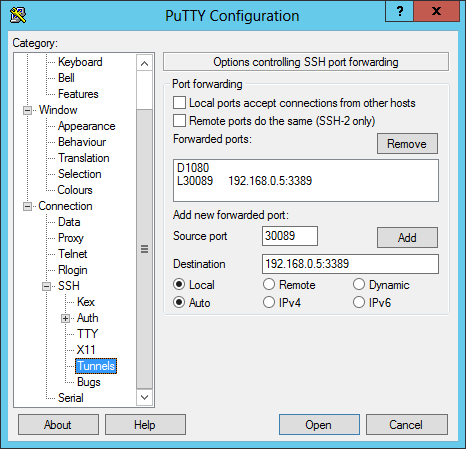
Once you've added instances of port forwarding you can't edit those
instances through the PuTTY configuration window though you can remove them and
add new ones. The information for port forwarding is stored in the registry
under the following key where Session_Name is the name for a stored
session:
HKEY_CURRENT_USER\Software\SimonTatham\PuTTY\Sessions\Session_Name
Updates are stored when you save a session.
E.g., if I saved a session with the name Omega using the tunneling
configuration shown above, the registry entry at
HKEY_CURRENT_USER\Software\SimonTatham\PuTTY\Sessions\Omega
for a dynamic SOCKS proxy at port 1080 and forwarding for RDP using local
port 30,089 forwarded to port 3389 on a system with IP address 192.168.0.5
would be as follows:
| Value name: | PortForwardings |
| Value data: | D1080=,L30089=192.168.0.5:3389 |
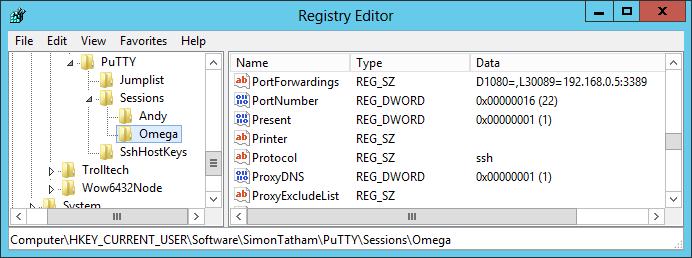
I could change the details for the port forwardings by editing the
registry entry. I would see the changed values when I loaded the session.
I could check the information from a command prompt with the following command:
C:\>reg query "HKEY_CURRENT_USER\Software\SimonTatham\PuTTY\Sessions\Omega" /v PortForwardings

HKEY_CURRENT_USER\Software\SimonTatham\PuTTY\Sessions\Omega
    PortForwardings    REG_SZ    D1080=,L30089=192.168.0.5:3389
[/os/windows/network/ssh/putty]
permanent link
Mon, Feb 23, 2015 11:48 pm
Disabling notifications for incoming email in Outlook 2013
To disable notifications when email arrives in Outlook 2013, take the following
steps:
- Select File.
- Select Options.
- Select Mail.
-
Uncheck the box next to "Play a sound" if you don't want to hear a sound.
If you don't want alerts to pop up, uncheck "Display a Desktop Alert"
- Click on OK
[/os/windows/office/outlook]
permanent link
Sun, Feb 22, 2015 5:27 pm
Checking on whether a Windows system can be hibernated
On a Microsoft Windows system, you can enable the
hibernation
feature using the command
powercfg /hibernate on or
pwercfg /h on.
When you hibernate a Microsoft Windows system, the contents of memory are
written to a file, hiberfil.sys, in c:\. If a system
has been hibernated, when you power it back on, the contents of
hiberfil.sys are read from disk into memory, so bringing a system
up from hibernate mode will take longer than bringing it back from sleep mode,
which is a power saving mode where the system state is saved to memory.
To check if hibernate mode is available, you can issue the command
powercfg /availablesleepstates at a command prompt. E.g., the
following example shows the output of the command on a Microsoft Windows 8
system on which hibernate mode has been enabled.
C:\>powercfg /availablesleepstates
The following sleep states are available on this system:
    Standby (S3)
    Hibernate
    Hybrid Sleep
    Fast Startup

The following sleep states are not available on this system:
    Standby (S1)
        The system firmware does not support this standby state.

    Standby (S2)
        The system firmware does not support this standby state.

    Standby (Connected)
        The system firmware does not support this standby state.
Since hibernate mode is enabled on the system, I can use shutdown /h
at a command prompt on the system to hibernate he system, even though
"hibernate" doesn't appear as one of the options when shutting down the system
through the Windows GUI
The example below shows the output from the
powercfg /availablesleepstates command issued on a Windows Server
2012 Essentials system after hibernate mode was enabled.
C:\>powercfg /availablesleepstates
The following sleep states are available on this system:
    Hibernate
    Fast Startup

The following sleep states are not available on this system:
    Standby (S1)
        The system firmware does not support this standby state.
        An internal system component has disabled this standby state.
                Graphics

    Standby (S2)
        The system firmware does not support this standby state.
        An internal system component has disabled this standby state.
                Graphics

    Standby (S3)
        An internal system component has disabled this standby state.
                Graphics

    Standby (Connected)
        The system firmware does not support this standby state.

    Hybrid Sleep
        Standby (S3) is not available.
References:
-
Enabling hibernation on a Windows Server 2012 Essentials system
Date: February 8, 2015
MoonPoint Support
[/os/windows/commands]
permanent link
Sun, Feb 22, 2015 1:06 pm
Installing Evernote Web Clipper for Chrome
To be able to use Evernote Web Clipper with Chrome, you can take the
following steps.
-
Inside the Chrome browser, click on the menu bar button, which is
represented by 3 horizontal lines, one beneath the other, in the top,
right-hand corner of the Chrome browser window.
-
Click on More Tools.
-
Select Extensions.
-
Scroll down to you see "Get more extensions" then click on the link for
it.
-
In the "Search the store" field, type
Evernote and hit Enter
.
-
Click on "Evernote Web Clipper"
-
At the "Evernote Web Clipper" page, click on the "+ ADD TO CHROME" button
to install the extension.
-
At the "Confirm New Extension" popup message, click on "Add". You should see
a message stating Evernote has been added to Chrome when the installation
has completed. You can then sign into your Evernote account.
The icon for Evernote, which is an elephant's head, should then appear next
to the Chrome menu bar without having to restart Chrome. You should also see
"Evernote Web Clipper" listed as enabled in the Chrome extensions list. You
can click on "options" for Evernote Web Clipper in the extensions list to
set option values.
Once the extension has been installed You will be able to see the
web pages you have saved in Evernote and add additional pages to your
Evernote archive.
Note: instructions tested with Chrome 40.0
on a Microsoft Windows system, but should apply to other versions and
operating systems as well.
[/network/web/browser/chrome]
permanent link
Sat, Feb 21, 2015 9:54 pm
Monitoring an UPS with Windows Server 2012
After connecting a new APC 1300 VA model number BX1300G UPS to a Windows
Server 2012 Essentials system, I found that I didn't need to install the UPS
manufacturer's software for monitoring the battery state in the UPS.
Windows automatically detected the UPS and provided information on the
battery charge for the UPS. I had previously enabled hibernation mode on
the server, so I configured the system to hibernate when the battery charge
for the UPS becomes critically low.
[ More Info ]
[/os/windows/server2012]
permanent link
Thu, Feb 19, 2015 11:01 pm
Enabling DNS Logging for Windows Server 2012
I wanted to log DNS queries and responses from all systems using a Windows
Server 2012 DNS server, so that I would have DNS logs available for reference
in the event of issues related to malware, etc. I also wanted to rotate the
log files every night, so that the file size wouldn't grow continually until
it reached the maximum 500 MB size I specified for the log file. Instructions
for doing so for a Windows Server 2012 system are
here. Instructions
for doing so on a Microsoft Windows Small Business Server (SBS) are
at
Enabling DNS Logging on a Windows
SBS 2003 Server.
[/network/dns/windows/logging]
permanent link
Tue, Feb 17, 2015 8:20 pm
Kaspersky Small Office Security 3 Proxy server is not found
On a system running Small Office Security 3 from
Kaspersky
Lab International Ltd.
, I was notified that
the antivirus database was not up-to-date. When I had the software attempt
to update the virus definitions, I saw the message "Update Center: Task
failed. Proxy server is not found."
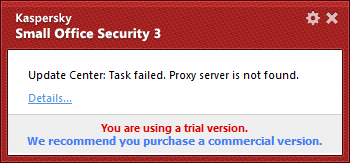
When I viewed the details, the "Detailed report" showed "
Update Center: failure (65)"
I then realized I had recently configured Internet Explorer on the system
to use a SOCKS proxy server - see
Configuring IE 10 to use an SSH SOCKS Proxy Server - so Kaspersky Small
Office Security 3 must automatically use the system proxy settings,
since I had not altered the configuration of the Kaspersky software,
but be unable to communicate with sites if the system proxy setting is
configured to use a SOCKS proxy rather than an HTTP proxy. I encountered
the same issue with Firefox when it was configured to use the system
proxy settings.
I configured Internet Explorer not to use a proxy server and then clicked
on the update button within Kaspersky Small Office Security 3. It was then
able to update its databases.
[/security/antivirus/Kaspersky]
permanent link
Tue, Feb 17, 2015 5:43 pm
Changing the Forwarders in the DNS Manager for Windows Server 2012
If a Windows Server 2012 system is functioning as a DNS server and you need
to change the DNS servers it is using as
forwarders, i.e., the ones to which it is forwarding DNS requests for
external DNS names it can't resolve locally, take the following steps:
-
Use Ctrl-Esc to get to the Start window where you can click on
Administrative Tools.
-
Double-click on DNS.
-
In the right pane of the DNS Manager window, double-click on
Forwarders.
-
Click on the Edit button to edit the list of forwarders. You can
then add, delete, or modify IP adresses for forwarders.
-
Click on OK once you have made the needed changes, then click on
OK again. You can then close the DNS Manager window.
A DNS server that is configured to use a forwarder functions as follows:
-
When the DNS server receives a query, it will attempt to resolve the query by
using the zones that it hosts and by using its cache.
-
If it can't resolve the query using local data, the DNS server forwards the
query to a DNS server that is designated as a forwarder.
-
If no forwarders are available, the DNS server will attempt to use its root
hints to resolve the query.
When a DNS server forwards a query to a forwarder, it sends a recursive
query to a DNS server designated as a forwarder rather than an iterative
query that a DNS server sends to another DNS server during standard name
resolution (name resolution that does not involve a forwarder).
If you would like further information on forwarders and conditional
forwarders, see
Understanding Forwarders.
[/os/windows/server2012]
permanent link
Tue, Feb 17, 2015 11:46 am
Reverting to a prior revision in Google Sheets
I sorted a spreadsheet created in
Google Sheets on a
column containing a date in order to revert to my original ordering of the
data after sorting on a column containing numbers. The spreadsheet had
a header row and another row at the bottom of the column where I summed
values in the column I had first sorted on. I was hoping merely to undo
the result of the numerical sort and get back to the sorting by date,
but I found that the sort on the date column put the header row at the
bottom of the worksheet along with the monthly sort by numeric value,
i.e., it sorted on those rows as well. I could have avoided including
those in the sort by selecting just the rows I wanted sorted by clicking
on the first row I wanted sorted and then the last one while holding
down the shift key, but I hadn't done that.
I couldn't find any way to unsort the data, i.e., to turn off the sorting
to revert to my original ordering, but Google Sheets does provide
the capability to revert to a prior version of a document. To do so,
click on "File" at the top of the workbook then select "See revision
history", which you can also get to by Ctrl+Alt+Shift+G. You will then
see a "Revision history" list with the times of prior revisions. You can
select one of those to restore a prior version of the workbook. When you
click on the entry for a prior revision, a link will appear beneath it
to "Restore this revision". You will also be shown the workbook as it
looked for the prior revision, so you can decide whether that is the
revision you wish to restore before actually restoring it.
[/network/web/services/google]
permanent link
Mon, Feb 16, 2015 9:26 pm
phpMyAdmin 4.3.6 on CentOS 7
When I tried accessing phpmyadmin on a CentOS 7 server running the Apache
webserver software using http://example.com/phpmyadmin, I received the message
below:
Forbidden
You don't have permission to access /phpmyadmin
on this server.
I got the same error if I tried using the IP address of the system instead
of example.com.
I could see the phpMyAdmin files on the system in /usr/share/phpMyAdmin and the rpm command showed
the package for it was installed on the system.
# rpm -qa | grep Admin
phpMyAdmin-4.3.6-1.el7.noarch
And when I logged into the web server, opened a browser, and pointed it
to http://localhost/phpmyadmin, I was able to get the phpMyAdmin login prompt.
I could also get to the setup page at http://localhost/phpmyadmin/setup. I
still received the "forbidden" error message if I tried the IP address of
the system in the address bar of the browser while logged into the system,
though.
I encountered the same error message about 4 years ago as noted in
Installing phpMyAdmin on a CentOS System Running Apache. In that
case my notes indicated I edited the phpmyadmin.conf file to add access
from an additional IP address. But when I looked for a phpadmin.conf
file on the current system, there was none to be found. After a little
further investigation, though, I found I should have been looking for
phpMyAdmin.conf rather than phpmyadmin.conf. I.e., I needed to look for a file
with a capital "M" and "A" in the file name.
# locate phpMyAdmin.conf
/etc/httpd/conf.d/phpMyAdmin.conf
I then added 192.168 after the instances of the
localhost address,
127.0.0.1, in the Directory /usr/share/phpMyAdmin/ section of
/etc/httpd/conf.d/phpMyAdmin.conf as shown
below, since the other systems on the LAN
had addresses in the 192.168.xxx.xxx range, so I could access
phpMyAdmin from any other system on the LAN.
<Directory /usr/share/phpMyAdmin/>
   AddDefaultCharset UTF-8

   <IfModule mod_authz_core.c>
     # Apache 2.4
     <RequireAny>
       Require ip 127.0.0.1 192.168
       Require ip ::1
     </RequireAny>
   </IfModule>
   <IfModule !mod_authz_core.c>
     # Apache 2.2
     Order Deny,Allow
     Deny from All
     Allow from 127.0.0.1 192.168
     Allow from ::1
   </IfModule>
</Directory>
I then restarted the Apache web server software by running apachectl
restart from the root account. I was then able to access phpMyAdmin
using the internal IP address of the system, e.g.,
http://192.168.0.5/phpmyadmin, though http://example.com/phpmyadmin didn't work
because even though I was trying to access the server from a system on
the same LAN by using the
fully
qualified domain name (FQDN), I was then accessing the system by the
external address on the outside of the firewall/router it sits behind. But,
in this case, accessing it by IP address was sufficient.
[/network/web/tools/phpmyadmin]
permanent link
Mon, Feb 16, 2015 3:59 pm
Scheduling a task to run periodically with schtasks
On newer versions of the Microsoft Windows operating system, such as
Windows 2008 and Server 2012, the at command that could be
used on earlier versions of Windows to schedule the execution of batch jobs
at a specified interval has been deprecated. The command has been replaced
with schtasks. You can use schtasks to specify how frequently
a batch job should be run, the account it should be run from, the time
the task should run, an end time, end date, etc.
C:\Users\JDoe>schtasks /?

SCHTASKS /parameter [arguments]

Description:
    Enables an administrator to create, delete, query, change, run and
    end scheduled tasks on a local or remote system.

Parameter List:
    /Create         Creates a new scheduled task.

    /Delete         Deletes the scheduled task(s).

    /Query          Displays all scheduled tasks.

    /Change         Changes the properties of scheduled task.

    /Run            Runs the scheduled task on demand.

    /End            Stops the currently running scheduled task.

    /ShowSid        Shows the security identifier corresponding to a scheduled t
ask name.

    /?              Displays this help message.

Examples:
    SCHTASKS
    SCHTASKS /?
    SCHTASKS /Run /?
    SCHTASKS /End /?
    SCHTASKS /Create /?
    SCHTASKS /Delete /?
    SCHTASKS /Query  /?
    SCHTASKS /Change /?
    SCHTASKS /ShowSid /?
[ More Info ]
[/os/windows/commands]
permanent link
Sun, Feb 15, 2015 10:42 pm
Using PuTTY to set up a SOCKS Proxy Connection
A SOCKS proxy can be set up from a system using an encrypted tunnel
established via an SSH connection to an SSH server, e.g., see
Creating a Socks Proxy Server
with SSH. On a Microsoft Windows system, the free
PuTTY telnet
and SSH client software can be used to set up such a connection. After
configuring PuTTY to establish a SOCKS proxy via its connection to the SSH
server, any browser that supports SOCKS proxies, such as Internet Explorer,
Chrome, Firefox, etc., can be configured to route its traffic to web servers
via the SOCKS proxy.
[ More Info ]
[/network/proxy]
permanent link
Sat, Feb 14, 2015 11:19 pm
Determining image information from the command line on OS X using file
For a file that is an image, you can determine the type of image from
a shell prompt, e.g., from a Terminal window, on an OS X system using
the file command:
$ file menu_button
menu_button: PNG image data, 18 x 18, 8-bit/color RGB, non-interlaced
For PNG images, the command will also reveal the size of the image, e.g., for
the example above the image is 18 pixels wide by 18 pixels high. The first
number is the width and the second number is the height, though in this case
the height equals the width.
The command can be useful if a file has a missing extension or if you need
to verify that the file extension matches the actual image type.
The command determines the type of image stored in a file from a
"magic number"
stored near the beginning of the file. For PNG images, the
PNG file header, which is the first 8 bytes
of the file, will contain ASCII 89 P N G cr nl sub nl. CR
represents a carriage return (octal 15, decimal 13, hexadecimal 0D) and NL
represents a newline, aka line feed, character (decimal 10, octal
12, hexadecimal 0A). ASCII SUB is octal 032, decimal 26 and hexadecimal
1A. The first character before "PNG" is octal 211, which is decimal 137 and
hexadecimal 89.
You can see the characters at the beginning of the file using the
od utility, which is a filter which displays the specified files,
or standard input if no files are specified, in a specified format. Supported
formats include octal, decimal, hexadecimal, or
ASCII. E.g, to display the
first 8 bytes of a file in ASCII format, you can use the -a option
to display the data in ASCII format and the -N option to display
only the first 8 bytes.
$ od -a -N 8 menu_button
0000000   89   P   N   G  cr  nl sub  nl
0000010
The 89 is the hexadecimal number for the first byte; that
is 137 in decimal and 211 in octal. The first 8 bytes in octal
format are shown below:
$ od -b -N 8 menu_button
0000000   211 120 116 107 015 012 032 012
0000010
The hexdump command with the -C ("C" stands
for "canonical") option can be used to display both hexadecimal and
ASCII output at the same time.
$ hexdump -C -n 8 menu_button
00000000  89 50 4e 47 0d 0a 1a 0a                           |.PNG....|
00000008
For GIF files,
file displays the size of the image with the first number, 165 in
the example below, being the width and the second number, 57, being
the height.
$ file home.gif
home.gif: GIF image data, version 89a, 165 x 57
File can determine that a file is a GIF file because for a GIF file the
first 6 characters of the file will be ASCII GIF87a.
$ od -a -N 6 home.gif
0000000    G   I   F   8   9   a
0000006
You can display both the hexadecimal and ASCII characters with the
hexdump command using the -C option.
$ hexdump -C -n 6 home.gif
00000000  47 49 46 38 39 61                                 |GIF89a|
00000006
For JPG files,
the file command won't display the image dimensions, but will display
any comments stored within the image.
$ file A12.jpg
A12.jpg: JPEG image data, JFIF standard 1.01, comment: "Processed By eBay with ImageMag"
The first two bytes of a JPG file are hexadecimal FF D8 and the last
two bytes in the file are hexadecimal FF D9
$ hexdump -n 2 A12.jpg
0000000 ff d8
0000002
$ hexdump A12.jpg
<text snipped>
00047c0 17 b2 96 08 0b 42 70 10 38 01 33 45 d0 7f ff d9
00047d0
[/os/os-x]
permanent link
Sat, Feb 14, 2015 4:43 pm
Correcting "Windows Installer Service could not be accessed" Problem
When I tried to install Norton Ghost 7.5 on a Windows Small Business Server
(SBS) 2003 server, I received the message below:
| Windows Installer |
The Windows Installer Service could not be accessed.
This can occur if you are running Windows in safe
mode, or if the Windows Installer is not correctly
installed. Contact your support personnel for assistance.
[ OK ]
|
I downloaded
Windows Installer 3.1 Redistributable (v2) From Microsoft's Download Center
and installed it, but I got the same results when I tried to reinstall
Symantec Ghost 7.5.
Microsoft's article,
"Error 1719: The Windows Installer service could not be accessed" error message
when you try to add or remove a program states the behavior may occur
if the following conditions are true:
- The Windows Installer files that are on your hard disk are damaged or are
missing.
- You install or remove a program that uses the Windows Installer Microsoft
Software Installation (MSI) package file (.msi). For example, this may occur
when you try to install Microsoft Office on your computer.
I was starting the Symantec Gost 7.5 installation process from a CD with an
autorun file, but I noticed there was a file, Symantec Ghost.msi in
an Install directory on the CD. The installation process likely uses
the .msi
file for the installation.
Microsoft's article recommends steps to resolve the problem. You should first
determine the location of the file msiexec.exe on your system. The file
will be in the Windows system32 directory, which is usually either
C:\Windows\system32 or C:\WINNT\system32 for versions of
Windows after Windows 98. For Windows 98 the file is usually in
C:\Windows\System. You can search for
the file or you can determine the
Windows directory by obtaining a command prompt and checking the value of
the %WINDIR% environment variable with echo %WINDIR%,
which will tell you which directory is the Windows directory on a system.
You can then verify that msiexec.exe is in that directory.
C:\>dir %WINDIR%\system32\msiexec.exe
 Volume in drive C has no label.
 Volume Serial Number is E88C-7773

 Directory of C:\Windows\system32

03/21/2005  02:00 PM            78,848 msiexec.exe
               1 File(s)         78,848 bytes
You then need to check the registry to make sure that
HKEY_LOCAL_MACHINE\SYSTEM\CurrentControlSet\Services\MSIServer\ImagePath
has a value that corresponds to the actual location of the
msiexec.exe file on the system. You can do so using the
regedit command or using a reg query command from a command
prompt.
C:\>reg query HKEY_LOCAL_MACHINE\SYSTEM\CurrentControlSet\Services\MSIServer

HKEY_LOCAL_MACHINE\SYSTEM\CurrentControlSet\Services\MSIServer
    Description    REG_SZ    Adds, modifies, and removes applications provided a
s a Windows Installer (*.msi) package. If this service is disabled, any services
 that explicitly depend on it will fail to start.
    Type    REG_DWORD    0x20
    Start    REG_DWORD    0x3
    ErrorControl    REG_DWORD    0x1
    ImagePath    REG_EXPAND_SZ    C:\Windows\system32\msiexec.exe /V
    DisplayName    REG_SZ    Windows Installer
    DependOnService    REG_MULTI_SZ    RpcSs
    DependOnGroup    REG_MULTI_SZ
    ObjectName    REG_SZ    LocalSystem

HKEY_LOCAL_MACHINE\SYSTEM\CurrentControlSet\Services\MSIServer\Security
HKEY_LOCAL_MACHINE\SYSTEM\CurrentControlSet\Services\MSIServer\Enum
If the msiexec.exe file is in C:\Windows\System32, you should
see C:\Windows\System32\Msiexec.exe /V as the value in the key.
In the case of the system I was working on, the file location matched the
registry value.
If the values don't match, you will need to enter the correct path in the
registry or put the file in the directory listed in the registry. Once the
values match, you will need to reregister the msiexec.exe file.
To do so, restart the computer in Safe Mode (hit F8
to get the menu of boot options before Windows starts when you reboot).
Once you've logged into an administrator account on the system in Safe Mode,
you will need to use the following procedure:
Click Start, click Run, type the following line, and then
click OK:
msiexec /regserver
Note: For 64-bit operating systems, you also need to reregister the 64-bit MSI
installer. To do this, click Start, click Run, type the
following line, and then click OK:
Drive:\Windows\Syswow64\Msiexec /regserver
On 64-bit editions of a Windows operating system, 32-bit binaries are located
in %systemroot%\SysWow64 folder. 64-bit binaries are located in the
%systemroot%\System32 folder.
Once you have reregistered the msiexec.exe file, you will need
to reboot into standard mode. Then try the installation process again that
failed previously. If that fails, Microsoft does offer another alternative
for dealing with the problem. See "Method 2" at
"Error 1719: The Windows
Installer service could not be accessed" error message when you try to add or
remove a program.
In my case, I was then able to successfully reinstall Symantec Ghost 7.5
on the system, though I did receive another error at the end of the process
that was not associated with the previous installer problem. The error I
received at the end is shown below.
| Symantec Ghost Configuration Server |
08001 [Sybase[[ODBC driver][Adaptive Server Anywhere]Unable to connect to
database server: Database server not running
[ OK ]
|
References:
-
Windows Installer 3.1 Redistributable (v2)
Date Published: September 2, 2005
Microsoft Download Center
-
"Error 1719: The Windows Installer service could not be accessed" error
message when you try to add or remove a program
Article ID : 315346
Last Review : March 1, 2007
Microsoft Help and Support
-
File Extension Details for .MSI
FileExt
[/os/windows/utilities/backup/ghost]
permanent link
Fri, Feb 13, 2015 10:45 pm
Hiding an Account from the Windows 7 Welcome Screen
To hide an account from the Microsoft Windows 7 welcome screen, take
the following steps:
-
Click on the Start button.
-
Type regedit in the "Search programs and files" field and hit
Enter.
-
When prompted if you want to allow the program to make change to the system,
choose "yes".
-
Navigate to
HKEY_LOCAL_MACHINE\Software\Microsoft\Windows NT\CurrentVersion\Winlogon\
-
Right-click on Winlogon and choose "New" then "Key" and put
SpecialAccounts for the key name.
-
Right-click on SpecialAccounts and choose "New" then "Key" and put
Userlist for the key name.
-
Right-click on UserList on the left side of the window and select
New and then DWORD (32-bit) Value.
-
You'll see the new entry in the right pane of the window, rename
this value, which by default will be labelled "New Value #1", to
the name of the user account you want hidden. It should be exactly
how it is listed on the welcome screen you see when the system
starts. Leave the value at 0.
-
You can then close the registry editor by clicking on File then
Exit.
Now when you logoff, you shouldn't see the hidden account on the
welcome screen. If you still see it, reboot.
Note: unlike with hidden accounts under Windows XP, you can't log into
a hidden account by hitting the Ctrl, Alt, and Del keys.
[/os/windows/win7]
permanent link
Fri, Feb 13, 2015 4:50 pm
Countif greater than or equal to a date
If you want to determine the number of entries in a spreadsheet that have
a date value that is greater than or equal to a particular date, you can
use the
COUNTIF function in Excel. E.g., if you had dates
in column G rows 4 through 959 and wished to know the number of rows
with a date that was greater than or equal to October 15, 2014, you could
use the formula below, assuming you are using the common U.S. style of date
in the form mm/dd/yyyy.
=COUNTIF(G4:G959,">=10/15/2014")
Suppose, instead, that you had a date in F970 and you wished to use
whatever date you had in that cell for the date comparision operation.
You could then use the following formula:
=COUNTIF(G4:G959,">="&F970)
The ampersand before the F970 concatenates the value in that cell to
the string >=, so that if cell F970 contains the date value
10/15/2014, COUNTIF will only count cells containing a date
greater than or equal to that date.
[/os/windows/office/excel]
permanent link
Fri, Feb 13, 2015 4:38 pm
Paste stopped working on OS X 10.8.5 laptop
On a MacBook Pro running OS X 10.8.5, the paste operation stopped working.
I didn't receive any error messages whenever I tried to copy text in
an application, but if I then tried to paste anything into that application
or any other, nothing would be pasted. Copying and pasting didn't work with
Command-C and
Command-V nor by selecting the copy and
paste functions from applications' menus. Nor did cutting with
Command-X
and then pasting with
Command-V work.
When I went to Edit and selected Show Clipboard within the
Finder, I saw "Clipboard contents: none".
The solution I found after some online searching was to kill the PasteBoard,
aka clipboard, process and restart it. That allowed me to use copy and
paste without rebooting the computer.
$ ps -A | grep pboard | grep -v grep
  464 ??         0:00.03 /usr/sbin/pboard
$ kill -s HUP 464
$ ps -A | grep pboard | grep -v grep
$
$ launchctl start com.apple.pboard
$ ps -A | grep pboard | grep -v grep
49810 ??         0:00.00 /usr/sbin/pboard
To be able to use copy and paste after restarting the pboard process, you
will need to close and reopen any application in which you need to copy and
paste data after you restart the process. You won't see data that is copied
appear in the clipboard shown by the Finder until you restart the Finder,
which you can do by clicking on the Apple icon at the top left of your screen
and then selecting Force Quit, then clicking on Finder
within the Force Quit Applications window to select it, and then
clicking on the Relaunch button. After you do that, you can click
on Edit and Show Clipboard within the Finder and see what
was previously copied into the clipboard before restarting the Finder.
If you have an application open that was open before you restarted the
PasteBoard, if you try copying something from it, it won't appear in the
clipboard. You will have to restart that application to copy anything from
it.
[/os/os-x]
permanent link
Mon, Feb 09, 2015 10:24 pm
Managing Chrome Cookies
To manage cookies in Google Chrome, take the following steps:
-
Click on the
Chrome menu bar, which is 3 short, horizontal lines, one below the
other at the top of the Chrome browser window.
- Click on Settings.
Note: you can also get to the settings window by putting
chrome://settings/ in the Chrome address bar.
- Scroll down until you see "Show advanced settings", then
click on "Show advanced settings".
-
In the Privacy section, click on the Content settings button.
-
At the Content settings window, click on the All cookies and
site data button.
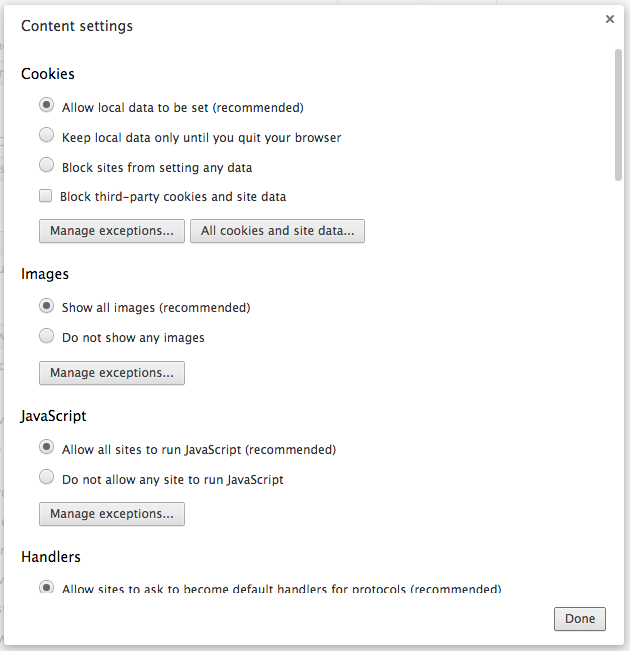
Note: you can also get to this window by putting
chrome://settings/content in the browser address bar.
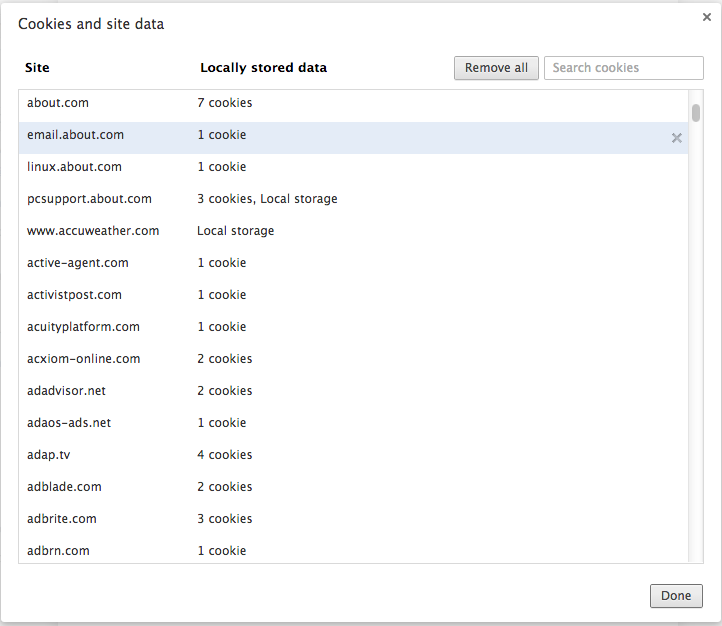
You will now see a Cookies and site data window showing you a
list of all the cookies Chrome has stored.
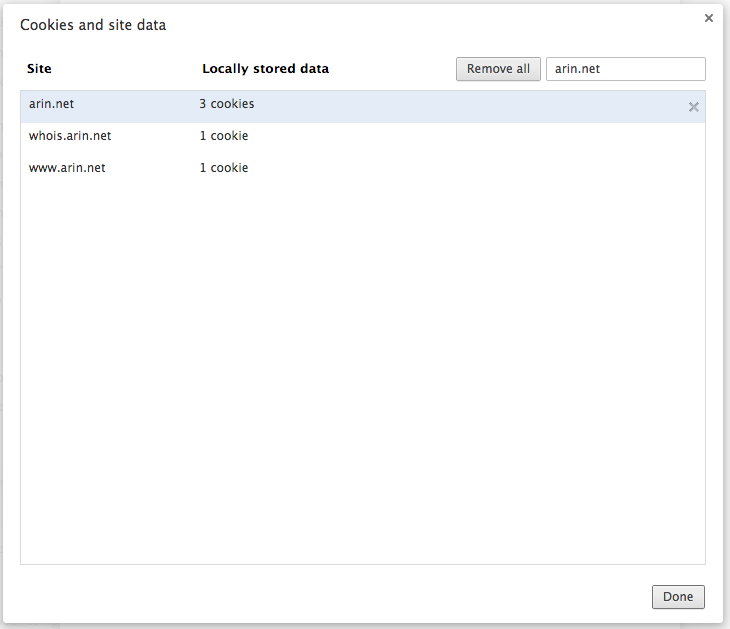
If you only want to check on cookies for a particular site, you can put
the site name in the "Search cookies" field next to the Remove all
button to display just the cookies associated with that domain name as shown
below where only the cookies pertaining to arin.net are displayed.
You dont' need to type in a complete domain name. E.g., if you wanted
to search for any cookies associated with a website with a domain name
beginning with "mysite", you could simply enter mysite for the
search criteria. If you wanted to delete the cookies for that site, with
only the relevant cookies for that site displayed by the search criteria,
you could click on Remove all to get rid of just the cookies for
that site.
Note: a shortcut to get to this list is to put chrome://settings/cookies
in the Chrome address bat.
[/network/web/browser/chrome]
permanent link
Sun, Feb 08, 2015 11:10 pm
Enabling hibernation on a Windows Server 2012 Essentials system
The command
shutdown /h can be used to hibernate a Microsoft
Windows system. If you run the command on a Windows Server 2012 Essentials
system which hasn't had hibernation mode enabled, you will see the following
message:
PS C:\Users\User> shutdown /h
Hibernation is not enabled on this system. You must enable hibernation in order to use the -h option.
To enable hibernation, you can issue the command powercfg
/hibernate on from a PowerShell prompt. However, you may see the
message below when you enter the command:
PS C:\Users\User> powercfg /hibernate on
An unexpected error condition has occurred.  Unable to perform operation.  You may not have permission to perform this o
peration.
To enable hibernation, right-click on the PowerShell icon, which looks like
a button with a ">_" in it, then choose "Run as Administrator" and then issue
the powercfg command.
Windows PowerShell
Copyright (C) 2012 Microsoft Corporation. All rights reserved.

PS C:\Windows\system32> powercfg /hibernate on
PS C:\Windows\system32>
Once you've done that, you can hibernate the system with shutdown
/h.
[/os/windows/server2012]
permanent link
Sat, Feb 07, 2015 10:24 pm
Obtaining a command prompt with administrator access under Windows 7
To open a command prompt with administrator access under Windows 7
you can take the following steps:
-
Click on the Windows Start button.
-
In the "Search programs and files" field type
cmd.

-
Right-click on cmd.exe and choose "Run as administrator". Provide
a userid and password for an account in the administrators group when
prompted.
Alternatively, you can open a command prompt with administrator
access from a command prompt you've opened from a standard user account
by typing runas /user:administrator cmd.exe. Or you can
substitute the name of some other account with administrator access
instead of "administrator". Enter the password for the account
when prompted to provide it.
[/os/windows/win7]
permanent link
Thu, Feb 05, 2015 10:50 pm
Chrome menu bar color changes
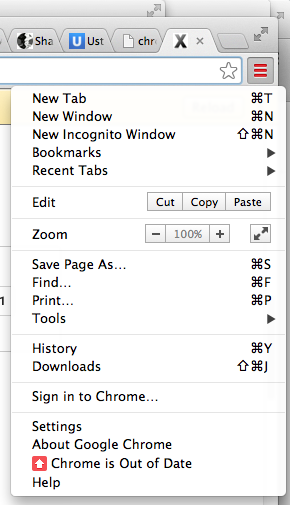
The Google Chrome menu bar, which consists of three horizontal bars, one
beneath the other, in the upper, right-hand corner of a Chrome window will
change color if Chrome is not up-to-date. Normally the 3 lines are black, but
they will change to green, orange, or red if the version of the Chrome
browser that you are using is no longer current. E.g., in the screen
shot below taken on a Mac OS X system running Chrome 35.0, the bars
have turned red. The menubar color changes apply to Chrome on other
operating sytems as well. Clicking on the menubar shows a list of menu
options, but also a "Chrome is Out of Date" message.
The menu bar color shows how long an update has been available:
| Color | How long an update has been available |
|---|
 | 2 days |
 | 4 days |
 | 7 or more days |
To configure Chrome to update automatically on a Mac OS X system, you can
select "About Google Chrome" from the menu that is accessible from the menu
bar then click on the "Set Up Automatic Updates for All Users" button.
References:
-
Update Google Chrome
Google Help
[/network/web/browser/chrome]
permanent link

Privacy Policy
Contact


