←July→
| Sun |
Mon |
Tue |
Wed |
Thu |
Fri |
Sat |
| |
|
|
1 |
2 |
3 |
4 |
| 5 |
6 |
7 |
8 |
9 |
10 |
11 |
| 12 |
13 |
14 |
15 |
16 |
17 |
18 |
| 19 |
20 |
21 |
22 |
23 |
24 |
25 |
| 26 |
27 |
28 |
29 |
30 |
31 |
|
|
|
Sat, Jul 18, 2026 5:40 pm
Advanced Diary Active Database and Backup Registry Values
Advanced Diary is a journaling/diary
application for Microsoft Windows systems developed by
CSoftLab. It stores the location of
the currently active datbase in the
Windows registry at
HKEY_CURRENT_USER\SOFTWARE\CSoftLab\Advanced Diary\Databases in
the key Database0. You can query the value from a
command prompt
using the reg query command
reg query "HKEY_CURRENT_USER\SOFTWARE\CSoftLab\Advanced Diary\Databases"
/v Database0
. You can change the value from a
command-line
interface (CLI) using the reg
add command.
C:\>reg query "HKEY_CURRENT_USER\SOFTWARE\CSoftLab\Advanced Diary\Databases" /v Database0

HKEY_CURRENT_USER\SOFTWARE\CSoftLab\Advanced Diary\Databases
    Database0    REG_SZ    Protocol=Local*Database=C:\Users\Alice\Documents\Advanced Diary\diary.dndb


C:\>
It stores the settings for automatic backups at
HKEY_CURRENT_USER\SOFTWARE\CSoftLab\Advanced Diary\Options.
The default option settings when no automatic backup has been set are
shown below.
C:\>reg query "HKEY_CURRENT_USER\SOFTWARE\CSoftLab\Advanced Diary\Options" | find "AutoBackup"
    AutoBackup    REG_DWORD    0x0
    AutoBackupPath    REG_SZ
    AutoBackupMode    REG_DWORD    0x0
    AutoBackupTime    REG_BINARY    4F5555555555D53F

C:\>
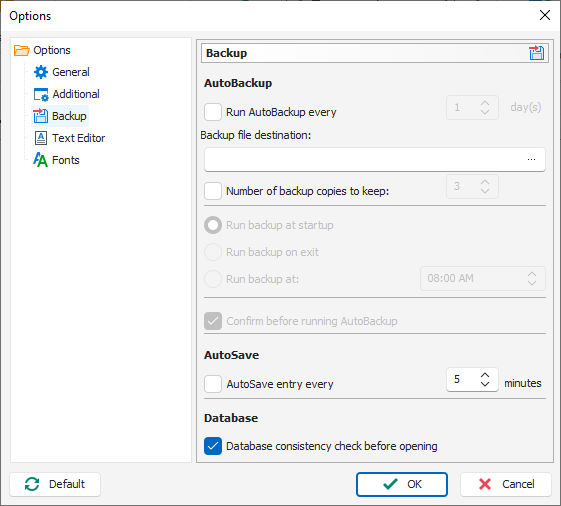
You can change the backup settings in the program by selecting Tools,
then Options, then Backup from the Advanced Diary menu bar.
The registry settings when automatic backups have been turned on with a
backup location specified and the default backup options left in place, e.g.,
every day, are shown below.
C:\>reg query "HKEY_CURRENT_USER\SOFTWARE\CSoftLab\Advanced Diary\Options" | find "AutoBackup"
AutoBackup REG_DWORD 0x1
AutoBackupPath REG_SZ P:\alice\Advanced Diary Backups\
AutoBackupMode REG_DWORD 0x0
AutoBackupTime REG_BINARY 4F5555555555D53F
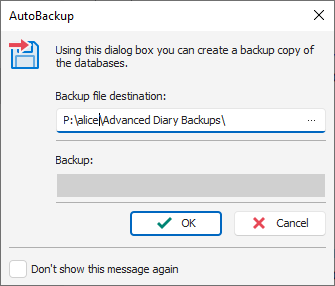
C:\>When you turn on the backup option, the next time you start the program
you will see a AutoBackup window prompting you to OK a backup.
if you leave the "Confirm before running AutoBackup" option checked.
The "AutoSave" option is stored in the registry at AutoSave
under HKEY_CURRENT_USER\SOFTWARE\CSoftLab\Advanced Diary\Options.
The default value is zero. With "AutoSave entry ever 5 minutes" turned on
the value will be "1" as shown below.
C:\>reg query "HKEY_CURRENT_USER\SOFTWARE\CSoftLab\Advanced Diary\Options" /v AutoSave

HKEY_CURRENT_USER\SOFTWARE\CSoftLab\Advanced Diary\Options
    AutoSave    REG_DWORD    0x1


C:\>
The value in minutes for the interval at which automatic saves are performed
is stored in the AutoSaveInterval key. The key that controls
whether the user is prompted to confirm backups is stored in the
BackupConfirmation key. A value of "0" indicates that confirmation
is not required.
C:\>reg query "HKEY_CURRENT_USER\SOFTWARE\CSoftLab\Advanced Diary\Options" /v AutoSaveInterval

HKEY_CURRENT_USER\SOFTWARE\CSoftLab\Advanced Diary\Options
    AutoSaveInterval    REG_DWORD    0x5


C:\>reg query "HKEY_CURRENT_USER\SOFTWARE\CSoftLab\Advanced Diary\Options" /v BackupConfirmation

HKEY_CURRENT_USER\SOFTWARE\CSoftLab\Advanced Diary\Options
    BackupConfirmation    REG_DWORD    0x0


C:\>
Related articles:
-
Obtaining a command prompt in Windows 11
Date: August 14, 2023
-
Remotely Enabling Remote Desktop Protocol From the Command Line
Date: April 11, 2009
-
Checking Microsoft Windows proxy server
settings
Date: January 7, 2015
[/os/windows/software/journaling/AdvDiary]
permanent link
Fri, Jul 17, 2026 9:30 pm
Renaming a Windows system and joining a Windows domain with PowerShell
You can view the current name of a system running a Microsoft Windows
operating system
(OS) using the hostname command in a
PowerShell or
command prompt window.
You can change the name of the
host by opening
a PowerShell window with administrator privileges by choosing "Run as
administrator" when opening the window and then using the PowerShell command
Rename-Computer -NewName "name" where name is the
new name you wish to assign to the system. Note: names must be 15 or fewer
characters due to NetBIOS
limitations and should only use standard alphanumeric characters, i.e, A-Z,
0-9, and hyphens (-). Spaces and most special characters are invalid and will
cause an error.
PS C:\Windows\system32> hostname
DESKTOP-PNS32H3
PS C:\Windows\system32> Rename-Computer -NewName "Jamestown"
WARNING: The changes will take effect after you restart the computer DESKTOP-PNS32H3.
PS C:\Windows\system32>
You will need to reboot to have the new name go into effect; you can
add the -Restart option to the command to restart automatically.
E.g., Rename-Computer -NewName "TheNewName" -Restart.
To join a Windows
domain from a
command-line interface (CLI), you can issue the command
Add-Computer -DomainName "YourDomainName" -Credential
(Get-Credential) -Restart
— replace YourDomainName with
the name of the Windows domain. If you don't want to automatically reboot, omit
the -Restart option.
Add-Computer -DomainName "ad.example.com" -Credential (Get-Credential) -Restart

cmdlet Get-Credential at command pipeline postion 1
Supply values for the following parameters:
Credential
You will see a "Windows PowerShell credential request" window open where
you can provide a user name and password for an account in the domain
administrators group. The system will automatically reboot if you have
added the -Restart parameter.
[/os/windows/PowerShell]
permanent link
Thu, Jul 16, 2026 6:53 pm
Querying and setting network settings with PowerShell
To determine the IP
address of a Microsoft Windows system from a
command-line
interface (CLI) you can
open a command prompt window and
use the ipconfig command
ipconfig /all. If you only need the IPv4 address you can
pipe
the output into find
or findstr. Alternatively,
you can use a netsh command.
C:\>ipconfig /all | find "IPv4 Address"
   IPv4 Address. . . . . . . . . . . : 192.168.0.8(Preferred)

C:\>ipconfig | findstr /C:"IPv4"
   IPv4 Address. . . . . . . . . . . : 192.168.0.8

C:\>netsh interface ip show addresses

Configuration for interface "Ethernet"
    DHCP enabled:                         Yes
    IP Address:                           192.168.0.8
    Subnet Prefix:                        192.168.0.0/24 (mask 255.255.255.0)
    Default Gateway:                      192.168.0.1
    Gateway Metric:                       0
    InterfaceMetric:                      25

Configuration for interface "Loopback Pseudo-Interface 1"
    DHCP enabled:                         No
    IP Address:                           127.0.0.1
    Subnet Prefix:                        127.0.0.0/8 (mask 255.0.0.0)
    InterfaceMetric:                      75


C:\>
You can also use a
PowerShell cmdlet to view the IP address.
PS C:\> Get-NetIPAddress -AddressFamily IPv4


IPAddress         : 192.168.0.8
InterfaceIndex    : 5
InterfaceAlias    : Ethernet
AddressFamily     : IPv4
Type              : Unicast
PrefixLength      : 24
PrefixOrigin      : Dhcp
SuffixOrigin      : Dhcp
AddressState      : Preferred
ValidLifetime     : 15:58:12
PreferredLifetime : 15:58:12
SkipAsSource      : False
PolicyStore       : ActiveStore

IPAddress         : 127.0.0.1
InterfaceIndex    : 1
InterfaceAlias    : Loopback Pseudo-Interface 1
AddressFamily     : IPv4
Type              : Unicast
PrefixLength      : 8
PrefixOrigin      : WellKnown
SuffixOrigin      : WellKnown
AddressState      : Preferred
ValidLifetime     : Infinite ([TimeSpan]::MaxValue)
PreferredLifetime : Infinite ([TimeSpan]::MaxValue)
SkipAsSource      : False
PolicyStore       : ActiveStore


PS C:\>
You can get a more concise version showing the interface and address
with Get-NetIPAddress -AddressFamily IPv4 |Select-Object InterfaceAlias,
IPAddress.
PS C:\> Get-NetIPAddress -AddressFamily IPv4 | Select-Object InterfaceAlias, IPAddress

InterfaceAlias              IPAddress
--------------              ---------
Ethernet                    192.168.0.8
Loopback Pseudo-Interface 1 127.0.0.1


PS C:\>
[ More
Info ]
[/os/windows/PowerShell]
permanent link
Wed, Mar 25, 2026 4:39 pm
Ejecting a Disc with PowerShell
I needed to eject a
optical disc
drive tray from a
command-line
interface (CLI) on a system running Microsoft Windows 11 so that
I could insert a DVD in the drive. That can be done using the
Powershell
command powershell (New-Object -ComObject
WMPlayer.OCX.7).cdromCollection.item(0).Eject(), which will
eject the tray of the first optical drive found by Windows Media Player's
COM object.
PS C:\> powershell (New-Object -ComObject WMPlayer.OCX.7).cdromCollection.item(0).Eject()
Windows PowerShell
Copyright (C) Microsoft Corporation. All rights reserved.

Install the latest PowerShell for new features and improvements! https://aka.ms/PSWindows

PS C:\>
[/os/windows/PowerShell]
permanent link
Thu, Mar 05, 2026 3:30 pm
Disabling Skye automatic startup
I found Microsoft's
Skype for
Business application was automatically staring on a Microsoft Windows
system where it was not being used. Microsoft
retired the product on May 5, 2025, replacing it with
Microsoft Teams,
and is no longer providing security updates or bug fixes for the software.
Though Microsoft ended official support for Skype for Business Server on
October 14, 2025 and is no longer providing cloud service for the product,
companies that installed their own servers can still run it locally. If there
is a need to retain the software on a system, but no need to have it start
automatically when the system boots, one can stop it from
starting whenever the system is rebooted by taking the following steps:
-
Open the program and then click on the gear icon near the top, right side of
the window.
- Choose Tools and Options.

-
Uncheck the option for "Automatically start the app
when I log on to Windows" under the Personal options to prevent
the program from restarting automatically upon a login to the system,
then click on OK to apply the change after unchecking that
option.

[/os/windows/software]
permanent link
Mon, Mar 02, 2026 11:11 pm
Turning off Fast Startup on a system running Microsoft Windows
Microsoft Windows 8 introduced a feature called
Fast Startup. The feature was a variation of hibernate mode, but when
enabled would close all running programs and log the user out before
hibernating. This feature would result in a user being able to log in
more quickly when a system is powered back on after a shutdown. There may
be cases where use of this feature is not desirable, however. E.g., if the
user wants to boot the system into
Linux, but still access data
on the Windows boot drive. To turn fast startup off, you can take the
following steps:
-
Type
Control Panel in the Windows Search field
at the bottom of the screen.
-
Click on System and Security.
-
Click on Change what the power buttons do under Power
Options.
-
Click on Change settings that are currently unavailable.
If prompted for administrator credentials, provide those for
an administrator account.
-
Uncheck the check box next to "Turn on fast startup (recommended)".
-
Click on Save changes. You can then close the window.
[ More Info ]
[/os/windows]
permanent link
Thu, Feb 26, 2026 10:31 pm
Restarting the Windows audio service
If you are experiencing problems with sound on a Microsoft Windows system,
such as being unable to hear audio even when the sound hasn't been muted
and any external speakers are turned on and set to an audible volume level,
one possible way to resolve the problem is to restart the
Windows Audio service. To do so, you can can take the following steps:
- Type
services in
the Windows Search field. You should see it returned by the search
utility. Click on "Run as administrator" and provide the login credentials
for an account that has adminisrator privileges.
- When the Services window opens, scroll
down until you see Windows Audio.
- Right-click on the entry and choose "Restart".
- When the status for the service returns to "Running",
you can close the Services window.
[ More Info ]
[/os/windows]
permanent link
Mon, Feb 23, 2026 10:05 pm
Determining if a drive is encrypted with Bitlocker on a Windows system
If you need to determine if a drive in a Microsoft Windows system or connected
to it via USB is
BitLocker encrypted, you
can use the
manage-bde utility. To use the program, open a
command prompt window with
administrator privileges and then issue the command
manage-bde -status to see the status of all drives. To see just
the status of one drive, e.g., C:, you could use manage-bde -status
C:.
C:\Windows\System32>manage-bde -status c:
BitLocker Drive Encryption: Configuration Tool version 10.0.26100
Copyright (C) 2013 Microsoft Corporation. All rights reserved.

Volume C: [Windows]
[OS Volume]

    Size:                 14826.87 GB
    BitLocker Version:    None
    Conversion Status:    Fully Decrypted
    Percentage Encrypted: 0.0%
    Encryption Method:    None
    Protection Status:    Protection Off
    Lock Status:          Unlocked
    Identification Field: None
    Key Protectors:       None Found


C:\Windows\System32>
[ More Info ]
[/os/windows/commands]
permanent link
Sat, Feb 14, 2026 7:02 pm
Changing the time zone on a Microsoft Windows system from the command line
The timezone on a Microsoft Windows system can be changed from the
command line
by
opening a command prompt window
with administrator privileges and then typing
timedate.cpl and
hitting
Enter, which opens a window where you can alter the
timezone or you can use the
tzutil utility to
change the time zone using a command of the form
tzutil /s
"TimeZone"
where
TimeZone is the appropriate time zone
identifier, e.g.,
tzutil /s "Eastern Standard Time".
[ More Info ]
[/os/windows/commands]
permanent link
Fri, Feb 13, 2026 9:45 pm
Installing OpenSSH Server software on a Windows 10 system with PowerShell
OpenSSH Server for
Windows 10 requires at
least Windows 10 (build 1809).
You can determine the build number for Windows 10 by typing winver
in the Windows "Type here to search" field at the bottom of the screen or
at a
PowerShell prompt. Or
you can use the
systeminfo utility and pipe it's output into the
findstr command, filtering
on the line that has "OS" at the beginning of the line and also "Version" in
the line.
PS C:\> systeminfo | findstr -B "OS" | findstr "Version"
OS Version:                10.0.19045 N/A Build 19045
PS C:\>
The SSH Client software may already be installed. You can determine if
it is already installed by opening a PowerShell prompt and typing
ssh. If it is installed, as it was on the Windows 10 Professional
Version 22H2 (OS Build 19045.6466) system on which I wanted to set up
the OpenSSH Server software, you will see a response like the following one:
PS C:\> ssh
usage: ssh [-46AaCfGgKkMNnqsTtVvXxYy] [-B bind_interface] [-b bind_address]
           [-c cipher_spec] [-D [bind_address:]port] [-E log_file]
           [-e escape_char] [-F configfile] [-I pkcs11] [-i identity_file]
           [-J destination] [-L address] [-l login_name] [-m mac_spec]
           [-O ctl_cmd] [-o option] [-P tag] [-p port] [-Q query_option]
           [-R address] [-S ctl_path] [-W host:port] [-w local_tun[:remote_tun]]
           destination [command [argument ...]]
PS C:\>
[ More Info ]
[/os/windows/network/ssh/OpenSSH]
permanent link

Privacy Policy
Contact

