←May→
| Sun |
Mon |
Tue |
Wed |
Thu |
Fri |
Sat |
| |
|
|
|
|
1 |
2 |
| 3 |
4 |
5 |
6 |
7 |
8 |
9 |
| 10 |
11 |
12 |
13 |
14 |
15 |
16 |
| 17 |
18 |
19 |
20 |
21 |
22 |
23 |
| 24 |
25 |
26 |
27 |
28 |
29 |
30 |
| 31 |
|
|
|
|
|
|
|
|
Sun, May 03, 2026 9:42 pm
Disney Dreamlight Valley Cloud Save Problem Under Ubuntu
My wife had been playing
Disney
Dreamlight Valley under
Windows 11. When
I installed
Ubuntu
25.10, I installed
Wine, then
Steam
as a Snap
package, and then installed Disney Dreamlight Valley under Steam. She
was able to use the Cloud Save option to log into the game with all of the
progress she had made under Windows. She needed to switch back to Windows for
a while and didn't switch back to Ubuntu for several weeks. When I started
Steam and Disney Dreamlight Valley again under
Ubuntu and then tried
the Cloud Save option, it did not work with the message below displayed
when I was prompted to provide login credentials:
Login Error
Cannot connect to online services. Continue playing in offline
mode
If I entered the wrong password, I got a response indicating that
the system was able to check the credentials, which I presumed were being
checked on a remote server. And I was able to successfully use the
change password option, which sent a password reset code to my wife's
email address. I was able to resolve the problem by uninstalling
Disney Dreamlight Valley under Steam and then reinstalling it.
[ More Info ]
[/os/unix/linux/wine]
permanent link
Sat, Apr 04, 2026 4:05 pm
Moving a Filename Magic Pro license from one system to another
My wife has been using
Filename Magic Pro for Windows for many years; she has version 1.00,
which still appears to be the latest version. The
software "offers robust functionality for batch renaming files within
folders. It streamlines the process for organizing large collections of
documents, music, or images." I transitioned her desktop PC from
Microsoft Windows 11
to
Ubuntu Linux 25.10 and installed
Wine so that she
could run Windows applications that she might want to still use on the
Ubuntu system. I was able to install Filename Magic Pro and use it without
any problems on the Ubuntu system. If you choose to have the program
create a desktop shortcut during the installation, you will see two
shortcuts on the desktop, Filename Magic Pro.desktop and
Filename Magic Pro.lnk. If you right-click on Filename Magic
Pro.desktop and choose Allow Launching, you can then
double-click on the shortcut to start the application. You can delete
the Filename Magic Pro.lnk by right-clicking on it and
choosing Move to Trash.
When you start the program, if it is unregistered, you will see
a countdown timer that counts down from 15.
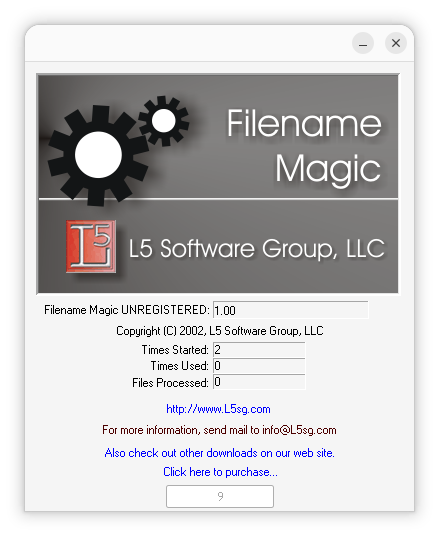
You can wait to the countdown gets to zero or just close the countdown
window to proceed, which will then lead to the display of the window
below.
There is a "click here to purchase" link, but that no longer works; if
you click on it, you will see a
HTTP 404 error
indicating the page no longer exists. But if you previously purchased a
license as we had, you can transfer it from an old system to a new system
or, in our case, from Windows to Linux by exporting the
HKEY_LOCAL_MACHINE\SOFTWARE\WOW6432Node\L5 Software Group
registry keys, which you can do with the Windows
registry
editor, RegEdit, or you can download or copy this
L5SoftwareGroup.reg file and edit it with a
text editor, such as
Windows Notepad
and replace the AppRegKey Xs with your license key (be sure to save it
with just the .reg extension and not a .txt file extension tacked on).
You can add the registry keys to the registry used by Wine by opening
a Terminal window
and running the command wine regedit filename.reg
where filename is the name of the .reg file.
jim@Wonderland:~$ wine regedit ~/Downloads/L5SoftwareGroup.reg
jim@Wonderland:~$
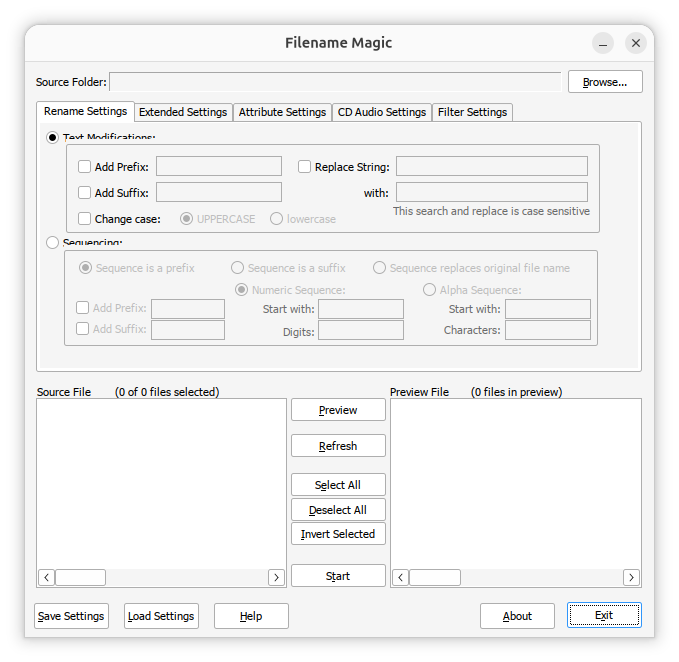
When you then open the program, you won't see the countdown
timer and can just click on OK. You can press Alt-Tab
afterwards to get to the main Filename Magic Pro window.
[/os/unix/linux/wine]
permanent link
Mon, Mar 30, 2026 9:51 pm
Setting the default application to open PDF and EPUB files in Wine
I installed Wine
on an Ubuntu Linux
system to be able to run Microsoft Windows applications on it. I
installed Sumatra
PDF to view PDF and
EPUB files. When
I double-clicked on EPUB files in the Wine
File Explorer
window, which you can run by issuing the command wine explorer
in a Terminal
window, or wine explorer &, if you wish to open it and
immediately return to the
shell prompt,
I saw an Error window which stated "There is no Windows program
configured to open this type of file." If I double-clicked on a PDF file,
it would open in the
GNOME Document Viewer
application. I was able to set the default application for opening those
files under Wine with the following steps:
-
From the Bash prompt in a Terminal window, run the Wine
registry
editor program to modify the
Windows
Registry with
wine regedit.
-
Navigate to
HKEY_CLASSES_ROOT\.epub and set
(Default) = epubfile. If you don't see a .epub
entry, right-click on HKEY_CLASSES_ROOT and choose New.
You can press the F5 key or choose View and Refresh to
refresh the display to show the new entry in alphabetical order.
-
If you then click on the
.epub entry, you will see
(Default) under Name, REG_SZ
under Type, and (value not set) under Data.
-
Double-click on the entry and then type
epubfile in the
Value data field and then click on OK.
-
Then navigate to
HKEY_CLASSES_ROOT\epubfile\shell\open\command,
if it exists. If there is no epubfile entry you can create one by
right-clicking on HKEY_CLASSES_ROOT and selecting
New and Key giving the new key a name of
epubfile. Then double-click on the (Default) entry
under the new key and type EPUB Document in the Value
data field. Then right-click on the epubfile key
and choose New and Key and type shell for
the name. Right-click on shell and create a new, open
beneath it. Then right-click on open and create a new key,
command beneath open.
-
Then right click on the command key and choose New then
String Value.
-
Double-click on the new (Default) entry under command
and then type the location and file name for the application that you
wish to use to open .epub files within double quotes followed by a space
and then
"%1", e.g.
"C:\Program Files\SumatraPDF\SumatraPDF.exe" "%1", if
you wish to open the files with Sumatra PDF and you installed it so
that it is accessible to all users of the system. Or use
"C:\users\username\AppData\Local\SumatraPDF\SumatraPDF.exe
" "%1"
, where username is the relevant username, if you chose
to install it just for the current user when you installed it.
[ More Info ]
[/os/unix/linux/wine]
permanent link
Sun, Mar 29, 2026 8:58 pm
Installing MakeMKV on a Ubuntu Linux system
After trying unsuccessfully to get the
Snap package of
MakeMKV working on
an
Ubuntu Linux system
(see
Installing the MakeMKV
Snap Package on a Ubuntu Linux system), I uninstalled the Snap version
and installed the software from the
source code.
Though installing the application from source code involved more steps,
I was able to successfully install and then rip a couple of discs in far
less time than I spent trying to get the Snap version to work.
[ More Info ]
[/os/unix/linux/ubuntu]
permanent link
Tue, Mar 24, 2026 9:15 pm
Could not initialise OpenGL support
I downloaded a YouTube
video on a Ubuntu Linux
with yt-dlp.
When I tried to view the downloaded
WebM file with the default
video application, Videos, also known as Totem, which is an application for
playing videos that is provided with Ubuntu, I saw the message below:
Ⓧ
An error occurred
Could not initialise OpenGL support
OK
When I opened the video with
VLC, which I had
previously installed, I heard audio, but no video was displayed. I checked
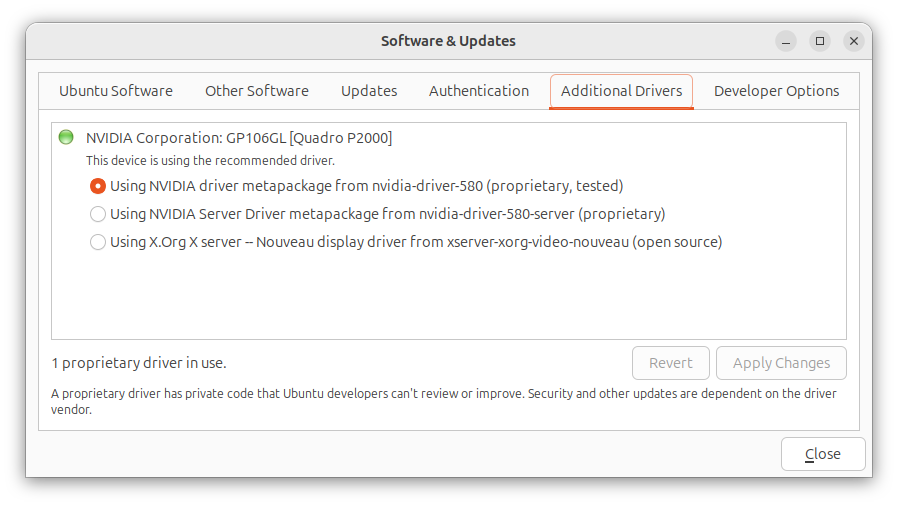
to see if the Nvidia
driver was up-to-date since the system had an Nvidia graphics card, but they
were up-to-date. You can check that by clicking on the Show Apps
button at the lower-right-hand corner of the screen Ubuntu desktop. Then type
Software Updates in the "Type to search" field. Click on
Software & Updates and then click on the Additional
Drivers.
To resolve the problem, I added the following line to the
/etc/environment file with a
text editor:
GDK_GL=gles
When I rebooted the system, I was then able to view the video with
the default Videos application, though when I tried playing it in
VLC I could hear audio, but did not see video.
[/os/unix/linux/ubuntu]
permanent link
Sun, Mar 01, 2026 10:55 pm
Controlling whether a scrollbar appears in a tab in a Terminal window
I needed to scroll back through a tab I had open in a
Terminal window on
an
Ubuntu Linux system,
but there was no
scrollbar on the right side of the tab in which I had run the command,
though a scrollbar was open in other Terminal tabs. I was able to get the
scrollbar to appear by clicking on the icon with 3 horizontal bars at
the top of the Terminal window and then selecting
Preferences.
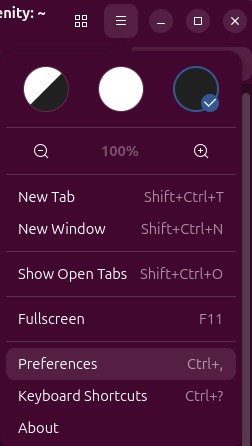
Then from the Behavior tab, I changed the setting from
Follow System to Always, which resulted in the
scrollbar appearing where it had been missing, but I could not scroll
back any further than the text that had been appearing in the tab
before I changed the settiing and that remained the same whenever
I issued another command and text moved upwards, so that I could no
longer see it or scroll back to see it, so I closed the tab.
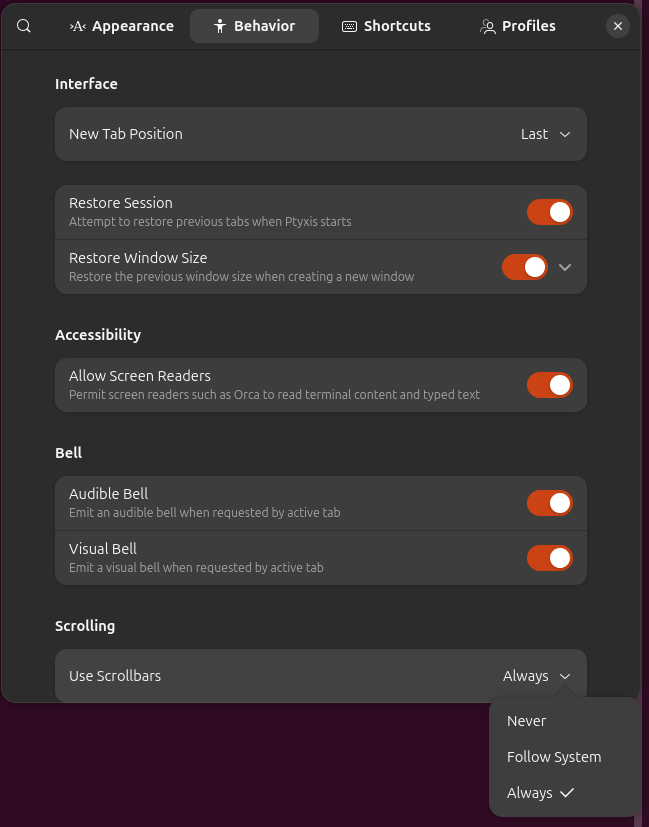
When I opened another tab, the scrollbar was there and operated
as expected.
[/os/unix/linux/ubuntu]
permanent link
Sat, Feb 28, 2026 8:29 pm
Creating a desktop shortcut under Ubuntu for a Windows app runnning under Wine
From a CD, I
installed
Microsoft Office 2007 under
Wine, so that
my wife could edit her
Microsoft
Publisher files on an
Ubuntu Linux system. I also installed
Microsoft Excel
and Microsoft Word.
All three seemed to be working OK when I checked them after the
installation completed. I was able to open the programs from the
File Explorer by
issuing the command wine explorer from a
shell prompt in
a Terminal window
and then navigating to the directory,
C:\Program Files (x86)\Microsoft Office\Office12, where the
applications were located. I could also start Publisher by issuing the command
below in a Terminal window:
wine "/home/alice@Wonderland/.wine/drive_c/Program Files (x86)/Microsoft Office/Office12/MSPUB.EXE"
To make it easer for my wife to open Publisher, though, I created a
shortcut on her Ubuntu desktop. To create a shortcut you can take the
following steps:
Open a Terminal
window and create a new .desktop file on your desktop. You can use
the nano
editor or another text
editor to create the file. E.g., nano
~/Desktop/AppName.desktop.
You then need to have lines like the following ones in the file:
[Desktop Entry]
Name=Name of Your Application
Exec=wine "/home/username/.wine/drive_c/Program Files/AppName/app.exe"
Type=Application
Icon=wine
Terminal=false
StartupNotify=true
You need to use the absolute path the the .exe file for the program and,
if the directory
path contains a space, you must enclose the path within quotes. Also,
you need to replace username with your username on the system.
For Publisher, I could use the following lines:
[Desktop Entry]
Name=Publisher
Exec=wine "/home/alice@Wonderland/.wine/drive_c/Program Files (x86)/Microsoft Office/Office12/MSPUB.EXE"
Type=Application
Icon=wine
Terminal=false
StartupNotify=true
If you use the nano text editor, you can hit Ctrl+X, the
Y, then Enter to save the file. You then need to make
the shortcut executable, which you can do by right-clicking on the file
on the desktop, selecting Properties, and then makng sure "Executable
as Program" is on. Or you can use the
chmod command to make
the file excutable by a command like chmod +x ~/Desktop/AppName.desktop
. You then need to permit launching of the application from the shortcut
by right-clicking on it and selecting Allow Launching.
[ More Info ]
[/os/unix/linux/wine]
permanent link
Fri, Feb 27, 2026 3:41 pm
Wine window becoming transparent with an attempt to resize it
My wife was using Advanced Diary for
journaling on a Microsoft Windows system, but wanted to transition to
Linux, so I installed
Ubuntu Linux and then,
since there is no Linux version of Advanced Diary, I installed
Advanced Diary under
Wine. She wanted to adjust the size of the Advanced Diary window, but when
she attempted to adjust the window size by clicking on the
Restore Down icon at the top right side of the
window (between the dash and the "X"), the Advanced Diary window became
transparent and it was not possible to close it or adjust the size of the
transparent box that appeared for the Advanced Diary window.
So I had to open a
Terminal window to determine the
process ID (PID)
of the Advanced Diary process with the
ps and then kill that
process with the
kill command. I could also have used the
killall command
killall AdvancedDiary.exe.
I tried closing and opening the program several times. The behavior
was consistent — the window would become transparent whenever
I tried resizing or minimizing the window.
If you are using the
GNOME desktop, you can use the steps below to try to resolve the problem.
GNOME is the default desktop environment for Ubuntu, but you can verify
it is the desktop in use by the command echo $XDG_CURRENT_DESKTOP.
Steps that may resolve the problem:
-
Run winecfg in a Terminal window.
-
In the Wine configuration window, click on the Graphics
tab.
-
Toggle the settings for "Allow the window manager to decorate the windows"
and "Allow the window manager to control the windows" one by one to see if
one of those settings change the behavior. When I toggled off "Allow the
window manager to decorate the windows", I now no longer saw the icons
to adjust the size of the window or minimize the window at the top of the
Wine window for Advanced Diary, but when I clicked where I expected them
to appear, the window became transparent again. I toggled the setting back
on and then toggled off the "Allow the window manager to control the
windows" setting. That resolved the problem. I then closed the window
and reopened Advanced Diary and toggled that setting on again, also, so
that both settings were checked. I could still adjust the window size
as expected. I closed and reopened the application several times
and was still able to adjust the window size, so just toggling the
"Allow the window manager to control the windows" setting off and
then back on seemed to resolve the problem.
[ More Info ]
[/os/unix/linux/wine]
permanent link
Tue, Feb 24, 2026 4:06 pm
Installing Advanced Diary on a Linux system with Wine
I needed to install Advanced Diary
on an Ubuntu Linux system.
for someone who had been using the program for journaling on a Microsoft Windows
system. I had previously installed
Wine, a program that
allows one to run Windows applications on
Linux,
macOS, and
FreeBSD
systems. I used AdvDiary.sh, which
contains the following lines, to install Advanced Diary:
#!/usr/bin/env bash

set -e

if [ -z "$1" ]; then
  echo "Usage: $0 AdvancedDiarySetup.exe"
  exit 1
fi

INSTALLER="$(realpath "$1")"
PREFIX="$HOME/.wine-advdiary"

echo "Creating 32-bit Wine prefix..."
export WINEPREFIX="$PREFIX"
export WINEARCH=win32
winecfg -v win7 >/dev/null 2>&1 || true

echo "Installing required components (gdiplus, corefonts)..."
winetricks -q gdiplus corefonts

echo "Forcing native GDI+..."
cat > "$PREFIX/user.reg" <<'EOF'
[Software\\Wine\\DllOverrides]
"gdiplus"="native"
EOF

echo "Running Advanced Diary installer..."
wine "$INSTALLER"

echo
echo "✔ Installation complete"
echo "Run with:"
echo "WINEPREFIX=$PREFIX wine \"$PREFIX/drive_c/Program Files/Advanced Diary/Diary.exe\""
To run it, you need to assign "execute" permission to the file, which can be
done in a Terminal
window with chmod + x filename or chmod a+x
filename to make a file executable by all users or
chmod u+x filename to make it executable by just the owner
of the file, i.e., the user.
alice@Wonderland:~/Downloads$ chmod u+x install-advanced-diary.sh
alice@Wonderland:~/Downloads$
When I ran the shell
script .sh file, I realized I hadn't installed
Winetricks beforehand, so I installed it with
sudo apt install winetricks after running the script.
I then reran the installation script for Advanced Diary. The installation
completed successfully — I selected the option to have the program
opened automatically at the conclusion of the installation — and it
appeared to open normally (I had to press Enter in the terminal
window to return to the shell prompt).
[ More Info ]
[/os/unix/linux/wine]
permanent link
Sun, Feb 22, 2026 3:38 pm
Running the Big Fish Games Manager on an Ubuntu system
You can run the Big
Fish Games Game Manager on an
Ubuntu Linux system
under Steam.
You can install Steam as a
Snap package
from the Ubuntu App Center.
Steps:
-
Download the Big Fish Games App (Game Manager) for PC
-
In Steam on the Ubuntu system, click on Add a Game, which is
at the lower, left-hand corner of the Steam window, then
select Add a Non-Steam Game, then browse to where you downloaded
the .exe installer for the game manager, click on it, and then
click on Add Selected Programs.
-
You should then see the Big Fish Game Manager in the "Uncategorized" list
of games at the left side of the Steam window, e.g., you may see
bfginstaller32_s1_l1.exe listed. Right-click on it and then select
Properties, then Compatibility, and then, from the
drop-down list that becomes available, select Proton Experimental
or the latest stable version — I selected Proton Experimental.
-
You can then close the Compatibility window by clicking on the
"X" at the upper, right-hand corner.
-
Then with the Big Fish Game Manager selected in the Uncategorized
list, click on the Play button to launch the Big Fish Game Manager
Setup and agree to the License Agreement when you see it appear.
When I started the install process, the installation appeared to hang at
"Execute: C:\Program Files (x86)\bfglient\epoch.exe". When I clicked on the
title bar for the window, I saw "About Wine", so it appeared to be using
Wine, which I had
previously installed on the Ubuntu system.
But I waited and eventually the installation succeeded, though I think it
took over 15 minutes. I closed the window and then went back to the
Steam window, I saw bfginstaller32_s1_l1.exe was still there. This time
when I clicked on it, the Big Fish window where I could sign in to Big
Fish Games opened fairly quickly.
Note: if the window goes blank or displays just a white background,
minimize it by clicking on the "-" in the upper, right-hand corner of
the Big Fish window and then switch to it again, which you can do with
Alt+Tab — continue to press the Tab key while
continuing to hold down the Alt key to cycle between open open
windows until you get to the Big Fish window.
Initially, you will see "No games to play," but if you have already
purchased games that you've played on another system, you can click
on Purchase History and install them on the Linux system.
When I installed the Big Fish Games Manager under Steam, I had my wife
check one of her games, Aquascapes, and that ran fine. I then closed
the Big Fish window and the Steam window and reopened it. Note: if
you want to change the name that appears for Big Fish Games in the
Uncategorized list, you can right-click on the entry, e.g.,
bfginstaller32_s1_l1.exe, and choose Properties and then change
the "Shortcut" value to something you prefer, such as "Big Fish Games".
When I reopened Steam and started Big Fish Games, I saw the Aquascapes
game under "My Games".
[ More Info ]
[/os/unix/linux/ubuntu]
permanent link

Privacy Policy
Contact

