Mon, Mar 30, 2026 9:51 pm
Setting the default application to open PDF and EPUB files in Wine
I installed Wine
on an Ubuntu Linux
system to be able to run Microsoft Windows applications on it. I
installed Sumatra
PDF to view PDF and
EPUB files. When
I double-clicked on EPUB files in the Wine
File Explorer
window, which you can run by issuing the command wine explorer
in a Terminal
window, or wine explorer &, if you wish to open it and
immediately return to the
shell prompt,
I saw an Error window which stated "There is no Windows program
configured to open this type of file." If I double-clicked on a PDF file,
it would open in the
GNOME Document Viewer
application. I was able to set the default application for opening those
files under Wine with the following steps:
-
From the Bash prompt in a Terminal window, run the Wine
registry
editor program to modify the
Windows
Registry with
wine regedit.
-
Navigate to
HKEY_CLASSES_ROOT\.epub and set
(Default) = epubfile. If you don't see a .epub
entry, right-click on HKEY_CLASSES_ROOT and choose New.
You can press the F5 key or choose View and Refresh to
refresh the display to show the new entry in alphabetical order.
-
If you then click on the
.epub entry, you will see
(Default) under Name, REG_SZ
under Type, and (value not set) under Data.
-
Double-click on the entry and then type
epubfile in the
Value data field and then click on OK.
-
Then navigate to
HKEY_CLASSES_ROOT\epubfile\shell\open\command,
if it exists. If there is no epubfile entry you can create one by
right-clicking on HKEY_CLASSES_ROOT and selecting
New and Key giving the new key a name of
epubfile. Then double-click on the (Default) entry
under the new key and type EPUB Document in the Value
data field. Then right-click on the epubfile key
and choose New and Key and type shell for
the name. Right-click on shell and create a new, open
beneath it. Then right-click on open and create a new key,
command beneath open.
-
Then right click on the command key and choose New then
String Value.
-
Double-click on the new (Default) entry under command
and then type the location and file name for the application that you
wish to use to open .epub files within double quotes followed by a space
and then
"%1", e.g.
"C:\Program Files\SumatraPDF\SumatraPDF.exe" "%1", if
you wish to open the files with Sumatra PDF and you installed it so
that it is accessible to all users of the system. Or use
"C:\users\username\AppData\Local\SumatraPDF\SumatraPDF.exe
" "%1"
, where username is the relevant username, if you chose
to install it just for the current user when you installed it.
[ More Info ]
[/os/unix/linux/wine]
permanent link
Sun, Mar 29, 2026 8:58 pm
Installing MakeMKV on a Ubuntu Linux system
After trying unsuccessfully to get the
Snap package of
MakeMKV working on
an
Ubuntu Linux system
(see
Installing the MakeMKV
Snap Package on a Ubuntu Linux system), I uninstalled the Snap version
and installed the software from the
source code.
Though installing the application from source code involved more steps,
I was able to successfully install and then rip a couple of discs in far
less time than I spent trying to get the Snap version to work.
[ More Info ]
[/os/unix/linux/ubuntu]
permanent link
Sat, Mar 28, 2026 1:28 pm
Updating file locations in Book Collector
Collectorz now appears to be focusing
on their mobile and web-based products
for managing book collections, but they also provide a desktop
Book Collector desktop application for systems running Microsoft
Windows, though I don't even see a link for it on the homepage of
their website nor do I see one in their
sitemap webpage. However, if you are using the desktop product and
need to update your Book Collector database if the location of cover images,
thumbnails, list item images, templates, and/or local files for
entries already in the datbase, you can take the steps below.
You can specify the directories for new entries by clicking on
Tools, Options, Folders to set the
directories Book Collector should use by default.
Inside the Book Collector program, click on Tools then
select Update File Links. In the Update File Links
window you can "choose the kind of files you would like to repair". I left
the default value of All Types, but you can also select Front
Cover, Back Cover, Pick List Image, Pick List
Template Image, Local File, or Backdrop.
When you click on Next Step, you can choose to have the program
automatically update the old folder to the new folder or you can choose
to do it manually. With the automatic option, you can "Select a base
folder and let the program find the missing files automatically" while
with the manual option you can "Use a find and replace action to
manually fix your file paths". For the "Choose folder where to
find files", browse to the appropriate directory where the files are
now located. Check the box next to "Include subfolders", if that is
appropriate, and then click on Next step. The program will then
show a "Finding best matches for missing files" window with a progress
bar as it updated links.
At the next step, Step 4, you can see the resulting file paths
and click on the Update File Links button to finalize the
changes. You will then see the number of file links that will be updated
and asked if you are sure to proceed. I saw a window with a message that
Book Collector was not responding, but I chose "Wait" several times and
it finally completed. When all the links are updated, you should see
a window informing you of the number of file links updated.
If you updated the location for the images for books already in the
database, you should now see the images appear for book entries.
If you just need to update the links for a particular kind of files,
e.g., the local files, or the location of those files differs from
the location of other files, e.g., if they are on a different drive than
the images, etc., at Step 1 where you "choose the kind of files you
would like to repair", you can choose that file type instead of "All
Types".
I was able to use the above steps when transitioning my wife's desktop
computer from Windows to
Ubuntu Linux, after I installed Book Collector under
Wine, to
specify the new location of image and local files.
[ More Info ]
[/software/database/collectorz]
permanent link
Wed, Mar 25, 2026 4:39 pm
Ejecting a Disc with PowerShell
I needed to eject a
optical disc
drive tray from a
command-line
interface (CLI) on a system running Microsoft Windows 11 so that
I could insert a DVD in the drive. That can be done using the
Powershell
command powershell (New-Object -ComObject
WMPlayer.OCX.7).cdromCollection.item(0).Eject(), which will
eject the tray of the first optical drive found by Windows Media Player's
COM object.
PS C:\> powershell (New-Object -ComObject WMPlayer.OCX.7).cdromCollection.item(0).Eject()
Windows PowerShell
Copyright (C) Microsoft Corporation. All rights reserved.

Install the latest PowerShell for new features and improvements! https://aka.ms/PSWindows

PS C:\>
[/os/windows/PowerShell]
permanent link
Tue, Mar 24, 2026 9:15 pm
Could not initialise OpenGL support
I downloaded a YouTube
video on a Ubuntu Linux
with yt-dlp.
When I tried to view the downloaded
WebM file with the default
video application, Videos, also known as Totem, which is an application for
playing videos that is provided with Ubuntu, I saw the message below:
Ⓧ
An error occurred
Could not initialise OpenGL support
OK
When I opened the video with
VLC, which I had
previously installed, I heard audio, but no video was displayed. I checked
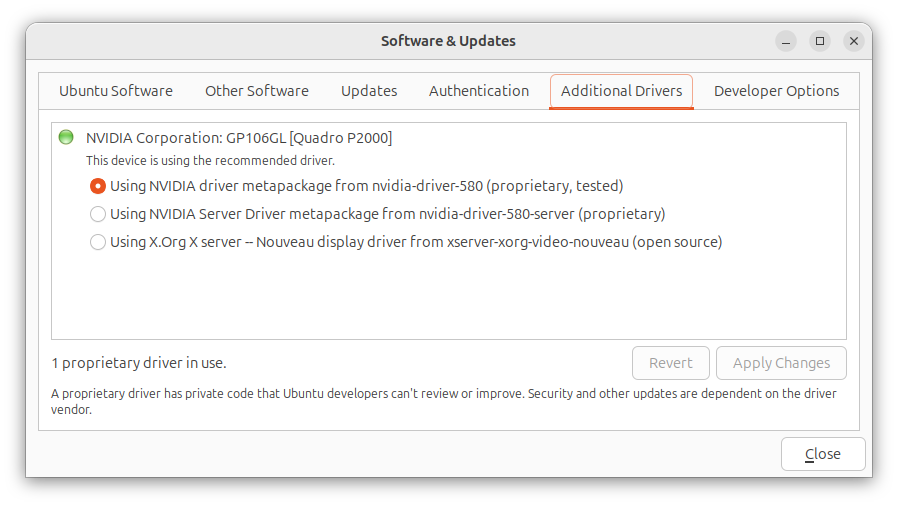
to see if the Nvidia
driver was up-to-date since the system had an Nvidia graphics card, but they
were up-to-date. You can check that by clicking on the Show Apps
button at the lower-right-hand corner of the screen Ubuntu desktop. Then type
Software Updates in the "Type to search" field. Click on
Software & Updates and then click on the Additional
Drivers.
To resolve the problem, I added the following line to the
/etc/environment file with a
text editor:
GDK_GL=gles
When I rebooted the system, I was then able to view the video with
the default Videos application, though when I tried playing it in
VLC I could hear audio, but did not see video.
[/os/unix/linux/ubuntu]
permanent link
Tue, Mar 24, 2026 9:10 pm
No video shown when playing a WebM file in VLC
When I tried to play a
YouTube video I
downloaded as a WebM file
using
yt-dlp on an Ubuntu
Linux system in the
VLC media player application, I could hear the audio, but no video
was shown. I tried opening a few other .webm videos and found I was able
to view the video in some, but not others, though I was able to view
the video and hear the audio in all the .mp4 and .mkv files. I tried
changing the video output setting from "Automatic" to "OpenGL video
output" and then "XVideo output (XCB)", which you can do by clicking on
Tools, then Preferences, then Video, and then
selecting those options from the dropdown list next to Output, but
neither of those options resolved the problem, so I reset Output
to Automatic. I was able to resolve the problem by taking the
following steps, though:
-
In the VLC program, click on Tools and then select
Preferences.
-
Click on Input/Codecs and change the hardware-accelerated
decoding setting by clicking on the downward arrowhead next to
Automatic, which will be the setting if the default setting is
in effect.
-
Change the setting to Disable and then click on Save.
When I checked the Codec
information for the file where I could not view the video before disabling
the hardware-accelerated decoding setting, which you can do by opening
an audiovisual
(AV) file in VLC and then selecting Tools and Codec
Information, I saw the video codec was AOMedia's AV1 Video
(av01). When I checked the video codec for another WebM file where
the video wasn't visible in VLC, I saw it was also the AOMedia's AV1
Video (av01) codec. Checking the video codec for .webm files where
I could view the video, I saw Google/ON2's VP9 Video (VP90)
for some and H264 - MPEG-4 AVC (part 10) (avc1) for another.
Note: you can also determine the codecs used in a file using the
mediainfo utility, which you can install on an Ubuntu system with
sudo apt-get install mediainfo. You can check on whether
it is already installed using the command which mediainfo,
which would show the location of the mediainfo executable file if the
application was installed, or you can use dpkg -s mediainfo,
which will show details on the mediainfo package if it is installed.
[/software/audio_video/VLC]
permanent link
Thu, Mar 12, 2026 7:48 pm
Concatenating videos with FFmpeg
The
FFmpeg video handling
utility can be used to join videos together into one larger video. If the video
files are
MPEG-1,
MPEG-2, MPEG
Program Stream (PS)
, or
Digital Video
(DV) files, you can use a Direct Stream copy method, by issuing a command in
the form
ffmpeg -i "concat:input1.mpg|input2.mpg" -c copy
output.mpg
. Using ffmpeg for the concatenation operation ensures that
file headers and timestamps are handled correctly, whereas using operating
system commands such as
cat on a Linux system or
copy /b on a Microsoft Windows system may produce payback issues.
This method can not be used for
MPEG-4 files, however.
Another method that can be used for MP4 files, as well as the above
file types is the Concat Demuxer method,
if the files use the same
codecs and parameters, such as
resolution,
framerate, etc.
If the files have the same characteristics, you can use a command of the form:
ffmpeg -f concat -safe 0 -i inputFileList.txt
-c copy output.mp4
[ More Info ]
[/video/ffmpeg]
permanent link
Wed, Mar 11, 2026 5:17 pm
Trimming a video with FFmpeg
FFmpeg provides a
suite of
command-line
interface tools for working with audio and video files. It is
free and
open-source software that is available for a variety of
operating systems,
including
Microsoft Windows,
Linux, and
macOS. If you wish to
use it on a Microsoft Windows system, you can install it with the
Windows
Package Manager known as winget by
opening a command prompt window
and issuing the command winget install "FFmpeg (Essentials Build)".
Microsoft Windows [Version 10.0.26100.7623]
(c) Microsoft Corporation. All rights reserved.

C:\Windows\System32>winget install "FFmpeg (Essentials Build)"
Found FFmpeg (Essentials Build) [Gyan.FFmpeg.Essentials] Version 8.0.1
This application is licensed to you by its owner.
Microsoft is not responsible for, nor does it grant any licenses to, third-party packages.
Downloading https://github.com/GyanD/codexffmpeg/releases/download/8.0.1/ffmpeg-8.0.1-essentials_build.zip
  ██████████████████████████████   101 MB /  101 MB
Successfully verified installer hash
Extracting archive...
Successfully extracted archive
Starting package install...
Command line alias added: "ffmpeg"
Command line alias added: "ffplay"
Command line alias added: "ffprobe"
Path environment variable modified; restart your shell to use the new value.
Successfully installed

C:\Windows\System32>
If you need to trim the beginning of a video file, such as a .mp4 file,
you can do so using a command of the form
ffmpeg -ss hh:mm:ss -i input.mp4 -c copy output.mp4 where
you specify the point you wish the video to start in the form hh:mm:ss
for hours, minutes, and seconds with -ss and
input.mp4 is the file you wish to trim and output.mp4
is the name you wish to give to the trimmed file. E.g., if I have a video
file, REC-0001-A.mp4, where I wish to discard audio and video up to the 3
minutes and 34 seconds mark in the file, I can use ffmpeg -ss 00:03:34 -i REC-0001-A.mp4 -c copy output1.mp4 to create a new file, output1.mp4,
that omits the first 3 minutes and 33 seconds from the input file. Using the
-c copy option copies the video/audio streams directly,
which is fast but can be less accurate on
keyframes.
[ More Info ]
[/video/ffmpeg]
permanent link
Thu, Mar 05, 2026 3:30 pm
Disabling Skye automatic startup
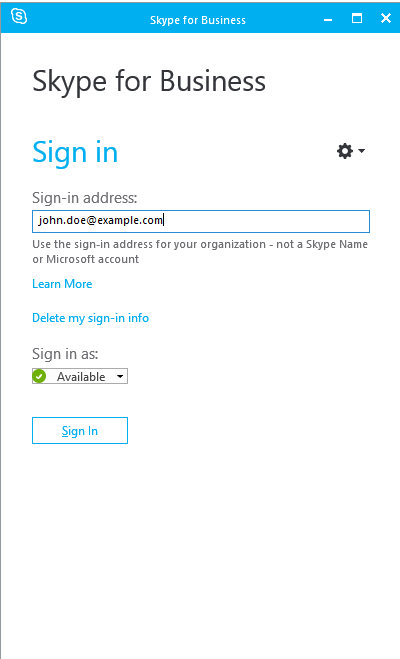
I found Microsoft's
Skype for
Business application was automatically staring on a Microsoft Windows
system where it was not being used. Microsoft
retired the product on May 5, 2025, replacing it with
Microsoft Teams,
and is no longer providing security updates or bug fixes for the software.
Though Microsoft ended official support for Skype for Business Server on
October 14, 2025 and is no longer providing cloud service for the product,
companies that installed their own servers can still run it locally. If there
is a need to retain the software on a system, but no need to have it start
automatically when the system boots, one can stop it from
starting whenever the system is rebooted by taking the following steps:
-
Open the program and then click on the gear icon near the top, right side of
the window.
- Choose Tools and Options.

-
Uncheck the option for "Automatically start the app
when I log on to Windows" under the Personal options to prevent
the program from restarting automatically upon a login to the system,
then click on OK to apply the change after unchecking that
option.

[/os/windows/software]
permanent link
Tue, Mar 03, 2026 3:33 pm
Adding the capability to save webpages as a single file to Firefox
The Firefox web
browser does not have the capability to save the contents of a webpage to a
single file, such as an
MHTML file, which is
a web archive file format that allows one to save the
HTML code, images
etc. on a webpage into a single file.
Though the capability is absent from Firefox, you can add the functionality
of saving a page to a single file by installing
Save
Page WE, an
add-on for Firefox
by DW-dev. The
extension provides the capability to "Save a complete web page (as
currently displayed) as a single HTML file that can be opened in any browser.
Save a single page, multiple selected pages or a list of page URLs. Automate
saving from command line." The saved file is not an MHTML file,
or one of the other common
web
archiving file formats, but it
is a single HTML file that Firefox and other browsers can read.
Save Page WE is implemented using the
WebExtensions API and is available for both Firefox and
Chrome with
identical functions and user interfaces.
When you start the installation process, you will see a list of the
permissions required by the extension:
- Access your data for all websites
- Download files and read and modify the browser's download history
- Display notifications to you
- Access browser tabs
- Access browser activity during navigation
Click on the Add button to add the extension. You should then
see the message "Save Page WE was added. Update permissions and data preferences any time in the extension settings." You also have the option to pin the
extension to the toolbar.
Select the option to pin the extension to the toolbar, which will
result in an icon of a 3.5" floppy disk appearing on the toolbar.
You can click on that icon to save the page displayed in the current
browser tab.
You can also save a page by hitting the Alt+A key
combination (you can cancel the saving of a page with At+C).
The file format is HTML rather than MHTML, so the
file extension
used by SavePageWE is .html, which Firefox can open — if you try to open
a file with the .mhtml extension, Firefox will prompt you to use another
application to open the file.
Anyone who wishes to have the ability to save a webpage as a single file
added to Firefox, can add their voice to the post at
Add native Web Archive File support to Firefox, including MHTML, MAFF, and
Webarchive...
References
-
How to save a webpage as .mhtml with Firefox?
Last updated: September 15, 2024
superuser
-
Add native Web Archive File support to Firefox, including MHTML, MAFF, and
Webarchive...
Date: August 15, 2023
By:
JohnBoyTheGreat
moz://a Connect
[ More Info ]
[/network/web/browser/firefox/addons]
permanent link
Mon, Mar 02, 2026 11:11 pm
Turning off Fast Startup on a system running Microsoft Windows
Microsoft Windows 8 introduced a feature called
Fast Startup. The feature was a variation of hibernate mode, but when
enabled would close all running programs and log the user out before
hibernating. This feature would result in a user being able to log in
more quickly when a system is powered back on after a shutdown. There may
be cases where use of this feature is not desirable, however. E.g., if the
user wants to boot the system into
Linux, but still access data
on the Windows boot drive. To turn fast startup off, you can take the
following steps:
-
Type
Control Panel in the Windows Search field
at the bottom of the screen.
-
Click on System and Security.
-
Click on Change what the power buttons do under Power
Options.
-
Click on Change settings that are currently unavailable.
If prompted for administrator credentials, provide those for
an administrator account.
-
Uncheck the check box next to "Turn on fast startup (recommended)".
-
Click on Save changes. You can then close the window.
[ More Info ]
[/os/windows]
permanent link
Sun, Mar 01, 2026 10:55 pm
Controlling whether a scrollbar appears in a tab in a Terminal window
I needed to scroll back through a tab I had open in a
Terminal window on
an
Ubuntu Linux system,
but there was no
scrollbar on the right side of the tab in which I had run the command,
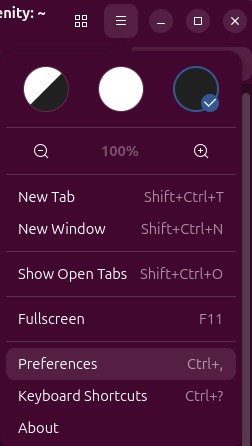
though a scrollbar was open in other Terminal tabs. I was able to get the
scrollbar to appear by clicking on the icon with 3 horizontal bars at
the top of the Terminal window and then selecting
Preferences.
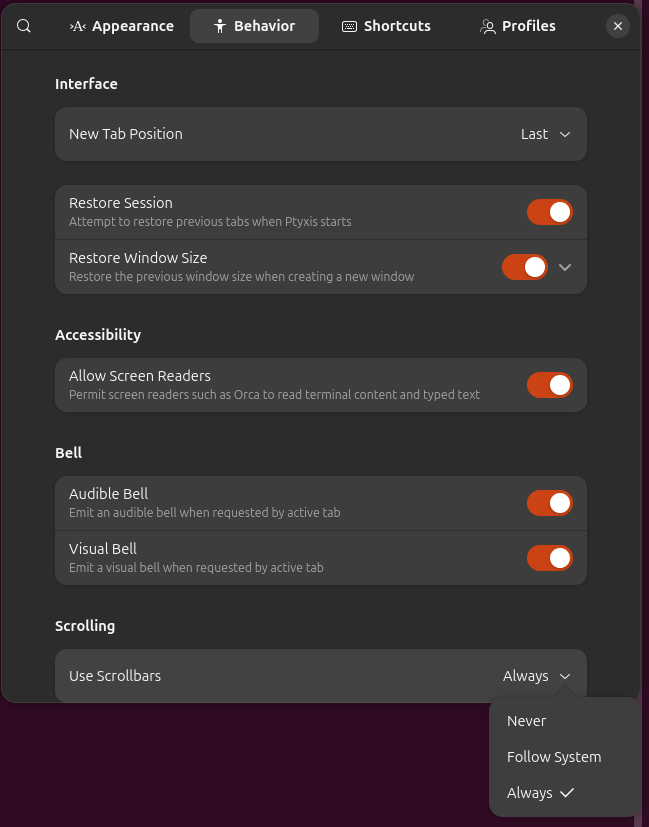
Then from the Behavior tab, I changed the setting from
Follow System to Always, which resulted in the
scrollbar appearing where it had been missing, but I could not scroll
back any further than the text that had been appearing in the tab
before I changed the settiing and that remained the same whenever
I issued another command and text moved upwards, so that I could no
longer see it or scroll back to see it, so I closed the tab.
When I opened another tab, the scrollbar was there and operated
as expected.
[/os/unix/linux/ubuntu]
permanent link

Privacy Policy
Contact

