←December→
| Sun |
Mon |
Tue |
Wed |
Thu |
Fri |
Sat |
| |
|
|
|
|
1 |
2 |
| 3 |
4 |
5 |
6 |
7 |
8 |
9 |
| 10 |
11 |
12 |
13 |
14 |
15 |
16 |
| 17 |
18 |
19 |
20 |
21 |
22 |
23 |
| 24 |
25 |
26 |
27 |
28 |
29 |
30 |
| 31 |
|
|
|
|
|
|
|
|
Tue, Dec 12, 2023 3:43 pm
Turning off Spelling and Grammar Checking for a Document in Microsoft Word 2010
If you wish to turn off the spelling check and/or the grammar check for a
document in Word in the Microsoft Office 2010 suite (version 14.0.7268.5000),
you can do so by taking the following steps:
-
Click on the Review tab at the top of the Word window where the
document is open.
-
On the Review tab, click on Spelling & Grammar.
-
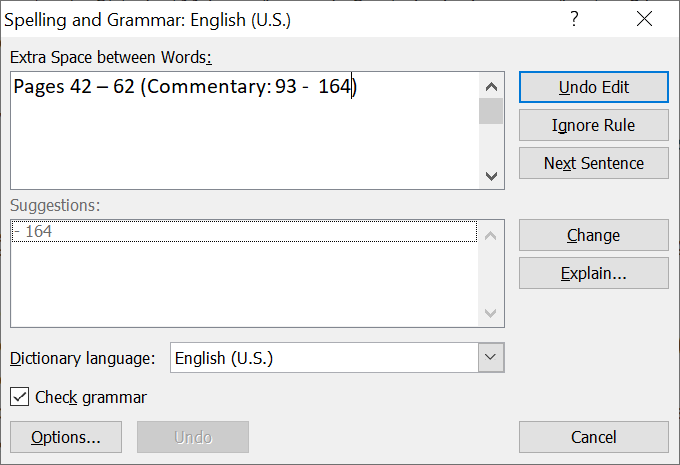
In the Spelling and Grammar window that then opens, click on the
Options button.
-
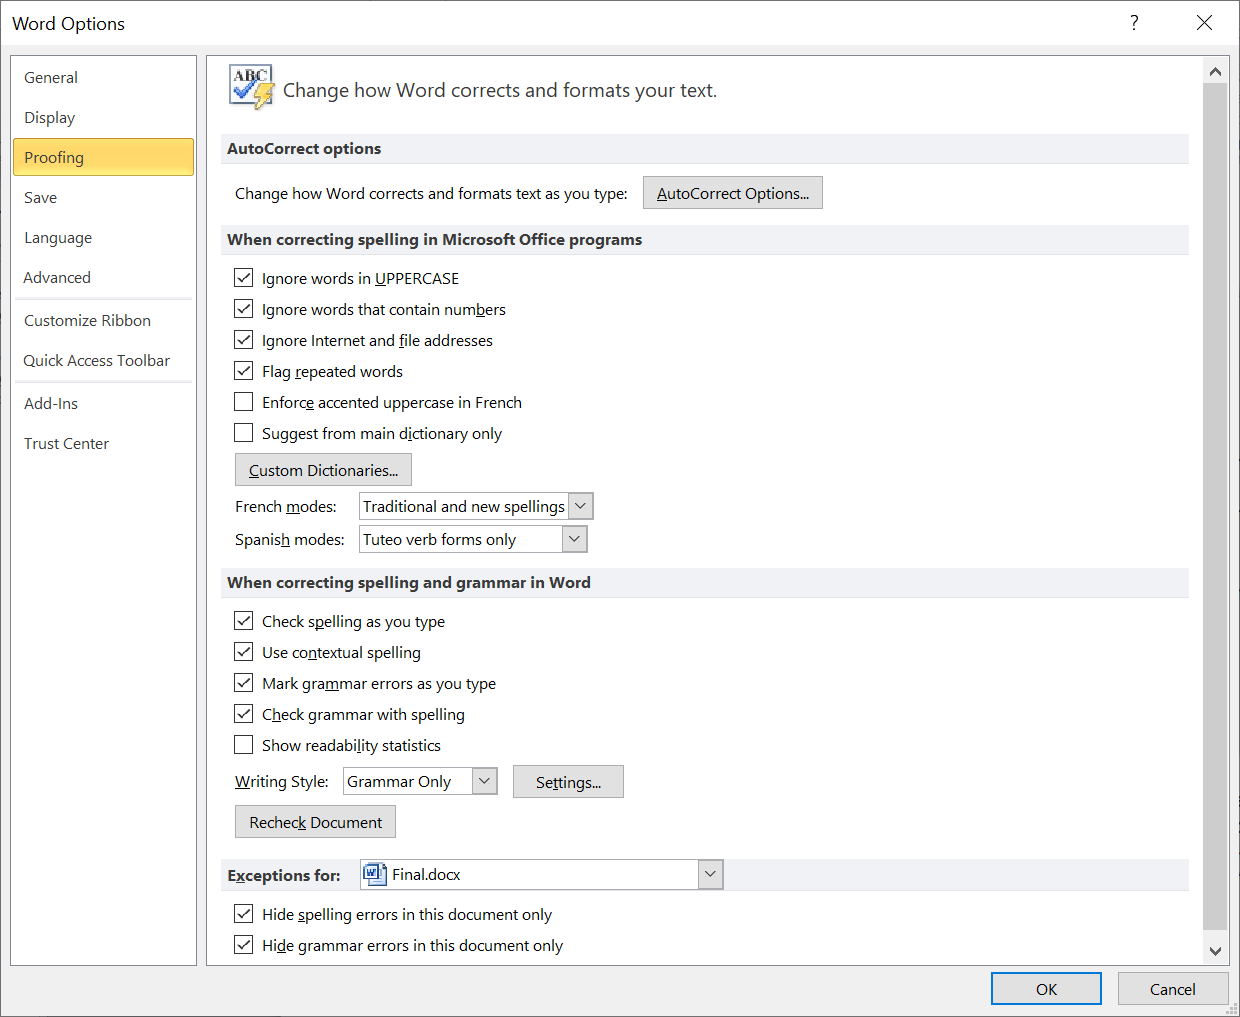
Under the Proofing option, you will see check boxes for "Hide
spelling errors in this document only" and "Hide grammar errors in this
document only". Check both boxes, if you wish to turn off checking for
both, and click on the Ok button.
-
You can then close the Spelling and Grammar window by clicking
on the "X" in the upper, right-hand corner of that window.
[/os/windows/office/word]
permanent link
Wed, Nov 01, 2023 5:06 pm
Clearing the formatting of paragraphs in Microsoft Word
I edit a newsletter for the retiree organization of my former employer.
Often when I receive a draft copy of the newsletter in Microsoft Word
format, I find that some paragraphs have a gray background or other formatting
that I need to remove. I can't remove that grey background by changing the
fill for the paragraph to "none", but I can remove it by highlighting the
paragraph and then clearing the formatting. The procedure for doing so
with Microsoft Word version 14.0, which is part of Microsoft Office
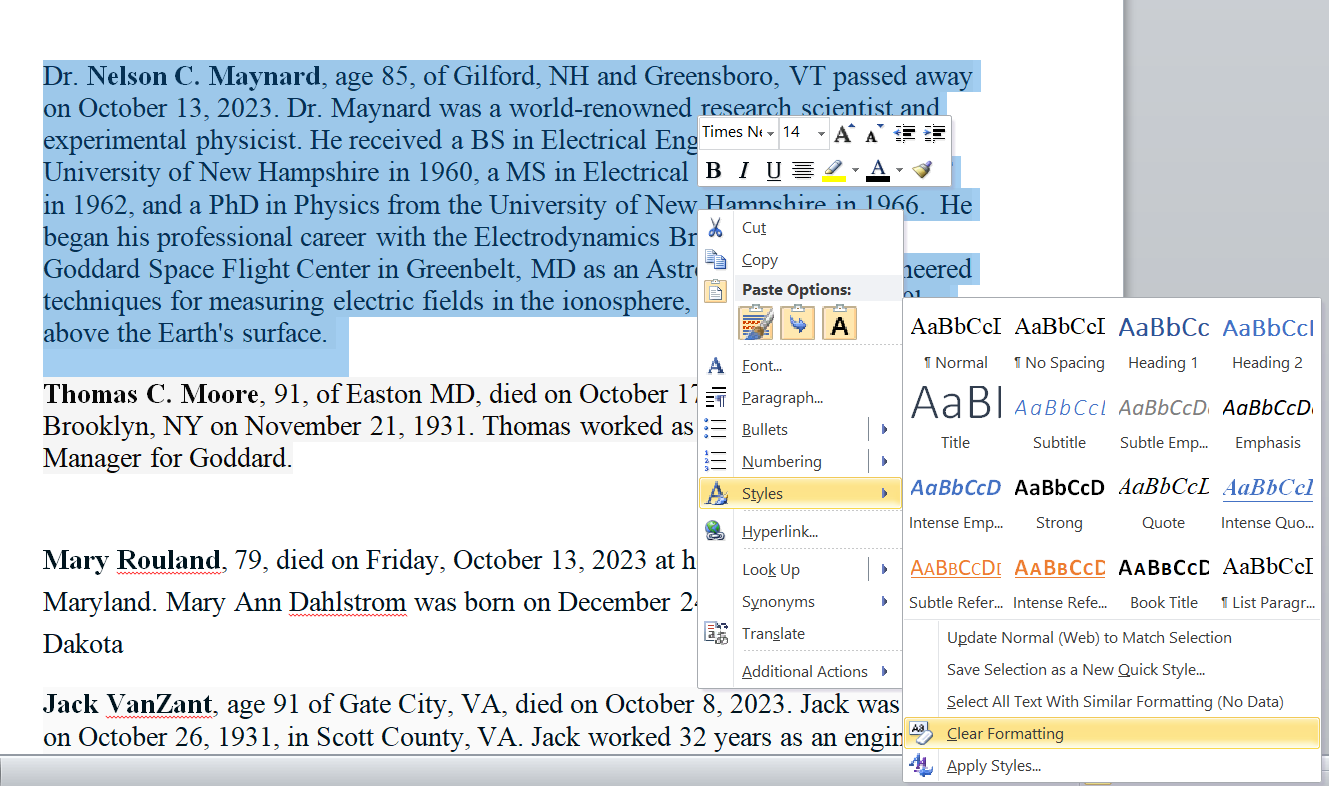
Professional 2010, and other versions on a Windows system is to right-click on
the paragraph after highlighting it, then select
Styles and then
Clear Formatting. The font selection will also be cleared.
Alternatively, with the text in the paragraph highligthed, hit the
Ctrl key and spacebar simultaneously to clear the formatting
for the paragraph.
[/os/windows/office/word]
permanent link
Wed, Oct 18, 2023 3:59 pm
Sites that can be used to download YouTube, Instagram, Facebook, Twitter, and TikTok videos
Sometimes videos you might wish to view later, or view again, will disappear
from online sites. If you would like to store videos on your own system
so that you don't need to worry about them disappearing, either removed by
personnel associated with the site or the person who posted the content, there
are sites that you can go to where you only need to provide
Uniform Resource Locators (URLs)
to have the site provide you with a download link you can use to store videos
on your own system. For
YouTube videos, you can use the
OffLiberty
site. For
Instagram
videos, you can use the
Inflact site,
which also allows you to save videos hosted by
Facebook,
Twitter (now X), and
Tiktok. Both sites allow you
to save a video on your own system in
.mp4 format. Use
of both sites is free.
Related articles
-
Downloading Video Clips with Offliberty
Date: January 26, 2014
[/video]
permanent link
Fri, Sep 15, 2023 5:14 pm
Determining the Serial Number of a Disk Drive with PowerShell
If you need to determine the serial number of a hard disk drive (HDD)
attached to a Microsoft Windows system, you can do so from a
PowerShell
window using the cmdlet Get-Disk (you can open a
PowerShell window by typing PowerShell in the Windows "Type here to
search field on a Windows 10 system and then selecting the app when it is
returned in the list of search results). If you just want a list of drives
attached to the system by a USB
connection, you can pipe
the output of the cmdlet to the
Where-Object cmdlet where you can filter on just drives that have a USB
connection as shown below.
PS C:\> Get-Disk | Where-Object -FilterScript {$_.Bustype -Eq "USB"}
Number Friendly Name Serial Number                    HealthStatus         OperationalStatus      Total Size Partition
                                                                                                             Style
------ ------------- -------------                    ------------         -----------------      ---------- ----------
1      SanDisk Cr... 03025228050421082418             Healthy              No Media                      0 B RAW
2      USB2.0 Car... 606569746800                     Healthy              No Media                      0 B RAW
4      USB2.0 Car... 606569746802                     Healthy              No Media                      0 B RAW
5      USB2.0 Car... 606569746803                     Healthy              No Media                      0 B RAW
3      USB2.0 Car... 606569746801                     Healthy              No Media                      0 B RAW
6      WD My Pass... WXM1A375CKEZ                     Healthy              Online                  931.48 GB GPT


PS C:\>
[ More Info ]
[/os/windows/PowerShell]
permanent link
Wed, Sep 13, 2023 10:22 pm
Filtering Windows Updates by a Specific Date
When I logged into a user's Microsoft Windows 10 system to check on a problem,
I found the system had rebooted late the night before, September 12, 2003, at
a time much later than I would expect the user to be working, so I didn't think
she had rebooted it. I didn't know if the reboot might be related to the
problem she reported to me or could possibly just be Microsoft Windows
rebooting because of an automatically installed update. From a
command prompt window, you can
obtain the last time the system was rebooted using the
systeminfo
command. To see just the last reboot time and not all of the other output
it provides, you can filter the output with the
find command
by
piping the output of the
systeminfo command to the
find command. You can check on updates that have been
installed using the
Windows Management Instrumentation Command-line (WMIC) command
wmic qfe list ("qfe" stands for "Quick Fix Engineering").
Since that command can also generate a lot of output for updates on dates
you may not be interested in, you can also filter that output
with the
find command.
[ More Info
]
[/os/windows/PowerShell]
permanent link
Mon, Aug 21, 2023 9:56 pm
Pinning Evernote to the Microsoft Edge browser toolbar
TO pin the
Evernote
Web Clipper extension to the
toolbar in the
Microsoft Edge browser, click on the 3 dots at the top, right-hand
corner of an Edge browser window, then select
Extensions, then
click on the Evernote Web Clipper extension, and then click on the icon
that appears to the right of it, which will have a slash through it if an
icon for the extension has not yet been added to the toolbar.
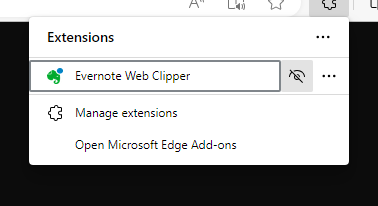
That will remove the slash from the icon and add an icon for Evernote,
the green elephant head, to the toolbar.
[/network/web/browser/edge/evernote]
permanent link
Sun, Aug 20, 2023 2:58 pm
Copying fonts from one Windows system to another
I needed to transfer the fonts my wife had installed from the Microsoft
Windows 10 system she had been using to a new Windows 11 system. To do
so, I copied the
C:\Windows\Fonts directory on her old system
to a network location that I could access from the new system (I could
also have used a
USB
flash drive). I then copied the contents of that directory to the
C:\Windows\Fonts directory on her new system. When doing so,
an
Installing Fonts window appeared with the following warning:
Cannot install StaticCahce.dat
The file 'C:\Users\username...\StaticCache.dat' does not appear to be
a valid font.
After I closed that window, I also saw another window with the message
below:
Cannot install
GlobalMonspace.CompositeFont
The file 'C:\Use...\GlobalMonspace.CompositeFont' does not appear to be
a valid font.
A similar message appeared for the following fonts:
- GlobalSansSerif.CompositeFont
- GlobalSerif.CompositeFont
- GlobalUserInterface.CompositeFont
I also saw some messages stating a font was already installed and asking
if I wanted to replace it. I chose "No" and checked the box for "Do this
for all current items". After that, I also saw "Cannot install Deleted,"
though I don't know why that appeared as there was no file named "Deleted"
in the directory from which I was performing the copy.
Note: you can see a list of the currently installed fonts on a Windows
system by typing fonts in the Windows Search window
at the bottom of the screen and then selecting Fonts Control Panel
when you see it returned in the search results.
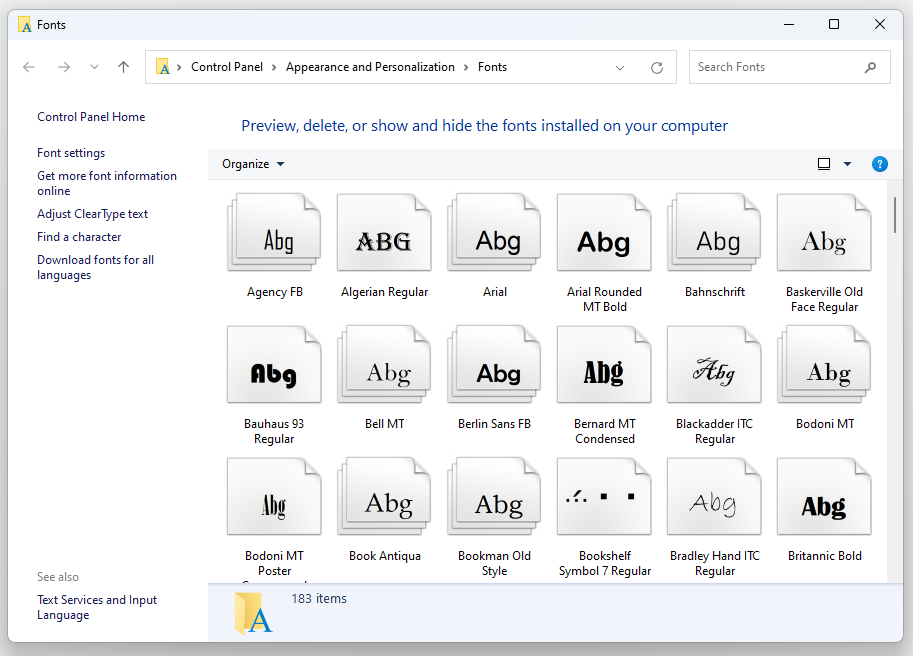
Before I started copying fonts from the old system, I saw "183 items" for
the number of fonts. After I copied the fonts, I saw "426 items" in the
Control Panel > Appearance and Personalization > Fonts window. The
number of items added will likely be less than the number of files in the
folder from which you transferred the fonts as some of the
TrueType font files (.ttf) are variations such as bold and italic,
of a particular font.
I also transferred Windows
themes from her account on the old system to her account on the new system.
[/os/windows/transfer]
permanent link
Fri, Aug 18, 2023 2:54 pm
Pinning a Brave browser extension
If you would like an extension you have added to the
Brave browser to
have an icon at the top of a Brave browser window, you can "pin" it to the
right of the address bar in the browser by clicking on the icon that looks like
a puzzle piece that appears to the right of the address bar, which will result
in a list of installed extensions appearing, and then clicking on the
pushpin icon for an extension that you would like to be "pinned" so that
an icon for the extension appears to the left of that puzzle piece icon,
allowing you to click on the extension's icon to use the extension. E.g., for
the Evernote Web Clipper extension shown below, if I click on the pushpin icon
next to it, an icon for the
Evernote extension than appears next to the puzzle piece icon.

[/network/web/browser/brave/evernote]
permanent link
Wed, Aug 16, 2023 9:09 pm
Replacing all occurrences of a text string in a binary file with XVI32
If you need to replace all occurrences of text in a file that isn't a text
file,
XVI32 is a free
hex editor that provides that capability. To use the program, download
the zip file
xvi32.zip and unzip the file to whatever directory you wish to place it in.
There is no installation procedure, you simply run the xvi32.exe file from
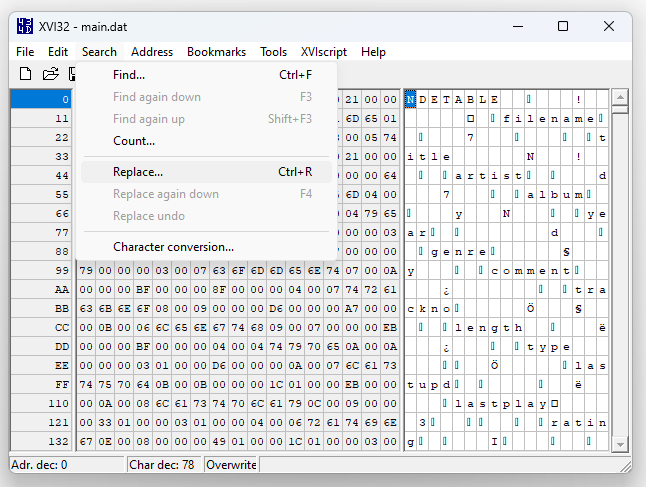
the directory where you placed it. To search for a
string
you wish to replace throughout a file, make sure you are at the beginning of
the file (position 0), then click on Search on the
program's toolbar
then choose Replace.
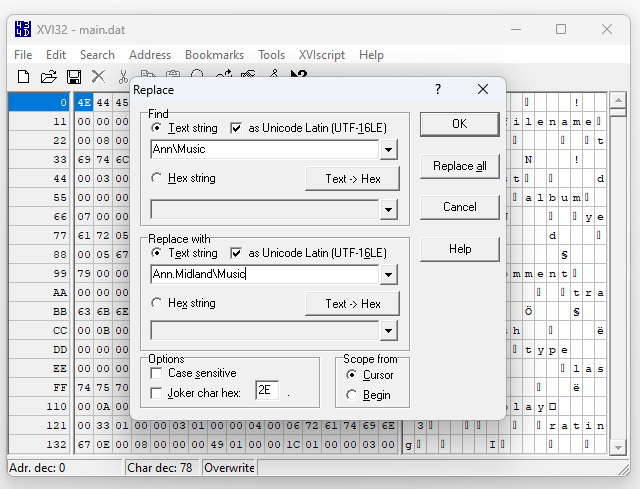
Then put the text you wish to replace in the Find field
(you may also need to check "as Unicode Latin (UTF-16LE)" if the
file uses Unicode
encoding, which is likely. Then put the replacement text in the
Replace with field. Again you may need to check the box for
"as Unicode Latin (UTF-16LR)".
UTF-16 is a 16-bit Unicode Transformation Format.
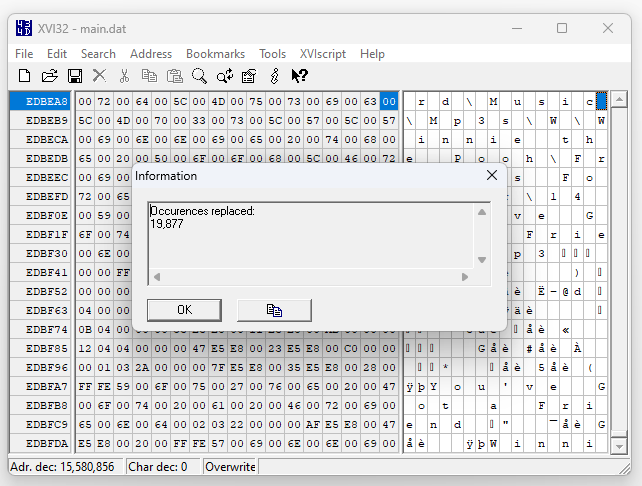
Then click on the Replace all button. The program will tell
you how many occurrences of the searched for text was replaced.
Choose File then Save to save the file you've
edited with the changes you made.
[/software/editors/xvi32]
permanent link
Mon, Aug 14, 2023 7:37 pm
Adding registry keys to the Windows Registry from a .reg file
You can save registry keys from the
Windows Registry
on a system running a Microsoft Windows operating system by running the
Windows Registry editor,
regedit.exe, then navigating to the location of a key you wish to save,
right-clicking on it and selecting Export to create a .reg file.
You can then import the registry key on another Windows system by
double-clicking on that file on the system on which you wish to have the
same registry entry. You may need to be logged in under a administrator
account for keys that apply to all users, but you can still import the
contents of the .reg file without logging out of the currently logged in
user account, if that is not an account in the administrator group, by opening
a
command prompt window with administrator privileges. On a Windows 11
system, you can do so by typing command prompt in the Search
field at the bottom of the screen. When you see the Command Prompt
app returned in the search results, click on it to open a command prompt window
without administator privileges or select "Run as administrator" to open
a command prompt window with administrator privileges. To add the registry
entries in a .reg file to the Windows Registry from the command prompt you
can issue the command reg /import filelocation\filename
where filelocation is the directory path to the file and filename
is the file's name. E.g., to import a registry file named
L5SoftwareGroup.reg located on the server server1 in the shared public folder
under the directory path \Software\Utilities, I could enter the
command below.
C:\Windows\System32>reg import \\server1\public\Software\Utilities\L5SoftwareGroup.reg
The operation completed successfully.

C:\Windows\System32>
Related articles
-
Obtaining a command prompt in Windows 11
Date: February 18, 2017
-
Obtaining a command prompt in Windows 10
Date: February 18, 2017
-
Obtaining a Command Prompt on a Windows 8 System
Date: March 15, 2014
[/os/windows]
permanent link
Sun, Aug 13, 2023 6:42 pm
CDisplay Installation File
While installing software that my wife uses on a new PC, I discovered
that the developer of
CDisplay, David Ayton, died in 2003 and the program is no longer
maintained. The application allows one to display
comic book
archive files, which are files with an extension of .cbr, cbz, .cbt,
or .cba — those files are renamed
RAR,
ZIP,
TAR, or
ACE
files. Since the website where I obtained the software almost two decades
ago, www.cdisplay.me, no longer exists, I've placed a Zip file
containing the installation program on this website at
CDisplay 1.8.1 so
that others who might need a copy of the software can access it.
[/os/windows/software/comics]
permanent link
Mon, Jul 24, 2023 1:16 pm
Stop sharing a folder on a Windows 2012 server
To stop sharing a folder on a Windows 2012 server, you can take the following
steps:
-
Hit Ctrl-Esc
-
Type
Computer Management and when you see Computer
Management returned in the search results, click on it.
-
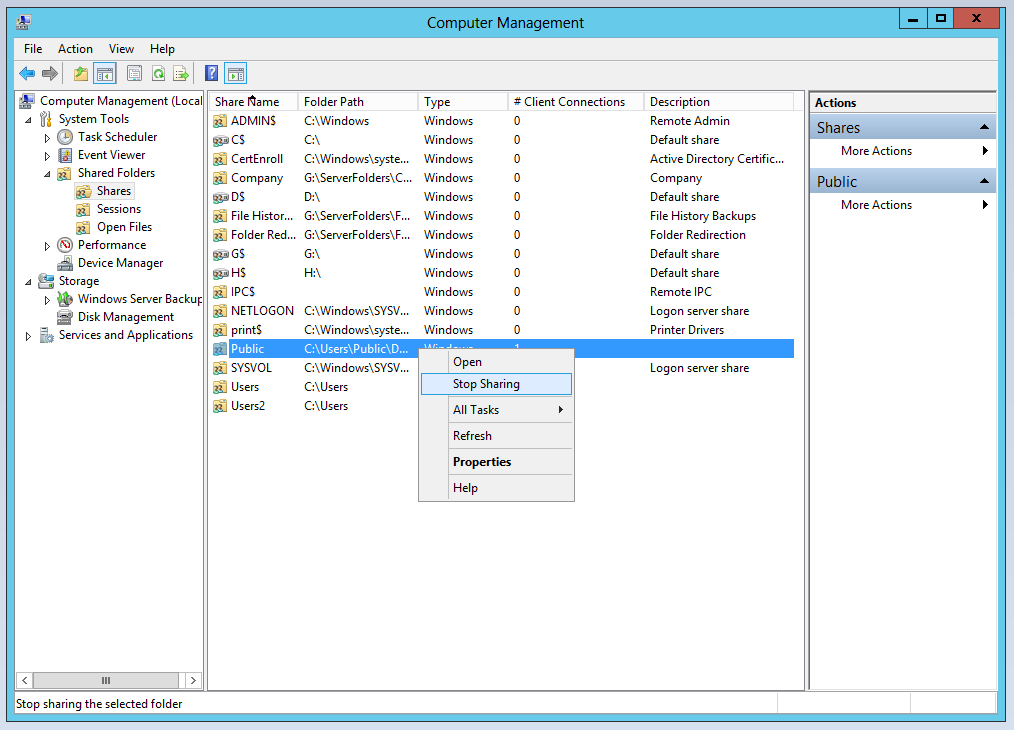
In the Computer Management window, select Shares under
Shared Folders, which is under System Tools.
-
Right-click on the directory you no longer wish to share and
select "Stop sharing".
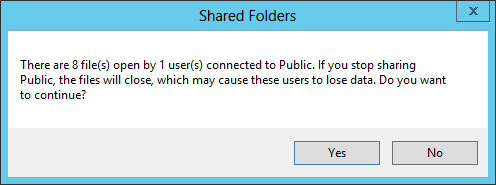
If you see a Shared Folders window open informing you that there
are open files in the shared directory when you attempt to stop sharing it,
you can click on Open Files, which appears beneath Shares
in the list of options for Shared Folders in the Computer
Management window to determine which files are open and which user
account has them open.
If you wish to close them from the server, you
can, after you have selected Open Files to see the list of open
files, right-click on a file and select the option to close it. You can also
close all open files by selecting "More Actions" in the right pane
of the Computer Management window, then "Disconnect All Open
Files".
You can also see which files are open by opening a
command prompt window with administrative access and issuing the
openfiles command.
You can open a commmand prompt window with administrator access by
hitting Ctrl-Esc then typing command prompt and when
you see "command prompt" returned in the search results, right-click on it
and choose "Run as administrator". In the command prompt window, enter
the command openfiles.
C:\Windows\system32>openfiles

INFO: The system global flag 'maintain objects list' needs
      to be enabled to see local opened files.
      See Openfiles /? for more information.


Files opened remotely via local share points:
---------------------------------------------

ID       Accessed By          Type       Open File (Path\executable)
======== ==================== ========== =====================================
27514635 Joe                  Windows    C:\..\Public\Documents\Books\Images
10066334 Joe                  Windows    C:\..\Documents\GRAA\2023\July
28185728 Joe                  Windows    C:\..\2023\Summer\Review\2023-06-26
25501373 Joe                  Windows    C:\..\Documents\MoonPoint\2023
22145930 Liz                  Windows    G:\..) (2023_07_15 23_24_31 UTC).pdf
28185729 Joe                  Windows    C:\..\Public\Documents\Books\Images
27514641 Liz                  Windows    G:\..) (2017_07_06 02_45_37 UTC).pdf
28856820 Joe                  Windows    C:\..\Documents\MoonPoint\2023
38923150 Joe                  Windows    C:\..\2023\Summer\Review\2023-06-26
22145934 Joe                  Windows    C:\..\Documents\GRAA\2023\July

C:\Windows\system32i>openfiles
If you can't determine which files are open because the full path to files
is not displayed, i.e., two dots are displayed for a portion of the path,
then you can add a format option (fo) to the command to display the output
in a different format. E.g., if you add /fo list, i.e.,
openfiles /query /fo list when you query for the open files,
you will then see the files displayed in a list format that will display
the full directory path for each file that is open. Other format options for the
display of output are table and csv. The
csv option is for
Comma-separated values. You can see a full list of options for the
openfiles command by issuing the command
openfiles /?.
[/os/windows/server2012]
permanent link
Mon, Jun 19, 2023 10:17 pm
Checking and setting the port speed on a Cisco switch
You can check the port speed on a
Cisco network switch from its
command-line
interface (CLI) by logging into the switch and then issuing the
show interface command. If you want to see the parameters,
including port speed, for all ports on the switch, the command
without any additional command line arguments will display information
for all the ports on the switch. If you are only interested in the rate for
a particular port, then specify it after the command. E.g., show
interface fa0/1.
Hadrian>show interfaces fa0/1
FastEthernet0/1 is up, line protocol is up (connected)
  Hardware is Fast Ethernet, address is 0009.e897.d281 (bia 0009.e897.d281)
  MTU 1500 bytes, BW 10000 Kbit, DLY 1000 usec,
     reliability 255/255, txload 32/255, rxload 1/255
  Encapsulation ARPA, loopback not set
  Keepalive set (10 sec)
  Full-duplex, 10Mb/s, media type is 100BaseTX
  input flow-control is unsupported output flow-control is unsupported
  ARP type: ARPA, ARP Timeout 04:00:00
  Last input never, output 00:00:00, output hang never
  Last clearing of "show interface" counters never
  Input queue: 0/75/0/0 (size/max/drops/flushes); Total output drops: 0
  Queueing strategy: fifo
  Output queue: 0/40 (size/max)
  5 minute input rate 72000 bits/sec, 29 packets/sec
  5 minute output rate 1286000 bits/sec, 728 packets/sec
     686444 packets input, 756803225 bytes, 0 no buffer
     Received 6 broadcasts (0 multicast)
     0 runts, 0 giants, 0 throttles
     4 input errors, 4 CRC, 0 frame, 0 overrun, 0 ignored
     0 watchdog, 0 multicast, 0 pause input
     0 input packets with dribble condition detected
     1626390 packets output, 293258140 bytes, 0 underruns
     0 output errors, 0 collisions, 2 interface resets
     0 babbles, 0 late collision, 0 deferred
     0 lost carrier, 0 no carrier, 0 PAUSE output
     0 output buffer failures, 0 output buffers swapped out
Hadrian>
[ More Info ]
[/hardware/network/switch/cisco]
permanent link
Mon, May 29, 2023 9:09 pm
youtube-dl unable to extract uploader id
I installed
ytdl-org /
youtube-dl from
Github
to download videos from
YouTube to a
Linux
system with the
pip package manager, since youtube-dl is a
Python
script, using the command
pip3 install youtube-dl. But when I
tried to download a YouTube video with youtube-dl, I received an error message
indicating the script was unable to extract the ID of the uploader of the
video and the video was not downloaded.
$ youtube-dl https://www.youtube.com/watch?v=JmSmjDngVXM
[youtube] JmSmjDngVXM: Downloading webpage
ERROR: Unable to extract uploader id; please report this issue on https://yt-dl.org/bug . Make sure you are using the latest version; see https://yt-dl.org/update on how to update. Be sure to call youtube-dl with the --verbose flag and include its complete output.
$
I verified I had the latest version of the program, 2021.12.17.
$ youtube-dl --version
2021.12.17
$
To obtain further information on the error, I then ran the script with the
--verbose option which showed me more details on the error.
$ youtube-dl --verbose https://www.youtube.com/watch?v=JmSmjDngVXM
[debug] System config: []
[debug] User config: []
[debug] Custom config: []
[debug] Command-line args: ['--verbose', 'https://www.youtube.com/watch?v=JmSmjDngVXM']
[debug] Encodings: locale UTF-8, fs utf-8, out UTF-8, pref UTF-8
[debug] youtube-dl version 2021.12.17
[debug] Python version 3.6.8 (CPython) - Linux-3.10.0-229.7.2.el7.x86_64-x86_64-with-centos-7.1.1503-Core
[debug] exe versions: none
[debug] Proxy map: {}
[youtube] JmSmjDngVXM: Downloading webpage
ERROR: Unable to extract uploader id; please report this issue on https://yt-dl.org/bug . Make sure you are using the latest version; see https://yt-dl.org/update on how to update. Be sure to call youtube-dl with the --verbose flag and include its complete output.
Traceback (most recent call last):
File "/usr/local/lib/python3.6/site-packages/youtube_dl/YoutubeDL.py", line 815, in wrapper
return func(self, *args, **kwargs)
File "/usr/local/lib/python3.6/site-packages/youtube_dl/YoutubeDL.py", line 836, in __extract_info
ie_result = ie.extract(url)
File "/usr/local/lib/python3.6/site-packages/youtube_dl/extractor/common.py", line 534, in extract
ie_result = self._real_extract(url)
File "/usr/local/lib/python3.6/site-packages/youtube_dl/extractor/youtube.py", line 1794, in _real_extract
'uploader_id': self._search_regex(r'/(?:channel|user)/([^/?&#]+)', owner_profile_url, 'uploader id') if owner_profile_url else None,
File "/usr/local/lib/python3.6/site-packages/youtube_dl/extractor/common.py", line 1012, in _search_regex
raise RegexNotFoundError('Unable to extract %s' % _name)
youtube_dl.utils.RegexNotFoundError: Unable to extract uploader id; please report this issue on https://yt-dl.org/bug . Make sure you are using the latest version; see https://yt-dl.org/update on how to update. Be sure to call youtube-dl with the --verbose flag and include its complete output.
$
The software, which is a command-line program to download videos from
YouTube.com and other video sites, is maintained by
ytdl-org and, on a Github webpage
for the organization, I found issue #32247,
ERROR: Unable to extract uploader id, which attributed the error to
YouTube recently starting to add that "at sign", i.e., @, to URLs. jgmayer,
who posted his comments and the solution just 3 hours before I encountered
the problem, posted the following solution:
The solution is to go to the file that you getting the error:
"/usr/local/Cellar/youtube-dl/2021.12.17/libexec/lib/python3.10/site-packages/youtube_dl/extractor/common.py"
Find the following line:
'uploader_id': self._search_regex(r'/(?:channel|user)/([^/?&#]+)', owner_profile_url, 'uploader id') if owner_profile_url else None,
Replace with the following:
'uploader_id': self._search_regex(r'/(?:channel/|user/|@)([^/?&#]+)', owner_profile_url, 'uploader id', default=None),
The poster indicated the relevant file is
/usr/local/Cellar/youtube-dl/2021.12.17/libexec/lib/python3.10/site-packages/youtube_dl/extractor/common.py,
but there is no /usr/local/Cellar directory on my system and
running the script with the verbose option, showed the relevant code is on line
1,794 of
/usr/local/lib/python3.6/site-packages/youtube_dl/extractor/youtube.py.
After making the suggested change, I was able to download a YouTube video
with the program.
$ youtube-dl https://www.youtube.com/watch?v=JmSmjDngVXM
[youtube] JmSmjDngVXM: Downloading webpage
[download] Destination: Ancient Greek Lesson #1 _ Learn Greek Fast Online-JmSmjDngVXM.mp4
[download] 100% of 14.88MiB in 04:20
$
The updated youtube.py that can
be used to replace the 2021.12.17 version in
/usr/local/lib/python3.6/site-packages/youtube_dl/extractor/youtube.py.
References:
-
ERROR: Unable to extract uploader id #32247
By: jgmayer
Date: May 29, 2023
Github - ytdl-org / youtube-dl
Related Articles:
-
Python script to download YouTube videos
on Mac OS X
[/video/youtube]
permanent link
Mon, May 22, 2023 10:05 pm
Relaying Denied by Sendmail
A family member reported she was no longer able to send email via a
Sendmail service I have
running on a CentOS Linux
system. She sent me a screenshot of the message she received when attempting
to send a message. I saw a "Server error: '550 5.7.1 ... Relaying denied'"
message. At first, I thought that a technician from her Internet Service
Provider (ISP) might have changed her
Microsoft Outlook
settings when he upgraded her network equipment recently, but then I remembered
I was restricting email
relaying on the system by
IP address and realized
her IP address would have changed when the technician upgraded her network
equipment. So I had her visit
whatismyipaddress.com and provide me with the public
IPv4
IP address it showed for her. I then replaced her prior IP address in
/etc/mail/access. The format for an entry to allow relaying
from a particular IP address is as shown below.
# Jane Doe
192.168.71.77                           RELAY
You can include a comment to indicate who the IP address is associated
with by prefixing the comment with a
pound sign. The
IP address should be followed by the word "RELAY" (you can put tabs in
between the IP address and the word, if you like).
After changing the IP address, I rebuilt the access database with the
makemap command. I
then restarted Sendmail
# makemap hash /etc/mail/access </etc/mail/access
# service sendmail restart
Redirecting to /bin/systemctl restart  sendmail.service
#
I was then able to receive a test message she sent me. After updating
the IP address, I may only have needed to restart Sendmail without running
the makemap command
first as I found the following at
19.3.2. Sendmail on a
Red Hat website in reference to running the
make all -C /etc/mail/ command (CentOS is derived from
Red Hat
Enterprise Linux):
All other generated files in /etc/mail (db files) will be
regenerated if needed. The old makemap commands are still usable. The make
command is automatically used whenever you start or restart the
sendmail service.
[/network/email/sendmail]
permanent link
Sun, Mar 19, 2023 10:11 pm
Renaming a PC and joining it to a Windows domain
If you need to rename a computer running the Windows 10 operating system
and/or make it a member of a
Windows domain, you
can take the following steps. To see the system's current name, you can press
the
Windows key
and the
Pause/Break key on the keyboard simultaneously. Alternatively,
you can type
about in the "Type here to search" field at the
bottom, left-hand side of the screen and then select the
About your
PC entry which is returned from the search. You can also type
this
pc
in the "Type here to search" field at the bottom, left-hand side of
the screen and then select the
This PC app when you see it listed.
For any of the three above options, you will then see an
About
window that lists "Device name," which is the system's current name.
If you just need to rename the PC, click on
Rename this PC.
If you need to both rename the PC and join a Windows domain, then
instead of clicking on
Rename this PC, scroll downards in
the
About window until you see "Rename this PC (advanced)"
and click on it.
[ More Info ]
[/os/windows/domain]
permanent link

Privacy Policy
Contact


