←December→
| Sun |
Mon |
Tue |
Wed |
Thu |
Fri |
Sat |
| |
1 |
2 |
3 |
4 |
5 |
6 |
| 7 |
8 |
9 |
10 |
11 |
12 |
13 |
| 14 |
15 |
16 |
17 |
18 |
19 |
20 |
| 21 |
22 |
23 |
24 |
25 |
26 |
27 |
| 28 |
29 |
30 |
31 |
|
|
|
|
|
Fri, Dec 12, 2025 7:28 pm
Problem with SQLIte database and table names being the same in Python code
I encountered a problem today when I created a
Python
program to help me automate the process of entering data into an
SQLite database. I've
been using
DB Browser for SQLite
on a laptop running Windows 11 to maintain the database and I installed
WinPython
3.12.4.1 today to help me automate some tasks related to SQLite databases
I maintain on the laptop. I had the Python program prompt me for data
to enter into fields in the database for a new entry in the database.
But after I entered data at the prompts, I saw the following error
message:
Traceback (most recent call last):
  File "N:\Sites\AddReference.py", line 65, in <module>
    main()
  File "N:\Sites\AddReference.py", line 58, in main
    prompt_for_entry(cur, conn)
  File "N:\Sites\AddReference.py", line 44, in prompt_for_entry
    insert_entry(cur, conn, ID, Title, Location)
  File "N:\Sites\AddReference.py", line 12, in insert_entry
    cur.execute(
sqlite3.OperationalError: near "References": syntax error
Line 12 in the program was as a cur.execute command in
the following function:
def insert_entry(cur, conn, ID, Title, Location):
    # Insert an entry into the database.
    try:
        cur.execute(
            "INSERT INTO References (ID, Title, Location) VALUES (?, ?, ?)",
            (ID, Title, Location)
        )
        conn.commit()
        print("Entry added successfully.\n")
    except sqlite3.IntegrityError as e:
        print(f"Error: {e}\n")
The database was named References and the table into which I was
attempting to add entries was also named References. That doesn't pose
an SQLite problem — a table within a database can have the same
name as the database itself, but that was posing a problem in the
Python code that resulted in the error message I received. When I
placed single quotes around References in the command, I no longer received
the error message and was able to successfully add new entries to the
database. I.e., I now have the following Python code, instead.
def insert_entry(cur, conn, ID, Title, Location):
    # Insert an entry into the database.
    try:
        cur.execute(
            "INSERT INTO 'References' (ID, Title, Location) VALUES (?, ?, ?)",
            (ID, Title, Location)
        )
        conn.commit()
        print("Entry added successfully.\n")
    except sqlite3.IntegrityError as e:
        print(f"Error: {e}\n")
[/languages/python]
permanent link
Mon, Nov 24, 2025 7:46 pm
Determining the location of a user's "My Documents" folder with PowerShell
I needed to move some files from one Windows 11 system that is no longer
being used, as the user is no longer working for the company, to another
Windows 11 system where the user of that system, Pam, is now handling a task
formerly handled by the prior employee, but while logged onto the account for
the user now handling the task on her system, I noticed that her
Documents folder was empty. The
Windows domain name
changed at that business a few years ago, so I thought that perhaps she
might be using a Documents directory associated with her account under
the prior domain name rather than the new one created for her new domain
login. You can determine the location of a user's "My Documents" directory,
which can be redirected to another location, including a network share
or another drive, by issuing the PowerShell command
[Environment]::GetFolderPath("MyDocuments"). E.g.:
Windows PowerShell
Copyright (C) Microsoft Corporation. All rights reserved.

Try the new cross-platform PowerShell https://aka.ms/pscore6

PS C:\Users\Pam> [Environment]::GetFolderPath("MyDocuments")
C:\Users\Pam\Documents
PS C:\Users\Pam>
The command utilizes the GetFolderPath method from the
System.Environment class to retrieve the path of special folders,
including "MyDocuments," for the user under whose context the script or command
is executed. This method correctly identifies the mapped location even if the
Documents folder has been redirected or moved from the default location.
In this case, I found that her "My Documents" directory was pointing to
the directory associated with the old domain name. Her "home" folder
was also pointing to the home folder that was in use for her account
in the old domain. You can type $home in a PowerShell window to
see that value. Or you can use $env:USERPROFILE to see the same
information.
PS C:\Users\Pam> $Home
C:\Users\Pam
PS C:\Users\Pam >$env:userprofile
C:\Users\Pam
PS C:\Users\Pam>
[/os/windows/PowerShell]
permanent link
Sat, Nov 22, 2025 10:12 pm
PowerShell cmdlets to check remote connectivity and firewall rules
When I tried to establish a
Secure Shell (SSH)
connection to a Windows 11 PC at a remote location today, I was unable to
do so. I usually connect to the
Windows
domain controller at the location and establish the SSH connection
to the user's Windows 11 system through it, but that was not working. I thought
the problem was likely due to
McAfee stopping providing
firewall protection for incoming connections to ports on PCs as part of
their antivirus software, since the antivirus
software on PCs at that location was
McAfee Antivirus
Plus. When McAfee stopped providing that firewall service as part of
McAfee AntiVirus Plus, the software reverted firewall protection for incoming
connections to Microsoft's default firewall software,
Microsoft Defender
Firewall, aka Windows Firewall. When I check firewall protection on a
Windows system running McAfee AntiVirus Plus, I now see the following message:
McAfee and Windows Defender are now working side by side
Our Advanced Firewall provides enhanced protection by blocking risky
outgoing connections. Windows Defender Firewall provides protection for
incoming connections.
Keep both firewalls on for complete protection.
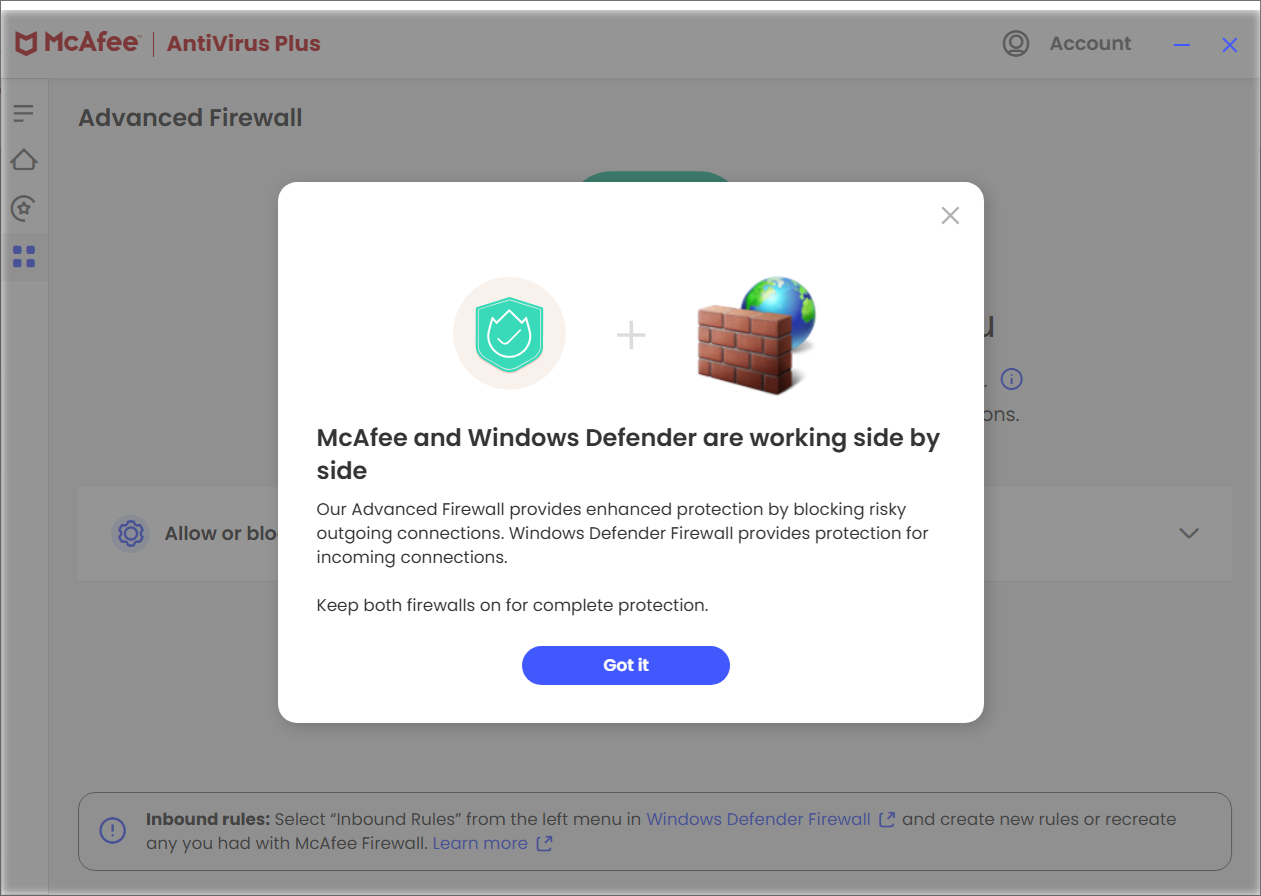
So I thought I likely needed to create similar firewall rules for
incoming connections in the Windows Firewall software as had existed
previously in the McAfee firewall software.
[ More Info ]
[/os/windows/PowerShell]
permanent link
Fri, Nov 21, 2025 7:55 pm
Changing the "from" address of an email in mutt
To change the "from" address of a message in the
Mutt email
client while composing a message, you can use Esc-f, i.e., hit the
Esc and f keys simultaneously. You will see a "From:" field
appear near the bottom of the window with the current "from" address, which you
can edit to replace it with whatever you would like. E.g., in the example below,
I am changing the "from" address that the recipients of the message will see
from jdoe@example.com to newsletter@example.com (the email address is within
the angle
brackets with a descriptive identifier before it.
y:Send q:Abort t:To c:CC s:Subj a:Attach file d:Descrip ?:Help
    From: Joe Doe <jdoe@example.com>
      To: "Bruce K." <bkamen2145@gmail.com>
      Cc: albusd@example.com
     Bcc:
 Subject: Re: July 2025 Newsletter
Reply-To:
     Fcc: ~/sent
Security: None


-- Attachments
- I 1 /var/tmp/mutt-example-508-23668-418711[text/plain, 8bit, utf-8, 1.4K


-- Mutt: Compose [Approx. msg size: 1.4K Atts: 1]----------------------------
From: Newsletter <newsletter@example.com>
After I've retyped the "from" address to be the one I want to appear,
when I hit Enter, I will see the "from" address replaced with
the one I want and can then hit y to send the message to
recipients.
y:Send q:Abort t:To c:CC s:Subj a:Attach file d:Descrip ?:Help
    From: Newsletter <newsletter@example.com>
      To: "Bruce K." <bkamen2145@gmail.com>
      Cc: albusd@example.com
     Bcc:
 Subject: Re: July 2025 Newsletter
Reply-To:
     Fcc: ~/sent
Security: None


-- Attachments
- I 1 /var/tmp/mutt-example-508-23668-418711[text/plain, 8bit, utf-8, 1.4K


-- Mutt: Compose [Approx. msg size: 1.4K Atts: 1]----------------------------
For a way to change the "from" address from the command line, see
Using a command-line interface
(CLI) to send email with mutt.
[/network/email/clients/mutt]
permanent link
Thu, Nov 20, 2025 12:03 pm
Changing the name of a Ubuntu Linux system from the command line
To change the name of a system running the
Ubuntu Linux operating
system from a
command-line
interface (CLI), i.e., a
terminal window,
you can take the following steps:
-
In the terminal window enter the command
sudo hostnamectl set-hostname newname where
newname is the new name you wish to assign to the system. E.g.:
jim@Firefly:~$ sudo hostnamectl set-hostname Smaug
[sudo: authenticate] Password:
jim@Firefly:~$
That will change the host name stored in /etc/hostname.
-
Then edit the
/etc/hosts file, replacing the old host name
there with the new one. E.g., if I had the following lines in the hosts
file, I would modify the second line containing the old host name.
127.0.0.1 localhost
127.0.1.1 Firefly
The 127.0.0.1 in the above lines is the
localhost IP address,
a loopback address that can be used when troubleshooting network issues.
Ubuntu also adds a 127.0.1.1 address in /etc/hosts with
the name you have assigned to the system. The name should match the
one in /etc/hostname, so change the name for the 127.0.1.1
address to the new name you wish to use.
References:
-
What is difference between localhost address 127.0.0.1 and 127.0.1.1
Updated: April 2, 2021
Ask Ubuntu
[/os/unix/linux/ubuntu]
permanent link
Wed, Nov 19, 2025 3:35 pm
Changing the password for a LUKS encrypted partition on Linux
If you need to change the password, i.e., the encryption key, used to encrypt
a partition with
Linux Unified
Key Setup (LUKS) on a Linux system, you can open a terminal window and use
the command sudo cryptsetup luksChangeKey /dev/sdaX where
sdaX is the relevant partition. E.g., I needed to
change the password on a Ubuntu
Linux system where the user's data was stored on /dev/sda3.
jim@Firefly:~$ sudo cryptsetup luksChangeKey /dev/sda3
Enter passphrase to be changed:
Enter new passphrase:
Verify passphrase:
jim@Firefly:~$
If you don't know the designation for the encrypted partition, e.g., if I
didn't know it was sda3, I could use the lsblk
command (it is part of the
util-linux package) to determine it. E.g.:
jim@Firefly:~$ lsblk
NAME                      MAJ:MIN RM   SIZE RO TYPE  MOUNTPOINTS
loop0                       7:0    0     4K  1 loop  /snap/bare/5
loop1                       7:1    0  73.9M  1 loop  /snap/core22/2133
loop2                       7:2    0  11.8M  1 loop  /snap/desktop-security-center/59
loop3                       7:3    0 247.6M  1 loop  /snap/firefox/6966
loop4                       7:4    0  11.1M  1 loop  /snap/firmware-updater/167
loop5                       7:5    0  91.7M  1 loop  /snap/gtk-common-themes/1535
loop6                       7:6    0  14.4M  1 loop  /snap/prompting-client/104
loop7                       7:7    0 516.2M  1 loop  /snap/gnome-42-2204/226
loop8                       7:8    0  17.5M  1 loop  /snap/snap-store/1300
loop9                       7:9    0  50.8M  1 loop  /snap/snapd/25202
loop10                      7:10   0   576K  1 loop  /snap/snapd-desktop-integration/315
loop11                      7:11   0 226.2M  1 loop  /snap/thunderbird/812
sda                         8:0    0 953.9G  0 disk
├─sda1                      8:1    0     1G  0 part  /boot/efi
├─sda2                      8:2    0     2G  0 part  /boot
└─sda3                      8:3    0 950.8G  0 part
  └─dm_crypt-0            252:0    0 950.8G  0 crypt
    └─ubuntu--vg-ubuntu--lv
                          252:1    0 950.8G  0 lvm   /
jim@Firefly:~$
From the above output, I can see that the disk drive in the system is
designated as sda and the encrypted partition is
sda3 (it is listed as type "crypt").
[ More Info ]
[/security/encryption/LUKS]
permanent link
Thu, Aug 28, 2025 6:33 pm
Copying and pasting in a Putty window
I installed the free and open-source
PuTTY terminal emulator
program on a laptop running Microsoft Windows 11 to use as a
SSH client.
On a system running Microsoft Windows, I would normally use Ctrl-C to copy
text from one window into the Windows
clipboard
and then use Ctrl-V to paste the copied text into another window. But that
doesn't work with PuTTY. Nor did the Shift-Insert key combination work.
But you can paste text into the PuTTY window after you have copied it into
the clipboard by left-clicking in the PuTTY window where you wish to place
the text after you've copied the text and then right-clicking. Using that
method, I was able to paste text from the Windows clipboard into a a file
I was editing with the
Vi text editor on a Linux server.
[/network/ssh/putty]
permanent link
Sat, Jun 14, 2025 9:52 pm
Display the applications on a Juniper router/firewall
To view the list of user-defined applications
on a Juniper
Networks router/firewall running the
JunOS
operating system from a
command-line
interface (CLI), you can enter cli mode by issuing the command
cli after logging in and then issue the command
show configuration applications.
root@Bellatrix> show configuration applications
application POP3 {
    protocol tcp;
    destination-port 110;
}
application POP3S {
    protocol tcp;
    destination-port 995;
}
application Rising_World_TCP {
    protocol tcp;
    destination-port 4254-4259;
}
application Rising_World_UDP {
    protocol udp;
    destination-port 4254-4259;
}

root@Bellatrix>
To view the list of predefined junos- applications
from the CLI, you can enter cli mode by issuing the command
cli after logging in and then issue the command show
configuration groups junos-defaults applications.
[ More Info ]
[/security/firewalls/SRX]
permanent link
Fri, Jun 13, 2025 7:54 pm
Determining the process listening on a particular port on a Linux system with ss
To determine what
process is listening on a particular
TCP
port on a Linux system,
you can use the ss command. On a CentOS Linux system, the command can be found in the /sbin/ss
directory. The utility is part of the iproute, or
iproute2 package.
# which ss
/sbin/ss
# rpm -qf /sbin/ss
iproute-3.10.0-21.el7.x86_64
#
To see help information on the utility, you can use the command
ss --help.
# ss --help
Usage: ss [ OPTIONS ]
       ss [ OPTIONS ] [ FILTER ]
   -h, --help           this message
   -V, --version        output version information
   -n, --numeric        don't resolve service names
   -r, --resolve       resolve host names
   -a, --all            display all sockets
   -l, --listening      display listening sockets
   -o, --options       show timer information
   -e, --extended      show detailed socket information
   -m, --memory        show socket memory usage
   -p, --processes      show process using socket
   -i, --info           show internal TCP information
   -s, --summary        show socket usage summary
   -b, --bpf           show bpf filter socket information

   -4, --ipv4          display only IP version 4 sockets
   -6, --ipv6          display only IP version 6 sockets
   -0, --packet display PACKET sockets
   -t, --tcp            display only TCP sockets
   -u, --udp            display only UDP sockets
   -d, --dccp           display only DCCP sockets
   -w, --raw            display only RAW sockets
   -x, --unix           display only Unix domain sockets
   -f, --family=FAMILY display sockets of type FAMILY

   -A, --query=QUERY, --socket=QUERY
       QUERY := {all|inet|tcp|udp|raw|unix|packet|netlink}[,QUERY]

   -D, --diag=FILE     Dump raw information about TCP sockets to FILE
   -F, --filter=FILE   read filter information from FILE
       FILTER := [ state TCP-STATE ] [ EXPRESSION ]
#
Or you can consult the
manual page
for ss using the command man ss.
[ More Info ]
[/os/unix/linux/network]
permanent link
Thu, Jun 12, 2025 9:34 pm
Changing a user's password in an htpasswd file or deleting a user from the file
An .htpasswd
file can be used to control access to specific directories that
visitors to a web server can access when the web server is an Apache web
server. Entries in the file can be added, modified, or deleted using
the htpasswd utility, which may be in the /bin directory
on a Linux sysem.
To update a password for a user listed in an .htpasswd file, a command
in the form htpasswd htpasswdFileLocation user
where htpasswdFileLocation is the location and name for the
.htpassword file on the system and user is a specific user listed
in that file. The htpasswd utility will prompt for a new password and
then prompt you to retype it to ensure there has not been a typo when
the new password was provided. E.g.:
# htpasswd /home/jdoe/music/.htpasswd mary
New password:
Re-type new password:
Updating password for user mary
#
If you wish to delete an entry for a user in the .htpasswd file, you can
use a command in the form htpasswd -D htpasswdFileLocation
user. The -D indicates the entry for the user
should be deleted. The response will indicate the password for the user
was deleted, which is true, but that indicates the entire entry for that
user was removd from the file. E.g.:
# htpasswd -D /home/jdoe/music/.htpasswd manny
Deleting password for user manny
#
Related
-
Apache AllowOverride AuthConfig
Directive
Date: May 13, 2008
[/network/web/server/apache]
permanent link
Sun, Jun 01, 2025 8:13 pm
Installing the Microsoft-provided SSH server software on a Windows 11 system
Microsoft provides
Secure Shell (SSH)
server software with Windows 11 that you can use to listen for connections
from remote SSH clients, but the server service is not installed by default.
To install the Microsoft-provided SSH server software on a Windows 11 system,
take the following steps:
-
Type optional features in the Windows Search field at the
bottom of the screen and hit Enter, then click on "Open" when it is
found.
-
Click on the View features button.
-
Scroll down the list of optional features until you see
Open SSH Server and then click on the check box for it
and click on the Next button.
-
Click on the Add button to add the OpenSSH Server capability
to the system.
-
When the Optional features window shows that the OpenSSH Server
software has been added, you can close the window.
If you scroll down the list of added features before closing the
window, you should see OpenSSH Server below OpenSSH Client.
After installing the software, you will need to start the OpenSSH server
service.
[ More Info ]
[/os/windows/network/ssh/OpenSSH]
permanent link
Sun, May 04, 2025 2:26 pm
Deleting all records from an SQLite table
If you wish to delete all of the records from a table in an
SQLite
database, you can do so using a command in the form delete from
tableName where tableName is the name of the
table from which you wish to remove all of the rows in the table.
E.g., if I wished to delete all of the records in a table named
TimeStamps, I could use the delete command below.
sqlite> select * from Timestamps;
2025-05-01 21:26:22|2025-05-01 21:23|10947739
2025-05-01 21:28:33|2025-05-01 21:28|10967247
2025-05-04 13:37:47|2025-05-04 13:36|18079581
sqlite> delete from Timestamps;
sqlite> select * from Timestamps;
sqlite>
If I only wanted to delete a record or records meeting a specific condition,
I could specify that condition in a WHERE clause. E.g., if the columns in the
table were CurrentTimestamp, LastUpdateTimestamp, and Size and I only wanted to
remove the row where the value of CurrentTimestamp is 2025-05-04 13:37:47,
I could use the command below, instead.
sqlite> .schema Timestamps
CREATE TABLE "Timestamps" (
        "CurrentTimestamp"      TEXT NOT NULL,
        "LastUpdateTimestamp"   TEXT NOT NULL,
        "Size"  INTEGER NOT NULL
);
sqlite> delete from Timestamps where CurrentTimestamp='2025-05-04 13:37:47';
[/software/database/sqlite]
permanent link
Fri, Mar 28, 2025 9:22 pm
Windows Files Flagged as Malware by Avira Rescue System Scan
Some antivirus companies provide "rescue system" software that you can
download for free and used to create bootable DVDs or
flash drives to
boot a PC outside of windows and scan the system for viruses and other
malware. The software can be used if a system won't boot because of the
malware.
Avira, a German
antivirus company, provides
Avira Rescue System antivirus software that can be used to scan a system
running a Microsoft Windows
operating system.
The
ISO file
that you download to create a bootable DVD or flash drive
contains the
Ubuntu
Linux operating system, but you don't need to be familiar with a
Linux operating
system to use the software.
[ More Info ]
[/security/antivirus/avira]
permanent link
Fri, Mar 14, 2025 7:18 pm
Determining the mount point for a USB flash drive on a Lubuntu system
I booted a PC from a USB
flash drive
on which I had installed
Lubuntu Linux.
I also plugged another flash drive into the system, but I didn't know
where it was mounted.
The hard
disk drive (HDD) in the system was /dev/sda and I assumed the
Lubuntu Linux bootable drive was /dev/sdb and the new drive would be
/dev/sdbc. You can type for devlink in /dev/disk/by-id/usb*;
do readlink -f ${devlink}; done at a
shell prompt, which you can obtain on a Lubuntu system by
clicking on the bird icon at the lower, left-hand corner of the
screen and selecting System Tools then Qterminal,
to see a list of the USB devices attached to a system.
lubuntu@lubuntu:~$ for devlink in /dev/disk/by-id/usb*; do readlink -f ${devlink}; done
/dev/sdc
/dev/sdc1
/dev/sdb
/dev/sdb1
lubuntu@lubuntu:~$
You can find the location where a USB drive is mounted by issuing
the mount
command and then
piping
the output into the
grep command to find information on just the particular drive in
which you are interested.
lubuntu@lubuntu:~$ mount | grep sdc
/dev/sdc1 on /media/lubuntu/EMTEC C450 type vfat (rw,nosuid,nodev,rela
time,uid=1000,gid=1000,fmask=0022,dmask=0022,codepage=437,iocharset=is
o8859-1,shortname=mixed,showexec,utf8,flush,errors=remount-ro,uhelper=udisks2)
lubuntu@lubuntu:~$
In this case, I knew the USB flash drive was a 16GB Emtec device
and I was able to see it was mounted at /media/lubuntu/EMTEC
C450. I was then able to view the files and folders for
the drive from the shell prompt.
lubuntu@lubuntu:~$ ls /media
cdrom  lubuntu  root
lubuntu@lubuntu:~$ ls /media/lubuntu
'EMTEC C450'
lubuntu@lubuntu:~$ ls /media/lubuntu/'EMTEC C450'
 EMTEC.icns   EMTEC.ico  'System Volume Information'   autorun.inf
lubuntu@lubuntu:~$
References:
-
How do I figure out which /dev is a USB flash drive?
Date: September 16, 2008
superuser
[/os/unix/linux/lubuntu]
permanent link
Sun, Mar 09, 2025 9:53 pm
Creating a bootable USB flash drive from an ISO file using Rufus
If you have an
ISO
file that could be written to a CD or DVD to boot a system, but wish to
use it to create a bootable
USB
flash drive and
wish to do so using software on a Microsoft Windows system, you
can use
Rufus.
The developer is Pete Batard and his blog can be found at
Pete's Blog; the GitHub page for
the software is at
rufus.
[ More Info ]
[/os/windows/utilities]
permanent link
Fri, Feb 28, 2025 7:55 pm
Burning an ISO file to a CD or DVD on a Windows 11 System
If you wish to burn a
.iso file to a
CD or a DVD on a Microsoft Windows 11 system, you can do so by taking the
following steps.
-
In the Windows File
Explorer, Right-click on the .iso file, then click on Burn, which appears
above the file list.

-
If the appropriate CD/DVD drive does not appear in the "Disc Burner"
field, select it then click on Burn (check the box first
for "Verify disc after burning", if you wish to have the program
verify that the disc can be read successfully after the iso
file is burned to the disc).
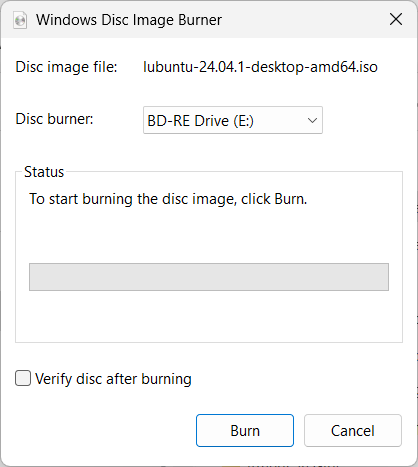
-
When the iso file has successfully been written to disc, you should
see "The disc image has been successfully burned to disc." You can
then click on the Close button.
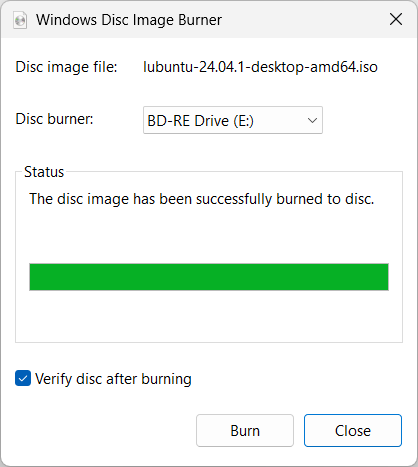
The disc will then be ejected.
[/os/windows/win11]
permanent link
Thu, Feb 13, 2025 8:08 pm
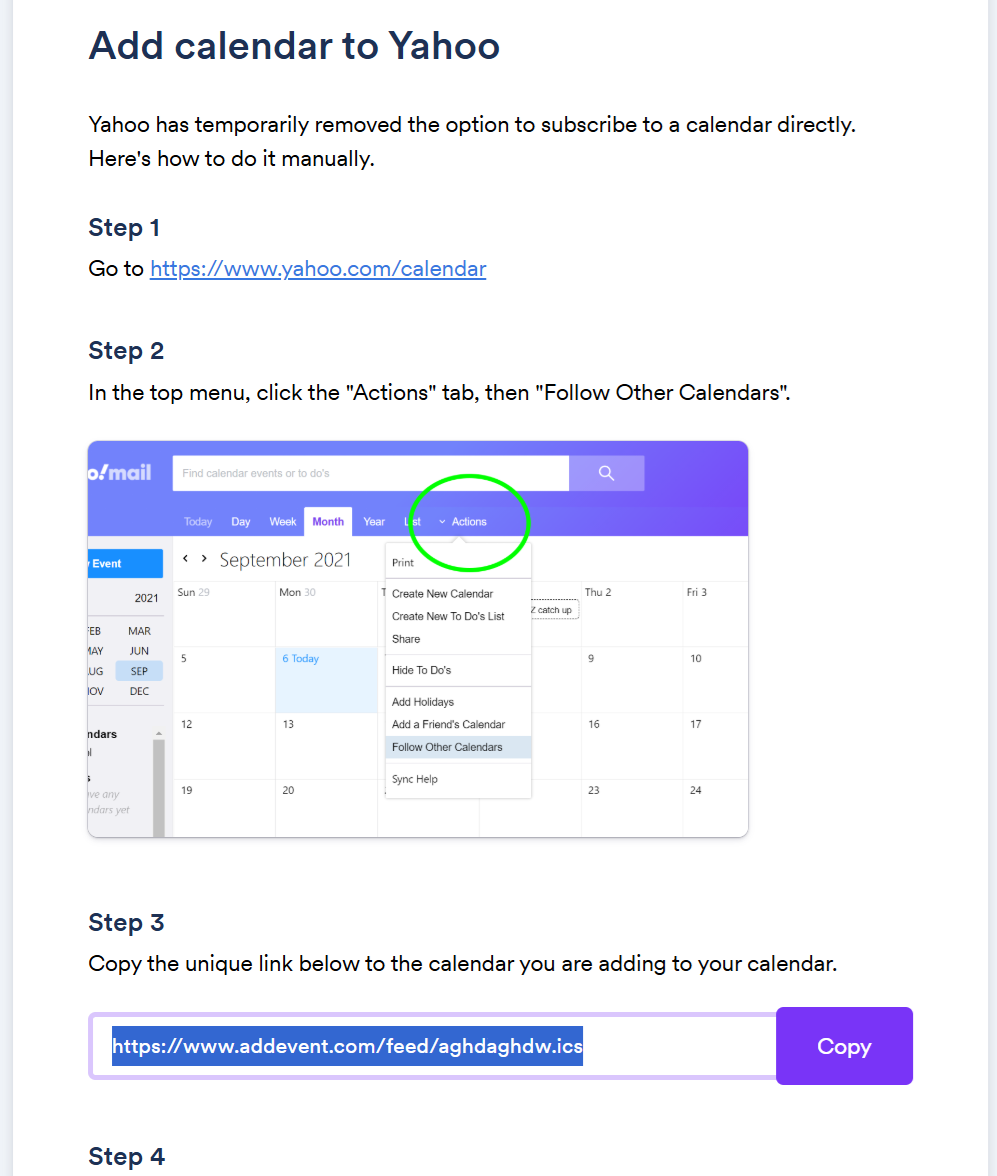
Add an AddEvent calendar to the desktop version of Outlook
AddEvent provides organizations
and companies a means to add their event calendars to their users'
calendars. When I was helping my wife add an organization's calendar
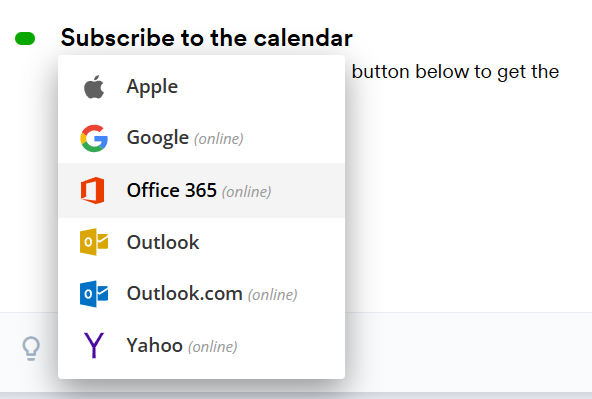
to her desktop version of Outlook, when I tried to add the calendar through
the AddEvent website, I saw two options for Outlook when I clicked on
Add to Calendar. On the "
Subscribe to the calendar" list of email options were the following:
- Apple
- Google (online)
- Office 365 (onlilne)
- Outlook
- Outlook.com
- Yahoo (online)
When I tried the Outlook option, the AddEvent
website gave me no option to download the
.ics calendar file for the
organization, instead the only option was to have the site open the new
Office 365 version of Outlook on the system, which would force her to sync
her email, contacts, and calendar with the Microsoft cloud, which I didn't
want to do. I wanted the .ics file so I could add it to the older version
of Outlook on her desktop system that she uses for her email, calendar, and
task list. There is a way to get the .ics file and use it with Outlook
or another application, but you have to choose the "Yahoo (online)" option.
In step 3 for the Yahoo instructions, you will see a URL for the .ics file
which you can copy and paste into a new tab in your browser, which will
allow you to download the .ics file to your system.
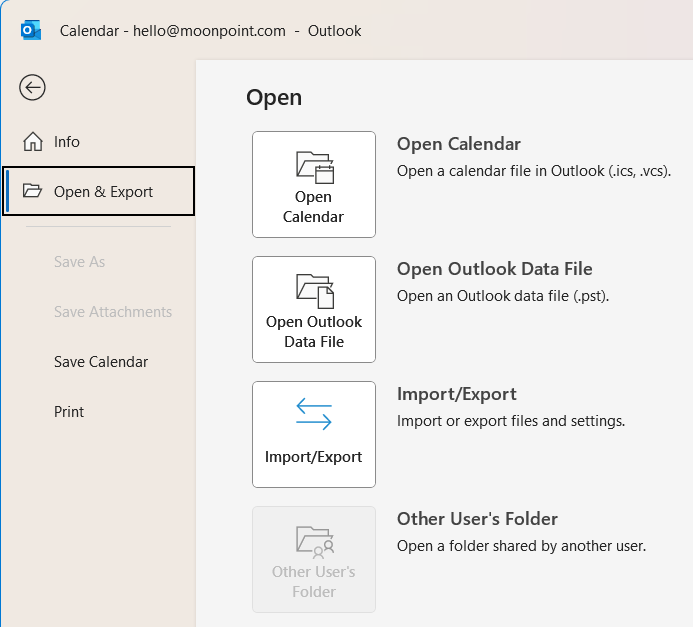
Once I had the .ics file, I was able to click on File then
Open & Export in Outlook on my wife's PC to open the
.ics file I downloaded and add the organization's calendar to her Outlook
calendar.
[/network/email/clients/outlook]
permanent link
Mon, Jan 27, 2025 10:06 pm
Transferring files over an RDP connection
If you are connected to a remote Microsoft Windows system from another
Windows system via the
Remote Desktop
Protocol (RDP) using the Microsoft terminal services client provided by
Microsoft with its Windows operating systems, mstsc.exe, you can copy and
paste files from one system to the other as you would from one directory
to another on one of the systems. E.g., if I want to copy a file from a
remote Windows 11 system to my local Windows 11 system, I can select it in the
Windows
File Explorer
on the remote system and then switch back to my local system
and go to the directory where I want to place it using the File Explorer
on that system and then hit
Ctrl-V, i.e, the
Ctrl and
V keys, to paste the file into that directory. You can use the same
technique to copy a directory, i.e., you can right click on the directory and
choose "copy" and then switch to the other system and navigate in the File
Explorer to where you wish to copy the directory and then and use the paste
function, e.g.
Ctrl-V to copy
I don't know how well the technique may work on very large files or
directories, e.g., ones that are multiple gigabytes, but I've found it works
well at least for those several megabytes in size. I also have not tested what
happens if you try another copy and paste operation before the first one
has completed.
Related:
-
Transferring Files Via the Remote Desktop
Date: March 13, 2010
[/os/windows/software/remote-control/rdp]
permanent link

Privacy Policy
Contact

