Sat, Jan 31, 2015 11:13 pm
Searching Windows event logs with get-eventlog
If you want to search a
Windows event log for occurrences of a particular eventid, you can use the
Windows
PowerShell cmdlet get-eventlog. E.g., to search the
system
event log, you would include that as a parameter after
get-eventlog. If I wanted to search that log for all instances
of the event id 5, I could use the command below:
c:\>powershell
Windows PowerShell
Copyright (C) 2014 Microsoft Corporation. All rights reserved.

PS c:\> get-eventlog "system" | where-object {$_.EventID -eq 5}

   Index Time          EntryType   Source                 InstanceID Message
   ----- ----          ---------   ------                 ---------- -------
     798 Nov 29 20:27  Error       Microsoft-Windows...            5 The des...


PS C:\>
Sometimes there may be many occurences of a particular eventid in a log
file. You can limit the display to those before or after a particular date
using -before or -after as shown below for a
search of the application event log:
PS C:\> get-eventlog -LogName "application" | where-object {$_.EventID -eq 753}

   Index Time          EntryType   Source                 InstanceID Message
   ----- ----          ---------   ------                 ---------- -------
    6239 Jan 25 22:29  Information Microsoft-Windows...          753 The Blo...
    2108 Dec 27 21:17  Information Microsoft-Windows...          753 The Blo...
    2099 Dec 27 21:00  Information Microsoft-Windows...          753 The Blo...
    1380 Nov 29 22:18  Information Microsoft-Windows...          753 The Blo...
    1359 Nov 29 22:05  Information Microsoft-Windows...          753 The Blo...
    1278 Nov 29 20:37  Information Microsoft-Windows...          753 The Blo...


PS C:\> get-eventlog -LogName "application" -before 2015-01-01 | where-object {$
_.EventID -eq 753}

   Index Time          EntryType   Source                 InstanceID Message
   ----- ----          ---------   ------                 ---------- -------
    2108 Dec 27 21:17  Information Microsoft-Windows...          753 The Blo...
    2099 Dec 27 21:00  Information Microsoft-Windows...          753 The Blo...
    1380 Nov 29 22:18  Information Microsoft-Windows...          753 The Blo...
    1359 Nov 29 22:05  Information Microsoft-Windows...          753 The Blo...
    1278 Nov 29 20:37  Information Microsoft-Windows...          753 The Blo...


PS C:\> get-eventlog -LogName "application" -after 2015-01-01 | where-object {$_
.EventID -eq 753}

   Index Time          EntryType   Source                 InstanceID Message
   ----- ----          ---------   ------                 ---------- -------
    6239 Jan 25 22:29  Information Microsoft-Windows...          753 The Blo...


PS C:\>
If you only want to see error events in a log, e.g. errors in the application
log, you could use a command such as the one shown below:
PS C:\> get-eventlog -LogName "application" -entrytype error

   Index Time          EntryType   Source                 InstanceID Message
   ----- ----          ---------   ------                 ---------- -------
    6599 Jan 31 20:19  Error       Microsoft-Windows...         2005 There w...
    6596 Jan 31 20:19  Error       Microsoft-Windows...         2005 There w...
    6455 Jan 28 22:38  Error       Microsoft-Windows...         2006 There w...
    6427 Jan 28 02:13  Error       Microsoft-Windows...          513 Cryptog...
    6383 Jan 27 21:55  Error       VSS                          8194 Volume ...
    6340 Jan 26 19:31  Error       VSS                          8194 Volume ...
    6240 Jan 25 22:29  Error       Microsoft-Windows...          513 Cryptog...
You can get help on using the get-eventlog cmdlet by typing
help get-eventlog at a PowerShell prompt.
PS C:\> help get-eventlog

NAME
    Get-EventLog

SYNTAX
    Get-EventLog [-LogName] <string> [[-InstanceId] <long[]>] [-ComputerName
    <string[]>] [-Newest <int>] [-After <datetime>] [-Before <datetime>]
    [-UserName <string[]>] [-Index <int[]>] [-EntryType <string[]> {Error |
    Information | FailureAudit | SuccessAudit | Warning}] [-Source <string[]>]
    [-Message <string>] [-AsBaseObject]  [<CommonParameters>]

    Get-EventLog [-ComputerName <string[]>] [-List] [-AsString]
    [<CommonParameters>]


ALIASES
    None


REMARKS
    Get-Help cannot find the Help files for this cmdlet on this computer. It
    is displaying only partial help.
        -- To download and install Help files for the module that includes
    this cmdlet, use Update-Help.
        -- To view the Help topic for this cmdlet online, type: "Get-Help
    Get-EventLog -Online" or
           go to http://go.microsoft.com/fwlink/?LinkID=113314.


PS C:\>
[/os/windows/PowerShell]
permanent link
Fri, Jan 30, 2015 11:14 pm
Windows color command
By default, when you open a command prompt window on a Microsoft Windows
system, you get a window with a black background and white text. If those
color choices are not the ones you would prefer, you can change them with
the
color command.
C:\Windows\system32>color /?
Sets the default console foreground and background colors.

COLOR [attr]

  attr        Specifies color attribute of console output

Color attributes are specified by TWO hex digits -- the first
corresponds to the background; the second the foreground.  Each digit
can be any of the following values:

    0 = Black       8 = Gray
    1 = Blue        9 = Light Blue
    2 = Green       A = Light Green
    3 = Aqua        B = Light Aqua
    4 = Red         C = Light Red
    5 = Purple      D = Light Purple
    6 = Yellow      E = Light Yellow
    7 = White       F = Bright White

If no argument is given, this command restores the color to what it was
when CMD.EXE started.  This value either comes from the current console
window, the /T command line switch or from the DefaultColor registry
value.

The COLOR command sets ERRORLEVEL to 1 if an attempt is made to execute
the COLOR command with a foreground and background color that are the
same.

Example: "COLOR fc" produces light red on bright white

C:\Windows\system32>
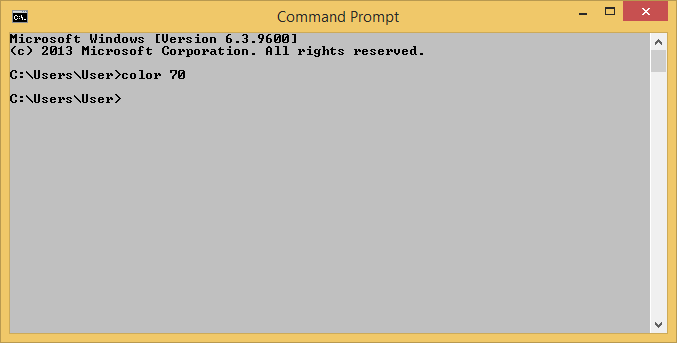
If you would prefer black text on a white background, you can use
color 70, though the background color looks like a light
gray on the systems on which I've tried that color combination, rather than
white.
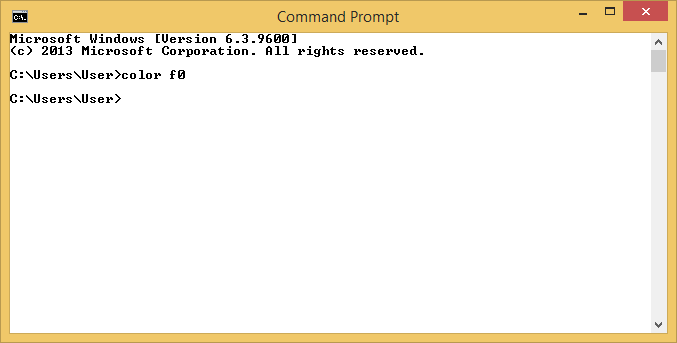
The command color f0, which is for black on bright white,
does provide a white background with black text, though, on those same
systems.
If you don't like a color combination you've obtained from the command,
you can set the colors back to the default white text on a black background
by entering the color command with no options.
If you want to make the change apply to every command prompt window
you open for the currently logged on account, you can use the windows
regedit command to edit the registry key
HKEY_CURRENT_USER\Software\Microsoft\Command Processor and change
the value for DefaultColor from its default value of 0 to the
hexadecimal value f0, which is decimal 240.
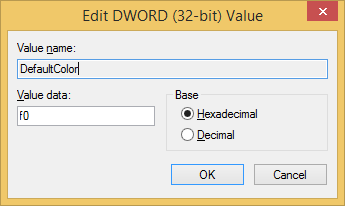
Once you've changed the registry value, every new command prompt
window you open from that time onwards will use the new settings.
You can check on the registry value from a command prompt with the
command reg query "HKEY_CURRENT_USER\Software\Microsoft\Command
Processor" /v DefaultColor.
C:\Users\User>reg query "HKEY_CURRENT_USER\Software\Microsoft\Command Processor"
 /v DefaultColor

HKEY_CURRENT_USER\Software\Microsoft\Command Processor
    DefaultColor    REG_DWORD    0x0
You can set the value from the command prompt with a command similar to
the following one:
C:\Users\User>reg add "HKEY_CURRENT_USER\Software\Microsoft\Command Processor" /
v DefaultColor /t REG_DWORD /d 240 /f
The operation completed successfully.

C:\Users\User>
The data to be used is specified with the /d option. In the
above case, I am using the decimal equivalent, 240, to the hexadecimal number
F0 and adding the /f option, so that I won't be prompted
as to whether I wish to overwrite the existing value.
[/os/windows/commands]
permanent link
Thu, Jan 29, 2015 11:18 pm
Word to Clean HTML
I maintain a website for an association with a little over 2,500 members
that sends a monthly newsletter to members. The newsletter is sent
by the U.S. Postal Service and email and I also convert the Microsoft
Word document the newsletter editor sends me to HTML and post it to the
association's website, which I've been maintaining for years now. The
newsletter editor uses Microsoft Word to produce the newsletter. I tried
Microsoft Word's "Save as Web Page" feature initially, but parts of the
HTML code it produced didn't display properly on non-Microsoft Windows
systems, sometimes because they didn't have the same fonts as those
present on Microsoft Windows systems. And the code looked messy when
I would edit the HTML version of the newsletter produced by Microsoft
Word. Eventually, I decided it was actually quicker to just copy the
text from Word, paste it into the Vi text editor and add the appropriate
HTML formatting tags manually to get the newsletter to look close to
the original Word version, but in a format that would display similarly
across browsers and operating systems.
The copying, pasting, and editing process can take an hour or more, so when
I came across the Word to Clean HTML
site, which provides a free tool to convert documents produced by Microsoft
Word and similar office software to HTML, I pasted the newsletter into
its online form for conversion. The tool "strips out invalid or
proprietary tags leaving clean HTML behind for use in web pages and ebooks",
I hoped it might save me a fair portion of the time I normally spend each
month on the manual conversion process and allow me to get the newsletter
posted more promptly after I receive it. So, I copied the contents of
the newsletter with command-C (I'm normally handling it on a Mac) and
then pasted it into the form on the site's webpage. I checked a couple of
the options that weren't checked by default: replace non-ascii with HTML
entities and replace smart quotes with ascci equivalents. I then clicked
on the convert to clean html button.
The HTML code produced by the tool was much cleaner than that produced
by Word and gave me code that looked the same when viewed from browsers
on different operating systems. I wouldn't have needed to do any editing
to have the newsletter display appropriately, but I noticed that for an
unordered list that at the end of each <li> entry there
were extraneous <strong><u></u></strong>
tags, i.e. there wasn't any text enclosed by the tags, which weren't needed.
But that wouldn't have affected members' view of the newsletter. I removed
it though, and made the source code a little more readable by putting in
some blank lines between some of the items. But that wasn't really needed
and by using the free online tool I should, hopefully, be able to reduce the
process of posting the newsletter to about 15 minutes and get the newsletter
posted shortly after I receive it now, so I'm thankful to
Olly Cope, a freelance python web developer,
for making it freely available to others. The tool was written in Python
using the lxml library.
[/os/windows/office/word]
permanent link
Wed, Jan 28, 2015 11:54 pm
Reducing the size of the Calendar folder in Entourage 2008
If you have a maximum storage limit on a Microsoft Exchange server and
need to reduce the amount of storage you are using and have Entourage 2008
as your email client, you can check the overall space consumed by right-clicking
on the icon representing the Exchange server that appears above your Inbox
on the server, then select
Folder Properties then
Storage.
You will then see a figure for "Total size (with subfolders)". One way
to reduce the amount of storage space consumed is to reduce the size of the
Calendar subfolder by removing outdated entries. You can see its
size in the list of all subfolders or you can right-click on
Calendar in the left pane of the Entourage window and
choose
Folder Properties then
Storage.
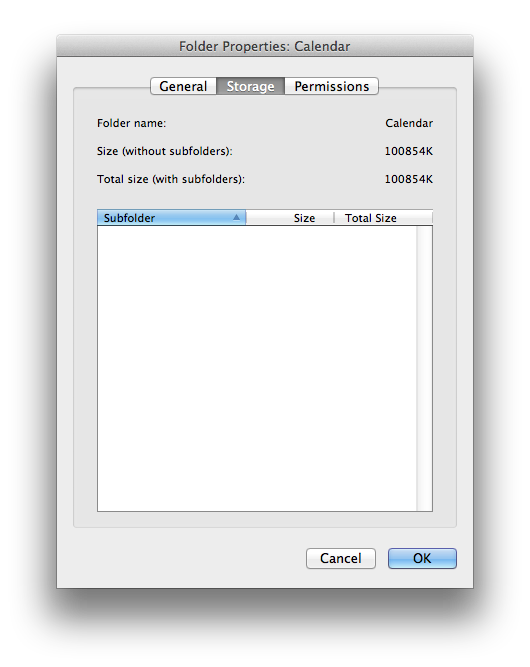
From the left pane of the Entourage window, you can select old
entries by clicking on Calendar then selecting Edit
from the menu bar at the top of the window and then selecting
Advanced Search. For "Item Contains", select "End Date"
and, instead of "Any Date", select "Greater Than".
Then put in a number of days in the field to the right of "Greater
Than". E.g., I could put in 730 to find any calendar
entry that was more than two years old. You can then delete all of
those old entries, though you may receive many prompts for "You
have chosen to cancel this event. Do you want to notify the Organizer?"
After you've finished, you can then right-click on Calendar
again and select Properties and Storage to see
how much space you freed be removing the old entries.
[/network/email/clients/entourage]
permanent link
Tue, Jan 27, 2015 10:52 pm
Using xlrd to extract a column from an Excel spreadsheet
The xlrd module provides the capability to work with Microsoft Excel
spreadsheets in Python. I wanted to be able to use a Python script to
extract the data from one column of an Excel worksheet and write the
data to a text file which I could further process with another script.
Xlrd, which is a package for reading data and formatting information
form Excel files, allowed me to easily extract just the data I needed,
which was a list of email addresses, from the spreadsheet. A tutorial
is provided for installing and using the module.
[ More Info ]
[/languages/python]
permanent link
Mon, Jan 26, 2015 11:12 pm
Shrink div width to fit contents
I sometimes want to have the width of a
div element
on a webpage stretch only as far as the width of the text contained
within it. E.g., if I want to show the text I see displayed in a
command prompt window on a Microsoft Windows system or a shell prompt
on a Linux or OS X system in an area on the web page with a black
background and white text within it, I will enlose the text in a
div such as the following:
<div style="background-color: black; color: white;"><pre>
C:\Windows\system32>wbadmin get items -version:01/25/2015-18:00
wbadmin 1.0 - Backup command-line tool
(C) Copyright 2012 Microsoft Corporation. All rights reserved.

Volume ID = {46a6263c-8cbc-11e4-93ed-806e6f6e6963}
Volume 'RECOVERY', mounted at <not mounted> ('RECOVERY', mounted at <not mounted
> at the time</pre></div>
Which would display as shown below:
C:\Windows\system32>wbadmin get items -version:01/25/2015-18:00
wbadmin 1.0 - Backup command-line tool
(C) Copyright 2012 Microsoft Corporation. All rights reserved.

Volume ID = {46a6263c-8cbc-11e4-93ed-806e6f6e6963}
Volume 'RECOVERY', mounted at <not mounted> ('RECOVERY', mounted at <not mounted
> at the time
But that will make the area with the black background extend across the
entire page rather than only as far as the 80th character on the page, i.e.,
the "d" at the end of "mounted", which is where the line wraps in the command
prompt window. I can add width: 80ch; to the style section
to specify that I only want it to be 80 characters wide, i.e., I can use
the following:
<div style="background-color: black; color: white; width: 80ch;"><pre>
The width of a character is judged to be the width of the zero
character in the current font, but I've found that won't always work in
all browsers and may give me an area that, though it doesn't now extend
across the whole page when I don't want it to do so, may be too wide or
too narrow depending upon the browser in which I'm viewing it.
The above example is shown again below with the style information changed
to include width: 80ch;.
C:\Windows\system32>wbadmin get items -version:01/25/2015-18:00
wbadmin 1.0 - Backup command-line tool
(C) Copyright 2012 Microsoft Corporation. All rights reserved.

Volume ID = {46a6263c-8cbc-11e4-93ed-806e6f6e6963}
Volume 'RECOVERY', mounted at <not mounted> ('RECOVERY', mounted at <not mounted
> at the time
When I view the page in Chrome version 39, the above div is wider
than I want, i.e, it extends far beyond the "d" in "mounted", i.e.,
far beyond the 80th character. Though when I view it in Firefox 35, I
see the width of the div extending only as far as the 80th character. If
I view it with Internet Explorer, it is not wide enough, so I see the
black area terminated after "mounted at <" with the followng "n" only
partially visible and the rest of the line invisible.
Another option is to use display: inline-block;, instead,
i.e., I can change the div line to be the following:
<div style="background-color: black; color: white; display: inline-block;"><pre>
The div section then displays the following when I've ended
the line of text I want wrapped at the 80th character at that
character:
C:\Windows\system32>wbadmin get items -version:01/25/2015-18:00
wbadmin 1.0 - Backup command-line tool
(C) Copyright 2012 Microsoft Corporation. All rights reserved.

Volume ID = {46a6263c-8cbc-11e4-93ed-806e6f6e6963}
Volume 'RECOVERY', mounted at <not mounted> ('RECOVERY', mounted at <not mounted
> at the time
The width of the black backround, i.e., the width of the div, extends
only as far as the width of the longest element within it, which is
the line I ended at the 80th character and works in all three browsers.
So I added the following line to the style.css file for the
site:
.commandprompt { background-color: black; color: white; display: inline-block; }
So I can then use <div class="commandprompt"><pre>
when I want a div, which will only contain text from a shell or command
prompt window, to stretch only as far as to accomodate the longest
element within it, which will be an 80 character line. So the div will
stretch, or shrink, however you prefer to view it, to fit.
[/network/web/html/css]
permanent link
Sun, Jan 25, 2015 11:03 pm
Checking the status of a server backup with wbadmin
If you've set up server backups on a Windows Server 2012 Essentials system,
the
wbadmin command can be run from a command prompt to
check the status of backups and view the available backups and the
items they contain. The command is available for Windows Server
2008, Windows Server 2008 R2, Windows Server 2012, Windows Server 2012 R2,
Windows Vista and Windows 8, also; i.e., it can be run on workstations as
well as servers. The command will allow you to back up and restore a
systems's operating system, volumes, files, folders, and applications
from the command line.
[ More Info ]
[/os/windows/commands]
permanent link
Sat, Jan 24, 2015 11:25 pm
Setting Up Windows Server 2012 Essentials server backup
One of the steps in setting up a Windows Server 2012 Essentials system
is to configure the server for automatic backups of the system to another drive.
You can configure the system to backup the operating system, server
folders, and other items by selecting "Set up Server Backup" from
the Dashboard. The drive, or drives, you select to be used for
the automatic backups, may be reformatted, so don't select a drive that
has files you wish to retain without copying them elsewhere first. You
can configure the backups to run at multiple times during the day;
Microsoft recommends you backup the server at least twice per day.
[ More Info ]
[/os/windows/server2012]
permanent link
Sat, Jan 24, 2015 8:23 pm
Obtaining details for disk drives with diskpart under Windows
The command line program diskpart can be used on Microsoft Windows 2000
and later systems to obtain details on the disk drives connected to a system
and the partitions and volumes on the disk drives. To use the
utility, at the diskpart prompt, which can be obtained by running the
program, you select the disk by number and then the partition or volume for
which you wish information by typing
detail followed
by
partition or
volume, or you can obtain
overall information for the drive with
detail disk.
[ More Info ]
[/os/windows/commands]
permanent link
Fri, Jan 23, 2015 11:07 pm
Generating a list of all the hotfixes and service packs on a Windows system
If you woul like to see a list of all the
Quick Fix Engineering (QFE)
updates, aka hotfixes, for a Microsoft Windows system from the
command line, you can enter the command
wmic qfe list. The
command will work from systems from Windows XP Professional onwards. You
can control the amount of information displayed for each hotfix by
including a list format after the word "list", e.g.,
wmic qfe list
brief
. You can see the available formats with
wmic qfe list
/?
. The following LIST formats are available:
| Format | Includes |
|---|
| BRIEF | Description, FixComments, HotFixID, Install Date,
InstalledBy, InstalledOn, Name, ServicePackInEffect, Status |
| FULL | |
| INSTANCE | __PATH |
| STATUS | __PATH, Status |
| SYSTEM | __CLASS, __DERIVATION, __DYNASTY, __GENUS, __NAMESPACE,
__PATH, __PROPERTY_COUNT, __RELPATH, __SERVER, __SUPERCLASS |
You can direct the output to a file by specifying
/output:filename before qfe list. E.g.:
C:\Users\User>wmic /output:hotfixes.txt qfe list brief
The output in the above example would be in
hotfixes.txt.
If you wanted the output to go to the clipboard, instead, you could use
wmic /output:clipboard qfe list brief.
[/os/windows/commands]
permanent link
Thu, Jan 22, 2015 10:35 pm
Changing the title of a command prompt window
If you open a command prompt window on a Microsoft Windows system, the
title for the window will be "Command Prompt".
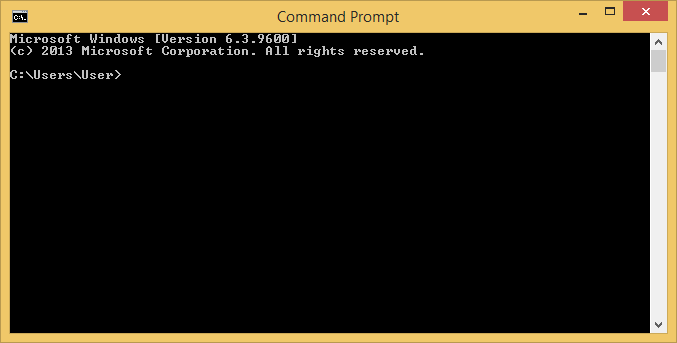
If you have several command prompt windows open, you might like to
have each uniquely identifiable by a distinct title, so that you can
easily select the relevant one. You can use the title command to
change the title that appears at the top of a command prompt window. The
syntax for the command is as follows:
C:\>title /?
Sets the window title for the command prompt window.

TITLE [string]

  string       Specifies the title for the command prompt window.
E.g., you could change the title to Test with title
Test.
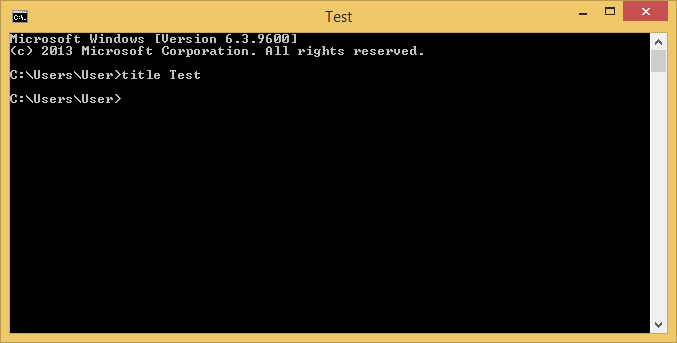
You don't need to include text in quotes after the title command if
the text contains spaces. E.g., you can use title Mary had a little lamb
to have the title appear as Mary had a little lamb. If
you put quotes on the command line after the title, the quotes would appear
in the window title.
If you give unique titles to the command prompt windows, you can also
tell how much memory each one is using with the tasklist command by filtering
on WINDOWSTITLE. E.g., if I had two command prompt windows open
with one named "Mary had a little lamb" and another titled "Jack and Jill":
C:\>tasklist /fi "WINDOWTITLE EQ Mary had a little lamb"

Image Name                     PID Session Name        Session#    Mem Usage
========================= ======== ================ =========== ============
cmd.exe                      14020 Console                    1      2,696 K

C:\>tasklist /fi "WINDOWTITLE EQ Jack and Jill"

Image Name                     PID Session Name        Session#    Mem Usage
========================= ======== ================ =========== ============
cmd.exe                      11536 Console                    1      2,188 K
If the title you choose is very long, only part of the text may be
displayed in the windows title with three dots substituted for the rest
of the text that can't be fit into the available space for the title.
[/os/windows/commands]
permanent link
Wed, Jan 21, 2015 11:18 pm
Restoring a prior browsing session in Chrome
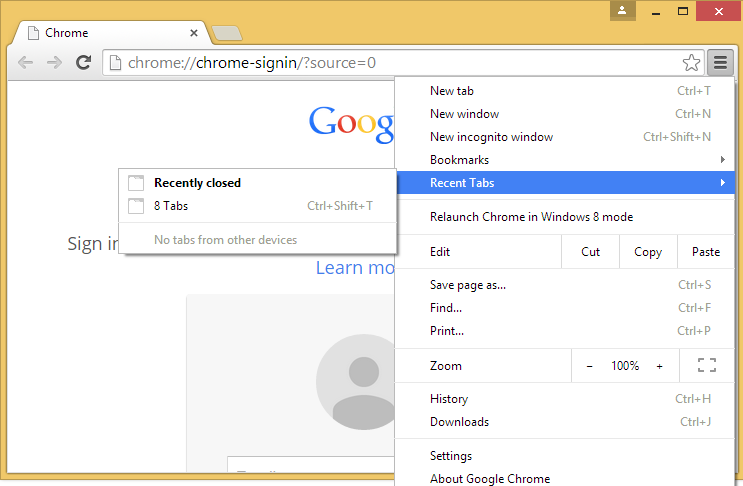
To restore a prior browsing session in the Google Chrome browser
immediately after reopening Chrome, take the following steps:
-
Click on the Chrome menu
 on the browser toolbar.
-
Select Recent Tabs
-
Under Recently closed, you will see the number of tabs
that were open during the last browsing session as "x Tabs" where
x is the number of tabs that were open before Chrome was
closed, e.g., "8 Tabs", if that was the number previously open.
Click on the "x Tabs" line to reopen all of those tabs.
[/network/web/browser/chrome]
permanent link
Tue, Jan 20, 2015 11:15 pm
Configuring Google Chrome to prompt for download directory
If you would like Google Chrome to prompt for the directory into which
it will save a file that you are about to download rather than putting
it in the downloads directory for the account you are using or some
other default directory, take the following steps:
-
Click on the Chrome menu
 on the browser toolbar.
- Select settings.
- Click on Show advanced settings.
- Scroll down to the Downloads section.
You can put a directory path in the "Download location" field to have a
set downloads directory; to be prompted as to where a file should be stored
each time you download a file, check the check box for "Ask where to save
each file before downloading".
-
Once you've made the change to the setting you can close the Settings tab
in Chrome.
The setting for whether a file is downloaded into a default
location or for Chrome to prompt the user for the location is
controlled, like other Chrome settings, in the Preferences
file for the account, which is stored beneath a user's home directory.
On a Mac OS X system, you can view the file from a command prompt
using the Terminal application by going to the directory shown
below:
$ cd ~
$ cd "Library/Application Support/Google/Chrome/Default"
$ more Preferences
On a Microsoft Windows system you can find the Preferences
file at %USERPROFILE%\AppData\Local\Google\Chrome\User
Data\Default\Preferences. The environment variable %USERPROFILE%
is usually C:\Users\username where username
is the account name. So you can open the file in Notepad from a command
prompt with:
C:\> notepad "%USERPROFILE%\AppData\Local\Google\Chrome\User Data\Default\Preferences"
You can edit the Preferences file with a text editor and
add "prompt_for_download": true to the download
section of the file to have Chrome prompt for the location in which to
place a downloaded file. E.g., the default configuration for the download
section when the downloads directory for an account is used is shown
below followed by the configuration when Chrome will prompt for the
location:
Use default downloads directory
   "download": {
      "directory_upgrade": true,
      "extensions_to_open": ""
   },
Prompt for download location
   "download": {
      "directory_upgrade": true,
      "extensions_to_open": "",
      "prompt_for_download": true
   },
Note: the "extensions_to_open": "" line may or may not
be present for default Chrome settings; I saw it on a Mac OS X system,
but it wasn't present on a Microsoft Windows system. But you only need
add the line to set the "prompt_for_download" to true.
References:
-
Configuring Other Preferences
The Chromium Projects
[/network/web/browser/chrome]
permanent link
Mon, Jan 19, 2015 7:21 pm
How to have quotes inside a title for a hyperlink in Google Sheets
Google Sheets
provide a free online spreadsheet program. If you want to insert
a URL into a cell in a Google sheet, the syntax is
=HYPERLINK(URL,cell_text). The
cell_text is
the text displayed for the URL. It is an optional argument; if it isn't
provided, the URL will be displayed. The URL and cell_text need to be
enclosed in double quotes.
So, how do you specify cell text when that text includes quotation marks.
E.g., for a title of Fixing "To" Addresses in a Queued Message,
using
=hyperlink(http://support.moonpoint.com/blog/blosxom/2005/04/06#fixing-to-address","Fixing "To" Addresses in a Queued Message")
won't work, since the first double quote character appearing after the beginning
one before Fixing signals the end of the cell_text.
Often a backslash character, \ can serve as an
escape character
indicating that the character that follows isn't to be treated the way
it would normally be treated by software, i.e., any special significance
for the following character is to be ignored. But in this case that didn't
work. I still saw #ERROR! in the cell and a little red triangle in
the cell that when clicked on displayed Error: Parse. Nor would
using the &ldquote; and &rdquote;
that can be used in HTML coding to signify left and right double quotes.
That just resulted in that text being displayed with the rest of the
cell text. What I found did work was to use the double
quote character itself as an escape character, so that if
two double quotes are placed one after the other in cell_text,
a double quote will appear within the cell_text. E.g., in the above case,
=hyperlink("http://support.moonpoint.com/blog/blosxom/2005/04/06#fixing-to-address","Fixing ""To"" Addresses in a Queued Message") worked
to display Fixing "To" Addresses in a Queued Message for the cell
text. You don't need to escape any single quotes within the cell_text,
only the double quotes. You can also escape double quote characters within
a URL the same way.
[/network/web/services/google]
permanent link
Mon, Jan 19, 2015 5:16 pm
Unidentified Task Manager startup list entry
If a file that would be automatically run at system boot or login time
doesn't actually exist, Microsoft Windows may show an entry named
"Program", with no publisher listed, in the list you see when you click
on the
Startup tab in the Windows
Task Manager. If
you right-click on the entry, you will see the "Open file location" option
grayed out. You can use the Microsoft autoruns utility to track down
the registry entry that is resulting in the "Program" entry appearing in
the startup list for the
Task Manager. When you locate it,
you can uncheck it in autoruns to stop the entry from appearing in the
Task Manager.
[ More Info ]
[/os/windows]
permanent link
Sat, Jan 17, 2015 11:39 pm
Proxy server configured to d2e24t2jgcnor2.webhostoid.com
I've used Vuze as a BitTorrent client on a number of systems previously
without problems. However, when I installed it on a new system for my
wife recently, I found that the bundled software that came with it,
which I thought I had indicated I didn't want installed with Vuze,
set itself up as a proxy server for HTTP and HTTPS traffic and installed a
self-signed security certificate into the root certificates list on the system,
effectively nullifying the protection offered by viewing sites with HTTPS
rather than HTTP and potentially exposing any userids and passwords,
credit card numbers, etc. to the view of the bundled GeniusBox software.
I first noticed that a serious security issue had occurred when
I mistyped a site's URL and saw a webpage displayed referencing
d2e24t2jgcnor2.webhostoid.com, instead of the expected site.
[ More Info ]
[/network/proxy]
permanent link
Sat, Jan 17, 2015 11:04 pm
dos2unix for CentOS 7
Microsoft Windows, Apple OS X and Linux systems use different means of
representing the end of a line in text files. E.g., see
OS X Line Endings.
Microsoft Windows and its predecessor operating system, DOS, use
a carriage return (CR), which is a hexadecimal 0D, followed by a line feed (LF),
which is a hexadecimal 0A, at the end of each line, whereas only the
LF character, i.e., the character represented by a hexadecimal 0A is used on
Linux systems.
If you upload a text file, such as a .txt or .html file, from a Windows
system to a Linux system and then edit it with vi, you may see
^M appear at various places in the file. To convert a text
file from the DOS/Windows format to the one used by Linux, you can
use the dos2unix utility.
You can install the dos2unix utility on a CentOS 7 system with the
command yum install dos2unix. The program will be
installed in /bin.
# which dos2unix
/bin/dos2unix
# rpm -qi dos2unix
Name        : dos2unix
Version     : 6.0.3
Release     : 4.el7
Architecture: x86_64
Install Date: Sat 17 Jan 2015 10:42:01 PM EST
Group       : Applications/Text
Size        : 178697
License     : BSD
Signature   : RSA/SHA256, Thu 03 Jul 2014 09:09:30 PM EDT, Key ID 24c6a8a7f4a80eb5
Source RPM  : dos2unix-6.0.3-4.el7.src.rpm
Build Date  : Mon 09 Jun 2014 06:00:48 PM EDT
Build Host  : worker1.bsys.centos.org
Relocations : (not relocatable)
Packager    : CentOS BuildSystem <http://bugs.centos.org>
Vendor      : CentOS
URL         : http://waterlan.home.xs4all.nl/dos2unix.html
Summary     : Text file format converters
Description :
Convert text files with DOS or Mac line endings to Unix line endings and
vice versa.
The syntax for the command is shown below:
$ dos2unix -h
dos2unix 6.0.3 (2013-01-25)
Usage: dos2unix [options] [file ...] [-n infile outfile ...]
 -ascii                convert only line breaks (default)
 -iso                  conversion between DOS and ISO-8859-1 character set
   -1252               Use Windows code page 1252 (Western European)
   -437                Use DOS code page 437 (US) (default)
   -850                Use DOS code page 850 (Western European)
   -860                Use DOS code page 860 (Portuguese)
   -863                Use DOS code page 863 (French Canadian)
   -865                Use DOS code page 865 (Nordic)
 -7                    Convert 8 bit characters to 7 bit space
 -c, --convmode        conversion mode
   convmode            ascii, 7bit, iso, mac, default to ascii
 -f, --force           force conversion of binary files
 -h, --help            give this help
 -k, --keepdate        keep output file date
 -L, --license         display software license
 -l, --newline         add additional newline
 -m, --add-bom         add UTF-8 Byte Order Mark
 -n, --newfile         write to new file
   infile              original file in new file mode
   outfile             output file in new file mode
 -o, --oldfile         write to old file
   file ...            files to convert in old file mode
 -q, --quiet           quiet mode, suppress all warnings
                       always on in stdio mode
 -s, --safe            skip binary files (default)
 -F, --follow-symlink  follow symbolic links and convert the targets
 -R, --replace-symlink replace symbolic links with converted files
                       (original target files remain unchanged)
 -S, --skip-symlink    keep symbolic links and targets unchanged (default)
 -V, --version         display version number
To convert the format of a file using the same file for both input
and output, you only need specify the file name as an argument to
dos2unix. E.g.:
$ dos2unix index.php
dos2unix: converting file index.php to Unix format ...
[/os/unix/linux/centos]
permanent link
Fri, Jan 16, 2015 11:15 pm
Viewing a stored WEP or WPA key
A laptop may be used to connect to many wireless networks with a unique
Wi-Fi Protected
Access (WPA), Wi-Fi Protected Access II (WPA2), or
Wired
Equivalent Privacy (WEP) key, which can be regarded as a Wifi password,
for each of those networks stored within a wireless profile on the
laptop. If you need to configure another device, e.g., a phone, tablet
or another laptop, to use the same key and want to view what has been
stored on the laptop from a command prompt, under Windows 8 you can use
the command
netsh wlan show profiles to view all of the
stored Wi-Fi profiles.
C:\>netsh wlan show profiles

Profiles on interface Wi-Fi:

Group policy profiles (read only)
---------------------------------
    <None>

User profiles
-------------
    All User Profile     : belkin54g
    All User Profile     : Imp
    All User Profile     : Harbor
    All User Profile     : Guest
    All User Profile     : library
    All User Profile     : T28J7
    All User Profile     : NETGEAR
    All User Profile     : linksys
You can then retrieve the key used for a particular profile by specifying
it with name=profile, where profile is one of
the stored profiles, followed by key=clear.
C:\>netsh wlan show profiles name=T28J7 key=clear

Profile T28J7 on interface Wi-Fi:
=======================================================================

Applied: All User Profile

Profile information
-------------------
    Version                : 1
    Type                   : Wireless LAN
    Name                   : T28J7
    Control options        :
        Connection mode    : Connect manually
        Network broadcast  : Connect only if this network is broadcasting
        AutoSwitch         : Do not switch to other networks

Connectivity settings
---------------------
    Number of SSIDs        : 1
    SSID name              : "T28J7"
    Network type           : Infrastructure
    Radio type             : [ Any Radio Type ]
    Vendor extension          : Not present

Security settings
-----------------
    Authentication         : Open
    Cipher                 : WEP
    Security key           : Present
    Key Content            : 719DDAB7A9
    Key Index              : 1

Cost settings
-------------
    Cost                   : Unrestricted
    Congested              : No
    Approaching Data Limit : No
    Over Data Limit        : No
    Roaming                : No
    Cost Source            : Default


C:\>netsh wlan show profiles name=Harbor key=clear

Profile Harbor on interface Wi-Fi:
=======================================================================

Applied: All User Profile

Profile information
-------------------
    Version                : 1
    Type                   : Wireless LAN
    Name                   : Harbor
    Control options        :
        Connection mode    : Connect automatically
        Network broadcast  : Connect only if this network is broadcasting
        AutoSwitch         : Do not switch to other networks

Connectivity settings
---------------------
    Number of SSIDs        : 1
    SSID name              : "Harbor"
    Network type           : Infrastructure
    Radio type             : [ Any Radio Type ]
    Vendor extension          : Not present

Security settings
-----------------
    Authentication         : WPA2-Personal
    Cipher                 : CCMP
    Security key           : Present
    Key Content            : ccc777cc

Cost settings
-------------
    Cost                   : Unrestricted
    Congested              : No
    Approaching Data Limit : No
    Over Data Limit        : No
    Roaming                : No
    Cost Source            : Default
In the above two examples, the WEP key for the wireless network
with an SSID of "T28J7" is "719DDAB7A9" and the WPA2-Personal key for the
wireless network named "Harbor" is "ccc777cc"
[/os/windows/win8]
permanent link
Thu, Jan 15, 2015 10:06 pm
HTTPNetworkSniffer v1.45
Nir Sofer provides many free network and system tools for Windows systems
from his website,
NirSoft.
One of those tools, HTTPNetworkSniffer, provides the capability to
"sniff", i.e, capture and examine, the HTTP network traffic between
the system on which the tool is installed and the web servers contacted
from that system. All, or portions, of the data captured can be saved
to a file in a variety of formats for later examination. Those formats
include the following ones:
- Text (*.txt)
- Tab Delimited Text File (*.txt)
- Tabular Text File (*.txt)
- Comma Delimited Text File (*.csv)
- HTML File - Horizonal (*.htm; *.html)
- HTML File - Vertical (*.htm; *.html)
- XML File - (*.xml)
[
More Info ]
[/reviews/software/windows/network/web]
permanent link
Mon, Jan 12, 2015 11:52 pm
Checking the digital signature for a file under Microsoft Windows
A program can be digitally signed to verify the developer or publisher
of the program. Digital signatures provide a means to authenticate that
software actually came from the claimed author and has not been modified
since the author published the software. However, they don't guarantee
that the software is safe to use, since even adware/spyware may be signed
digitally.
On a Microsoft Windows system, information on the digital signature
can be viewed with the PowerShell cmdlet Get-AuthenticodeSignature,
which is included with Microsoft Windows 7 and later; PowerShell is also
available from Microsoft for earlier versions of their operating system.
The Sysinternals tool, Sigcheck from Microsoft may also be used
to check the digital signature on a file.
[ More Info ]
[/os/windows]
permanent link
Sun, Jan 11, 2015 5:55 pm
Checking the proxy server settings with Google Chrome on a Windows system
In Google Chrome on a Microsoft Windows system you can check or change the
proxy server setttings by the following steps within the Chrome browser.
Note: changing the proxy server settings by this means changes the system-wide
proxy server settings, so the configuration changes you make will also apply
to Internet Explorer.
-
Click on the "Customize and Control Google Chrome" button at the top,
right-hand side of the Google Chrome window. It is represented as a button
with 3 short horizontal lines on it.
-
Select Settings
-
Click on the "Show advanced settings" link near the bottom of the window.
-
Scroll down to the Network Settings section and click on
the Change proxy settings button.
-
That will open an Internet Properties window where you can
click on the LAN settings button, which will open a
Local Area Network (LAN) Settings window.
-
Check the checkbox next to "Use a proxy server for your LAN (These settings
will not apply to dial-up or VPN connections)."
-
Click on the Advanced button, which will open a
Proxy Settings window.
-
Put in the IP address and port number for the proxy server in the
"Proxy address to use" and "Port" fields. You will see four types of proxies
listed: HTTP, Secure, FTP, and Socks. The line where you will place the
IP address and port number will depend on which of those you are using.
-
Click on OK and then OK again at the
Local Area Network (LAN) Settings window, and again
at the Internet Properties window.
Note: tested on Google Chrome 39.0 on a Microsoft Windows system.
[/network/proxy]
permanent link
Sun, Jan 11, 2015 5:13 pm
Finding files modified on or after a date on a Linux system
If you wish to find all of the files modified on or after a particular
date on a Unix/Linux system, you can use the
find command
with the
newermt argument. E.g., suppose I want to find
all files with a .php extension modified on or after January 10, 2015 in the
current directory and any subdirectories. I could use the command below:
find . -name "*.php" -newermt 2015-01-10
The -newermt argument, which is a form of -newerXY
is explained below:
-newerXY reference
       Compares  the timestamp of the current file with reference.  The
       reference argument is normally the name of a file  (and  one  of
       its  timestamps is used for the comparison) but it may also be a
       string describing an absolute time.  X and  Y  are  placeholders
       for other letters, and these letters select which time belonging
       to how reference is used for the comparison.

       a   The access time of the file reference
       B   The birth time of the file reference
       c   The inode status change time of reference
       m   The modification time of the file reference
       t   reference is interpreted directly as a time

       Some combinations are invalid; for example, it is invalid for  X
       to  be t.  Some combinations are not implemented on all systems;
       for example B is not supported on all systems.  If an invalid or
       unsupported  combination  of  XY  is  specified,  a  fatal error
       results.  Time specifications are interpreted as for  the  argu‐
       ment  to the -d option of GNU date.  If you try to use the birth
       time of a reference file, and the birth time  cannot  be  deter‐
       mined,  a  fatal  error  message results.  If you specify a test
       which refers to the birth time of  files  being  examined,  this
       test will fail for any files where the birth time is unknown.
References:
-
Linux / Unix: Find Files Modified On Specific Date
By: nixCraft
Date: February 27, 2013
nixCraft - Insight into Linux Admin
Work
-
Ubuntu Linux: find files between specific times?
Posted: April 9, 2013
Super User
[/os/unix/commands]
permanent link
Sun, Jan 11, 2015 4:33 pm
Using a Juniper Networks NetScreen Firewall as a DHCP Server
A Juniper Networks NetScreen firewall running the ScreenOS operating system
can also serve as a DHCP server. The firewall can be configured through
a
GUI by accessing
the firewall from a browser, but also has a command line interface, which
is accessible via a
SSH connection.
The DHCP configuration provided by the server upon DHCP client requests can
be configured via the command line interface where you can set
the DNS servers, gateway address, netmask, etc. or enable and disable the
DHCP server functionality in the firewall.
[ More Info ]
[/security/firewalls/netscreen]
permanent link
Sat, Jan 10, 2015 10:24 pm
Viewing the Trusted Root certificates on a Windows system
Windows maintains a list of trusted
root certificates,
which are used when you are visiting websites that use the
HTTPS protocol for
security. A website using HTTPS will have a security certificate that
has usually been signed by some more trusted entity. A site can use a
self-signed certificate, but when you first visit such a site your browser
will warn you that its certificate can't be verified, though your connectivity
will still be encrypted if you visit the site. You then usually have the
opportunity to accept that certificate either temporarily or permanently or
can choose not to visit the site.
For signed certificates, the trustworthiness of the signer is vital.
There may be a certificate chain with the certificate of the site you
are viewing having a certificate signed by some entity that in turn had
its own certificate signed by an even more trustworthy authority. Eventually,
the chain ends at a trusted root certificate. To be safe when visiting
sites and providing credentials, such as userids and passwords, you need
to have a trusted chain of certificates. It is vital that the root
certificates you have on your system belong to very trustworthy authorities.
Microsoft distributes a list of trusted root certificates with its operating
system and browsers, such as Firefox, may have their ownl list, but some
malware, such as Genius Box, will install its own certificate
in the Windows trusted root certificates list making a system susceptible
to a man-in-the-middle
attack as the GeniusBox software also sets itself up as an HTTP and
HTTPS proxy on a system it infects.
To view the list of trusted root certificates on a Microsoft
Windows system, see
Viewing the Trusted Root certificates on a Windows system.
[/os/windows/certificates]
permanent link
Fri, Jan 09, 2015 11:03 pm
Recovering information for the HKCU branch of the registry from a backup
Microsoft Windows stores information contained in the
HKEY_CURRENT_USER
branch of the registry, which is often abbreviated as
HKCU,
in the file
NTUSER.DAT. That file is stored in the user's
profile directory, which is usually
C:\Windows\Username,
where
Username is the account name. The location can be checked by
issuing the command
echo %USERPROFILE% from a command prompt
while logged into the account.
The file is a hidden and system file, so you would need to turn on
the display of hidden and system files in the Windows Explorer to see it,
but even then, if you are logged into the account for which you are trying
to access NTUSER.DAT it will be locked from
access. You can view the contents of the file for another account
or the contents of a backup copy of NTUSER.DAT
using the RegFileExport utility from NirSoft as explained in
Recovering information for the HKCU branch of the registry from a
backup.
[/os/windows/registry]
permanent link
Thu, Jan 08, 2015 11:24 pm
Windows 7 wallpaper location
The location for the various wallpapers that come with Windows 7 is
%SYSTEMROOT%\Web\Wallpaper%. The
Windows
environment variable %SYSTEMROOT% usually points to
C:\Windows, but you can check its value on a particular
system from a command prompt with
echo %SYSTEMROOT%.
C:\Users\Pamela>dir %SYSTEMROOT%\Web\Wallpaper
 Volume in drive C is OS
 Volume Serial Number is 4445-F6ED

 Directory of C:\Windows\Web\Wallpaper

11/04/2011  01:00 AM    <DIR>          .
11/04/2011  01:00 AM    <DIR>          ..
11/21/2010  02:16 AM    <DIR>          Architecture
11/21/2010  02:16 AM    <DIR>          Characters
11/04/2011  01:00 AM    <DIR>          Dell
11/21/2010  02:16 AM    <DIR>          Landscapes
11/21/2010  02:16 AM    <DIR>          Nature
11/21/2010  02:16 AM    <DIR>          Scenes
11/21/2010  02:16 AM    <DIR>          Windows
               0 File(s)              0 bytes
               9 Dir(s)  863,115,665,408 bytes free

C:\Users\Pamela>echo %SYSTEMROOT%
C:\Windows
The location of the current wallpaper for the currently logged on user
can be found by a reg query command.
C:\Users\Pamela>reg query "HKEY_CURRENT_USER\Control Panel\Desktop" /v WallPaper


HKEY_CURRENT_USER\Control Panel\Desktop
    WallPaper    REG_SZ    C:\Users\Pamela\AppData\Roaming\Microsoft\Windows\Themes\TranscodedWallpaper.jpg
If you pick an image you want to use for wallpaper, it will be copied to the
location in the above registry key and renamed
TranscodedWallpaper.jpg, which allows you to modify the original
image without changing the wallpaper, but may seem confusing if you are
expecting the file name to be the same as it was for the original image you
selected for the wallpaper.
[/os/windows/win7]
permanent link
Wed, Jan 07, 2015 11:32 pm
Checking Microsoft Windows proxy server settings
Web browsers can be configured to use a proxy server for network connections,
i.e., instead of directly connecting to websites, the connections are
routed to a proxy server, which then establishes a connection to the
website and routes the return traffic from the site back to the browser.
This may be done for security reasons, e.g., the proxy server may be
running antivirus software that checks all downloads from websites before
passing files on to users' systems or the proxy server may be used to
block access to websites deemed malicious, i.e., ones distributing malware,
or ones that are deemed inappropriate for the workplace or by children, if
the proxy server is located in a home rather than a business environment.
A proxy server may also be used to hide the actual IP address of the system
on which the browser is running for privacy reasons.
The proxy server settings for the system can be configured within
Internet Explorer on a Microsoft Windows system. They can also be queried
and set from a command line interface using the reg query
or reg add commands.
[ More Info ]
[/network/proxy]
permanent link
Tue, Jan 06, 2015 10:13 pm
Configuring Juniper NetScreen firewall rule from command line
I needed to configure an old Juniper Networks 5XP firewall from a command line
interface, so that I could block all access to the Internet from that
system, but, since it had been a very long time since I set a rule in one of
those firewalls from its command line interface, which is accessible via
SSH, it took me some time to get the syntax right for the command after
realizing I had to associate the IP address with a name that I could use
in the policy for the system first.
[ More Info ]
[/security/firewalls/netscreen]
permanent link
Mon, Jan 05, 2015 11:53 pm
Restore a computer from a Windows Server 2012 Essentials backup
In a Microsoft Windows domain where the domain controller is a
Windows Server 2012 Essentials server, backups are normally done on
a daily basis to the server. From the Dashboard, which is accessible
from the Launchpad, on a client computer you can restore
files and folders from backups on the server by these
steps. You will have
the option of selecting which of the daily backups you wish to use to
restore the client computer.
The Launchpad on the client computer also provides the capability
to initiate a backup from the client to the server and to check on the
status of the last backup of the client to the server.
[/os/windows/server2012]
permanent link
Sun, Jan 04, 2015 5:53 pm
Evernote "Related to what you're working on" popup
While editing a note in the Evernote application on a Microsoft Windows system
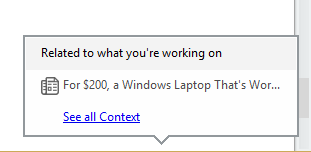
today I was plagued by an annoying popup appearing every few seconds with a
title "Related to what you're working on". It appeared the "content" being
suggested to me was an add, since I saw "For $200, a Windows Laptop That's
Wor...", but when I clicked on the link, I found it pointed to a Wall Street
Journal article
HP Stream 11 Review: A $200
Windows Laptop That’s Worth the Price.
Though some of the "Related to
what you're working on" notices I've seen have been relevant, this one was not
and I don't want the distraction of such notices when trying to use the
software for note keeping. If I dismiss such a notice, I don't want to see it
constantly reappearing every few seconds until I'm forced to click on it to
stop it from reappearing.
If you click on Tools from the Evernote window and select
Options, then Context, you can manage those notices.
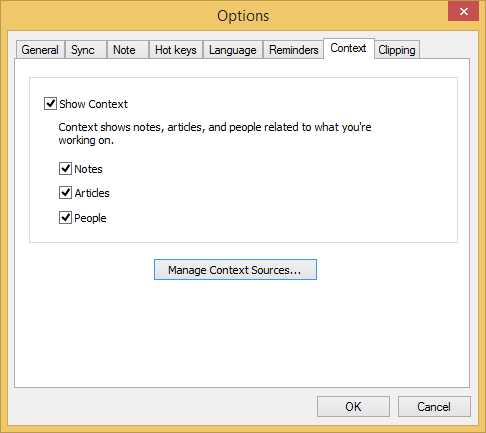
In this case rather than just unchecking "Show Context", I clicked on
Manage Context Sources, which opened a web page in a browser on
the system. From that page I could select which sources would be used; I
unchecked the one for The Wall Street Journal, since this is the first
time I've encountered the annoyance of a notice appearing repeatedly every
few seconds in Evernote and have not experienced it from any other source.

[/software/archiving/Evernote]
permanent link
Sun, Jan 04, 2015 2:14 pm
SMF Connection Problems
When I tried to access a
Simple Machines
Forum (SMF) website after rebooting the server on which it resides, I saw
the message below:
Connection Problems
Sorry, SMF was unable to connect to the database. This may be caused by the
server being busy. Please try again later.
When I tried to check access to the database it uses with the
mysql command, I saw the following error message:
# mysql
ERROR 2002 (HY000): Can't connect to local MySQL server through socket '/var/lib/mysql/mysql.sock' (2)
The system uses MariaDB,
a fork of the MySQL relational database management system (RDBMS) for databases.
Checking prior notes
on the error message, I found it can indicate that the
mariahdb database service didn't start when the system rebooted. From
the root account I issued the command systemctl start
mariadb.service . When I tried accessing the forum again, it was then
accessible.
[/network/web/forums/smf]
permanent link
Sat, Jan 03, 2015 8:08 pm
Google Drive files not syncing - not connected
If Google Drive files are not synchronizing between systems or files are
not appearing when you view the conents of your Google Drive storage area
from a browser by going to drive.google.com, it is possible the system
that should be synchronizing the files has lost its connection to Google
Drive. Clicking on the Google Drive icon in the system tray should reveal
if that is the case. It can be easy to remedy the connection problem, but
you may have to wait a fair amount of time before all files are synchronized
after you reestablish the connection.
[ More Info ]
[/network/web/services/google/drive]
permanent link
Fri, Jan 02, 2015 9:54 pm
Creating a button with CSS
Images may be used to provide clickable buttons on a webpage, but one can
also create buttons entirely with text using Cascading Style Sheets (CSS).
Rectangular buttons can be created or the buttons can be given rounded
corners using a
border-radius value.
E.g., the following could be used to create a green button with rounded
corners with the word "Download" in it in white text:
<style type="text/css">
.downloadbutton {
  width: 67px;
  height: 20px;
  background-color: #31B404;
  border-radius: 15px;
  border: 3px solid #009900;
  padding: 5px;
}
.downloadbutton A:link {color: white; text-decoration:none}
</style>
[ More Info ]
[/network/web/html/css]
permanent link
Fri, Jan 02, 2015 3:05 pm
Link Colors
The color used for the
anchor text for
a link on a web page can be controlled through Cascading Style Sheets (CSS)
inserted into the head section of a web page. You can change the color used
for a link before it is visited, after it is visited, when someone hovers a
mouse over the link, and when someone clicks on the link, but hasn't yet
visited the web page.
[ More Info ]
[/network/web/html/css]
permanent link
Thu, Jan 01, 2015 9:47 pm
MediaMonkey Codec Pack 2.1.2.105 Installation
MediaMonkey
provides the capability to manage a movie/music library, even ones
containing over 100,000 files whether they are on a hard drive, CD, DVD,
or on other devices on your network. You can organize, browse or search
music by genre, artist, year, rating, etc. It supports a variety of
audio/video formats such as MP3, AAC (M4A), OGG, WMA, FLAC, MPC, WAV,
CDA, AVI, MP4, OGV, MPEG, WMV, M3U, PLS, etc. For
codecs your system
doesn't already support, you can install a codec pack for it to support
additional formats. If you don't have support for the codecs already on
the system, it will provide support for the following codecs:
- aac (.m4a, .m4b)
- h.264 (.mp4, .m4v, .mkv)
- mpeg4 (.avi), + flash
- .mov
- mpeg
[
More Info ]
[/os/windows/software/audio-video/MM]
permanent link

Privacy Policy
Contact


