Fri, Jul 31, 2026 9:18 pm
Creating and using a Wine prefix on an Ubuntu Linux system
A Wine prefix is a directory that acts like a separate Windows installation.
Each prefix has its own registry, installed programs, libraries, and
configuration, providing a way to isolate applications and configure Wine
in a way that is optimal for a particular Windows application or set of
applications without affecting other Windows applications that you need
to run on the system. To create a new Wine prefix, take the following
steps:
Create a new Wine prefix
Open a
terminal
window.
-
Choose a location for the new prefix. For example:
export WINEPREFIX="$HOME/.wine-myapp"
-
Initialize the prefix:
WINEPREFIX="$HOME/.wine-myapp" wineboot
Wine will create the directory and initialize a fresh Windows environment.
[ More Info ]
[/os/unix/linux/wine]
permanent link
Wed, Jul 22, 2026 11:41 pm
Viewing and setting the display turn off time using powercfg
You can view the current setting for a Microsoft Windows system to turn off
the attached screen by typing "power settings" in the Windows "Type here to
search" field and selecting "Power & sleep settings".
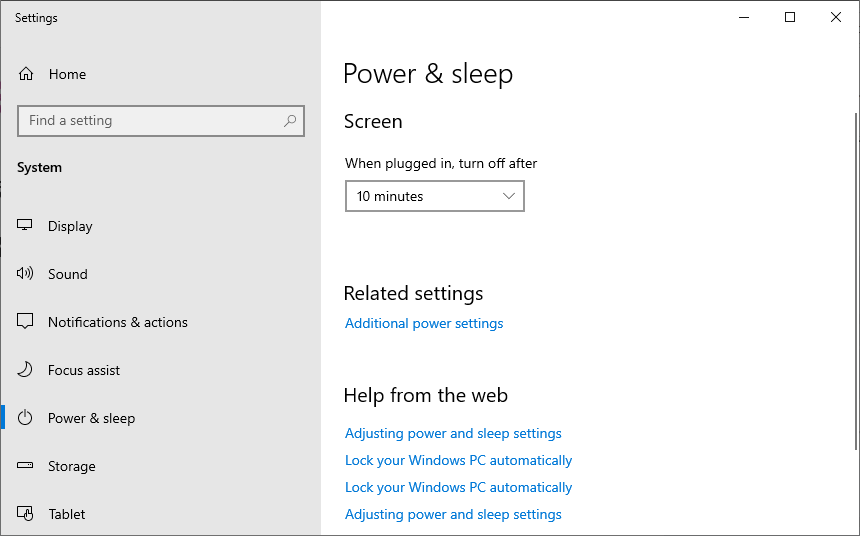
Settings on a desktop system running
Windows 10
Alternatively, you can see the current screen timeout power off settings
from a
command-line interface (CLI) using the command
powercfg /query SCHEME_CURRENT SUB_VIDEO VIDEOIDLE
from a PowerShell or
command prompt window.
C:\>powercfg /query SCHEME_CURRENT SUB_VIDEO VIDEOIDLE
Power Scheme GUID: 381b4222-f694-41f0-9685-ff5bb260df2e  (Balanced)
  GUID Alias: SCHEME_BALANCED
  Subgroup GUID: 7516b95f-f776-4464-8c53-06167f40cc99  (Display)
    GUID Alias: SUB_VIDEO
    Power Setting GUID: 3c0bc021-c8a8-4e07-a973-6b14cbcb2b7e  (Turn off display after)
      GUID Alias: VIDEOIDLE
      Minimum Possible Setting: 0x00000000
      Maximum Possible Setting: 0xffffffff
      Possible Settings increment: 0x00000001
      Possible Settings units: Seconds
    Current AC Power Setting Index: 0x00000258
    Current DC Power Setting Index: 0x0000012c


C:\>
[ More Info ]
[/os/windows/win10]
permanent link
Tue, Jul 21, 2026 1:06 pm
Installing GVIM with winget
My preferred text editor
is
gVim, which is available for
Linux,
macOS,
MS-DOS and
Microsoft Windows
systems as well as other
operating systems.
It is
free and open-source software. I've been using personal computers since
the early days of MS-DOS and have used the
vi text editor on
which it is based for decades, so I've learned many of the
keyboard shortcuts
which make it a powerful text editor and which make it easier for me to
modify text files more quickly than I could navigating through menu entries
in a graphical
user interface (GUI). So I usually install it on Microsoft Windows systems
that I will be using regularly. You can download an installation file from
the website of the developer,
Bram Moolenaar or
on Windows 10 or later versions of Windows, you can use Microsoft's
package manager
utility,
winget. To install the application using winget, you can open a
command prompt window or
PowerShell window and issue the command winget install vim.vim.
Note: on a Windows 10 system (version 22H2),
I found that the command was not available from a command prompt or PowerShell
window with administrator privileges, only from windows opened with standard
account privileges.
C:\>winget install vim
Multiple packages found matching input criteria. Please refine the input.
Name            Id              Source
---------------------------------------
Vim             vim.vim.nightly winget
Vim             vim.vim         winget
Vim Cheat Sheet 9WZDNCRDMCWR    msstore

C:\>winget install vim.vim
Found Vim [vim.vim] Version 9.2.0758
This application is licensed to you by its owner.
Microsoft is not responsible for, nor does it grant any licenses to, third-party packages.
Downloading https://github.com/vim/vim-win32-installer/releases/download/v9.2.0758/gvim_9.2.0758_x64_signed.exe
  ██████████████████████████████  12.7 MB / 11.7 MB
Successfully verified installer hash
Starting package install...
Successfully installed

C:\>
[/software/editors/vi]
permanent link
Mon, Jul 20, 2026 9:05 am
Installing Jellyfin as a Snap package on an Ubuntu Linux system
Jellyfin is a
free and
open-source
media server
application. It can be installed on an
Ubuntu Linux system as a
Snap package through
the App Center.
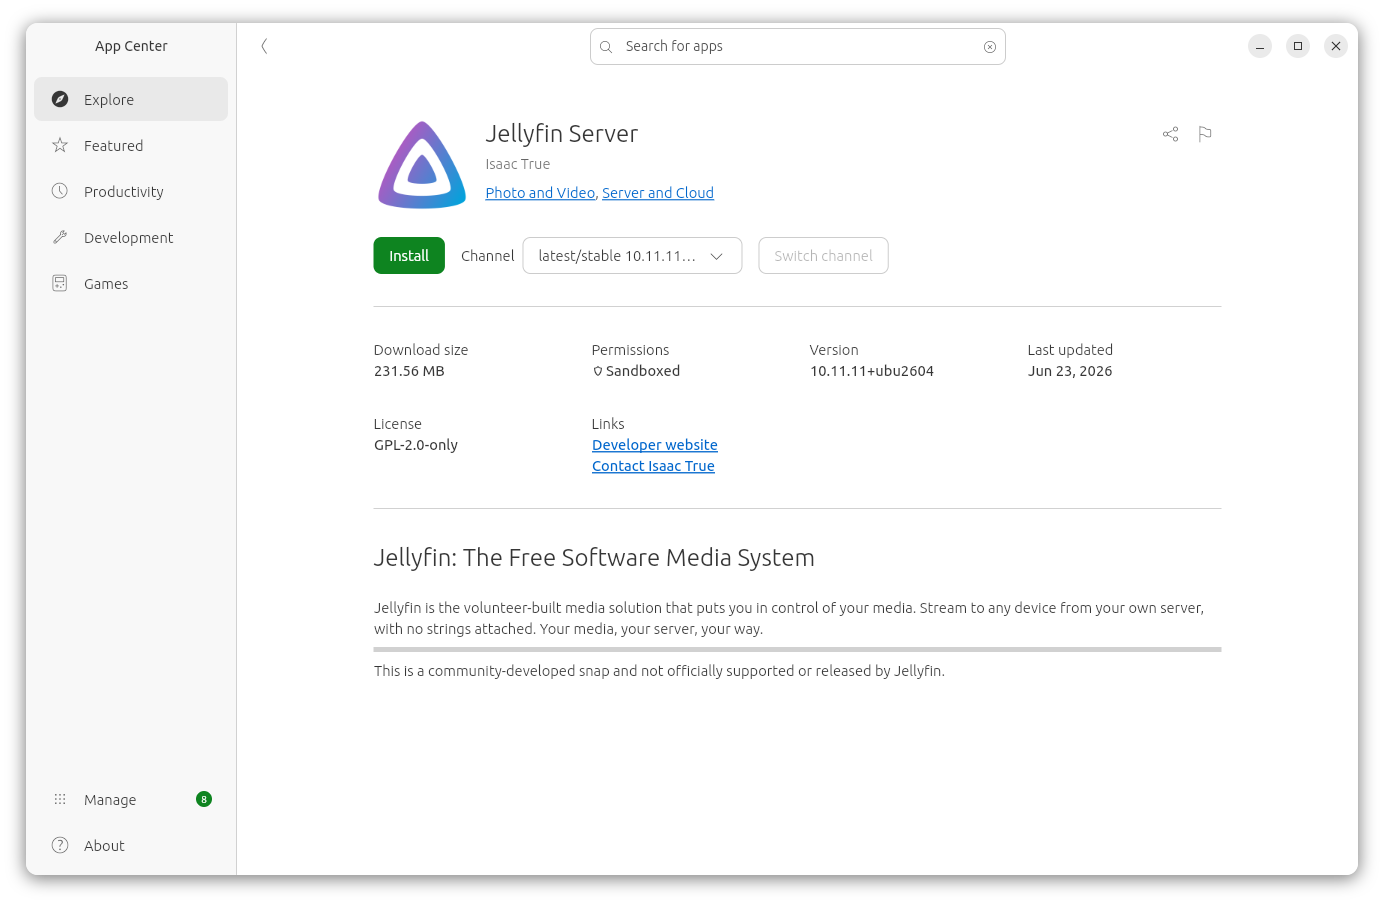
Alternatively, you can install the software from a
terminal window
with the command sudo snap install itrue-jellyfin.
$ sudo snap install itrue-jellyfin
[sudo: authenticate] Password:
itrue-jellyfin 10.11.11+ubu2604 from Isaac True (itrue) installed
$
[ More Info ]
[/network/web/server/jellyfin]
permanent link
Sun, Jul 19, 2026 8:53 pm
Importing Winamp playlists into Audacious
The Winamp media player
was developed to run on Microsoft Windows
operating
systems. The last stable release of the software was released about
three years ago on April 26, 2023. If you need a native
Linux alternative
to Winamp,
Audacious is a
free and open-source audio player that has a
GTK-based interfrace (GTKUI),but which can also be configured with a Winamp-like interface and which
supports Winamp 2 skins, i.e., Winamp .wsz files (a type of
ZIP archive
file). You can also migrate Winamp playlists into Audacious; it supports
the standard .m3u and
.m3u8 playlist formats,
though you will need to modify the Windows-style
file paths to be
Linux-style file paths. To use Winamp playlists on a Linux system,
such as an Ubuntu system,
you can take the following steps.
-
Locate your Winamp playlists, which are .m3u or .m3u8 files typically
located in
C:\Users\username\AppData\Roaming\Winamp\Plugins\ml\playlists
where username is the relevant username. You can view the contents
of that directory from a command
prompt window using the command dir
%appdata%\Winamp\plugins\ml\playlists since %appdata% is an
environment
variable pointing to the account's AppData\Roaming
directory.
A list of the playlists is contained in the playlists
XML file. In that
file, which can be viewed in a
text editor such as
the Windows Notepad,
you will see data like the following:
<?xml version="1.0" encoding="UTF-16"?>
<playlists playlists="35">
<playlist filename="plf8064.m3u8" title="Moonzic (Top Favorite Mix)"
id="{8B45286F-9CF9-4A14-9045-F27EDC1ED72B}" songs="217" seconds="0"/>
The first line above shows the version of XML in use is 1.0 and the
character encoding
is UTF-16. The
next lines shows that, in this case, there are 35 playlists. The next line
shows the filename of 1 of the 35 playlists and the title for the playlist
in Winamp.
-
If the music files, e.g., the
.mp3 files referenced in the
playlists are not accessible from the Linux system, copy them to a location
that is accessible from the Linux system. If you preserve a similar
folder structure, if you need to copy or move the files, editing the
playlists files will be easier. E.g., if the Winamp playlists contain
paths like:
C:\Users\Alice\Music\Artist\Album\song.mp3
You could have a similar folder structure on Linux like the following:
/home/alice/Music/Artist/Album/song.mp3
-
Edit the playlists files. You could use a global find and replace function
in a text editor
or you could update all of the files at once with
sed (short for stream
editor), which you can run from a
Terminal window.
Sed will likely already be present on a Linux system. You can verify
that by using the
which command, i.e.,
which sed, which will show you the
location of the program, if it is present. Sed is also available for Microsoft
Windows systems at
sed for
Windows. A sed command like the one below, if executed from the
directory where the playlist files are located, could be made to make the
needed changes if the the Windows and Linux file paths were like the ones
above.
sed -i 's|C:\\Users\\Alice|/home/alice|g; s|\\|/|g' *.m3u8
- The
-i tells sed to edit files in place, i.e., to
make the changes to the specified file rather than create a new
file.
- The commands sed will use are enclosed in single quotes.
- The
s at the beginning of the command instructs sed
to perform a substitution. The
vertical bar is
being used to separate the old
string
from the new replacement string. Another character could be used, such
as a colon,
etc.
- The string to be replaced,
C:\\Users\\Alice is
placed within the first pair of vertical bars. Each
backslash must be
preceded by another backslash because the backslash character has a
special meaning — it is an
escape
character. If you have a period in the replacement string, you should also
precede it with a backslash, since the period (.) has a special meaning
in a regular
expression, also. The replacement string is enclosed within the
second set of vertical bars.
- The
g that follows the 4th vertical bar indicates it
is a "global" replacement operation, i.e., it should occur everywhere
the original string occurs in the file.
- The semicolon
separates the first command from a second one, which indicates any
backslashes in the file should be replaced with forward slashes. I.e.,
the backslashes that occur later in each line should also be replaced.
- The
*.m3u8 indicates that the sed commands should be
applied to all .m3u files in the directory.
-
After updating the .m3u8 files, within Audacious, click on Playlist
and select Import.
-
Navigate to the location of the playlist then select one by clicking
on it and then click on the Import button.
-
The playlist name, e.g.,
plf68B in the example below, will
match the filename for the .m3u/.m3u8 file. You can rename it to match
the name for the playlist in Winamp by opening the Winamp
playlists.xml file, which will be in the same directory
as the playlist .m3u8 files, in a text editor or web browser and looking for
the corresponding entry, e.g.:
<playlist filename="plf68B.m3u8" title="Disney Classic Tunes"
id="{AAD2A93E-93E9-442B-B24C-88D0BFBB4607}" songs="44" seconds="8231"/>
Right-click on the playlist name in Audacious and choose Rename.
[ More Info ]
[/software/audio_video/Audacious]
permanent link
Sat, Jul 18, 2026 5:40 pm
Advanced Diary Active Database and Backup Registry Values
Advanced Diary is a journaling/diary
application for Microsoft Windows systems developed by
CSoftLab. It stores the location of
the currently active datbase in the
Windows registry at
HKEY_CURRENT_USER\SOFTWARE\CSoftLab\Advanced Diary\Databases in
the key Database0. You can query the value from a
command prompt
using the reg query command
reg query "HKEY_CURRENT_USER\SOFTWARE\CSoftLab\Advanced Diary\Databases"
/v Database0
. You can change the value from a
command-line
interface (CLI) using the reg
add command.
C:\>reg query "HKEY_CURRENT_USER\SOFTWARE\CSoftLab\Advanced Diary\Databases" /v Database0

HKEY_CURRENT_USER\SOFTWARE\CSoftLab\Advanced Diary\Databases
    Database0    REG_SZ    Protocol=Local*Database=C:\Users\Alice\Documents\Advanced Diary\diary.dndb


C:\>
It stores the settings for automatic backups at
HKEY_CURRENT_USER\SOFTWARE\CSoftLab\Advanced Diary\Options.
The default option settings when no automatic backup has been set are
shown below.
C:\>reg query "HKEY_CURRENT_USER\SOFTWARE\CSoftLab\Advanced Diary\Options" | find "AutoBackup"
    AutoBackup    REG_DWORD    0x0
    AutoBackupPath    REG_SZ
    AutoBackupMode    REG_DWORD    0x0
    AutoBackupTime    REG_BINARY    4F5555555555D53F

C:\>
You can change the backup settings in the program by selecting Tools,
then Options, then Backup from the Advanced Diary menu bar.
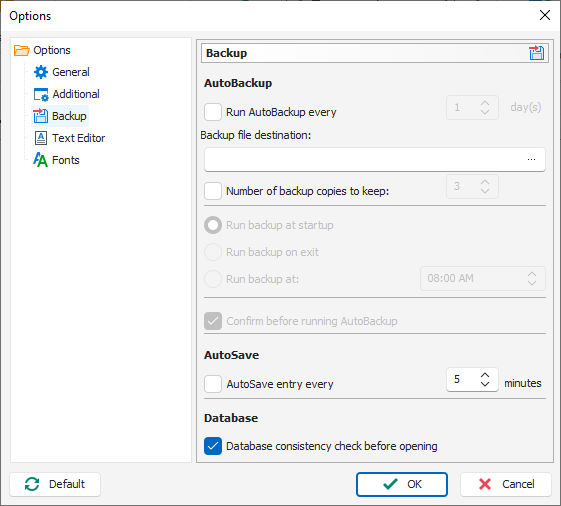
The registry settings when automatic backups have been turned on with a
backup location specified and the default backup options left in place, e.g.,
every day, are shown below.
C:\>reg query "HKEY_CURRENT_USER\SOFTWARE\CSoftLab\Advanced Diary\Options" | find "AutoBackup"
    AutoBackup    REG_DWORD    0x1
    AutoBackupPath    REG_SZ    P:\alice\Advanced Diary Backups\
    AutoBackupMode    REG_DWORD    0x0
    AutoBackupTime    REG_BINARY    4F5555555555D53F

C:\>
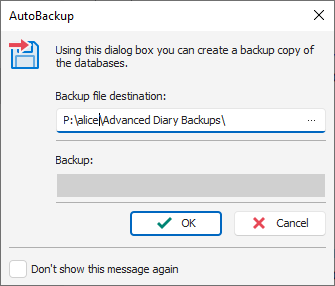
When you turn on the backup option, the next time you start the program
you will see a AutoBackup window prompting you to OK a backup.
if you leave the "Confirm before running AutoBackup" option checked.
The "AutoSave" option is stored in the registry at AutoSave
under HKEY_CURRENT_USER\SOFTWARE\CSoftLab\Advanced Diary\Options.
The default value is zero. With "AutoSave entry ever 5 minutes" turned on
the value will be "1" as shown below.
C:\>reg query "HKEY_CURRENT_USER\SOFTWARE\CSoftLab\Advanced Diary\Options" /v AutoSave

HKEY_CURRENT_USER\SOFTWARE\CSoftLab\Advanced Diary\Options
    AutoSave    REG_DWORD    0x1


C:\>
The value in minutes for the interval at which automatic saves are performed
is stored in the AutoSaveInterval key. The key that controls
whether the user is prompted to confirm backups is stored in the
BackupConfirmation key. A value of "0" indicates that confirmation
is not required.
C:\>reg query "HKEY_CURRENT_USER\SOFTWARE\CSoftLab\Advanced Diary\Options" /v AutoSaveInterval

HKEY_CURRENT_USER\SOFTWARE\CSoftLab\Advanced Diary\Options
    AutoSaveInterval    REG_DWORD    0x5


C:\>reg query "HKEY_CURRENT_USER\SOFTWARE\CSoftLab\Advanced Diary\Options" /v BackupConfirmation

HKEY_CURRENT_USER\SOFTWARE\CSoftLab\Advanced Diary\Options
    BackupConfirmation    REG_DWORD    0x0


C:\>
Related articles:
-
Obtaining a command prompt in Windows 11
Date: August 14, 2023
-
Remotely Enabling Remote Desktop Protocol From the Command Line
Date: April 11, 2009
-
Checking Microsoft Windows proxy server
settings
Date: January 7, 2015
[/os/windows/software/journaling/AdvDiary]
permanent link
Fri, Jul 17, 2026 9:30 pm
Renaming a Windows system and joining a Windows domain with PowerShell
You can view the current name of a system running a Microsoft Windows
operating system
(OS) using the hostname command in a
PowerShell or
command prompt window.
You can change the name of the
host by opening
a PowerShell window with administrator privileges by choosing "Run as
administrator" when opening the window and then using the PowerShell command
Rename-Computer -NewName "name" where name is the
new name you wish to assign to the system. Note: names must be 15 or fewer
characters due to NetBIOS
limitations and should only use standard alphanumeric characters, i.e, A-Z,
0-9, and hyphens (-). Spaces and most special characters are invalid and will
cause an error.
PS C:\Windows\system32> hostname
DESKTOP-PNS32H3
PS C:\Windows\system32> Rename-Computer -NewName "Jamestown"
WARNING: The changes will take effect after you restart the computer DESKTOP-PNS32H3.
PS C:\Windows\system32>
You will need to reboot to have the new name go into effect; you can
add the -Restart option to the command to restart automatically.
E.g., Rename-Computer -NewName "TheNewName" -Restart.
To join a Windows
domain from a
command-line interface (CLI), you can issue the command
Add-Computer -DomainName "YourDomainName" -Credential
(Get-Credential) -Restart
— replace YourDomainName with
the name of the Windows domain. If you don't want to automatically reboot, omit
the -Restart option.
Add-Computer -DomainName "ad.example.com" -Credential (Get-Credential) -Restart

cmdlet Get-Credential at command pipeline postion 1
Supply values for the following parameters:
Credential
You will see a "Windows PowerShell credential request" window open where
you can provide a user name and password for an account in the domain
administrators group. The system will automatically reboot if you have
added the -Restart parameter.
[/os/windows/PowerShell]
permanent link
Thu, Jul 16, 2026 6:53 pm
Querying and setting network settings with PowerShell
To determine the IP
address of a Microsoft Windows system from a
command-line
interface (CLI) you can
open a command prompt window and
use the ipconfig command
ipconfig /all. If you only need the IPv4 address you can
pipe
the output into find
or findstr. Alternatively,
you can use a netsh command.
C:\>ipconfig /all | find "IPv4 Address"
   IPv4 Address. . . . . . . . . . . : 192.168.0.8(Preferred)

C:\>ipconfig | findstr /C:"IPv4"
   IPv4 Address. . . . . . . . . . . : 192.168.0.8

C:\>netsh interface ip show addresses

Configuration for interface "Ethernet"
    DHCP enabled:                         Yes
    IP Address:                           192.168.0.8
    Subnet Prefix:                        192.168.0.0/24 (mask 255.255.255.0)
    Default Gateway:                      192.168.0.1
    Gateway Metric:                       0
    InterfaceMetric:                      25

Configuration for interface "Loopback Pseudo-Interface 1"
    DHCP enabled:                         No
    IP Address:                           127.0.0.1
    Subnet Prefix:                        127.0.0.0/8 (mask 255.0.0.0)
    InterfaceMetric:                      75


C:\>
You can also use a
PowerShell cmdlet to view the IP address.
PS C:\> Get-NetIPAddress -AddressFamily IPv4


IPAddress         : 192.168.0.8
InterfaceIndex    : 5
InterfaceAlias    : Ethernet
AddressFamily     : IPv4
Type              : Unicast
PrefixLength      : 24
PrefixOrigin      : Dhcp
SuffixOrigin      : Dhcp
AddressState      : Preferred
ValidLifetime     : 15:58:12
PreferredLifetime : 15:58:12
SkipAsSource      : False
PolicyStore       : ActiveStore

IPAddress         : 127.0.0.1
InterfaceIndex    : 1
InterfaceAlias    : Loopback Pseudo-Interface 1
AddressFamily     : IPv4
Type              : Unicast
PrefixLength      : 8
PrefixOrigin      : WellKnown
SuffixOrigin      : WellKnown
AddressState      : Preferred
ValidLifetime     : Infinite ([TimeSpan]::MaxValue)
PreferredLifetime : Infinite ([TimeSpan]::MaxValue)
SkipAsSource      : False
PolicyStore       : ActiveStore


PS C:\>
You can get a more concise version showing the interface and address
with Get-NetIPAddress -AddressFamily IPv4 |Select-Object InterfaceAlias,
IPAddress.
PS C:\> Get-NetIPAddress -AddressFamily IPv4 | Select-Object InterfaceAlias, IPAddress

InterfaceAlias              IPAddress
--------------              ---------
Ethernet                    192.168.0.8
Loopback Pseudo-Interface 1 127.0.0.1


PS C:\>
[ More
Info ]
[/os/windows/PowerShell]
permanent link
Tue, Jul 14, 2026 9:27 pm
Copying and pasting from a VirtualBox VM to the host operating system
If you wish to be able to be able to copy text from within a
virtual machine (VM)
running on
VirtualBox
to the host
operating
system (OS) clipboard, e.g., from a Microsoft Windows guest VM to a Linux
host, take the following steps:
- Shut down the VM
-
With the VM selected, click on Settings, then General,
then select Features. Change the Shared Clipboard setting from
Disabled to Bidirectional then click on OK.
-
Start the VM.
-
In the running VM, click on Devices then select Shared Clipboard
. Make sure it is set to Bidirectional.
-
Select Devices then Insert GUest Additions CD image....
-
When you see the "VirtualBox - Question" window with the message "Do you
wish to download this disk image file fromt he Internet?", click on
Download.
-
If you see a window asking you to confirm the VirtualBox Guest Additions
disk image file followed by the URL for the download, e.g.,
https://download.virtualbox.org/virtualbox/7.2.6/VBoxGuestAdditions_7.2.6.iso,
click on Download.
-
You should then see a window informing you that the VirtualBox Guest
Additions disk image file has been successfully downloaded and saved
locally. The download location is
~/.config/VirtualBox/VBoxGuestAdditions_x.y.z where
x.y.z is the version of the ISO file, e.g.
VBoxGuestAdditions_7.2.6.iso. You will be asked "Do you
wish to continue with Guest Additions installation?" Click on Continue.
-
Open the Windows File Explorer, then navigate to "CD Drive (D:) VirtualBox
Guest Additions" in the left pane and with it selected, in the right pane,
right-click on VBoxWindowsAdditions and select "Run as administrator". When
asked if you wish to allow the program to make changes", click on "Yes".
-
You will then see a "Welcome to the Oracle VirtualBox Guest Additions Setup"
window which will inform you "It is recommended that you close all other
applications before starting Setup. This will make it possible to update
relevant system files without haviging to reboot your computer." Close
any applications you are running in the Windows VM and then click on
Next.
-
At the next window you can "Choose Install Location". Unless you need
to change the location, just click on Next.
-
The next window is one where you can "Choose Components". You can click on
Install to proceed with the default options. The space required is
675.0 KB.
-
At the next window you will be informed "Your computer must be restarted in
order to complete the installation of Oracle VirtualBox Guest Additions..."
and asked "Do you want to reboot now?" You can click on Finish to
immediately reboot. Once you have rebooted, you should be able to copy and
paste between the host and guest operating systems.
You should also see the "VirtualBox Guest Additions Service" and
"VirtualBox Guest Additions Tray Application" processes running if you
bring up the Windows Task Manager.
[
More Info ]
[/os/virtualbox]
permanent link
Mon, Jul 13, 2026 4:52 pm
Installing Discord on an Ubuntu Linux system
To install Discord on
an Ubuntu Linux system,
you can install it as a
Snap package through Ubuntu's App Center.
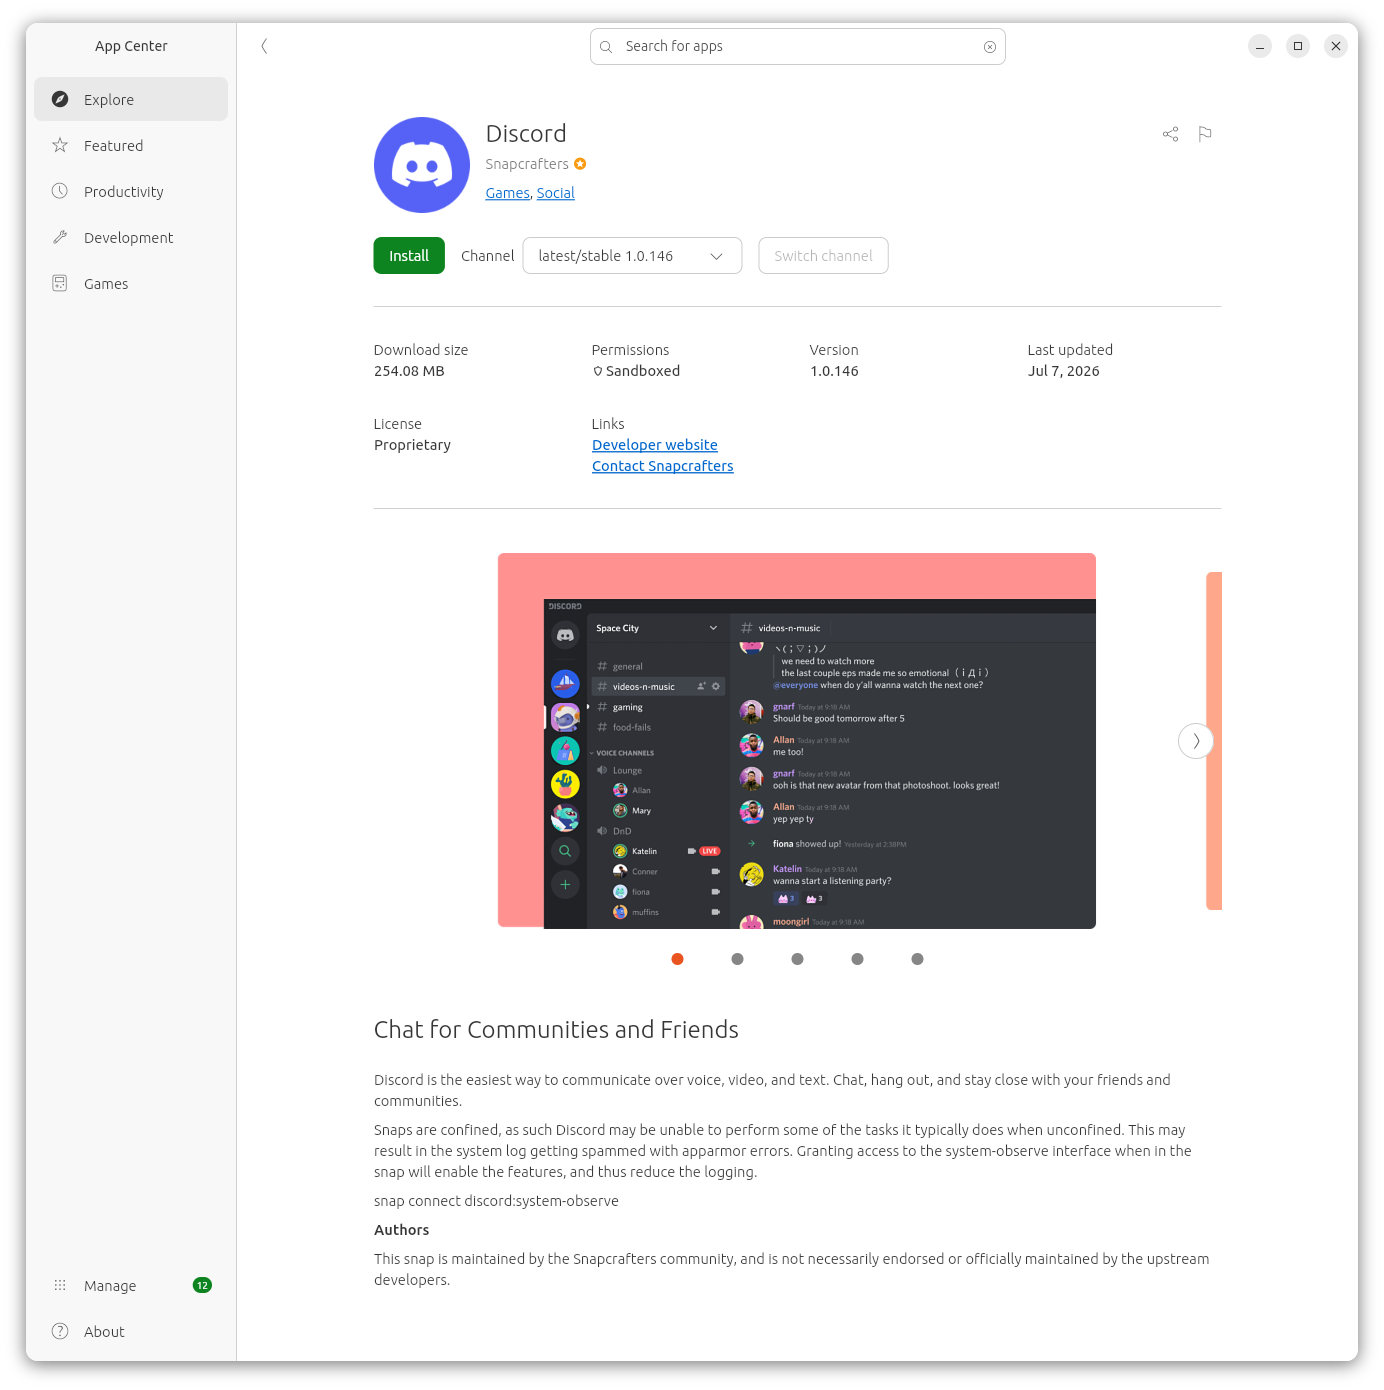
At the install screen, I saw the message below:
Snaps are confined, as such Discord may be unable to perform some
of the tasks it typically does when unconfined. This may result in the
system log getting spammed with apparmor errors. Granting access to the
system-observe interface when in the snap will enable the features, and
thus reduce the logging.
snap connect discord:system-observe
AppArmor is a
Linux kernel
security module that provides system administrators the capability to
restrict the access programs have to the system on which they run.
[ More Info ]
[/os/unix/linux/ubuntu]
permanent link
Thu, Jul 09, 2026 2:50 pm
Installing Python on a Microsoft Windows system using winget
If you would like to use the
Python
programming language on a Microsoft Windows system, one way to install
Python software is to use the
Windows
Package Manager, aka winget. Open
a command prompt and enter the command winget install python.
After the software is installed, you can view information on the Python
package with the command winget show python.
C:\>winget install python
The `msstore` source requires that you view the following agreements before using.
Terms of Transaction: https://aka.ms/microsoft-store-terms-of-transaction
The source requires the current machine's 2-letter geographic region to be sent to the backend service to function properly (ex. "US").
Do you agree to all the source agreements terms?
[Y] Yes [N] No: Y
Found Python 3.12 [9NCVDN91XZQP] Version Unknown
This package is provided through Microsoft Store. WinGet may need to acquire the package from Microsoft Store on behalf of the current user.
Agreements for Python 3.12 [9NCVDN91XZQP] Version Unknown
Version: Unknown
Publisher: Python Software Foundation
Publisher Url: https://www.python.org/
Publisher Support Url: https://www.python.org/doc/
License: https://docs.python.org/3.12/license.html
Privacy Url: https://www.python.org/privacy
Copyright: (c) Python Software Foundation
Agreements:
Category: Developer tools
Pricing: Free
Free Trial: No
Terms of Transaction: https://aka.ms/microsoft-store-terms-of-transaction
Seizure Warning: https://aka.ms/microsoft-store-seizure-warning
Store License Terms: https://aka.ms/microsoft-store-license
The publisher requires that you view the above information and accept the agreements before installing.
Do you agree to the terms?
[Y] Yes [N] No: Y
Starting package install...
██████████████████████████████ 100%
Successfully installed
C:\>winget show python
Found Python 3.12 [9NCVDN91XZQP]
Version: Unknown
Publisher: Python Software Foundation
Publisher Url: https://www.python.org/
Publisher Support Url: https://www.python.org/doc/
Description:
Python is an easy to learn, powerful programming language. It has efficient high-level data structures and a simple but effective approach to object-oriented programming. Python’s elegant syntax and dynamic typing, together with its interpreted nature, make it an ideal language for scripting and rapid application development in many areas on most platforms.
The Python interpreter and the extensive standard library are freely available in source or binary form for all major platforms from the Python web site, https://www.python.org/, and may be freely distributed. The same site also contains distributions of and pointers to many free third party Python modules, programs and tools, and additional documentation.
The Python interpreter is easily extended with new functions and data types implemented in C or C++ (or other languages callable from C). Python is also suitable as an extension language for customizable applications.
License: https://docs.python.org/3.12/license.html
Privacy Url: https://www.python.org/privacy
Copyright: (c) Python Software Foundation
Agreements:
Category: Developer tools
Pricing: Free
Free Trial: No
Terms of Transaction: https://aka.ms/microsoft-store-terms-of-transaction
Seizure Warning: https://aka.ms/microsoft-store-seizure-warning
Store License Terms: https://aka.ms/microsoft-store-license
Installer:
Installer Type: msstore
Store Product Id: 9NCVDN91XZQP
Offline Distribution Supported: true
C:\>
You can then type python in a command prompt window to
open the Python interpreter where you can enter commands. E.g., in the
example below it is being used as a calculator. You can exit the program
by typing exit(). You can run Python
scripts from
the command prompt window using commands in the form python
example.py.
C:\>python
Python 3.12.10 (tags/v3.12.10:0cc8128, Apr 8 2025, 12:21:36) [MSC v.1943 64 bit (AMD64)] on win32
Type "help", "copyright", "credits" or "license" for more information.
>>> 99 / 4
24.75
>>> 12 * 13
156
>>> exit()
C:\>
Related articles:
-
Obtaining a command prompt in
Windows 11
Date: August 14, 2023
-
Obtaining a command prompt in Windows
10
Date: February 18, 2017
-
WinPython - Python for Microsoft
Windows
Date: May 13, 2018
-
Installing new packages for WinPython
Date: May 18, 2018
[/languages/python]
permanent link
Thu, Jul 02, 2026 9:42 pm
DVDFab 13 - Unload debugger
My wife had been using
DVDFab 13 under Microsoft
Windows 11 and wanted to continue to use it for
ripping DVDs after we
converted her desktop PC to
Ubuntu Linux. DVDFab 13
seemed to be working fine after I installed it using
Wine until after I
updated Wine to version 11.0 (you can see which version of Wine is present
by issuing the command wine --version in a
Terminal window).
When I tried to run DVDFab afterwards, though, I saw the message
“A debugger has been found running in your system. Please, unload
it from memory and restart your program.”
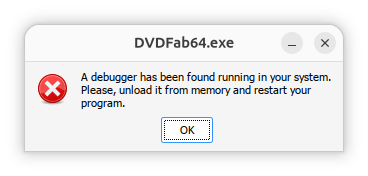
When I queried
ChatGPT about the
issue, it replied “This error is usually not caused by an actual
debugger running on Ubuntu. DVDFab contains anti-debugging / anti-tamper
checks, and under Wine or Proton those checks can sometimes incorrectly
conclude that a debugger is attached.” It also stated that, for
DVDFab 13 specifically, there is an issue when trying to run the program on
later versions of Wine with the problem appearing with version 10.3 or
later. The problem occurs on newer versions, even when no
debugger is running.
I decided to install the application under Bottles, which I had previously
installed on the system with Flatpak, to see if the problem might not occur
if I tried to run the application under
Bottles, but the problem still occurred. I.e., I saw the "A debugger
has been found running in your system. Please, unload it from memory and
restart your program.” message. It took me a considerable amount of time
to resolve the problem, but I was finally able to fix the issue by disabling
DXVK and VKD3D in the settings for the DVDFab bottle.
[ More Info ]
[/os/unix/linux/ubuntu/DVDFab]
permanent link
Wed, Jul 01, 2026 9:13 pm
Remove a Flatpak
To see the Flatpaks
installed on a Linux system, you can issue the command flatpak list
in a terminal window. To remove a Flatpak from a system, find the Application
ID of the software by issuing the command flatpak list --app.
Once you have the Application ID, you can uninstall the Flatpak with the
command flatpak uninstall AppID where AppID is
the relevant Application ID. To remove all of the application's local settings
and configuration files, add the --delete-data option. E.g.,
to remove the
Bottles Flatpak, I could use the command
flatpak uninstall --delete-data com.usebottles.bottles.
alice@Wonderland:~$ flatpak list
Name             Application ID              Version Branch       Installation
Bottles          com.usebottles.bottles      63.2    stable       system
i386             …sktop.Platform.Compat.i386         25.08        system
Mesa             …esktop.Platform.GL.default 26.0.6  25.08        system
Mesa (Extra)     …esktop.Platform.GL.default 26.0.6  25.08-extra  system
nvidia-580-159-… …tform.GL.nvidia-580-159-03         1.4          system
Mesa             …ktop.Platform.GL32.default 26.0.6  25.08        system
Mesa (Extra)     …ktop.Platform.GL32.default 26.0.6  25.08-extra  system
nvidia-580-159-… …orm.GL32.nvidia-580-159-03         1.4          system
Nvidia VAAPI dr… …ktop.Platform.VAAPI.nvidia         25.08        system
Codecs Extra Ex… …ktop.Platform.codecs-extra         25.08-extra  system
i386             …Platform.codecs_extra.i386         25.08-extra  system
GNOME Applicati… org.gnome.Platform                  49           system
Yaru Gtk Theme   org.gtk.Gtk3theme.Yaru              3.22         system
gecko            org.winehq.Wine.gecko               stable-25.08 system
mono             org.winehq.Wine.mono                stable-25.08 system
alice@Wonderland:~$ flatpak list --app
Name        Application ID             Version     Branch     Installation
Bottles     com.usebottles.bottles     63.2        stable     system
alice@Wonderland:~$ flatpak uninstall --delete-data com.usebottles.bottles


        ID                                    Branch         Op
 1. [-] com.usebottles.bottles                stable         r
 2. [-] com.usebottles.bottles.Locale         stable         r

Uninstall complete.
Delete data for com.usebottles.bottles? [y/n]: y
alice@Wonderland:~$
A Flatpack may required shared "runtimes" components. When you delete
the application, those runtimes can become "orphaned", but still occupy
space on the system. You can, optionally, use the command
flatpak uninstall --unused afterwards, if that is a concern.
[/os/unix/linux]
permanent link

Privacy Policy
Contact