In the Microsoft Excel spreadsheet program, if you wish to create a dropdown
list where a user can select options from the list for a cell's value, you can
take the steps below:
Highlight the cells where you wish to have the the dropdown list appear, e.g.,
by clicking in a cell and dragging downwards through a column where a user
should select from the dropdown list.
Click on Data on the menu bar at the top of the Excel window
Click on Data Validation.
If you see 3 options under Data Validation, i.e., Data Validation,
Circle Invalid Data, and Clear Validation Circles, select Data
Validation.
You will then see a window where you can change settings. In the "Allow"
field for validation criteria, select List.
You will then be given an option to provide the items for the list in
the source field. If you have just a couple of options for the list
that won't change, you can type them separated by a comma.
Click on OK.
In cells where you have chosen to present a dropdown list to a user,
when the user clicks on the cell or tabs into it, he/she will see a
small box with a downward pointing arrowhead appear to the right of
the cell. The user can then either type a value in the field or he/she
can chose a value from the dropdown list by clicking on the small
box with the downard pointing arrowhead. If the user types a value
that isn't in the list rather than selecting from the dropdown list,
when the user hits enter or moves the cursor out of the cell, he/she
will see the message "The value you entered is not valid. A user has
restricted values that can be entered in this cell."
I needed to compare two
KeePass Password Safe
(version 2.45) databases, since one was copied to a laptop where I thought
it might have been updated after it was copied with the original also
being updated, so the two files no longer matched. I needed to add any
new entries from the laptop to the original database. I knew there should
at most only be a few additions on the laptop. You can see modification
timestamps by clicking on an individual entry and then selecting the
History tab for that entry, but I didn't want to go through every entry
in the database that way to determine new entries, since it would have
taken many hours. There is a way to speed the process by clicking on
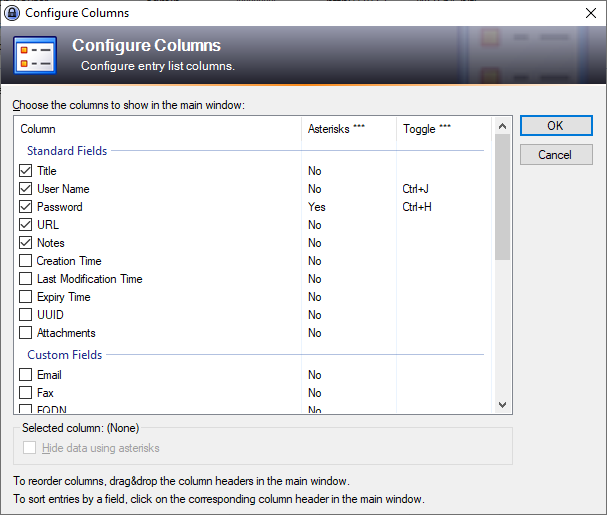
View from the KeePass menu bar which will give you the option
to select Configure Columns.
Check the check box next for Last Modification Time, then
click on OK. You will then see a "Last Modification Time" column
for each entry, so you don't have to open each entry, though you will have
to go through each group you've created to check the last modification time
for entries, but you can click on the column header for "Last Modification
Time" to sort them by time. You can sort them from oldest to newest or newest
to oldest by clicking on the column header multiple times to toggle the
display. By then viewing a list of entries under each group within KeePass
on the laptop, I could see that nothing had been added, so I didn't need
to add any entries to the original database to ensure synchronization of
any updates made to the copy with the original file.
I wanted to save a local copy of an image on a webpage I was viewing in
the Google Chrome browser on a Windows 10 system, but I couldn't right-click on
it to download it, so I thought I could look for it in the Chrome browser
cache, which is located at
C:\Users\username\AppData\Local\Google\Chrome\User
Data\Default\Cache
where username is the name of the relevant
account on a Windows system. I had the
ChromeCacheView
program from NirSoft on the
system, which provides a command-line option to copy image files from the
Chrome cache for a user, so I used it. Since I was logged into a regular
user account, I
opened a command prompt as the
administrator and then made the working directory the directory where
the ChromeCacheView program was located with
cd C:\Program Files (x86)\Network\NirSoft\ChromeCacheView. Then
from that directory I issued the command below:
You can use the -folder option to tell ChromeCacheView which
user's cache file you wish to use while the /copycache option
can be used to specify the directory where you want images, such as
PNG files,
to be copied—in this case I was looking for a .png file because when I
examined the HTML code on the
webpage I thought that the the image was a PNG file. I created a
temp\chrome directory under the Documents directory for
the user account prior to issuing the command to hold the images stored
in the cache. After the command completed, I could see all of the PNG
files that had been in the Chrome cache in that temporary directory I
had created.
When I didn't see the image I was looking for, I thought I might have
misidentified it in the code, so I copied all of the image files from the
cache directory, not just the PNG ones by changing "image/png" to
"image" in the command. I.e.:
When I opened Book Collector version 20.5.2 today, I saw the message
"Failed to open database, because your license key (xxxxxxxxxxxx) is already in
use on computer "YYYYYYYY" by another user (zzzzzz). Do you wish to unlock your
database file and open it here?" I could choose "yes" or "no" with the "no"
answer opening Book Collector with a new empty book database. The computer the
message referenced was the one on which I was currently trying to open the
program. Since the system I was using had crashed earlier in the day, I
realized that Book Collector was likely finding a lock file that would be
deleted when the program is closed normally. I saw a file with the name I had
given to my book collection, but with a .bkclck
filename
extension in the directory where I stored the book database. When I opened
the file I saw the file conained only one line:
In cases where Book Collector was not closed normally, you can either choose
"yes" at the prompt or delete the .bkclck file before opening Book
Collector as its presence is what causes the message to appear.
To download a video hosted on
Panopto, such as a class
lecture, you can take the following steps in the
Firefox web
browser:
Right-click on the video in Panoptoo—you may need to click on the small
video in the upper, left-hand side of the window rather than the one on the
right side of the window—and select "Inspect Element (Q)."
In the "Search HTML" field, type .mp4 and hit
Enter—this presumes the video is an
MP4 video.
You should see the area in the HTML code where the MP4 file is referenced
highlighted.
Right-click on the highlighted area and choose "Copy" then "Outer HTML."
Then paste the information copied into the clipboard into
Microsoft Notepad or some other text editor, depending on your operating
system and preferred editor. You should see the
URL for the
video listed in the content pasted into the editor. Copy the URL starting with
the "https" up through the ".mp4"—don't copy the information after
the ".mp4."
Paste the copied URL into a browser tab. You can then right-click on the
video in that browser tab and select "Save Video As" to download the video
to your local system. You can give the video a more meaningful name than
the long string of
hexadecimal
digits used for the name.
At 11:55 AM EDT this morning, my wife received a recorded call stating our
electricity would be cut off by Delmarva Power, our electric utility, in
thirty minutes. She called for me to pick up the phone, but by the time I got
to a phone in another room, the call was disconnected. She said the message
had instructed her to hit "1" to speak to someone. The call sounded like a
scam to me, since I didn't know of any issue with our electicity payments and
also because I would have expected a letter well before a cutoff date and
more than 30 minutes to pay any past due payment if someone called. It seemed
to me an obvious attempt to panic a called party into providing a credit card
to a scammer engaged in fraud, but I checked our bank account anyway and saw
the last payment due had been deducted from our checking account about two
weeks before the call and when I logged into Delmarva's website to check the
status of our account, I saw the last payment credited and a balance of zero
dollars.
Using *69, I was able to determine the listed calling number was
1-443-739-1747, but a search online for accounts of others receiving a call
from a scammer using that number did not reveal other such activity. I called
the number back to see how the scammer operated or to see if it might be
a spoofed number, but just got a recorded message that the called party
was not available, so I should leave a message. It sounded like a generic
voicemail message. So, perhaps, the scammer spoofed the calling number
as they often do to make it difficult to track down their identity.
After watching lectures for classes that are stored on the
Panopto website, I like
to save the text listed for a video in the Contents and Captions that
Panopto provides in a text file. However, if I copy and paste the text into
Windows Notepad
or some other text
editor, I see the timestamps appear beneath the relevant text on the
following line. To address the problem, I paste the text into
the Vim editor
on a Microsoft Windows system and apply the command
v/\d:\d\d\n/s/\n/ / that replaces the end-of-line character
at the end of all lines that don't have a timestamp with a space, instead.
If you wish to insert vowels used in Latin in a document, such as
a Microsoft Word or WordPad
document, on a Microsoft Windows system to indicate
vowel length, i.e.,
whether the vowel should be pronounced as a long or short vowel, you can use
the Unicode values shown
in the table below — Unicode is an encoding standard for characters
in most of the world's
writing systems. For Latin, a
macron, which is
a diacritic mark,
is placed above the letter to indicate a long vowel. Sometimes a
breve may also be used
to indicate a short vowel. In addition to the Unicode codes, the corresponding
Hypertext Markup Language (HTML)
code is listed as well for displaying the characters in a web page.
To insert the characters using a Windows keyboard on a system running the
Microsoft Windows operating system, type the numeric code (the numbers are
hexadecimal numbers so
"A" through "F" represent the numbers 10 through 15) and then hit Alt-x,
i.e., hit the "Alt" and "x" keys simultaneously, after entering the numeric
code. Note, you needed to have a space before the number you enter, otherwise
if you attempt to put "ē" in "fēmina," by typing "f" with "0113"
immediately after it, the "f0113" will be replaced with a small box with a
question mark within it. So place a space after the "f," type
0113, hit Alt-x, then when ē appears, remove
the space before it. Also note that though Microsoft Word supports this
method of entering vowels with a diacritic mark in a document not all
Microsoft Office
applications allow you to enter Unicode characters by this
method. E.g., for
Microsoft Powerpoint, you will need to use the
Character Map method of entering such characters, instead.
I needed to reset the password on a Cisco router provided by Comcast for
Internet service for a local business, since I needed to update firewall rules
in the router, but when I tried what I thought was the password it didn't
work. The model number for the Cisco router was DPC3941B (the model number
is on the bottom of the router). I also needed to reconfigure the subnet
used by the router for the Local Area Network (LAN) after resetting the
router, since the computers on the LAN were using IP addresses from a
192.168.0.0/24 subnet rather than the 10.1.10.0/24 subnet used as the
default one for the router.
To temporarily turn off the realtime antivirus protection in McAfee
AntiVirus Plus, e.g., so you could move a file to another system for analysis
that it might deem malware or to scan the system with other antivirus
software, you can take the following steps:
Open the program and click on the gear (cog) icon at the upper, right-hand
corner of the window.
Under the PC Security section of the Settings, you will
see "Real-Time Scanning." When you click on "Real-Time Scanning" you will
have the option of turning off the real-time monitoring for 15 minute intervals
from 15 to 60 minutes or you can select "When I restart my PC" or "Never."
If you select a timed option, the protection will automatically turn back
on after that period of time. You can also turn on protection again
prior to that time by modifying the "Real-Time Scanning" setting again.
If you wish to view or restore items McAfee AntiVirus Plus has quarantined,
you can click on "Quarantined items" under Settings, which will show
you all files in the quarantine area, if any.
Note: these steps were tested on McAfee® AntiVirus Plus version 16.0
To configure Outlook 2010 to check an AOL email account, take the following
steps.
Open Outlook and click on Next at the startup window.
When prompted as to whether you would like to configure an E-mail account,
maintain the default option of "yes" and click on Next.
At the Add New Account window, choose "Manually configure server
settings or additional server types" and then click on Next.
At the Choose Service window, maintain the default option of
"Internet E-mail" and click on Next.
At the Internet E-mail Settings window, you will need to
provide the relevant information for your AOL email account. In the
username field, include "@aol.com" as part of the user name, e.g.,
jdoe@aol.com. You will also need to choose
whether you will access your AOL email account using the
Post Office
Protocol (POP) or the
Internet Message Access Protocol (IMAP). The default option is
POP3, version 3 of POP. With that option, the email in your inbox will
be downloaded to Outbox and deleted from the server after a specified
period of time; by default Outlook will leave it on the server for 14 days.
If you log into the AOL website to check your
email after you've downloaded it with Outlook and delete a message while
viewing your email in a browser, it won't be available to download with
Outlook, if you subsequently check your AOL email with Outlook, although
that may not matter to you. A disadvantage of using the POP protocol is
that it only downloads email from the inbox, not any other folders you
may have created to hold specific email messages. Also, by default email
is deleted from the email server after you download it to Outlook, so email
you've already downloaded won't be visible to you if you check your email
through a web browser at a later time—by default Outlook will leave
the email there for 14 days, though. You can change that setting, though, once
you've filled in account information by clicking on the More Settings
button, then clicking on the Advanced tab and choosing how long
a copy of messages should be left on the server.
If you select IMAP for the account type, you can view email in
other folders besides the inbox and Outlook's view of the email in your
account is synchronized with the email messages maintained on the AOL email
server, so you can check with a web browser or with Outlook and see the
same messages in your email folders. You could also set up Outlook on another
system and select IMAP there as well to see the same email messages on
a separate system where you are using Outlook.
The information you should put in the incoming mail server and
outgoing mail server fields is as follows:
Protocol
Server
Port Settings
POP3
Incoming mail server (POP3): pop.aol.com
Outgoing mail server (SMTP): smtp.aol.com
POP3: 995-SSL SMTP: 465-SSL
IMAP
Incoming mail server (IMAP): imap.aol.com
Outgoing mail server (SMTP): smtp.aol.com
IMAP: 993-SSL SMTP: 465-SSL
Put a check mark in the "Remember password"
check box, if you don't want to have to enter your password every time
you open Outlook to check your email.
If you are using
Book Collector to track your book
collection and wish to add a photograph of an author to the information about
the author, you may be able to do so by taking the following steps:
Download the image of the author. If you wish, you can place the image in the
location where book cover images are stored, i.e. the images
directory beneath the Book Collector directory where you store the book
database.
If you are editing an entry for a book by the author, you can right-click on the
icon of three horizontal bars to the left of the author's name while editing
the book entry and select "Edit this author entry." Or from the main Book
Collector window, you can select "Edit" then "Manage Pick Lists" to select
the author picklist where you can select the relevant author—you can
double-click on the author entry then to edit it.
In the Edit Author window, click on the Images tab.
For the "Template Image" field, browse to where you downloaded
the image of the author. Once you have selected the image, click on OK.
Leave the "Image (will be scaled to 16x16)" field blank.
You can then close the entry where you are editing the author's information.
When viewing the entry for a book by the author from the book list in
the home screen for Book Collector, you should then see a small thumbnail
picture of the author.
If you don't have an image, but want to add a picture to the author's
entry, check to see if there is a
Wikipedia entry for the author or if
the author has a website.
You can use similar steps to add an image for a publisher's entry in
the database.
You can verify a website's security certificate from a command line
interface (CLI), such as a shell prompt, by using
OpenSSL, which is
available for Linux, macOS, Microsoft Windows and other operating systems
— for a Windows version, see the instructions at
How to install the most recent version of OpenSSL on Windows 10 in 64 Bit.
To check a certificate, you can issue the command openssl s_client
-connect example.com:443 -showcerts, substituting the
fully
qualified domain name (FQDN) of the site you wish to check for
example.com. The output for example.com is shown below.
$ openssl s_client -connect example.com:443 -showcerts         CONNECTED(00000003)
depth=2 C = US, O = DigiCert Inc, OU = www.digicert.com, CN = DigiCert Global Root CA
verify return:1
depth=1 C = US, O = DigiCert Inc, CN = DigiCert SHA2 Secure Server CA
verify return:1
depth=0 C = US, ST = California, L = Los Angeles, O = Internet Corporation for Assigned Names and Numbers, OU = Technology, CN = www.example.org
verify return:1
---
Certificate chain
 0 s:/C=US/ST=California/L=Los Angeles/O=Internet Corporation for Assigned Names and Numbers/OU=Technology/CN=www.example.org
   i:/C=US/O=DigiCert Inc/CN=DigiCert SHA2 Secure Server CA
-----BEGIN CERTIFICATE-----
MIIHQDCCBiigAwIBAgIQD9B43Ujxor1NDyupa2A4/jANBgkqhkiG9w0BAQsFADBN
<text snipped>
SSL-Session:
    Protocol  : TLSv1.2
    Cipher    : ECDHE-RSA-AES128-GCM-SHA256
    Session-ID: 907C391C745555481A141A04D65B7CD175BD5E052FF39EFD17B30848D535F0D1
    Session-ID-ctx:
    Master-Key: 9DC337D789BB8DB7CCE82BBC3EAD28C4A9E98016C98D35AD9A6B737C0B76AE3118881303F7E7890BEE0567FFC402B5F9
    Key-Arg   : None
    Krb5 Principal: None
    PSK identity: None
    PSK identity hint: None
    TLS session ticket lifetime hint: 7200 (seconds)
    TLS session ticket:
    0000 - b1 7d 3a 56 0e 17 8f 5a-37 b0 4b 03 dd de 8d 98   .}:V...Z7.K.....
    0010 - 59 36 bb 73 43 e2 95 2a-9b 2e de ef 99 5e 92 d8   Y6.sC..*.....^..
    0020 - 3a 16 b6 4d 78 2b c6 a4-58 a5 5b 2e c0 8a 1f a6   :..Mx+..X.[.....
    0030 - e6 35 dd 8d 77 fb 4e 09-82 94 c0 8c 6e f8 56 41   .5..w.N.....n.VA
    0040 - 9a bb 82 a6 b1 30 5d bc-38 24 00 9c a6 a3 10 c5   .....0].8$......
    0050 - 6f cc e8 c8 25 62 6f e0-8f 7d 1a d9 18 6a db 32   o...%bo..}...j.2
    0060 - 48 07 df b0 15 fc 98 a0-5d 27 93 df 20 4c 6c ae   H.......]'.. Ll.
    0070 - cf 95 23 49 d0 c0 57 10-c1 8b 12 fa b0 c4 33 41   ..#I..W.......3A
    0080 - 2f 21 cf df dc 9a 1f 44-68 a3 76 81 0f b8 04 ab   /!.....Dh.v.....
    0090 - 59 e7 c4 29 79 28 f9 45-43 82 b9 a0 5a e5 6d 5a   Y..)y(.EC...Z.mZ

    Start Time: 1592522720
    Timeout   : 300 (sec)
    Verify return code: 0 (ok)
---
closed
$
If you wish to check on whether a particular
cipher is supported, you
can use the command openssl s_client -cipher followed by the
particular cipher for which you wish to connect and then -connect
followed by the FQDN, a colon, and then the HTTPS port, port 443, as shown
below for example.com. If you see the response "handshake failure" as in the
example below, the cipher is not supported.
$ openssl s_client -cipher 'ECDHE-ECDSA-AES256-SHA' -connect example.com:443
CONNECTED(00000003)
140497569793952:error:14077410:SSL routines:SSL23_GET_SERVER_HELLO:sslv3 alert handshake failure:s23_clnt.c:769:
---
no peer certificate available
---
No client certificate CA names sent
---
SSL handshake has read 7 bytes and written 121 bytes
---
New, (NONE), Cipher is (NONE)
Secure Renegotiation IS NOT supported
Compression: NONE
Expansion: NONE
No ALPN negotiated
SSL-Session:
    Protocol  : TLSv1.2
    Cipher    : 0000
    Session-ID:
    Session-ID-ctx:
    Master-Key:
    Key-Arg   : None
    Krb5 Principal: None
    PSK identity: None
    PSK identity hint: None
    Start Time: 1592522976
    Timeout   : 300 (sec)
    Verify return code: 0 (ok)
---
$
If the cipher is supported, you will see "connected" instead, as shown
below.
$ openssl s_client -cipher 'ECDHE-RSA-AES128-GCM-SHA256' -connect example.com:443
CONNECTED(00000003)
depth=2 C = US, O = DigiCert Inc, OU = www.digicert.com, CN = DigiCert Global Root CA
verify return:1
depth=1 C = US, O = DigiCert Inc, CN = DigiCert SHA2 Secure Server CA
verify return:1
depth=0 C = US, ST = California, L = Los Angeles, O = Internet Corporation for Assigned Names and Numbers, OU = Technology, CN = www.example.org
verify return:1
---
Certificate chain
 0 s:/C=US/ST=California/L=Los Angeles/O=Internet Corporation for Assigned Names and Numbers/OU=Technology/CN=www.example.org
   i:/C=US/O=DigiCert Inc/CN=DigiCert SHA2 Secure Server CA
<text snipped>
   Krb5 Principal: None
    PSK identity: None
    PSK identity hint: None
    TLS session ticket lifetime hint: 7200 (seconds)
    TLS session ticket:
    0000 - 27 d3 5d a3 cf ac 34 0b-92 af c6 00 17 0d 15 bc   '.]...4.........
    0010 - 6b be b4 92 dc 1a 01 97-98 9c f4 2b 68 f7 fd 69   k..........+h..i
    0020 - 1c fd 25 16 21 ba aa f9-43 2b 1a 4b 54 d8 48 37   ..%.!...C+.KT.H7
    0030 - 90 f7 2f 3f 76 d1 88 22-cf db 43 77 55 40 d2 41   ../?v.."..CwU@.A
    0040 - c8 3a 8c f5 75 02 9b 88-92 92 38 f3 53 46 e7 48   .:..u.....8.SF.H
    0050 - 9a bf 2d db 78 00 cd 12-2c 30 fc f8 81 20 e9 89   ..-.x...,0... ..
    0060 - c0 8f 3c e3 e6 22 69 af-cb cd b0 ec dd 06 1b c9   ..<.."i.........
    0070 - f3 82 cb ee 85 f1 c8 6a-27 29 5b 42 7e bb 87 60   .......j')[B~..`
    0080 - c3 17 4a ff 54 41 b3 1a-8e 3b e3 30 b6 48 fa 9d   ..J.TA...;.0.H..
    0090 - b3 50 a5 2b 73 8d 59 16-4c fd b4 24 54 48 14 08   .P.+s.Y.L..$TH..

    Start Time: 1592523392
    Timeout   : 300 (sec)
    Verify return code: 0 (ok)
---

closed
$
If you are hosting a website through
HostGator,
you can take the following steps to reset the
cPanel
password for the HostGator account associated with the website:
Click on Manage, which is under Hosting Packages.
Click on Settings.
Click on Reset Password.
You will see the username you should use under Username. You
will also see the
fully qualified domain name (FQDN), e.g.,
serverxxxx.hostgator.com, where "xxxx" is a four-digit number, of the
server you will connect to under Server. Or you can use the IP
address shown, instead. Click on Reset Password.
When prompted for a new password, enter one that is a minimum of 8
characters in length with a mixture of uppercase and lowercase characters
(at least one of each) and which also contains at least one digit and one
special character, such as a dash, exclamation mark, dollar sign, etc. Click
on the Change Password button to reset the password.
My wife received a call today that was a recorded message purportedly about
a suspicous Amazon charge for an
iPhone.
She asked me to pick up the phone, but by the time I got to the phone the
call was disconnected. I used *69 to determine the calling number was
1-616-465-0071, though of course the number may have been spoofed. I
searched online and didn't find anyone else reporting a fraudulent call
from that number purporting to be from Amazon. I checked our Amazon
account just to be certain there was no recent charge for something
neither of us ordered, but I didn't see anything ordered after a recent purchase
of ink for my wife's printer. I tried calling the number using *69 just to see
whether I could get anyone at the other end or any identifying voice
message, but only got the message "I'm sorry we can not connect your
call at this time." Subsequent attempts I made to call the number resulted
in a busy signal. At this point, I'm presuming the call was an attempt
by a scammer to obtain information about our Amazon account or a credit
card number associated with the account.
When watching YouTube video lectures, I often wish to save the dialog
to a text file that I can search. You can obtain a text transcript of
the audio for a YouTube video lecture by clicking on the three dots to
the right of "Share", which will give you the option to "Open transcript."
When you choose that option, you will then see a transcript displayed
to the right of the video. But when you copy that text to a text editor,
you may see the dialog on separate lines from the accompanying
timestamps. You can put each line of dialog on the same line as its
timestamp using the regular expression 1,$ s/\(:\d\d\)\n/\1 /
within the vi or vim text editors.
PubPeer is a website
that allows users of the site to anonymously review scientific research.
If you wish to install a plugin for
Zotero, which is
free and
open-source software that you can use for reference management,
take the following steps:
Within Zotero, click on Tools on the menu bar, then select
Add-ons.
Click on the gear icon on the Add-ons Manager window, and select
"Install Add-on From File."
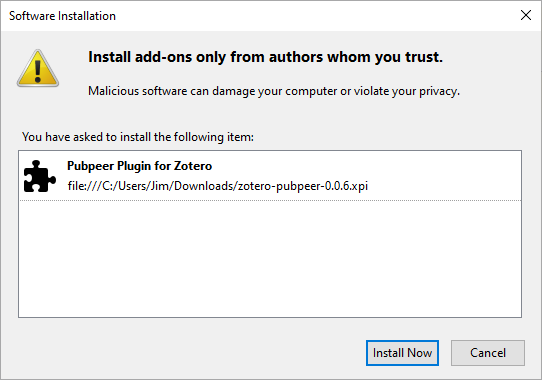
Navigate to the location where you downloaded the .xpi file and click on
it to select it, which will open a Software Installation window
where you can click on the plugin to select it and then choose Install
Now.
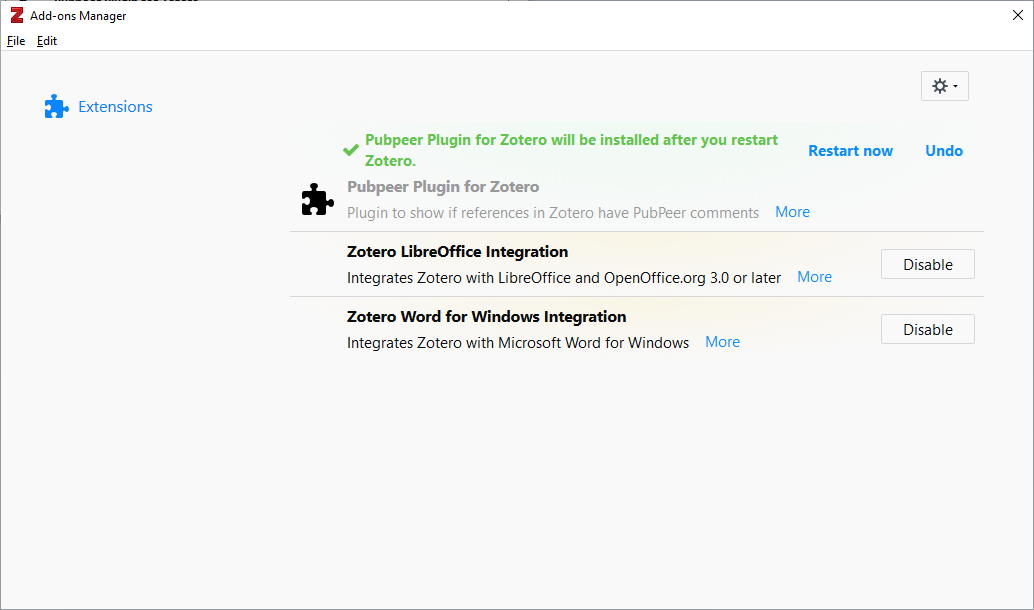
Next, click on "Restart now" to restart Zotero and complete the installation.
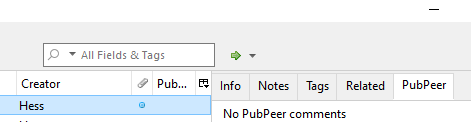
After the add-on is installed, when you select an item you've saved
in Zotero, you will see a "PubPeer" tab next to the usual "Info," "Notes,"
"Tags," and "Replated" tabs.
If you are using Microsoft Word to write a paper adhering to the
Chicago Manual of Style (CMS) guidelines for citations
that appear in the
endnotes section of the paper, references to endnotes should be made
in the paper using Arabic numerals at the end of sentences with
the numbers put in superscript.
Example
Ludwig considered it an honor that his books were among those burned by the Nazis in 1933.1
Endnote
1. Emil Ludwig, Three Portraits: Hitler, Mussolini, Stalin (New York:
Alliance Book Corporation: 1940), 49.
You can configure Microsoft Word for CMS style citations by clicking on the
References tab and then selecting a Chicago option for the
Style option. Microsoft Word 2010 lists "Chicago Fifteenth Edition"
as the CMS option.
If you are concerned about malicious
JavaScript
being hidden inside a PDF file, you can upload the file to Google's
VirusTotal site which will scan
the file with many antimalware programs. The scan results will show if
any of the dozens of antivirus programs the site uses in its scans have
detected malware in the file. However, for additional security, you may
want to know if the file contains code that will automatically be executed
when you open the file in a PDF viewer or if it contains embedded JavaScript.
The VirusTotal site will provide that information. For PDF files, you will
see "pdf" displayed in a gray oval underneath the file that was scanned. If
there is code within the PDF file that will automatically be executed when
you open the file, next to that oval will be another one with "autoaction"
in it. Embedded JavaScript is denoted by an oval with "js-embedded" within
it. Just because you see "autoaction" or "js-embedded" doesn't mean the
JavaScript is malicious, but if you want to ensure any malicious JavaScript
isn't executed, if you are using the
Foxit Reader
program to view PDF files, you can disable its execution of JavaScript.
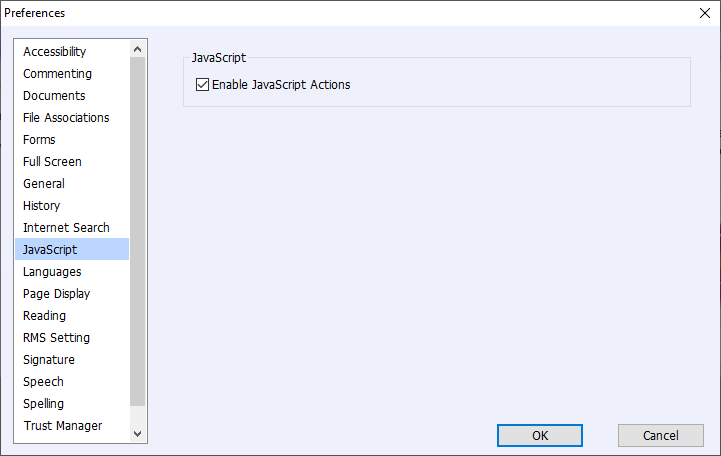
To disable the execution of JavaScript in Foxit Reader Version 5.3.1.0606,
take the following steps:
From the menu at the top of the Foxit Reader window,
click on Tools and select Preferences.
Click on JavaScript on the left side of the Preferences
window that will open and then uncheck the check box for "Enable JavaScript
Actions."
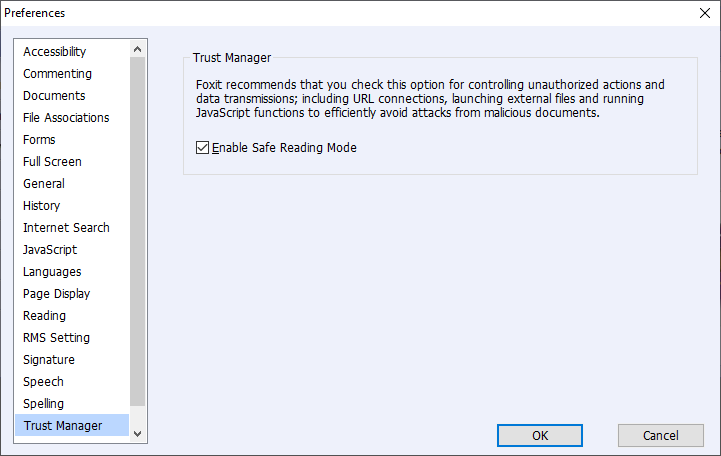
Also click on Trust Manager from the Prferences menu
and make sure that the "Enable Safe Reading Mode" check box is checked.
In the description of that setting, you will see "Foxit recommends that you
check this option for controlling unauthorized actions and data transmissions;
including URL connections, launching external files and running JavaScript
functions to efficiently avoid attacks from malicious documents."
I use SparkPost to distribute
a newsletter by email for an organization I support. A member of the
organization reported to me that she has not been receiving email copies
of the organization's newsletter, so I logged into the SparkPost account
after this month's newsletter was sent and clicked on Events
on the Dashboard, selected "Last 7 Days" in the Events Search
date range selection field and then put the member's email address in the
"Filter by recipient email address" field and hit Enter. I saw
an "Injection" and a "Bounce" event whereas I would see an "Injection" and
a "Delivery" event for email successfully sent to a recipient. When I clicked
on the View Details button, I found that the email sent to
the member bounced with SparkPost listing the reason as "554 5.7.1 [internal]
recipient address was suppressed due to customer policy." At the SparkPost
page on the problem,
554 5.7.1 — Recipient address was suppressed due to customer policy,
I saw the possible reasons for that bounce message appear listed as those
below:
The address was invalid (address does not exist)
The user clicked the list-unsubscribe header
The user clicked one of your emails and flagged it as
SPAM. This FBL (FeedBack Loop) event should add that email address to your
Suppression List.
I couldn't type anything in the
Microsoft Edge
address bar where URLs are entered nor could I type in the "Find on page"
field in Edge on a Microsoft Windows 10 system. But in tabs opened to
pages where I might type some input, such as a tab in which I was viewing
a Wikipedia article, I cold type and see what I had typed appear. E.g.,
in the Wikipedia tab, I could search for other Wikipedia articles. And in
the outlook.com tab that was also open, I could compose email messages. I
could also type input into the Microsoft Windows "Type here to search"
field at the bottom of the screen. When I searched online for a
possible resolution to the problem, I found a couple of pages where
people linked it to McAfee antivirus software on the system, but that
isn't installed on the system. I also saw a couple of pages where people
stated that running the built-in Windows
ctfmon.exe program might resolve the problem. I opened a command prompt
and issued the tasklist
command to see if it was already running. It was and when I ran it again
anyway, there was no change to the problem.
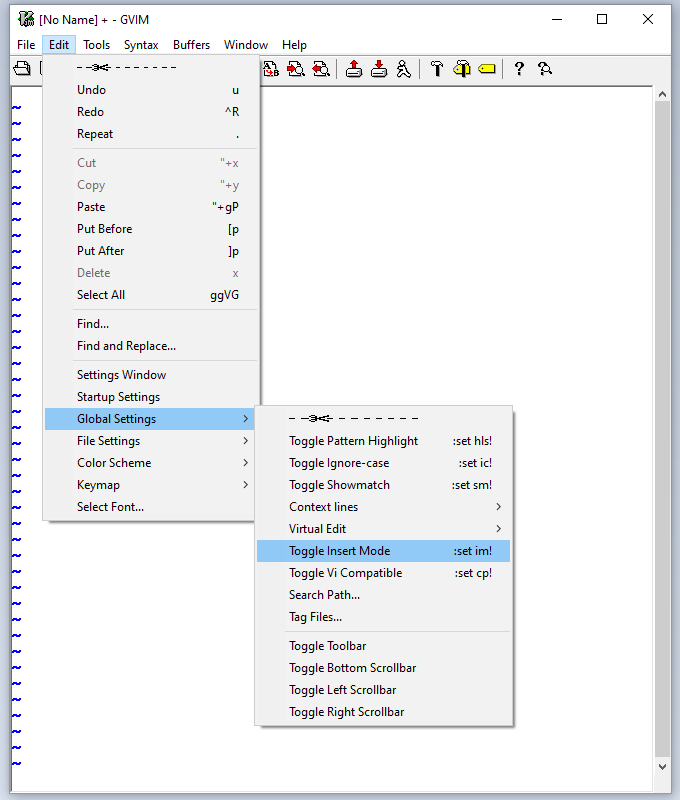
While editing a file with the
gVim
text editor on a Microsoft Windows 10 system, I found I was stuck in insert
mode. Hitting the Esc key would no longer take me out of insert
mode and when I closed and reopened the editor I would be put in insert
mode as soon as the editor opened. I switched to another user account on
the system and opened gVim from that account. I could use the escape key
on that account to exit insert mode, which proved that there wasn't a problem
with the escape key on the keyboard. I was able to resolve the problem
by clicking on Edit, selecting Global Settings, and
then Toogle Insert Mode.
After I selected Toogle Insert Mode, the editor was taken out
of insert mode and I was then able to enter editor commands. I could re-enter
insert mode by hitting the i key as usual. Though I could now
move in and out of insert mode with the Esc and i keys
as usual, when I closed and reopened gVim, I found it was not exiting
insert mode when I hit the Esc key, so I had to select the
Toggle Insert Mode option again from the menu. I'll have to
check the gVim Startup Settings later to see why it is not responding
to the Esc key on the one account, though there may be an issue
outside of gVim as I found that I can no longer type
URLs in
the address field of
Microsoft Edge tabs, though I could type in the search field of an
already open Wikipedia
tab in the browser.
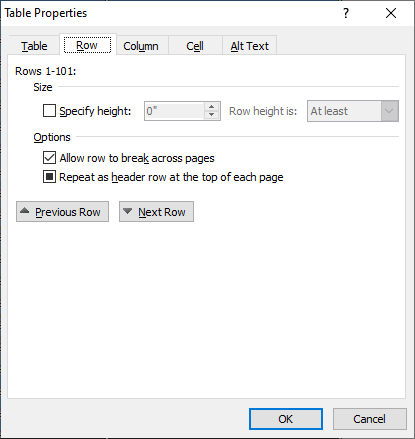
If you wish to determine the number of rows present in a table in
Microsoft
Word 2010 on a Microsoft Windows system, highlight all of the rows in the
table by putting the mouse pointer in the top or bottom row and
then dragging it downwards or upwards until all of the rows are
highlighted. Then right-click and select Table Properties.
Under the Row tab you should see the number of rows listed.
If you don't see the row count, click on the Table or
Column tab and then go back to the Row
information by selecting the Row tab again. You should then
see the row count displayed.
An HP laptop running the Microsoft Windows 10 operating system that I was using
was performing poorly and when I checked the system's performance with the Windows
Task Manager, I could see that the memory utilization
was consistently high. So I decided to check on whether I could increase
the memory in the system. A sticker on the underside of the laptop showed
the model number to be G70-460US. I wondered whether I could also
get the model number from a
Windows Management Instrumentation Command-line (WMIC)
command if the sticker was no longer present or was illegible, so I opened a
command prompt window and checked to
see what information I could get using the wmic csproduct get
command.
I recently removed
Trojan:Win32/Nymaim, which was detected by
Windows Defender on a Microsoft Windows 10 system. When Windows Defender
detected that malware, it prevented the weekly backup program on the system,
which was the Windows 7 backup and restore utility, from completing
successfully. After removing that malware, I ran the backup program again, but
I found that again the backup program did not complete successfully due to
Windows detecting a
trojan during the backup operation. This time it was
TrojanClicker:JS/Chroject.A.
When I checked a Windows 10 system to ensure that the Windows 7 backup program
that is scheduled to perform weekly backups of the system was functioning
properly, I found that the last successful backup occurred on November 11, 2018.
When I clicked on "More information" to determine the cause of the weekly
backups failing, I saw the message "Operation did not complete successfully
because the file contains a virus or potentially unwanted software." So I
opened the Windows Security application by clicking on the Windows Start button,
then selecting Settings, then Update & Security, then
Windows Security. I then clicked on Virus & threat protection
and selected Protection history, which showed an entry of "Remediation
incomplete" for the backup that ran on February 16, 2020. The issue encountered
was listed as "servere." I clicked on the downward-pointing arrowhead next
to "severe" which showed the following for the malware detected:
Threat detected:
Trojan:Win32/Nymaim
Alert level:
Severe
Date:
2/16/2020 10:46 PM
Category:
Trojan
Details:
This program is dangerous and executes commands from
an attacker.
Microsoft Windows 10 comes with a backup program that will allow you to create
a system image for backups. You can get to it by right-clicking on the Windows
Start button and choosing "Settings" then "Backup," which is under "Update &
Security," and then selecting "Go to Backup and Restore (Windows 7)." That
program was being used to backup a Windows 10 system every weekend, but when I
checked the status of backups for the system, I saw a message stating "The last
backup did not complete successfully."
I clicked on the "More information" button and saw a "Check your backup"
message stating that the "Operation did not complete successfully because the
file contains a virus or potentially unwanted software."
When I clicked on "Show Details," I saw the time of the failed backup
and "Error code: 0x800700E1."
When I ran a scan of a Windows System with
Spybot Search & Destroy 1.62, it reported it found a
Windows
registry key associated with GhostMail - it identified
GhostMail as adware. To check the registry key, I typed regedit in
the "Type here to search" field at the bottom of the screen and then selected
the "Registry Editor" app when it appeared in the list of returned results
(you can also open the application by typing regedit and hitting
enter at a command prompt. I then
navigated to the relevant key. I wanted to determine when the registry was
created or at least when it was last modified. You can't see that information
in the Windows
Registry Editor, but you can create a text file that will
contain that information by right-clicking on a key and choosing "Export" to
generate a text file - select "Text Files (*.txt)" in the "Save as type" field,
not the default value of "Registration Files (*.reg)."
The
text file will contain the key as well as
the time it was last written to:
In this case, the date on the key was months ago, so didn't explain recent
problems on the user's PC and since Spybot - Search & Destroy didn't
locate anything else, the registry key may have been a remnant of something
removed many months ago.
I downloaded SUPERAntiSpyware
Free Edition version version 8.0.1048, an antivirus program,
from the developers website on January 27, 2020. When I attempted to install it
by right-clicking on the file and choosing "Run as administrator, a
Windows Defender
window popped up with the message below:
Windows protected your PC
Windows Defender SmartScreen prevented an
unrecognized app from
starting. Running this app might put your PC at risk. More info
When I clicked on the "X" at the top-right, hand corner of the window,
the message went away, but the installation did not start.
A user reported her Windows 10 system was running slowly. When I connected to
the system remotely to check it after the user had left for the day and closed
all the applications she had running, I found that the memory utilization was
78%. I knew the system was a Dell PC, but I didn't remember the model number.
I was able to determine it was an Inspiron 570 by right-clicking on the Windows
Start button and choosing System. Under "Device specifications," I
saw "Inspiron 570". I also saw that the system had only 3 GB of memory
installed.
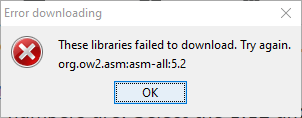
When I tried to install Minecraft on a Microsoft Windows system using the
Windows
Installer file I had downloaded, I saw the error message "These libraries
failed to download. Try again. org.ow2.asm:asm-all:5.2."
I then clicked on the link for "Installer" rather than "Windows Installer on the
website from which I had downloaded the installation file, which resulted in a
.jar file being downloaded. I right-clicked on the .jar file,
forge-1.12.2-14.23.5.2768-installer.jar, and chose "Open with" then "Java(TM)
Platform SE binary". I was then able to install the Minecraft client. When the
client was successfully installed, I saw the message "Successfully installed
client profile forger for version forge 1.12.2-14.23.5.2768 into launcher and
grabbed 1 required libraries."
Note: These are notes from an October 12, 2019 installation that I hadn't
posted, but I am posting now in case I encounter a similar error again.


