←December→
| Sun |
Mon |
Tue |
Wed |
Thu |
Fri |
Sat |
| |
|
|
|
|
|
1 |
| 2 |
3 |
4 |
5 |
6 |
7 |
8 |
| 9 |
10 |
11 |
12 |
13 |
14 |
15 |
| 16 |
17 |
18 |
19 |
20 |
21 |
22 |
| 23 |
24 |
25 |
26 |
27 |
28 |
29 |
| 30 |
31 |
|
|
|
|
|
|
|
Wed, Dec 26, 2012 4:37 pm
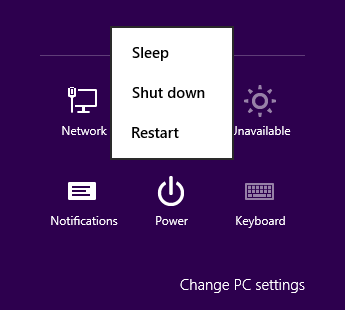
How to Shutdown and Restart Windows 8 Systems
With prior versions of Windows, you could easily find shutdown and
restart options from the Windows
Start window. Not so with
Windows 8. To shutdown and restart Windows 8 systems, you can hit the
Windows and "C" keys simultaneously to bring up a menu of options
that can lead you to a selection to put the system to sleep, shut it down,
or restart it, however. The
Windows key is the one with the Windows
logo (4 window panes separated by a vertical and horizontal line)
to the left of the
Alt key. When you hit those keys,
you should see a menu appear on the right side of your screen with
Search,
Share,
Start,
Devices,
and
Settings options. Click on the
Settings icon and
then select
Power. You can then select from
Sleep,
Shutdown, or
Restart.
References:
-
How To Restart, Log Off, Sleep And Shutdown Windows 8
By: Usman Javaid
Date: September 16, 2011
addictivetips
[/os/windows/win8]
permanent link
Thu, Dec 13, 2012 10:04 pm
Changing the Office 2010 Product Key
If you need to change the Microsoft 2010 product key, e.g., to resolve an
activation issue, after you have installed it, you can take the following
steps to do so on a Windows 7 system:
- Click on the Windows Start button.
- Select Control Panel.
- Click on Programs.
- Click on Programs and Features.
- Right-click on Microsoft Office Professional 2010, or whatever
the appropriate entry is for the version of Office installed on the system,
and select Change.
- Select Enter a Product Key.
- Click on the Continue button.
- Enter the new product key.
- Click on the Continue button with "Attempt to automatically
activate my product online" checked.
- Click on the Continue button.
- When the configuration process is completed, click on the Close
button.
Reference:
-
How to Change Product Key of Microsoft Office 2013, Office 2010 and Visio 2010?
By Mezanul
My Technology Guide: Windows, Mac,
Linux, Internet, Software, Review
[/os/windows/office]
permanent link
Wed, Dec 12, 2012 10:24 pm
Configure Presets for Scanning With Adobe Acrobat X
If you have a scanner attached to your system,
Acrobat X Standard
provides the capability to scan documents directly
into PDF files. To do so, take the following steps:
- Open Adobe Acrobat.
- Click on File.
- Select Create.
- Select PDF from Scanner.
- You can then choose whether you want to scan in
color or black and white or have the software "Autodetect Color Mode".
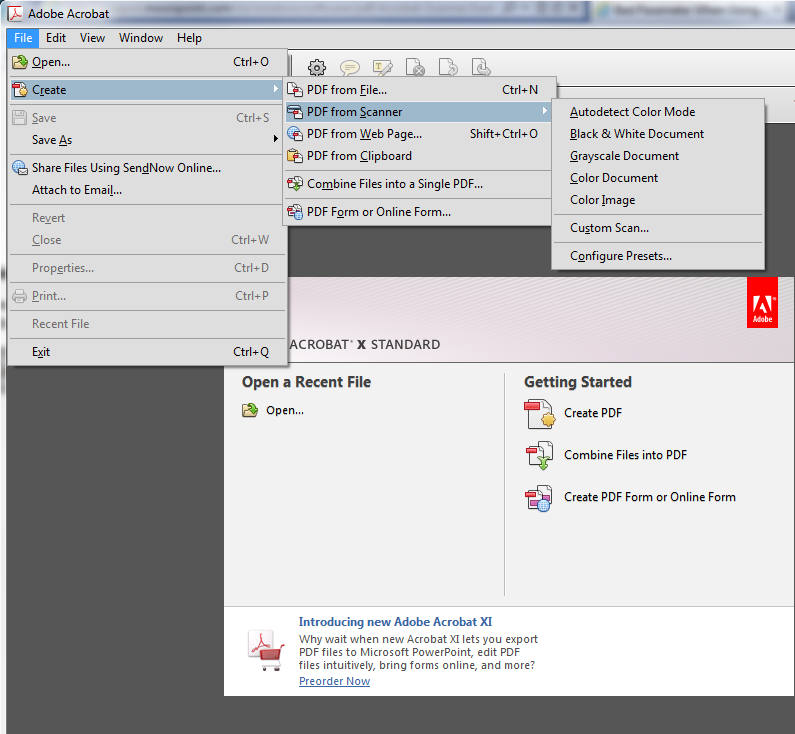
Acrobat has some preset configurations from which you can choose. The choices
available to you are as follows:
- Autodetect Color Mode
- Black & White Document
- Grayscale Document
- Color Document
- Color Image
If you wish to adjust the settings for any of those preset scan configuration
optsions for certain scans you perform regularly, follow the above steps, but
instead of picking the color mode at the last step above, choose
Configure Presets.
That will open a Configure Presets window where you can
adjust settings for a particular color mode choice. You can change the
resolution, the quality of scanned images (higher quality equates to
larger file size), whether you are prompted for scanning more pages into
one PDF document, etc. E.g., if you wanted to have 300 DPI, the highest
available image quality, have Acrobat prompt you for scanning
more pages, but not run Optical Character Recognition (OCR), you would select
settings as shown below:

When you have adjusted the settings appropriately, click on
Save and then Close.
Reference:
-
Scan a paper document to PDF
Date: February 3, 2012
[/os/windows/software/pdf/acrobat]
permanent link
Wed, Dec 12, 2012 10:15 pm
Dealing with the bad parameter message when attempting to scan with Acrobat
When I attempted to use
Acrobat X Standard to scan a document
from an HP LaserJet 3052 scanner, I received a "bad parameter" error message.
I've posted the steps
here
for dealing with the issue.
I needed to use the Adobe Acrobat X software for scanning rather than the
Windows® Fax and Scan utility that came with Microsoft Windows 7 because
that software doesn't provide the capability to scan multiple pages into
one file nor even provide the capability to save the scanned image to
a PDF file. It also doesn't allow one to create presets where you select
a preset configuration, e.g., color and 200 dpi, for certain documents you
may scan regularly, whereas Adobe Acrobat X does provide that capability.
I was able to scan documents using Adobe Acrobat X and the HP LaserJet
3052 printer/scanner/copier, however, unlike with the Windows® Fax
and Scan utility, they always looked garbled when scanned on the Windows
7 system.
[/os/windows/software/pdf/acrobat]
permanent link
Mon, Dec 10, 2012 9:27 pm
Steps for Transferring Outlook Signatures from an XP to Windows 7 System
To transfer Microsoft Outlook 2010 signatures from a Microsoft Windows XP
system to a Microsoft Windows 7 system take the following steps:
- On the source system, i.e., the Windows XP system,
open the Windows Explorer and navigate to
\Documents and Settings\username\Application Data\Microsoft\Signatures
Note: You may have to turn on the display of hidden files and folders to
view the folder; steps to do so on a Windows XP system are detailed
here.
-
Copy the contents of the
Signatures folder to
\Users\username\AppData\Roaming\Microsoft\Signatures on the
Windows 7 system.
Note: In both cases username should be the relevant account name
on the two systems. Instructions for displaying hidden files and folders
on a Windows 7 system can be found
here.
If you need to copy Outlook stationery from one system to another,
simply navigate to the Stationery folder instead of the
Signatures folder.
[/os/windows/office/outlook]
permanent link
Sat, Dec 08, 2012 11:30 pm
Acronis Bootable Media Image Backup
I was unable to backup a new HP PC with
RAID drives using a couple of
other backup programs I often use, but was able to do so using Acronis
Backup & Recovery 11.5.
[
More ]
[/os/windows/utilities/backup/acronis]
permanent link
Tue, Nov 27, 2012 9:41 pm
Exporting Contacts from iCal
You can take the following steps to export a contact list from iCal 1.5.5
(v670) on a Mac OS X system.
- Click on Window.
- Click on Address Book.
- Under Group, click on All to
select it.
- Click on File.
- Select Export Group vCard.
- By default, the file name for the exported
list wil be
All, which will be placed in the
Documents directory for the account under which you are logged
in.. You can change the name and folder,, if you wish. Click on the Save
button.
[/os/os-x]
permanent link
Tue, Nov 20, 2012 10:12 pm
Changing the Navigation Pane Font Size in Outlook 2010
The mail, calendar contacts, and task folders appear on the left side of the
Outlook 2010 window. If you want to change the font used for those folders,
e.g. to make it larger, you can follow
these steps.
[/os/windows/office/outlook]
permanent link
Mon, Nov 12, 2012 5:43 pm
Changing the Default Font Size for Outlook 2010
If you wish to change the default font used by Outlook 2010 when you are
composing email or replying to or forwarding email that others have sent
you, e.g., you wish to increase the font size, you can follow the steps
here.
[/os/windows/office/outlook]
permanent link
Thu, Nov 08, 2012 9:41 pm
Verifying a Windows 2003 SBS System is Functioning as a VPN Server
To ensure a Microsoft Windows Small Business Server (SBS) 2003 system
is functioning as a
VPN
server, take the following steps:
- Click on Start.
- Choose All Programs.
- Choose Administrative Tools.
- Choose Routing and Remote Access.
- Right-click on the server name and choose
Properties.
- Under the General tab, ensure check "Remote
access server" is checked.
- Click on OK.
- You can then close the Routing and Remote Access
window.
You can also verify that the systems is functioning as a VPN server by
obtaining a command prompt and issuing the command netstat -a | find
"pptp". You should see a "LISTENING" line displayed indicating the
system is listening on the
Point-to-Point Tunneling Protocol (PPTP) connection.
C:\>netstat -a | find "pptp"
  TCP    ANDY:pptp              ANDY.example.lan:0    LISTENING
TCP
port 1723 is used for PPTP, which you can see if you use netstat -an
instead of netstat -a, so that numbers are displayed
rather than text descriptions for ports. If a VPN connection is active
at the time you issue the command, you will see the remote IP address
displayed.
C:\>netstat -an | find "1723"
  TCP    0.0.0.0:1723           0.0.0.0:0              LISTENING
  TCP    192.168.0.8:1723       74.125.228.67:49359    ESTABLISHED
  UDP    0.0.0.0:21723          *:*
If you wish to monitor VPN connections on the SBS 2003 sever, see
Checking User
VPN Connections on SBS 2003.
[/os/windows/server2003]
permanent link
Thu, Oct 18, 2012 7:34 pm
X-Fonter Upgrade from 6.4 to 7.5.2
I set up a new computer for my wife. She was using X-Fonter 6.4 on the old
system to manage fonts and wanted the program on the new system, also. I
downloaded the latest version of the software,
which is produced by
Blacksun
Software from
X-Fonter.
Since she had added a lot of fonts on the old system, I copied the
contents of the fonts folder, C\Windows\Fonts, on the old
system to the same location on the new system. I chose not to overwrite any
existing font files of the same name on the new system. After adding all of her
fonts to the new system, I installed the X-Fonter software on the new system.
I also needed to copy the font collections she created in X-Fonter to the new
system. X-Fonter uses .xfl files to store information about a "collection",
i.e., a grouping of fonts that the user creates to help manage fonts.
E.g., my wife created a collection she titled "Christmas And Winter" for
fonts she finds fitting for documents and webpages related to Christmas or
winter themes. X-Fonter created a Christmas And Winter.xfl file
that lists all of the fonts associated with that collection. E.g., see
Copying X-Fonter Settings. A font can be in more than one
collection.
On the old system running Windows 7 with X-Fonter 6.4, the font collections
were stored in C:\Program Files\X-Fonter\Collections. On the new
system, also running Windows 7, X-Fonter was installed in
C:\Program Files (x86)\X-Fonter. There was no
Collections directory beneath it, so I simply copied the
Collections folder from the old system to that location on the
new system. After deciding to make some changes to the collections on the new
system, my wife inadvertently deleted a collection. When I looked in the
C:\Program Files (x86)\X-Fonter\Collections folder on the new
system I found that none of the .xfl collections files were there, even though
she could still see the other collections in X-Fonter. Checking for .xfl
files on the system, I found that the new version had moved them to
C:\ProgramData\X-Fonter\Collections. The files were also
appearing in C:\Users\All Users\X-Fonter\Collections, but
C:\Users\All Users is just a shortcut that points to the
C:\ProgramData directory. So I had her close X-Fonter on the
new system and copied the .xfl file for the
collection she inadvertently deleted from the old system to the
C:\ProgramData\X-Fonter\Collections folder and she was then able
to reopen X-Fonter and see that collection along with the others.
Reference:
-
Copying X-Fonter Settings
Date: June 27, 2009
MoonPoint Support
[/os/windows/software/fonts]
permanent link
Sun, Oct 14, 2012 5:50 pm
Copying Themes from One Windows 7 System to Another
If you wish to copy themes from one Windows 7 system to another, copy the
contents of
\Users\Username\AppData\Local\Microsoft\Windows\Themes,
where
Username is the account name for the account from which
you wish to copy the themes. If the new system doesn't have a
Themes
directory under the
\Users\Username\AppData\Local\Microsoft\Windows\ directory, because no themes have been added, just copy the
Themes
directory itself from the source system to the destination system.
Afterwards, on the destination system, you can right-click on an empty area of
the desktop, select
Personalize, then select the theme you wish to use.
Note: you may need to turn on the display of hidden files and folders to
locate the directory as described
here.
[/os/windows/software/themes]
permanent link
Wed, Sep 26, 2012 9:08 pm
Annoying "Card Member Services" call from 407-476-5700
My wife has been getting annoying "Card Member Services" calls on
almost a daily basis. Today I hit *69 to get the number from which
the call was being placed. The number was 407-476-5700. I hit 1 on
the phone's keypad to speak with someone who claimed, when I asked him
what company he worked for that he worked for the dubiously named "Card
Member Services" company. I informed him that I was on the government
Do Not Call list and that he
shouldn't be calling. He hung up and I reported the calling number at the
National Do Not Call Registry
website, since our home phone number has been on that list for years.
I also called the calling number where one of the options was to enter
my phone number after the beep to have the company take our number off
their list. There was no beep, but I entered the number anyway.
I found many others reporting such calls from 407-476-5700 over the last few months at
800notes Directory of Unknown Callers 407-476-5700. I found postings there from others on the government "Do Not Call" list and postings from people stating that requesting the company remove their number didn't put an end to such calls.
[/phone]
permanent link
Tue, Sep 11, 2012 5:17 pm
Bad Route to Host
After switching from a wireless connection to a wired connection on a MacBook
Pro laptop running Mac OS X 10.6.8, I was no
longer able to access a website I needed to access to establish a
VPN connection to a remote
network.I had a VPN connection established before switching from the
wireless to the wired network. When I plugged the network cable into
the laptop for a wired connection I also changed the network settings
under
System Preferences on the system by selecting "Turn
AirPort Off" to ensure the wireless connection would not be
used. Afterwards, when I tried pinging the destination system using the
wired connection, I saw the following:
$ ping vpn.example.com
PING vpn.example.com (10.0.56.76): 56 data bytes
ping: sendto: Network is down
ping: sendto: Network is down
Request timeout for icmp_seq 0
ping: sendto: Network is down
Request timeout for icmp_seq 1
ping: sendto: Network is down
Request timeout for icmp_seq 2
ping: sendto: Network is down
Request timeout for icmp_seq 3
cping: sendto: Network is down
Request timeout for icmp_seq 4
ping: sendto: Network is down
Request timeout for icmp_seq 5
ping: sendto: Network is down
Request timeout for icmp_seq 6
cping: sendto: Network is down
Request timeout for icmp_seq 7
ping: sendto: Network is down
Request timeout for icmp_seq 8
ping: sendto: Network is down
Request timeout for icmp_seq 9
^C
--- vpn.example.com ping statistics ---
11 packets transmitted, 0 packets received, 100.0% packet loss
To determine why I was getting the "Network is down" message, I checked
the route for the IP address associated with the destination system.
$ route get 10.0.56.76
   route to: vpn.example.com
destination: vpn.example.com
    gateway: 192.168.1.1
  interface: en1
      flags: <UP,GATEWAY,HOST,DONE,STATIC>
 recvpipe  sendpipe  ssthresh  rtt,msec    rttvar  hopcount      mtu     expire
       0         0      3411        67        67         0      1500         0
I noticed the gateway, i.e., router address, was pointing to the wireless
router's IP address, 192.168.1.1, rather than the IP address for router for
the wired connection, 192.168.0.1. But when I checked the default route,
I saw it was correct.
$ route get default
   route to: default
destination: default
       mask: default
    gateway: 192.168.0.1
  interface: en0
      flags: <UP,GATEWAY,DONE,STATIC,PRCLONING>
 recvpipe  sendpipe  ssthresh  rtt,msec    rttvar  hopcount      mtu     expire
       0         0         0         0         0         0      1500         0
I flushed the routing table. Note: you must put the sudo
command before the route flush command, if you are not logged
in as root, but the account you are using is allowed to administer the
computer, and then supply your password in order to execute the
route flush command as you must be root to alter the
routing table.
$ route flush
route: must be root to alter routing table
$ sudo route flush
default              192.168.2.1          done
route: write to routing socket: No such process
got only -1 for rlen
After then disconnecting the network cable from the laptop and then
reconnecting it, I then saw the correct route for the webserver through the
wired router, which had IP address 192.168.0.1, and was able to ping it.
$ route get 10.0.56.76
   route to: vpn.example.com
destination: default
       mask: default
    gateway: 192.168.0.1
  interface: en0
      flags: <UP,GATEWAY,DONE,STATIC,PRCLONING>
 recvpipe  sendpipe  ssthresh  rtt,msec    rttvar  hopcount      mtu     expire
       0         0         0         0         0         0      1500         0
$ ping 10.0.56.76
PING 10.0.56.76 (10.0.56.76): 56 data bytes
64 bytes from 10.0.56.76: icmp_seq=0 ttl=57 time=19.955 ms
64 bytes from 10.0.56.76: icmp_seq=1 ttl=57 time=21.017 ms
^C
--- 10.0.56.76 ping statistics ---
2 packets transmitted, 2 packets received, 0.0% packet loss
round-trip min/avg/max/stddev = 19.955/20.486/21.017/0.531 ms
I was then also able to access the website using Safari.
I had not been able to do so when I previously had tried just disconnecting
and reconnecting the network cable without flushing the routing table.
[/os/os-x]
permanent link
Sat, Sep 08, 2012 8:21 pm
Passwords Plus CS Registry Entries
I set up a new system for someone who had been using the
Dataviz
Passwords Plus
program to manage passwords. She had been using the 1.006 version of the
software on the prior system. I installed the latest version which was
Passwords Plus CS version 2.001. The software is free for Windows systems,
but the cost is $9.99 USD for the version that runs on iPhones. Passwords
can be synchronnized between Microsoft Windows PCs and iPhones using the
new version. I had to make a few changes to the Windows registry in order
for the program on the new system to access shared password database
files on another system.
[
More Info ]
[/os/windows/software/security/password/PasswordsPlusCS]
permanent link
Sat, Aug 11, 2012 5:18 pm
avast! IE 9 Stopped Working
On a Windows 7 system
that came with
avast! Free Antivirus
preinstalled, whenever I was browsing the web with Internet Explorer 9,
I would periodically see "Internet Explorer has stopped working" messages.
When I clicked on the "View problem details" link in the window that
appeared, I found the problem associated with the avast! antivirus program's
asWebRepIE.dll Dynamic Link Library (DLL) module.
[ More Info ]
[/security/antivirus/avast]
permanent link
Sat, Jul 28, 2012 10:26 pm
Printing Boolean Values as Yes or No
If you have a PHP variable that is storing
Boolean data,
i.e.
0 for "false" or "no" and
1 for "true" or
"yes", but want to display the value as "no" when a zero is stored in the
variable and "yes" when a one is stored in the variable, you can print
the value using the ternary operator,
?, which is
described in the
Ternary Operator section of the manual page
Comparison Operators.
E.g., suppose I have an array named swinfo that has
information on various software packages that has an
array variable Free that has a 0 stored in it
if the software is not free and a 1 stored in it if the
software is free. If I have a software package that isn't free, if I just
print the contents of the variable as in the first instance below, I get a
zero, but by using ther ternary operator, i.e., the ?, I can
specify that I want "yes" or "no" displayed, instead as for the
second instance where it is displayed below.
      echo "<table>\n" .

      "<tr>\n" .
       "<td><b>Free:</b></td><td>" .
        $swinfo['Free'] . "</td>" .
       "</tr>\n" .

       "<tr>\n" .
       "<td><b>Free:</b></td><td>" .
        ($swinfo['Free'] ? 'yes' : 'no') . "</td>" .
       "</tr>\n" .

       "</table>\n";
For an instance where the software isn't free, I would see the following
displayed:
References:
-
Echo boolean field as yes/no or other values
Stack Overflow
-
Comparison Operators
PHP: Hypertext Preprocessor
[/languages/php]
permanent link
Sat, Jul 28, 2012 9:12 pm
Printing an array with print_r
The contents of an array can be printed in PHP using
print_r.
E.g., suppose that the information to be displayed is stored in a database
in a table called
tests that has student test scores with
each student identified by a student id. The following PHP code could be
used to fetch the test information for a student whose id is stored in the
variable
$num and then print the entire array named
testinfo.
  $result1 = mysql_query("SELECT * FROM tests WHERE ID = $num");

  $testinfo = mysql_fetch_array($result1);

  print_r ($testinfo);
References:
-
Print_r () PHP Function
By Angela
Bradley
About.com PHP/MySQL
[/languages/php]
permanent link
Sat, Jul 14, 2012 5:17 pm
Attachment and Avatar Settings for SMF 2.0
To modify the attachment and avatar settings of an
Simple Machines Forum (SMF) 2.0
forum click on
Admin, then select
Forum,
then
Attachments and Avatars, and then either
Avatar Settings
or
Attachment Settings.
For the avatar settings, there is an Avatars directory setting
and an Avatars URL setting. If the directory specified for
Avatars directory doesn't exist, then "Avatars directory" is
displayed as red text.
For the attachment settings, you specify an Attachments directory.
If you specify a directory that doesn't exist, the words "Attachments
directory" will be displayed as red text.
If you change any of the settings, click on the
Save button at the bottom of the page to save the new settings.
[/network/web/forums/smf]
permanent link
Sat, Jul 14, 2012 1:11 pm
Deleting a Theme for a SMF 2.0 Forum
To delete a theme for a
Simle Machines
Forum (SMF) 2.0 forum, take the following steps from an account with
administrator privileges:
- Click on Admin then select
Features and Options.
- Click on Configuration then
select Themes and Layout then Theme Settings.
- To the right of each theme listed is an icon
of a piece of paper with a folded corner with a red "X" over it. Click
on that icon to delete the theme.
- You will also need to delete the relevant subdirectory
beneath the SMF Themes directory on the web server where the forum
resides. E.g., for the
Blue
Moonlight theme the directory would be Themes/Blue_Moonlight_SMF2.
[/network/web/forums/smf]
permanent link
Mon, Jul 09, 2012 10:16 pm
SMF 2.0 Forum Smileys Location
After I moved a
Simple Machines Forum
(SMF) forum from one domain name to another, I found the smileys, aka
emoticons, were no longer accessible. The steps for pointing the SMF software
to look in a different directory for the smileys is listed below.
- Click on Admin.
- Click on Smileys and Message Icons.
- Click on Settings.
- Change the values for "Base URL to all smiley
sets" and "Absolute path to all smiley sets". Note: If you see "Absolute path
to all smiley sets" as red text, then there is a problem with the path
you specified.
[/network/web/forums/smf]
permanent link
Sun, Jul 08, 2012 9:14 pm
Comparing Two Directories with Diff
If you need to compare two directories to determine which files are in one
directory, but not another, on a Unix, Linux, or Mac OS X system,
you can use the
diff command. E.g., suppose the directories
are named dir1 and dir2; they can be compared with
diff dir1 dir2
$ diff dir1 dir2
Only in dir2: index.html
Common subdirectories dir1/temp and dir2/temp
Only in dir2: a.png
Only in dir2: b.png
Only in dir1: 123.png
Only in dir1: 456.png
If you wish to see only the differences and not common directories and
subdirectories, you can use diff dir1 dir2 | grep "Only".
To perform the comparision recursively through the various subdirectories
within the two directories use diff --recursive dir1 dir2.
Reference:
-
Find files in one directory not in another
Server Fault
[/os/unix/commands]
permanent link
Sat, Jul 07, 2012 9:21 pm
Google Member Map 2.6 SMF Mod Installation
I moved a
Simple Machines Forum
(SMF) forum from one domain to another, which required updating
the
Google Member Map mod. Google no longer requires a key for using the
map service provided by Google and the latest version of the mod doesn't
even provide a means to specify a key.
[More Info]
[/network/web/forums/smf]
permanent link
Mon, May 28, 2012 9:02 pm
Perl Sleep Function
Perl has a function
sleep that will cause a Perl script to
wait, i.e., "sleep" a specified number of seconds before going on to the
next step in a script.
Syntax
sleep EXPR
Definition and Usage
Causes the script to sleep for EXPR seconds, or forever if no
EXPR. May be interrupted if the process receives a signal such
as "SIGALRM". Returns the number of seconds actually slept.
You probably cannot mix "alarm" and "sleep" calls, because
"sleep" is often implemented using "alarm".
On some older systems, it may sleep up to a full second less
than what you requested, depending on how it counts seconds.
Most modern systems always sleep the full amount. They may
appear to sleep longer than that, however, because your process
might not be scheduled right away in a busy multitasking system.
For delays of finer granularity than one second, you may use
Perl’s "syscall" interface to access setitimer(2) if your sys-
tem supports it, or else see "select" above. The Time::HiRes
module (from CPAN, and starting from Perl 5.8 part of the stan-
dard distribution) may also help.
Example
my $sleeptime = 3; # Number of seconds to "sleep"

sleep($sleeptime);
Note
If you use sleep alone without any value given to it for
the sleep period, then the script will sleep indefinitely.
[/languages/perl]
permanent link
Mon, May 28, 2012 3:16 pm
Wide Character in Print Warning from Perl Script
When I ran a
Perl script
I wrote to download webpages from a website, I kept getting two warning
messages printed for the same line whenever I ran the script.
Wide character in print at ./get_webpage.pl line 39.
Wide character in print at ./get_webpage.pl line 39.
I found at
Unicode-processing issues in Perl and how to cope with it,
written by Ivan Kurmanov, that the problem can occur when a file has
Unicode characters in it.
Unicode is a "computing industry standard for the consistent encoding,
representation and handling of text expressed in most of the world's
writing systems."
Unicode can be implemented by different character encodings. The
most commonly used encodings are UTF-8, UTF-16 and the now-obsolete
UCS-2. UTF-8 uses one byte for any ASCII characters, which have the same
code values in both UTF-8 and ASCII encoding, and up to four bytes for
other characters. UCS-2 uses a 16-bit code unit (two 8-bit bytes) for
each character but cannot encode every character in the current Unicode
standard. UTF-16 extends UCS-2, using two 16-bit units (4 x 8 bit)
to handle each of the additional characters.
The webpages I was downloading were encoded using
UTF-8, which I confirmed
by viewing the source code for one of the webpages I was downloading.
In the "head" section of the webpage, I saw the following
meta tag.
<meta http-equiv="Content-Type" content="text/html; charset=UTF-8" />
Line 39 in my Perl script, which printed the webpage, was as follows:
print WEBPAGE $page;
Prior to that line I had the following line:
open(WEBPAGE,">$first_fname") || die "$page$n could not be opened";
The variable first_fname is the name for the file holding the
first page saved to disk.
To resolve the problem, I followed the suggestion offered by Ivan to
use open FILE, ">:utf8", $filename;. I therefore changed the
line in my script to the following:
open(WEBPAGE,">:utf8",$first_fname) || die "$page$n could not be opened";
For subsequent pages, I used an id number followed by ".html" for the
filename for the webpages with the id number changing based on the contents
of the webpage downloaded. I enclosed ">:utf8" and "$id.html" in double quotes
to get the script to run without producing the "wide character in print"
warning nor any error messages.
     if ($n == 1) {
       # First page will be named differently, e.g., index.html
       open(WEBPAGE,">:utf8",$first_fname) || die "$page$n could not be opened";
     }
     else {
       open(WEBPAGE,">:utf8", "$id.html") || die "$page$n could not be opened";
     }
     print WEBPAGE $page;
     close(WEBPAGE);
     $n++;
[/languages/perl]
permanent link
Mon, May 28, 2012 2:52 pm
Interactive Spelling Checker aspell
For interactive spellchecking on Linux systems, you can use the
aspell command at a shell prompt. Just type the command
followed by the option
list then hit enter and type one or
more words for which you wish to check the spelling. Hit
Ctrl-D
when you've entered all the words for which you wish to check the
spelling. You will then see the words that are misspelled, or at least
the ones for which aspell doesn't recognize the spelling, displayed.
You can put the words one per line, if you wish, as in the example
below. In that example, "cat" was the first word I entered and "apropos"
was the last word I entered before hitting Ctrl-D. The aspell
spellchecker showed "cateb" and "flummoxe" as the misspelled words
immediately after the last word I entered.
$ aspell list
cat
cart
cateb
flummox
flummoxe
apropos
cateb
flummoxe
You can also enter all of the words you want checked on one line, if you
prefer, as in the example below, where "cat horse dog punto giraffe" were
typed. When I hit Enter and Ctrl-D to terminate word
entry, aspell showed "punto" as the misspelled word, since though it
is Italian for the English word "point", it is not a valid word in English..
$ aspell list
cat horse dog punto giraffe
punto
[/os/unix/commands]
permanent link
Sun, May 27, 2012 10:51 pm
Downloading Webpages with Perl Using Get
I had written a Perl script to dowload specific webpages from a site
and peform some processing on the downloaded copies of the webpages. When
I moved the script to another system, I received the error message below
when I ran it.
Can't locate LWP/Simple.pm in @INC (@INC contains: /etc/perl /usr/local/lib/perl/5.14.2 /usr/local/share/perl/5.14.2 /usr/lib/perl5 /usr/share/perl5 /usr/lib/perl/5.14 /usr/share/perl/5.14 /usr/local/lib/site_perl .) at ./get_webpage.pl line 5.
BEGIN failed--compilation aborted at ./get_webpage.pl line 5.
The script uses the get command from the LWP::Simple Perl module,
which allows me to download a webpage similar to how I would use the
GNU wget command from
a shell prompt to download webpages. I wanted to use the Perl script, instead
of wget, though, since I wanted to examine the webpages for specific links
and then download other pages based on specific URLs present in the downloaded
web pages.
When I checked for the presence of the LWP::Simple module, which provides
support for the get, command on the system on which the script
worked, I saw the following:
$ perldoc -l LWP::Simple
/usr/lib/perl5/vendor_perl/5.8.8/LWP/Simple.pm
$ cd /home/joe/www/support/languages/perl
When I checked on the system on which the script failed, I saw the following:
$ perldoc -l LWP::Simple
You need to install the perl-doc package to use this program.
I decided just to proceed with the installation of the LWP::Simple
module by running the command perl -MCPAN -e shell.
Since it was the first time I had run it, I was prompted to answer a number
of questions. I hit Enter to accept the default answer for all of
the questions. When the configuration process was completed, I entered
install LWP::Simple at the cpan prompt. When the
module was installed, I entered exit.
$ sudo bash
[sudo] password for joe:
root@Saturn:~/Documents/bin# perl -MCPAN -e shell

CPAN.pm requires configuration, but most of it can be done automatically.
If you answer 'no' below, you will enter an interactive dialog for each
configuration option instead.

Would you like to configure as much as possible automatically? [yes]

 <install_help>

Warning: You do not have write permission for Perl library directories.

To install modules, you need to configure a local Perl library directory or
escalate your privileges.  CPAN can help you by bootstrapping the local::lib
module or by configuring itself to use 'sudo' (if available).  You may also
resolve this problem manually if you need to customize your setup.

What approach do you want?  (Choose 'local::lib', 'sudo' or 'manual')
 [local::lib]

Autoconfigured everything but 'urllist'.

Now you need to choose your CPAN mirror sites.  You can let me
pick mirrors for you, you can select them from a list or you
can enter them by hand.

Would you like me to automatically choose some CPAN mirror
sites for you? (This means connecting to the Internet) [yes]
Trying to fetch a mirror list from the Internet
Fetching with HTTP::Tiny:
http://www.perl.org/CPAN/MIRRORED.BY

Looking for CPAN mirrors near you (please be patient)
.............................. done!

New urllist
  http://httpupdate3.cpanel.net/CPAN/
  http://httpupdate23.cpanel.net/CPAN/
  http://mirrors.rit.edu/CPAN/

Autoconfiguration complete.

Attempting to bootstrap local::lib...

Writing /home/joe/.cpan/CPAN/MyConfig.pm for bootstrap...
commit: wrote '/home/joe/.cpan/CPAN/MyConfig.pm'
Fetching with HTTP::Tiny:
http://httpupdate3.cpanel.net/CPAN/authors/01mailrc.txt.gz
Going to read '/home/joe/.cpan/sources/authors/01mailrc.txt.gz'
............................................................................DONE
Fetching with HTTP::Tiny:
http://httpupdate3.cpanel.net/CPAN/modules/02packages.details.txt.gz
Going to read '/home/joe/.cpan/sources/modules/02packages.details.txt.gz'
  Database was generated on Mon, 28 May 2012 01:35:04 GMT
  HTTP::Date not available
..............
  New CPAN.pm version (v1.9800) available.
  [Currently running version is v1.960001]
  You might want to try
    install CPAN
    reload cpan
  to both upgrade CPAN.pm and run the new version without leaving
  the current session.


..............................................................DONE
Fetching with HTTP::Tiny:
http://httpupdate3.cpanel.net/CPAN/modules/03modlist.data.gz
Going to read '/home/joe/.cpan/sources/modules/03modlist.data.gz'
............................................................................DONE
Going to write /home/joe/.cpan/Metadata
Running make for A/AP/APEIRON/local-lib-1.008004.tar.gz
Fetching with HTTP::Tiny:
http://httpupdate3.cpanel.net/CPAN/authors/id/A/AP/APEIRON/local-lib-1.008004.tar.gz
Fetching with HTTP::Tiny:
http://httpupdate3.cpanel.net/CPAN/authors/id/A/AP/APEIRON/CHECKSUMS
Checksum for /home/joe/.cpan/sources/authors/id/A/AP/APEIRON/local-lib-1.008004.tar.gz ok

  CPAN.pm: Going to build A/AP/APEIRON/local-lib-1.008004.tar.gz

Attempting to create directory /home/joe/perl5

*** Module::AutoInstall version 1.03
*** Checking for Perl dependencies...
*** Since we're running under CPAN, I'll just let it take care
    of the dependency's installation later.
[Core Features]
- ExtUtils::MakeMaker ...loaded. (6.57_05 >= 6.31)
- ExtUtils::Install   ...loaded. (1.56 >= 1.43)
- Module::Build       ...loaded. (0.38 >= 0.36)
- CPAN                ...loaded. (1.960001 >= 1.82)
*** Module::AutoInstall configuration finished.
Checking if your kit is complete...
Looks good
Writing Makefile for local::lib
Writing MYMETA.yml
cp lib/POD2/PT_BR/local/lib.pod blib/lib/POD2/PT_BR/local/lib.pod
cp lib/lib/core/only.pm blib/lib/lib/core/only.pm
cp lib/local/lib.pm blib/lib/local/lib.pm
cp lib/POD2/DE/local/lib.pod blib/lib/POD2/DE/local/lib.pod
Manifying blib/man3/POD2::PT_BR::local::lib.3pm
Manifying blib/man3/lib::core::only.3pm
Manifying blib/man3/local::lib.3pm
Manifying blib/man3/POD2::DE::local::lib.3pm
  APEIRON/local-lib-1.008004.tar.gz
  /usr/bin/make -- OK
'YAML' not installed, will not store persistent state
Running make test
PERL_DL_NONLAZY=1 /usr/bin/perl -I/home/joe/perl5/lib/perl5/i686-linux-gnu-threa
d-multi-64int -I/home/joe/perl5/lib/perl5 "-MExtUtils::Command::MM" "-e" "test_h
arness(0, 'inc', 'blib/lib', 'blib/arch')" t/classmethod.t t/coderefs_in_inc.t t
/de-dup.t t/install.t t/lib-core-only.t t/pipeline.t t/stackable.t
t/classmethod.t ...... Name "File::Spec::rel2abs" used only once: possible typo
at t/classmethod.t line 20.
t/classmethod.t ...... 1/? Attempting to create directory t/var/splat
t/classmethod.t ...... ok
t/coderefs_in_inc.t .. ok
t/de-dup.t ........... ok
t/install.t .......... skipped: Install Capture::Tiny to test installation
t/lib-core-only.t .... ok
t/pipeline.t ......... ok
t/stackable.t ........ ok
All tests successful.
Files=7, Tests=29, 41 wallclock secs ( 0.17 usr  0.04 sys +  1.32 cusr  0.14 csys =  1.67 CPU)
Result: PASS
  APEIRON/local-lib-1.008004.tar.gz
  /usr/bin/make test -- OK
Running make install
Installing /home/joe/perl5/lib/perl5/POD2/PT_BR/local/lib.pod
Installing /home/joe/perl5/lib/perl5/POD2/DE/local/lib.pod
Installing /home/joe/perl5/lib/perl5/lib/core/only.pm
Installing /home/joe/perl5/lib/perl5/local/lib.pm
Installing /home/joe/perl5/man/man3/local::lib.3pm
Installing /home/joe/perl5/man/man3/lib::core::only.3pm
Installing /home/joe/perl5/man/man3/POD2::PT_BR::local::lib.3pm
Installing /home/joe/perl5/man/man3/POD2::DE::local::lib.3pm
Appending installation info to /home/joe/perl5/lib/perl5/i686-linux-gnu-thread-multi-64int/perllocal.pod
  APEIRON/local-lib-1.008004.tar.gz
  /usr/bin/make install  -- OK
Tried to deactivate inactive local::lib '/home/joe/perl5'

local::lib is installed. You must now add the following environment variables
to your shell configuration files (or registry, if you are on Windows) and
then restart your command line shell and CPAN before installing modules:

Use of uninitialized value $deactivating in numeric eq (==) at /home/joe/perl5/l
ib/perl5/local/lib.pm line 354.
Use of uninitialized value $deactivating in numeric eq (==) at /home/joe/perl5/l
ib/perl5/local/lib.pm line 356.
Use of uninitialized value $interpolate in numeric eq (==) at /home/joe/perl5/li
b/perl5/local/lib.pm line 366.
export PERL_LOCAL_LIB_ROOT="/home/joe/perl5";
export PERL_MB_OPT="--install_base /home/joe/perl5";
export PERL_MM_OPT="INSTALL_BASE=/home/joe/perl5";
export PERL5LIB="/home/joe/perl5/lib/perl5/i686-linux-gnu-thread-multi-64int:/home/joe/perl5/lib/perl5";
export PATH="/home/joe/perl5/bin:$PATH";

Would you like me to append that to /home/joe/.bashrc now? [yes]


commit: wrote '/home/joe/.cpan/CPAN/MyConfig.pm'

You can re-run configuration any time with 'o conf init' in the CPAN shell
Terminal does not support AddHistory.

cpan shell -- CPAN exploration and modules installation (v1.960001)
Enter 'h' for help.

cpan[1]> install LWP::Simple


<text snipped>

cpan[2]> exit
I was then able to successfully run the Perl script.
[/languages/perl]
permanent link
Wed, May 23, 2012 7:17 pm
Creating an Audio CD from MP3 Files in iTunes
Apple's iTunes software can be used to
"
burn",
i.e., write MP3 files to an audio CD that can be played in a car CD player
or similar device. You can store up to 80 minutes of music or other audio
files on a CD that will play in almost all CD players.
[ More Info ]
[/software/audio_video/itunes]
permanent link
Sun, May 20, 2012 5:07 pm
Excel Defined Name
Microsoft Excel provides the capability to assign a "defined name" to a
cell or range of cells to make it easier to understand the purpose of
a cell or group of cells. E.g, TaxRate is more meaningful in a formula than
E21. Defined names also allow you to ensure that hyperlinks pointing to
locations in a spreadsheet are updated appropriately when a spredsheet is
modified.
[ More Info ]
[/os/windows/office/excel]
permanent link
Fri, May 18, 2012 11:37 pm
Port Forwarding RDP With PuTTY
You can use PuTTY, which is a free implementation of Telnet and SSH clients for Windows and Unix platforms to log into a system via SSH and by using the SSH port forwarding functionality that PuTTY provides, establish a Remote Desktop Protocol (RDP) connection through a "tunnel" you establish via the SSH connection.
[
More Info ]
[/os/windows/network/ssh/putty]
permanent link
Sat, May 12, 2012 4:16 pm
Keep Header Row Visible in Excel When Scrolling
If you have an Excel spreadsheet with many rows, you may want to keep the
header row visible even when you scoll far down through the rows of the
spreadsheet, so you know what the values in each column represent. This
can easily be done, if you have headings for each column in the top
row of the spreadsheet, or near the top row, by going to the top of
the spreadsheet, so that the header row is the top row of the Excel
window. Then click on the cell in column
A just below the
header row to make it the current cell. Then click on
Window
and select
Freeze Panes. Now, when you scroll down through the
spreadsheet, the header row will "float" at the top of the Excel
window, so that it is always visible and you don't have to scroll back
to the top again to remind yourself what data is found in each column.
If you have other rows above the column heading row you selected, those
will remain visible as well as everything above the row you were on
when you selected
Freeze Panes.
If you later want to turn the display of the header row or rows when
you scroll through the spreadhseet, click on Window and select
Unfreeze Panes.
Note: this works in Microsoft Excel 2000 and later on Microsoft Windows
systems and Microsoft Excel 2008 for Mac and should work on other versions
of Excel as well.
[/os/windows/office/excel]
permanent link
Sat, May 12, 2012 2:25 pm
Determining the Package for a File on a Ubuntu Linux System
To determine which installed package provides a file on a
Ubuntu Linux system, you can
use the command
dpkg -S filename. If you need
a particular file, but the package providing it is not installed,
you can install the
apt-file package and then use
the command
apt-file search filename to determine
which package or packages provide it.
[ More Info ]
[/os/unix/linux/ubuntu]
permanent link
Thu, May 03, 2012 10:58 pm
Time and Date Issue and mDNSResponder and configd messages
When I started a MacBook Pro laptop this morning, I found the date was
set set to December 31, 2000, though it had the correct date the day
before. I also received messages asking whether I wanted to allow
configd and mDNSResonder to accept incoming network connections. I believe
those messages appeared because the signing certificates for the two
applications no longer appeared valid to the system because their signing
dates were after the December 31, 2000 date the system was showing.
[ More Info ]
[/os/os-x]
permanent link
Sun, Apr 22, 2012 4:01 pm
Sumif for Date Range
Microsoft Excel's
Sum function allows you to sum the values
in a column. E.g., if I have a column, column J, that contains revenue in
dollars for items sold with the first entry in row 4 and the last entry in
row 62, I could use the formula
=SUM(J4:J63) to calculate the
total revenue for all items (I use "63" instead of "62" presuming that new
entries will continue to be added by inserting new rows above row 63). But,
if you wanted to determine the revenue just for the current month, presuming
the month is April 2012, you could use the
sumif function, e.g.,
assuming the date of sale for each item is in column F, I could use the
formula
=SUMIF(F4:F63,">=2012-04-01",J4:J63) to calculate the
revenue for any items sold on or after April 1, 2012, presuming that I am
still in the month of April 2012. In this case any row that has a date
value of April 1, 2012 or later in column F will have the sales amount in
column J for that entry added to the total sales calculation for April.
I could also have used "01-Apr-12" for the date value in the formula, if
I wished, instead of "2012-04-01", i.e., I could use YYYY-MM-DD where YYYY
is the year, MM is the two digit value for the month and DD is the two digit
value for the day or DD-Mon-YY, where Mon is the 3 letter abbreviation for
the month.
Presuming that the only entries on the worksheet are for the year 2012,
I could find the total sales for January using the formula
=SUMIF(F4:F63,"<=31-Jan-12",J4:J63). But, if I want to
determine the sales for February, I need to add only entries where the
date is between February 1, 2012 and February 29, 2012. One simple way to
do so that will work even for older versions of Excel, such as
Microsoft® Excel 2000, is to perform one SUMIF calculation
for all the values greater than or equal the starting date and then subtract
from that total the value calculated using another SUMIF formula
that adds all the values where the date is greater than the ending date. E.g.,
if I wanted to determine the total revenue for February, I could use the forumla
below:
=SUMIF(F4:F63,">=2012-02-01",J4:J63)-SUMIF(F4:F63,">2012-02-29",J4:J63)
The first SUMIF adds the sales amount in column J whenever the
date value in column F is greater than or equal February 1, 2012. The next
SUMIF adds the sales amount in column J whenever the date
value stored in column F is greater than the last day in Feburary of 2012,
which is February 29, 2012. The result of the first SUMIF will
be the total for all entries on or after February 1, 2012. The result of
the second SUMIF will be the total for all entries after February
29, 2012. The difference between those two values will be the total for all
sales in the month of February 2012.
[/os/windows/office/excel]
permanent link
Thu, Apr 19, 2012 5:58 pm
Thu, Apr 12, 2012 10:39 pm
Mac OS X Hibernate Mode
Mac
OS X provides a
hibernation
feature, which allows you to save the current state of the system to
memory or the hard drive. You might wish to use this feature if you
are going to be away from the system for awhile and don't want to close
all of the applications you have open or you can't power the system from
a wall electrical outlet and wish to conserve battery power.
OS X supports five different hibernate modes. The default mode is "3",
which means when you put the system to "sleep" it saves the current state
of the system to Random Access Memory (RAM), blanks the display, and goes
to a low power consumption state.
-
0 - Old style sleep mode, with RAM powered on while sleeping, safe sleep
disabled, and super-fast wake.
-
1 - Hibernation mode, with RAM contents written to disk, system
totally shut down while “sleeping,” and slower wake up, due to
reading the contents of RAM off the hard drive.
-
3 - The default mode on machines introduced since about fall 2005.
RAM is powered on while sleeping, but RAM contents are also written
to disk before sleeping. In the event of total power loss, the
system enters hibernation mode automatically.
-
5 - This is the same as mode 1, but it‘s for those using secure virtual
memory (in System Preferences –> Security).
-
7 - This is the same as mode 3, but it‘s for those using secure virtual
memory.
You can determine the current hibernate mode by opening a Terminal window
(use the Finder to go to Applications then Utilities
then double-click on Terminal) using
pmset -g | grep hibernatemode.
$ pmset -g | grep hibernatemode
 hibernatemode	3
You can change the hibernation mode by using sudo pmset -a
hibernatemode n where n is one of the above integers
representing a supported hibernation mode. E.g., to write the current state
of the system, which includes the open applications and files in memory,
to the hard drive and completely shut down the system, you can set the
hibernatioon mode to 1. This is akin to hibernate mode on a
Microsoft Windows system.
$ sudo pmset -a hibernatemode 1
Password:
$ pmset -g | grep hibernatemode
 hibernatemode	1
To put the system in hibernation, you can click on the Apple icon in the
upper, left-hand corner of the screen and select Sleep. The system
will then be put in the selected hibernate mode.
References:
-
Does Mac OS X support hibernation?
superuser
[/os/os-x]
permanent link
Thu, Apr 12, 2012 9:50 pm
Copying a Disc with Burn under Mac OS X
The
Disk Utility application that comes with Mac
OS X, at least as of
OS X
10.6 ,aka
Snow Leopard, does not permit
one to copy an audio CD. An alternative application that can be used to
create an
.iso file from an
audio CD is
Burn,
which is free software licensed under the
GNU General Public License (GPL)
.
[ More Info ]
[/os/os-x/software/utilities/cd-dvd]
permanent link
Wed, Apr 11, 2012 10:48 pm
Show the list of installed packages on a Ubuntu system
To display the list of installed packages on a
Ubuntu Linux system from a shell prompt,
you can use
dpkg --get-selections. You can also use the
Ubuntu Software Center, if you prefer a
GUI method of checking.
$ dpkg --get-selections | more
accountsservice					install
acl						install
acpi-support					install
acpid						install
adduser						install
adium-theme-ubuntu				install
aisleriot					install
alsa-base					install
alsa-utils					install
amazonmp3					install
anacron						install
If you only want to determine whether a paricular package is installed,
you can use grep to filter the results.
$ dpkg --get-selections | grep libboost
libboost-filesystem1.46.1			install
libboost-serialization1.46.1			install
libboost-system1.46.1				install
You can find the locations for the files installed when the package was
installed by using the -L option with dpkg
$ dpkg -L libboost-filesystem1.46.1
/.
/usr
/usr/lib
/usr/lib/libboost_filesystem.so.1.46.1
/usr/share
/usr/share/doc
/usr/share/doc/libboost-filesystem1.46.1
/usr/share/doc/libboost-filesystem1.46.1/copyright
/usr/share/lintian
/usr/share/lintian/overrides
/usr/share/lintian/overrides/libboost-filesystem1.46.1
/usr/share/doc/libboost-filesystem1.46.1/NEWS.Debian.gz
/usr/share/doc/libboost-filesystem1.46.1/README.Debian.gz
/usr/share/doc/libboost-filesystem1.46.1/changelog.Debian.gz
To obtain information regarding a package, including its description,
you can use the -s or --status option followed
by the complete package name.
$ dpkg -s libboost-filesystem1.46.1
Package: libboost-filesystem1.46.1
Status: install ok installed
Priority: optional
Section: libs
Installed-Size: 208
Maintainer: Ubuntu Developers <ubuntu-devel-discuss@lists.ubuntu.com>
Architecture: i386
Source: boost1.46
Version: 1.46.1-5ubuntu2
Depends: libboost-system1.46.1 (>= 1.46.1-1), libc6 (>= 2.4), libgcc1 (>= 1:4.1.1), libstdc++6 (>= 4.1.1)
Description: filesystem operations (portable paths, iteration over directories, etc) in C++
 This package forms part of the Boost C++ Libraries collection.
 .
 The Boost Filesystem Library provides portable facilities to query and
 manipulate paths, files, and directories.  The goal is to
 facilitate portable script-like operations from within C++ programs.
Homepage: http://boost.org/libs/filesystem/
Original-Maintainer: Debian Boost Team <pkg-boost-devel@lists.alioth.debian.org>
[/os/unix/linux/ubuntu]
permanent link
Tue, Apr 10, 2012 8:00 am
Memory for Asus P4P800-E
I installed two additional memory modules in an ASUS
P4P800-E motherboard. The motherboard has 4 memory slots that
take
DDR1 memory
modules. The system had two 1 GB memory modules already installed.
I installed two additional 1 GB memory modules giving the system 4 GB
of
RAM, which is the maximum
amount of memory the P4P800-E motherboard will support. I used
Corsair VS1GB333 memory
modules. After I installed the additional memory, I used the free
MemScope Memory
Tester software to test all of the memory in the system. I let the
test run over night for six complete passes and part of a seventh pass with
no errors found.
Note: you can download the MemScope Memory Tester software
here. At the
moment there is a missing image on the page that has a link associated with
it for downloading the software. The link appears immediately below the
"Test 7 Random Data Sequence Test" paragraph or you can click
here to access the form you need to fill out to download the software.
[/pc/hardware/motherboard]
permanent link
Thu, Apr 05, 2012 7:57 pm
Recovering Lost Photos with DEFT Linux and PhotoRec
DEFT Linux can be used for
forensics examination of a disk drive or to recover deleted or otherwise
lost files from a disk drive.
If you have lost files on a device, such as a memory card from a camera,
perhaps because you accidentally deleted them, you can use DEFT and
the
PhotoRec utility that comes with
DEFT 7 to search for and recover
those files.
PhotoRec 6.13 comes with
DEFT 7. PhotoRec was created by Christophe Grenier. It is also
available for
Mac OS X and Microsoft Windows systems.
[ More Info ]
[/os/unix/linux/deft]
permanent link
Fri, Mar 30, 2012 3:29 pm
National Do Not Call Registry
If you, like me, don't like receiving telemarketing calls and live in the
U.S., the federal government maintains a "National Do Not Call Registry"
that telemarketers are supposed to refer to before calling phone numbers. If
a telephone number is on the list, the telemarketer is not supposed to
call the number. You can add your phone number to the list by
pointing your web browser to the
National Do Not Call
Registry website.
Unfortunately, some telemarketers ignore the list. If they do, you can
file a complaint at the
complaints page. You will be asked to provide the number that was
called, the approximate time of the call, and the calling number, which
you may be able to get by
Caller ID or by hitting *69 on your phone
immediately after the call has ended to get the time of the last incoming call.
You will also be asked to provide the name of the company, if you know it.
I received an automated call today telling me I hadn't responded to
prior offers to reduce my credit card rate and this would be my last chance.
I hit "1" on the phone to speak to someone. When I asked for the name of
the company I was told it was "Branch Card Services", which is probably not
the real name of the company for which the telemarketer or scam artist I
spoke to works. When I asked where the company was located, he immediately
hung up. I hit *69 on my phone and found the number from which he was
calling was 971-220-1771. I then went to the National Do Not Call Registry
website and filed a complaint, since my phone numbers have been on that
list for years. A company that ignores the list is subject to being fined
by the government for ignoring the "do not call" list.
When I looked up the number on the
Intelius reverse phone number lookup site,
I found the
location for 971-220-1771 listed as Gresham, Oregon. Of course, such
companies can employ
Caller ID spoofing
techniques to hide the true number from which they are calling, so
the number you obtain from Caller ID or *69 isn't guaranteed to be the
number from which the call was placed.
You might wonder who would be foolish enough to provide a credit card
to someone who calls when you have no means of verifying the caller's
identity and no way of knowing if he isn't just a scam artist collecting
credit card numbers to sell to others or use himself. Obviously, such
calls must work, though, since I often receive them. I can usually get
the person on the other end of the line to give me a company name, all
of which have sounded rather dubious. Sometimes, I can even get the
person to give me the location from which he or she is calling. In one
instance, when I told the person that I shouldn't be getting such calls
because I'm on the "do not call" list, she asked me how she could get
on the list; I told her to go to
donotcall.gov.
[/phone]
permanent link
Fri, Mar 23, 2012 5:37 pm
Redirecting a Local Drive with Remote Desktop
The
Remote Desktop Protocol (RDP) is a protocol developed by Microsoft
that allows one to remotely manage a Microsoft Windows system. E.g., you
could remotely manage a Microsoft Windows XP PC, Windows Server 2003 system,
etc. from another Microsoft Windows system. There are also RDP clients
that run on Linux, Solaris, and Mac OS X systems that will allow you to manage
a Microsoft Windows system from a system running one of those operating
systems.
A program that can be run on one of those operating systems
is rdesktop.
If you have a Linux system, you may find that it is already installed.
If not you can download and install it for free.
You can determine if rdesktop is already installed by using the
command which rdesktop.
$ which rdesktop
/usr/bin/rdesktop
Rdesktop allows you not only to remotely manage a Microsoft Windows
system, but also map a directory on the system running rdesktop to what
appears to be a shared network drive on the Microsoft Windows system.
$ rdesktop -0 -r 'disk:Linux=/home/jdoe/Documents/' -u administrator 192.168.0.5
I used the following options with the rdesktop command
issued on a Ubuntu Linux system:
-0
The -0 option allows you to attach to the console of the server
(requires Windows Server 2003 or newer), which would be akin to sitting
down at the system to which you are logging on, i.e., it doesn't establish
a session separate from the login session you would get when sitting at
the system. So, if you were already logged into the system locally, when
you connect remotely via rdesktop, you will see all of the open programs and
files.
-r disk:<sharename>=<path>,...
Redirects a path to the share \\tsclient\<sharename> on the
server (requires Windows XP or newer). The share name is limited to 8
characters.
In this case I used -r 'disk:Linux=/home/jdoe/Documents/'.
I picked "Linux" for the sharename, but you can use whatever name you like.
The name you select is the name the Microsoft Windows system will see for
a shared network drive. The /home/jdoe/Documents/ means that
if, from the Microsoft Windows system, I use the Explorer or an application
to browse to the shared network drive named Linux it is really
pointing to /home/jdoe/Documents on the Linux system. So I
can place a file in /home/jdoe/Documents/ on the Linux
system and access it from the Microsoft Windows system. Or I can save
a file with an application on the Microsoft Windows system to the directory
/home/jdoe/Documents on the Linux system.
-u <username>
The -u option allows you to spcify the Username for authentication
on the Microsoft Windows system to which you wish to logon. In this case,
I'm logging in as the administrator.
The 192.168.0.5 is the IP address of the Microsoft Windows system
to which I wish to connect. You can also use a
fully qualified domain name
(FQDN) as well, e.g., a.example.com.
[/os/windows/software/remote-control/rdp]
permanent link
Fri, Feb 24, 2012 4:10 pm
JavaScript Language Versus Type Attribute
After updating an old webpage, I validated the HTML on the page with the
W3C Markup Validation Service. One
of the errors reported for the page was the following one:
 Line 19, Column 30: required attribute "TYPE" not specified
<script language="JavaScript">
The attribute given above is required for an element that you've used, but you
have omitted it. For instance, in most HTML and XHTML document types the "type"
attribute is required on the "script" element and the "alt" attribute is
required for the "img" element.
Typical values for type are type="text/css" for <style> and type=
"text/javascript" for <script>.
In the head section of the HTML code, I had the following line:
<script language="JavaScript">
I didn't realize that the language attribute has been deprecated
in favor of the type attribute. According to a posting I found
at HTML Script tag: type or language?
The language attribute has been deprecated. Both will work in pretty much all
browsers, but the first better adheres to modern standards.
The javascript code on the page was working as expected when I viewed the page
with a browser, but I changed the line to the one below:
<script type="text/javascript">
[/network/web/browser/javascript]
permanent link
Fri, Feb 17, 2012 9:36 pm
Viewing Message Headers in Hotmail
For Hotmail email accounts, I've posted the steps for viewing
an email message's headers, which can provide information
about the true orgination point, for an email message
here.
[/network/email/hotmail]
permanent link
Tue, Feb 07, 2012 11:25 pm
Connecting to a Wireless Network with OS X
I've provided instructions
here
for connecting to a wireless network from a Mac OS X laptop.
[/os/os-x/wireless]
permanent link
Sat, Feb 04, 2012 9:45 pm
Microsoft Windows Live Messenger Winks .dt2 Files
Microsoft Windows Live Messenger, at least with version 2009, stores
a Flash file within a
.dt2 file associated with a
"
wink". The .swf file
provides the animation associated with a wink. The .swf
file can be extracted from the .dt2 file using Microsoft's
expand utility.
[ More Info ]
[/network/chat/live_messenger]
permanent link
Sun, Jan 29, 2012 10:03 pm
Customizing the Start Menu on a Windows 7 System
To change the items that appear when you click on the
Start button

on a Windows 7 system, take the following steps:
- Right-click on the Start button.
- Select the Start Menu tab.
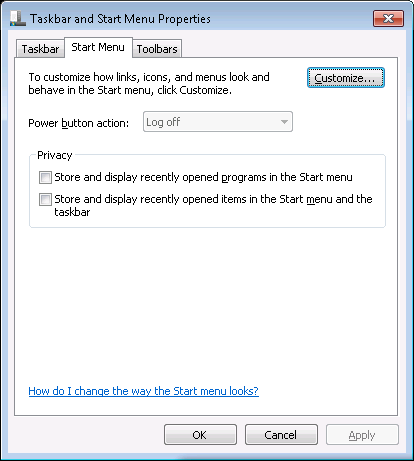
- Click on the Customize button.
-
You can then select which items, such as "Computer", "Documents",
etc. that you wish to be displayed.
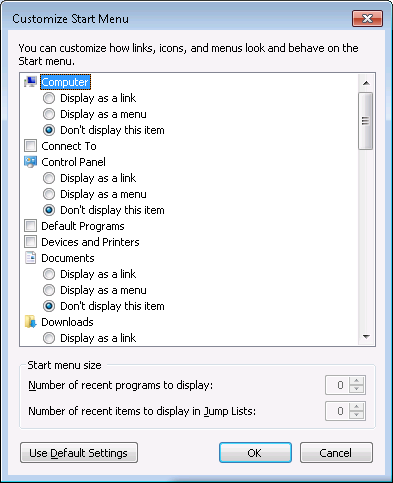
If you want to use the default settings, click on the button labeled
Use Default Settings. E.g., you might want to choose that option if
some items have disappeared from the Start Menu. The default settings are
listed below:
Computer (default: "Display as a link)
Connect To (default: checked)
Control Panel (default: "Display as a link")
Default Programs (default: checked)
Devices and Printers (default: checked)
Documents (default: "Display as a link)
Downloads (default: "Don't display this item")
Help (default: checked)
Highlight newly installed programs (default: checked)
Homegroup (default: unchecked)
Music (default: "Display as a link")
Network (default: unchecked)
Personal folder (default: "Display as a link")
Pictures (default: "Display as a link")
Recent Items (default: unchecked)
Recorded TV (default: "Don't display this item)
Run command (default: unchecked)
Search other files and libraries (default: "Search with public folders")
Search All Programs menu by name (default: checked)
System administrative tools (default: unchecked)
Use large icons (default: checked)
Videos (default: "Don't display this item)
Start menu size
Number of recent programs to display (default: 10)
Number of recent items to display in Jump Lists (default: 10)
-
When you are finished click on OK then OK again.
[/os/windows/win7]
permanent link
Sun, Jan 29, 2012 7:59 pm
Redirection to Rogue rr.nu Site
While searching for a power adapter, I found a link for the part number of
the power adapter for which I was searching that redirected me to
www2.smartouholder.rr.nu. That site displayed a fake virus scan
(see
image),
which reportedly was finding malware on the system from which I was searching,
but was really just a ruse to try to lure unsuspecting users into buying
rogue antivirus software, i.e.,
scareware. If I tried
to navigate away from the site, I would receive a "Are you sure you want
to navigate away from this page?" message.
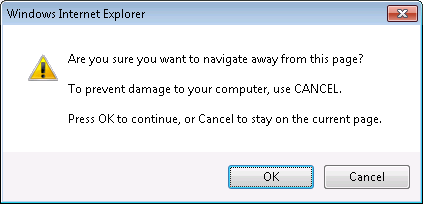
No matter which option I selected from "OK" or "Cancel", I was left at the
scareware webpage. After finally getting back to a prior Google search page,
I checked the site's reputation at
Norton™ Safe Web.
It did not list the site www2.smartouholder.rr.nu, stating it had not
been tested yet, but
it did list rr.nu.
Norton Safe Web reported the following for the rr.nu site:
rr.nu
Summary
| •Computer Threats: |
|
1 |
| •Identity Threats: |
|
0 |
|
•Annoyance factors:
|
|
0
|
|
|
|
| Total threats on this site: |
|
1 |
| |
|
|
|
•Community Reviews:
|
|
5
|
Norton Safe Web listed "Drive-By Downloads" as the threat from the site.
After I was able to navigate away from the site, I added an entry to
the /Windows/system32/drivers/etc/hosts file to ensure that
the system would not be able to contact the site again. I put the following
2 lines at the bottom of that file:
# Inserted on 2012-01-29. Site is attempting to download rogue antivirus software

127.0.0.1	www2.smartouholder.rr.nu
When a Windows system attempts to find an IP address for a website name,
such as www.example.com, it will first check the hosts file
to see if an IP address is listed there for the
fully qualified domain name. If
not, then it will perform a
Domain Name System (DNS) query to obtain the IP address associated with
the name. By associating the name with 127.0.0.1, which is the
loopback address
for the local system, you can ensure that a system on which the entry has
been put in the hosts file will see the name as pointing to its own address and
thus will never be able to reach the actual site.
Note: if you edit the hosts file with the Windows Notepad
editor, be sure you save the file as hosts, not
hosts.txt. The file may be marked as read-only, also, so in
order to save the file. you will need to take off the read-only attribute
temporarily and put the attribute back on after you have saved the file.
You can do so by right-clicking on the hosts file, choosing
Properties and unchecking the read-only attribute. Or you can
use the following two commands from the command line to take the attribute
off the file and put it back on after you've edited the file.
attrib -r C:\Windows\System32\drivers\etc\hosts

attrib +r C:\Windows\System32\drivers\etc\hosts
You will need to run the commands from an administrator account to do so.
You will also need to run Notepad from an administrator account to edit the
file. If you are logged in as another user, you can use the "runas" command
from the command line to run Notepad or the attrib command from the
administrator account.
E.g., you can use
runas /user:administrator cmd to open another command prompt
under the administrator account to run the attrib commands or
runas /user:administrator notepad to run Notepad from the
administrator account. Alternatively, for the attrib command you could use
runas /user:administrator
"attrib -r C:\Windows\System32\drivers\etc\hosts"
. If you are using a
domain administrator account you would use
runas /user:domainname\administrator.
[/security/malware]
permanent link
Mon, Jan 16, 2012 12:59 pm
Floating Left and Right Columns Within a Div
I wanted to have two columns on one section of a web page where the
fist column was all left-aligned on the page, but the second column
was aligned to the right of the page.
I used the DIV
tag to create the two columns. I used <div style="float: left;">
for the left columan and <div style="float: right;">
for the right column. I enclosed both of them in an outer DIV. Since I
wanted to have a top margin of 75 pixels for the outer DIV to separate it from
the material above, I used <div style="margin-top: 75px;">
for it. But when I viewed the page, the material in the two columns wasn't
appearing the way I wanted it to appear. I then tried adding overflow:
auto to the outer DIV as shown below.
<div style="margin-top: 75px; overflow: auto;">

<div style="float: left;">
Stuff in left column
</div>

<div style="float: right;">
Stuff in right column
</div>

</div>

<p>Stuff below</p>
That looked fine when viewed in Firefox, but Internet Explorer showed
the "stuff below" between the two columns.
I was able to resolve the problem by inserting a
complete "cleared" element last in the container as explained at
How To Clear Floats Without Structural Markup By adding another DIV
below the two column DIVs but within the outer DIV, I was able to get the
results I wanted in both Internet Explorer and Firefox. That DIV was just
<div style="clear: both;"></div>.
So I then had the following HTML code for the page.
<div style="margin-top: 75px; overflow: auto;">

<div style="float: left;">
Stuff in left column
</div>

<div style="float: right;">
Stuff in right column
</div>

<div style="clear: both;"></div>

</div>

<p>Stuff below</p>
References:
-
2 Column Div float right and left child divs outside parent
Date: August 31, 2010
Stack Overflow
-
How To Clear Floats Without Structural Markup
By: Big John
Created May 14, 2004
Last updated: July 2, 2008
Position Is Everything
[/network/web/html]
permanent link
Sun, Jan 08, 2012 6:34 pm
MySQL Field Types
I can't remember the ranges for various MySQL numberic data types, such as
TINYINT, SMALLINT, MEDIUMINT, INT, etc. nor how many characters a TEXT field
hods versus a MEDIUMTEXT field and when I need the information it sometimes
takes me a little while to find it again, so I've placed a page listing
those values on this site for ready reference.
[ More Info ]
[/software/database/mysql]
permanent link
Sat, Jan 07, 2012 9:54 pm
Displaying Data from a MySQL Database with PHP
If you have data stored in a MySQL database that you wish to include on
a webpage, PHP provides a mechansim to query a MySQL database to extract
and dispaly the data on a webpage.
[ More Info ]
[/languages/php]
permanent link
Thu, Jan 05, 2012 6:40 pm
Google Chrome for the Mac
Google Chrome is available for Mac OS X systems at
http://www.google.com/chrome/index.html?platform=mac&hl=en.
It is available in
Apple Disk Image
format, i.e., .dmg format as
googlechrome.dmg.
The following window opens when you click on the .dmg file.
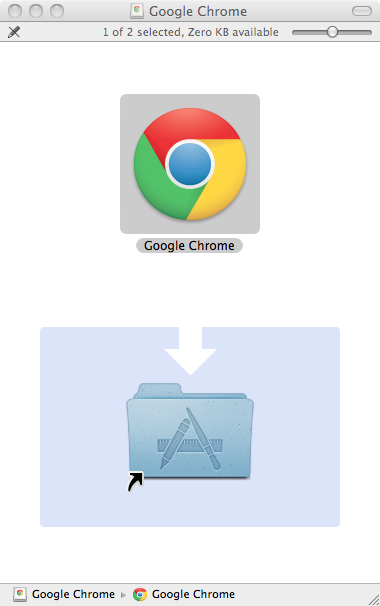
If you double-click on the folder icon in the window, you will have the
option of selecting where Chrome should be insalled. The default location is
the Applications folder where applications are normally stored.
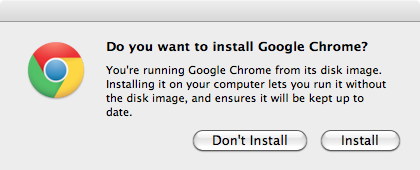
When you then double-click on the "Google Chrome" icon in the window, you will
have the option of installing the software or running it from the disk
image.
If you don't want to intall it, you can simply run it from the disk image,
since it will then be "mounted" as a drive within the
Finder

[/network/web/browser/chrome/os-x]
permanent link
Wed, Jan 04, 2012 11:05 pm
Removing Specific Cookies from Firefox
Firefox allows you to remove all
HTTP cookies, cookies
for one particular site, or even individual cookies associated with a particular
site which may have placed multiple cookies on your system. To remove cookies,
follow the process below.
Note: this procedure was written for Firefox 3.6, but may apply to other
versions as well.
- Open Firefox.
- Click on Tools and select
Options.
- Click on Privacy.
- There will be a "remove individual cookies"
link in the middle of the Options window; click on it.

- Search or scroll through the list until you
find the relevant website. You can search on a domain name,
e.g., example.com.
- If you want to delete all cookies for a
particular website, highlight its
entry by clicking on it, then click on the Remove Cookies button.
If yo wish to remove only certain cookies for a website, click on the rightward
pointing triangle next to it or double-click on the entry to reveal the
individual cookies associated with the website. Click on one you want removed
to highlight it, then click on the Remove Cookie button.
- Click on the Close button when
you have removed all the cookies you wish to remove.
- Click on the OK button to close the
Options window.
[/network/web/browser/firefox]
permanent link
Sun, Jan 01, 2012 1:55 pm
Resizing an image from the command line
If you have the
ImageMagick package
installed on a Linux system or Mac OS X, you can use the
convert tool
that comes with it to resize an image from a shell prompt. ImageMagick
is also available for Microsoft Windows systems, but I haven't tried it
on a Microsoft Windows system.
To resize an
image, one uses the -sample option for the convert tool as in
the example below, which resizes an image, input.jpg, to 80 pixels wide and
40 pixels high, storing the result in output.jpg.
$ convert -sample 80x40 input.jpg output.jpg
You can also specify percentages of the original file size rather than a
size in pixels.
convert -sample 25%x25% input.jpg output.jpg
Note: when you use the -sample option to specify the size
of the output image in pixels, you may not get the exact sizes you specified
for the width and height of the image. This is because ImageMagick considers
the aspect ratio of the two sides of the image when it is resizing, keeping
the aspect ratio of the new image the same as that of the previous image.
So one of the values may not be the same as the number you put on the
command line.
You can use the
identify utility that comes with ImageMagick to obtain the width and
height of an image (the width value is displayed first followed by the
height).
$ identify example.png
example.png PNG 100x89 100x89+0+0 DirectClass 11kb
In the example above, the image is 100 pixels wide by 89 pixels high.
You can determine if ImageMagick and these associated tools are on
the system by using the which command.
$ which identify
/usr/bin/identify
$ which convert
/usr/bin/convert
References:
-
Graphics from the command line
Flip, size, rotate, and more with ImageMagick
By:
Michael Still, Senior software engineer, Tower Software
Date: July 16, 2003
Linux - Technical resources for Linux programmers and system administrators
[/software/graphics/imagemagick]
permanent link

Privacy Policy
Contact


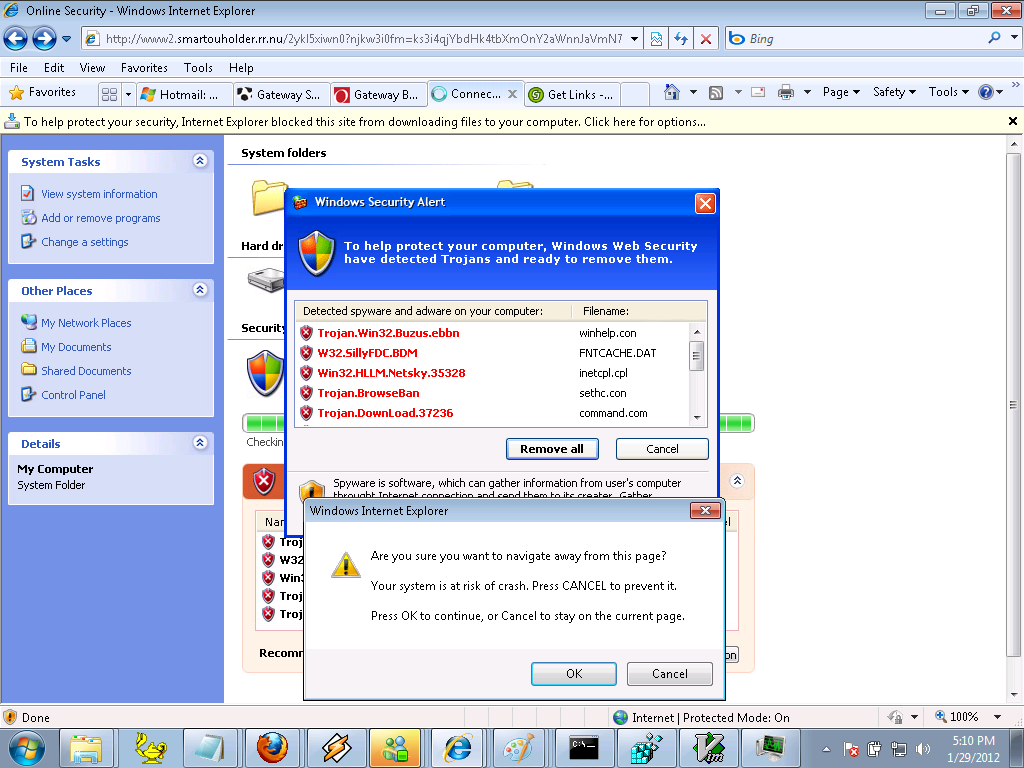