Sat, Dec 30, 2006 3:36 pm
Barracuda Spam Firewall 200 Setup
I set up a
Barracuda Spam Firewall 200
antispam appliance today. I was surprised by how noisy the device is; the fans are
quite loud. Unfortunately, the device is supposed to sit in a closet next to
someone's desk. I'm not sure how well she will be able to tolerate the noise from
the device.
[ More Info ]
[/network/email/spam/barracuda]
permanent link
Thu, Dec 28, 2006 9:33 pm
Fixing TeaTimer Window Problem with Resource Hacker
On several systems where I've installed
Spybot - Search
& Destroy 1.4, I've encountered problems with the
popup windows that appear when I've activated TeaTimer,
a Spybot application that monitors attempts to change
the registry. The buttons on the warning window that
appears won't have the correct description of their
function written on them, so it is hard to determine
what will happen when you click on a particular button.
The problem can be fixed with
Resource
Hacker.
[ More Info ]
[/security/spyware/spybot/teatimer]
permanent link
Wed, Dec 27, 2006 10:02 pm
Starting and Stopping pcAnywhere Service from Command Line
I sometimes need to stop and restart the pcAnywhere service from a
command line, but do it so rarely I usually can't remember the exact
name of the service. You can see the names of services on a system
by using the
net start command. Issuing it without any
arguments given to it shows a list of available services on the system.
If you use the
find with it, you can filter the list of
displayed services to see just the name for the pcAnywhere service.
C:\Documents and Settings\administrator>net start | find /i "pcanywhere"
   pcAnywhere Host Service
Knowing that it is "pcAnywhere Host Service", you can then use net stop
"pcanywhere host service" to stop the service and net start
"pcanywhere host service" to restart it.
References:
-
How to Use the net Command
Cisco Systems, Inc.
May 17, 2006
[/os/windows/software/remote-control/pcanywhere]
permanent link
Wed, Dec 13, 2006 11:06 pm
Adding an Email Address to Outlook's Safe Senders List
Outlook 2003 provides the capability to add an email
address to a "safe senders" list. Outlook will not
apply its junk e-mail filter to email from senders on
the safe senders list. However, you may have Outlook
rules that will still route email from addresses on
the list to the junk e-mail folder.
[ More Info ]
[/os/windows/office/outlook]
permanent link
Wed, Dec 13, 2006 6:26 pm
Using pktstat to Monitor Network Traffic
Pktstat is free software for Linux and Unix systems that will display a
real-time list of active
connections seen on a network interface, and how much bandwidth is being used
by various network connections. It partially decodes the
HTTP and
FTP protocols to show what
filename is being transferred. X11 application names are also shown. Entries
hang around on the screen for a few seconds so you can see what just happened.
It also accepts filter expressions à la tcpdump.
An RPM file
that can be used to install the software on Linux systems is available
from
http://www.stearns.org/pktstat/.
As of December 13, 2006, the current version is 1.7.2q. I installed the
software from the RPM file.
# wget http://www.stearns.org/pktstat/pktstat-1.7.2q-0.i386.rpm

# rpm -qip pktstat-1.7.2q-0.i386.rpm
warning: pktstat-1.7.2q-0.i386.rpm: V3 RSA/MD5 signature: NOKEY, key ID f322929d
Name        : pktstat                      Relocations: (not relocateable)
Version     : 1.7.2q                            Vendor: David Leonard
Release     : 0                             Build Date: Thu 10 Jul 2003 12:38:40 AM EDT
Install Date: (not installed)               Build Host: sparrow
Group       : Applications/Internet         Source RPM: pktstat-1.7.2q-0.src.rpmSize        : 145837                           License: Public Domain
Signature   : RSA/MD5, Thu 10 Jul 2003 12:38:40 AM EDT, Key ID 012334cbf322929d
Packager    : William Stearns <wstearns@pobox.com>
URL         : http://www.itee.uq.edu.au/~leonard/personal/software/#pktstat
Summary     : Displays a live list of active connections and what files are being transferred.
Description :
Display a real-time list of active connections seen on a network
interface, and how much bandwidth is being used by what. Partially
decodes HTTP and FTP protocols to show what filename is being
transferred. X11 application names are also shown. Entries hang around
on the screen for a few seconds so you can see what just happened. Also
accepts filter expressions a la tcpdump.

# rpm --install pktstat-1.7.2q-0.i386.rpm
warning: pktstat-1.7.2q-0.i386.rpm: V3 RSA/MD5 signature: NOKEY, key ID f322929d
Once installed the software can be run with the pktstat
command. If you need to install from the source code rather from the RPM
package, the steps to install the software are fairly straightforward
and can be found at Bandwidth
Monitoring Tools, which also lists a number of other free bandwidth
monitoring tools.
The software can show you what files people are accessing on your web server
in realtime as shown below:
interface: eth0
load averages: 6.3k 3.2k 1.4k bps

   bps    % desc
 779.9   2% icmp unreach port frostdragon -> ns2
            tcp adsl-68-126-206-36:2039 <-> frostdragon:http
            - GET /notebook/encyclopedia/s/slr_chibimoon.htm
            tcp adsl-68-126-206-36:2041 <-> frostdragon:http
            - 304 GET /notebook/encyclopedia/s/slr_chibimoon.htm
            tcp adsl-68-126-206-36:2042 <-> frostdragon:http
            - 304 GET /graphics/notepad.gif
            tcp adsl-68-126-206-36:2043 <-> frostdragon:http
            - 304 GET /notebook/encyclopedia/s/slr_chibimoon-title.jpg
            tcp adsl-68-126-206-36:2044 <-> frostdragon:http
            - 304 GET /notebook/encyclopedia/s/slr_chibimoon-002.jpg
            tcp adsl-68-126-206-36:2045 <-> frostdragon:http
            - 304 GET /notebook/encyclopedia/s/slr_chibimoon-001.jpg
            tcp adsl-68-126-206-36:2046 <-> frostdragon:http
            - 304 GET /notebook/encyclopedia/s/slr_chibimoon-lunapball.gif
 278.1   0% tcp adsl-68-126-206-36:2047 <-> frostdragon:http
            - 304 GET /notebook/encyclopedia/s/slr_chibimoon-ckey2.gif
  1.6k   5% tcp adsl-68-126-206-36:2048 <-> frostdragon:http
            - 304 GET /notebook/encyclopedia/s/slr_chibimoon-compact.gif
You can use tcpdump style filter expressions to limit the displayed information
to just traffic you are interested in at the moment. For instance, if I just
want to monitor email traffic, i.e.
SMTP traffic on
port 25, I can use the command pktstat port 25 when I start
the program.
interface: eth0
load averages: 5.6k 1.2k 421.1 bps
filter: port 25
   bps    % desc
            tcp 245:29801 <-> frostdragon:smtp
            tcp bny92-4-82-228-126-176:1672 <-> frostdragon:smtp
 19.0k  51% tcp frostdragon:53388 <-> mx01:smtp
  55.6   0% tcp frostdragon:smtp <-> mail:22421
 18.0k  48% tcp frostdragon:smtp <-> pool-71-245-166-13:62216
By default, pktstat does not show the Fully Qualified Domain Name (FQDN)
of systems. But you can change that behavior with the -F
option.
         -F    Show full hostnames.  Normally, hostnames are truncated to
               the first component of their domain name before display.
For instance I could have it show the full name for systems that are exchanging
email with my server with pktstat -F port 25
interface: eth0
load averages: 98.9 21.9 7.4 bps
filter: port 25
   bps    % desc
            tcp frostdragon.com:smtp <-> gateway.blackspider.com:43181
If you would prefer to see IP addresses and port numbers rather than names, you
can use the -n option. E.g. I could use pktstat -n port
25 to again monitor only SMTP traffic, but this time display IP
addresses rather than the host names and the port number, 25, rather than
its description, which is smtp.
-n Do not try and resolve hostnames or service port numbers.
interface: eth0
load averages: 55.2 11.4 3.8 bps
filter: port 25
   bps    % desc
 587.1  85% tcp 66.104.202.96:36199 <-> 66.22.186.53:25
  98.4  14% tcp 66.22.186.53:25 <-> 67.172.4.27:4681
References:
-
Bandwidth Monitoring Tools
Planet Malaysia Blog
-
pktstat
By David Leonard
-
pktstat file listing
By William Stearns
Mary 13, 2006
[/os/unix/linux/network]
permanent link
Tue, Dec 12, 2006 8:03 pm
Joining a Windows XP Media Center Edition PC to a Domain
I've been looking at PCs for a Christmas gift for a family member. Many of
those I've looked at come with Microsoft
Windows
XP Media Center Edition (MCE). Likely as
part of its marketing strategy to be able to charge more for a "business"
edition of Windows, i.e. Windows XP Professional, Microsoft has crippled
the MCE edition of Windows so that it can't be joined to a domain, at
least not easily. I did find instructions on how to join a Windows MCE PC
to a domain at
Windows Media Center 2005 Can't Join Domains, though. If there is
actually a way to join a system running MCE to the domain in the house, I am
more apt to buy a system with that Microsoft operating system.
Oh, well, another way in which Linux is
superior to Windows. Unfortunately, two users of the system use it to
play GoPets and I don't believe
there is a Linux client, though I did find a comment from a GoPets
representative at
F13.net - Usefully Cynical Commentary >> AGC Interview with GoPets!
that their partner in the Phillipines have suggested a Linux client be
created.
I can remember how Microsoft used to charge hundreds more for Windows NT
server than it did for Windows NT Workstation. An O'Reilly webpage,
Differences
Between NT Server and Workstation are Minimal, states the difference
was $800 and that Microsoft claimed that there were technical reasons why
there were restrictions on the number of simultaneous connections you could
have to a web server running on Windows NT Workstation. Yet all it took
to get the same functionality on Windows NT Workstation were a couple of
registry changes. For those who remember the olden days when DOS was the
predominant operating system, it would be like charging hundreds more for
a few simple modifications to your config.sys or autoexec.bat file.
Incidentally, I noted that GoPets Ltd. which is a company based in Korea
has been engaged in a domain dispute with someone in America who was apparently
cybersquatting on
the gopets.com domain name, putting up just
a page with a handful of links at that address. Some people buy domain names
using names that companies are using to do business solely so they can demand
large sums of money from those companies for the domain names.
[/os/windows/xp]
permanent link
Mon, Dec 11, 2006 8:35 pm
Using Full Media Capacity with cdrw
I downloaded a
Knoppix ISO file to one of my Solaris 10 systems and attempted
to create a
Live CD from the
.iso file using the cdrw command. However,
when I attempted to do so, I received a "size required is greater than
available space" error message.
bash-3.00$ cdrw -i KNOPPIX_V5.0.1CD-2006-06-01-EN.iso
Looking for CD devices...
Initializing device...done.
Size required (730036224 bytes) is greater than available space (681986048 bytes).
The file I was trying to write to the CD was 696 MB, which won't fit on
a 650 MB CD, but I was using an 80 minute 700 MB CD.
The problem can be resolved by using the -C option with the
cdrw command. Without that option, cdrw will assume a default
capacity of 650 MB for CDs. To use the full 700MB capacity, you need the
-C option.
     -C       Uses stated media capacity.  Without  this  option,
              cdrw  uses  a  default value for writable CD media,
              which is 74 minutes  for  an  audio  CD,  681984000
              bytes for a data CD, or 4.7 Gbytes for a DVD.
Once I used the option, I was able to write the .iso file to a blank CD.
bash-3.00$ cdrw -C -i KNOPPIX_V5.0.1CD-2006-06-01-EN.iso
Looking for CD devices...
Initializing device...done.
Writing track 1...40 %
[/os/unix/solaris]
permanent link
Fri, Dec 08, 2006 9:40 pm
Forwarding Print Jobs
I have a PC running Solaris 5.10 connected to one network interface on a Sun
Ultra 5 system running Solaris 2.7. The Ultra 5 workstation has another network
interface that faces the world. The PC connects only to the Ultra 5 and has
no other network access. It has web acces through proxy server software
running on the Ultra 5. I also needed to be able to print from the PC to
printers on the other side of the Ultra 5. To obtain that access, I used
balance
Balance is a load balancing solution, which uses a simple but powerful generic
TCP proxy with round robin load balancing and failover mechanisms. Its behaviour
can be controlled at runtime using a simple command line syntax, which is listed
below.
balance 3.19
Copyright (c) 2000-2003,2004 by Inlab Software GmbH, Gruenwald, Germany.
All rights reserved.

usage:
  balance [-b host] [-t sec] [-T sec] [-dfp] \
          port [h1[:p1[:maxc1]] [!] [ ... hN[:pN[:maxcN]]]]
  balance [-b host] -i [-d] port
  balance [-b host] -c cmd  [-d] port

  -b host   bind to specific host address on listen
  -B host   bind to specific host address for outgoing connections
  -c cmd    execute specified interactive command
  -d        debugging on
  -f        stay in foregound
  -i        interactive control
  -H        failover even if Hash Type is used
  -p        packetdump
  -t sec    specify connect timeout in seconds (default=5)
  -T sec    timeout (seconds) for select (0 => never) (default=0)
   !        separates channelgroups (declaring previous to be Round Robin)
   %        as !, but declaring previous group to be a Hash Type

example:
  balance smtp mailhost1:smtp mailhost2:25 mailhost3
  balance -i smtp
Balance is Open Source Software (OSS) and is provided under the Gnu Public
License (GPL). It runs on Linux, FreeBSD, BSD/OS, Solaris, Windows using
Cygwin, Mac-OS X, HP-UX, and other operating systems.
To use balance to forward print jobs from the PC through the Ultra 5 workstation
to printers on the other side of the Ultra 5 workstation, I installed balance
on the Ultra 5 system and then issued the following command:
# balance -b 192.168.1.1 515 bermuda.somewhere.org:515
I specified the -b option, since I did not want balance listening
on both of the Ultra 5 network interfaces, only the one that faces the PC.
The address for the network card to which the PC connects is 192.168.1.1.
The 515 after that address specifies that balance should listen
on TCP port 515 on that interface. I then want balance to forward any data
it receives on port 515 on the 192.168.1.1 interface to a printer with
a network name of bermuda.somewhere.org. The :515 at the end
of the printer's network name indicates that balance should forward data to
port 515 on the printer. TCP port 515 is the port for the
Line Printer Daemon (LPD) protocol. It is a standard
port on which network printers listen for print jobs. If you wish balance
to listen on ports less than 1024, which are the "well known" ports, then
you must issue the command to run balance from the root account.
I then needed to tell the PC that there is a printer available at the
192.168.1.1 address, though in actuality, the workstation at that address will
simply forward any data it receives on port 515 to the bermuda printer.
First, I checked to see what printers the PC already thought were available
through the lptstat command.
# lpstat -a
laserjet accepting requests since Dec 05 19:23 2006
The system already is set up to print to laserjet, but unfortunately that
printer is no longer accessible, which is why I need to use balance and
the bermuda printer.
I then used the lpadmin command on the PC running Solaris 10 PC
to add the new printer.
# lpadmin -p bermuda -s 192.168.1.1
The first lpadmin command has a -p argument, which
specifies the printer name I want to use on the PC for the printer. I am
going to use the name bermuda to make it match the name on
the network name of that printer, but it wouldn't have to match. The next
argument is specified with -s. The -s option is
followed by a system name, e.g. ultra5.somewhere.org, or IP address. I used
the latter and specified the IP address on the Ultra 5 workstation to which
the PC is connected. The -s option is used to make a printer
available on another system available to the local system.
     -s system-name[!printer-name]

         Make a remote printer (one that must be accessed through
         another  system)  accessible  to  users  on your system.
         system-name is the name of the remote  system  on  which
         the  remote  printer  is located it. printer-name is the
         name used on the remote system  for  that  printer.  For
         example,  if  you want to access printer1 on system1 and
         you want it called printer2 on your system:

         -p printer2 -s system1!printer1
Once I added the printer, I wanted to make it the default printer, which
I can do with the -d option for lpadmin.
# lpadmin -d bermuda
If you want to check which printer is the default printer, you can use
the command lpstat -d.
# lpstat -d
system default destination: bermuda
Now, if I check printer status with lpstat -a, I see both
the old and new printers listed.
# lpstat -a
laserjet accepting requests since Dec 08 19:32 2006
bermuda accepting requests since Dec 08 19:32 2006
_default accepting requests since Dec 08 19:32 2006
If I want more details, I can use lpstat -s.
# lpstat -s
scheduler is not running
system default destination: bermuda
system for laserjet: 192.168.1.1
system for bermuda: 192.168.1.1
system for _default: 192.168.1.1 (as printer bermuda)
To get rid of the entry for the no longer accessible laserjet printer,
I used the lpadmin -x command.
# lpadmin -x laserjet
# lpstat -a
bermuda accepting requests since Dec 08 19:57 2006
_default accepting requests since Dec 08 19:57 2006
Solaris stores the information about printers in /etc/printers.conf,
so the lpadmin commands are modifying that file.
After adding the printer, if I then want to make it visible to a user
account that is using the Java Desktop System for the user interface,
I need to take the following steps:
- Click on Launch.
- Select Preferences.
- Select Printer Preferences.
- Click on View.
- Click on Select Printers to Show.
- Bermuda is now in the list of available printers, so click on
it to select it and then click on OK.
- Right-click on it and select Set as Default.
- Close the Printer Manager window.
Now when printing from the Solaris 10 PC, I can print to the bermuda printer
from the user account under which I made the above changes
by selecting it as the printer in applications.
References:
-
balance
Author: Thomas Obermair
freshmeat.net
-
Balance
Inlab Software GmbH
-
Line Printer Daemon protocol
Wikipedia
-
Print Server Port Numbers for Netcat
By Jeff Liebermann
May 17, 2000
-
How to Add a Network Printer Locally on a UNIX Solaris SPARC Workstation
Citrix
January 13, 2003
-
Proxying the LPD Port with Balance
MoonPoint Support
March 3, 2006
-
Balance
MoonPoint Support
[/os/unix/solaris]
permanent link
Mon, Dec 04, 2006 12:57 am
Pacerd.bundle
BazookaTM Adware and Spyware Scanner v1.13.03.
reported that it found
Pacerd.bundle on a Windows XP system, G, when I scanned it.
The uninstall procedure on the Kephyr webage suggested using "Add or Remove
Programs" from the Windows Control Panel to remove entries named
"Surf Sidekick", "ItalMgr", "Command", "RelevantKnowledge" and
"MarketScore" before going through the manual uninstall instructions.
However, none of those existed.
The Kephyr site indicates that the presence of any of the files or
directories listed below may indicate a system is infected with this malware.
%ProgramsDir%\Msnmaker\
%ProgramsDir%\Quick Links\
%ProgramsDir%\InetGet\
%ProgramsDir%\FREEPR~1\
%ProgramsDir%\Freeprod Toolbar\
%ProgramsDir%\Cas\
%ProgramsDir%\CasStub\
%ProgramsDir%\CMSystem\
%ProgramsDir%\System Files\System.exe
%ProgramsDir%\System Files\plugin.dll
%ProgramsDir%\Yazzle Sudoku\
%WinDir%\etb\pokapoka73.exe
%WinDir%\etb\pokapoka75.exe
%WinDir%\exe82.exe
%WinDir%\bsx32\
%WinDir%\etb\
%WinDir%\jptc.dat
%WinDir%\offun.exe
%WinDir%\rk.exe
%WinDir%\rlvknlg.exe
%SystemDir%\PSof1.exe
%SystemDir%\exp.exe
%SystemDir%\wintask.exe
%SystemDir%\adcomplusanalytic.exe
%SystemDir%\ichckupd.exe
%SystemDir%\bho.dll
%SystemDir%\nsb12.dll
%SystemDir%\APD123.exe
%SystemDir%\wuauclt.dll
%SystemDir%\202_app13.exe
%SystemDir%\APD123.exe
%SystemDir%\MTE2ODM6ODoxNg.exe
%SystemDir%\PopOops.dll
%SystemDir%\PopOops.dll
%SystemDir%\SI.exe
%SystemDir%\SWLAD1.dll
%SystemDir%\SWLAD1.dll
%SystemDir%\atmtd.dll
%SystemDir%\atmtd.dll._
%SystemDir%\dist001.exe
%SystemDir%\installer216.exe
%SystemDir%\nstD.dll
%SystemDir%\uc.exe
%SystemDir%\wuauclt.dll
%SystemDir%\AOP2.exe
%SystemDir%\repairs302972979.dll
%WinDir% is a
variable. By default, this is C:\Windows (Windows 95/98/Me/XP) or
C:\WINNT (Windows NT/2000).
%SystemDir% is a
variable. By default, this is C:\Windows\System (Windows 95/98/Me), C:\WINNT\System32 (Windows NT/2000), or C:\Windows\System32 (Windows XP).
%ProgramsDir% is a
variable. By default, this is C:\Program Files.
I created a batch file,
pacerd_bundle-files.bat to search for any intances of the above
files or directories on the system. None were found.
I then checked the registry for the presence of any of the registry
keys the Kephyr webpage listed as being associated with the malware.
I found only one of the listed registry keys. The one I found was
associated with a Windows startup entry for winsync.
C:\>reg query HKEY_LOCAL_MACHINE\SOFTWARE\Microsoft\Windows\CurrentVersion\Run /
v winsync

! REG.EXE VERSION 3.0

HKEY_LOCAL_MACHINE\SOFTWARE\Microsoft\Windows\CurrentVersion\Run
    winsync     REG_SZ  C:\WINDOWS\System32\kdkgpx.exe reg_run
However, I did not see that file on the system, even when I booted into safe
mode. And none of the listed files were found on the system when I checked
under safe mode, also.
I deleted the registry key with the reg delete command.
C:\Documents and Settings\Administrator\My Documents>reg delete HKEY_LOCAL_MACHI
NE\SOFTWARE\Microsoft\Windows\CurrentVersion\Run /v winsync

Delete the registry value winsync (Y/N)? y

The operation completed successfully
When I scanned the system again with Bazooka, it did not report the presence
of Pacerd.bundle. The registry key it found previously was likely a remnant
of spyware previously removed by another antispyware program on the system.
References:
-
Pacerd.bundle
[/security/spyware/pacerd_bundle]
permanent link
Sun, Dec 03, 2006 10:12 pm
Exploit searchterror.com
I ran a scan of a system, G, with
BazookaTM Adware and Spyware Scanner v1.13.03.
It found
Exploit searchterror.com on the system.
The uninstall procedure on the Kephyr webage suggested using "Add or Remove Programs" in the
Windows® Control Panel to remove the malware. I looked for "SpySheriff" and "WeirdOnTheWeb"
entries as suggested, but found none.
The Kephyr site indicates that the presence of any of the files or
directories listed below may indicate a system is infected with this malware.
c:\loader.exe
c:\mailz.txt
c:\sys.exe
c:\tmp.txt
c:\trig.dtl
c:\winstall.exe
%WinDir%\weirdontheweb_topc.exe
%WinDir%\zsettings.dll
%WinDir%\tool1.exe
%WinDir%\tool2.exe
%WinDir%\tool3.exe
%WinDir%\svchost.exe
%WinDir%\ms1.exe
%WinDir%\ms2.exe
%WinDir%\ms3.exe
%WinDir%\ms4.exe
%WinDir%\msmsgr2.exe
%WinDir%\drexinit.dll
%WinDir%\kernels32.exe
%WinDir%\vr_sys.dll
%WinDir%\desktop.html
%WinDir%\dvpd.dll
%WinDir%\installer_SIAC.exe
%WinDir%\sasent.dll
%WinDir%\sasetup.dll
%WinDir%\cdmweb\
%SystemDir%\latest.exe
%SystemDir%\maxd.exe
%SystemDir%\newdial.exe
%SystemDir%\realupd32.exe
%SystemDir%\realupd_32.exe
%SystemDir%\thn.dll
%SystemDir%\thn32.dll
%SystemDir%\tibs.exe
%SystemDir%\vx.tll
%SystemDir%\init32m.exe
%SystemDir%\cssrs.exe
%SystemDir%\abc.exe
%SystemDir%\paytime.exe
%SystemDir%\vxgame1.exe
%SystemDir%\vxgame2.exe
%SystemDir%\vxgame3.exe
%SystemDir%\vxgame4.exe
%SystemDir%\win32.exe
%SystemDir%\newdial1.exe
%SystemDir%\zolk.dll
%SystemDir%\ztoolber.dll
%SystemDir%\ztoolbar.bmp
%SystemDir%\ztoolbar.xml
%SystemDir%\~update.exe
%ProgramsDir%WeirdOnTheWeb\
%WinDir% is a
variable. By default, this is C:\Windows (Windows 95/98/Me/XP) or
C:\WINNT (Windows NT/2000).
%SystemDir% is a
variable. By default, this is C:\Windows\System (Windows 95/98/Me), C:\WINNT\System32 (Windows NT/2000), or C:\Windows\System32 (Windows XP).
%ProgramsDir% is a
variable. By default, this is C:\Program Files.
The file svchost.exe is part of the list, but is also a file normally
found on Windows systems. On Windows NT and later systems, though, it is found
in %WinDir%\system32, rather than in %WinDir%. The Kephyr webpage indicates its presence in the %WinDir% directory indicates the presence of this malware.
I created a batch file,
searchterror-files.bat to search for any intances of the above
files or directories on the system. The script did not find either of
the two directories associated with the malware %WinDir%\cdmweb\
nor %ProgramsDir\%WeirdOnTheWeb\. The only file from the list which it found was
C:\temp.txt, which had a creation timestamp of
Thursday, December 23, 2004, 4:21:31 PM. When I renamed that file,
Bazooka no longer reported the presence of Exploit searchterror.com
on the system. Since it didn't find any registry entries associated with
the malware, I believe the report was a false positive.
References:
-
Exploit searchterror.com
[/security/spyware/searchterror]
permanent link
Thu, Nov 30, 2006 9:10 am
Rdesktop for x86/Solaris 10
Rdesktop for Solaris 10 on the Intel platform is available from
sunfreeware.com at
Freeware for
Solaris.
rdesktop-1.5.0-sol10-x86-local.gz Rdesktop is a client for
Windows terminal servers - installs in /usr/local. You will also need to
install
libiconv,
openssl-0.9.8d, and to obtain /usr/local/lib/libgcc_s.so.1 you will need
to have installed
libgcc-3.4.6 or
gcc-3.4.6 or higher.
rdesktop-1.5.0.tar.gz Source Code.
[Details]
When I checked for libiconv on my Solaris 10 system, I did not find evidence
of its presence.
# find / -name libiconv\*
When I checked which version of OpenSSL I had on the system, I found
I had an older version than the one recommended.
# /usr/sfw/bin/openssl version
OpenSSL 0.9.7d 17 Mar 2004
I also found an older version of libgcc than the one recommended.
# find / -name libgcc\* -print
/usr/sfw/lib/amd64/libgcc_s_amd64.so
/usr/sfw/lib/amd64/libgcc_s.so.1
/usr/sfw/lib/libgcc_s.so
/usr/sfw/lib/libgcc_s.so.1
/usr/sfw/lib/gcc/i386-pc-solaris2.10/3.4.3/amd64/libgcc.a
/usr/sfw/lib/gcc/i386-pc-solaris2.10/3.4.3/amd64/libgcc_eh.a
/usr/sfw/lib/gcc/i386-pc-solaris2.10/3.4.3/libgcc.a
/usr/sfw/lib/gcc/i386-pc-solaris2.10/3.4.3/libgcc_eh.a
I found gcc in /usr/sfw/bin, but it was version 3.4.3, not version 3.4.6
as recommended.
# pkgchk -l -p /usr/sfw/bin/gcc
Pathname: /usr/sfw/bin/gcc
Type: linked file
Source of link: ../../../usr/sfw/bin/i386-pc-solaris2.10-gcc-3.4.3
Referenced by the following packages:
        SUNWgcc
Current status: installed
Since
libgcc-3.4.6 or
gcc-3.4.6
was recommended for libiconv, I installed gcc version 3.4.6 first.
References:
-
Freeware for Solaris
(x86/Solaris 10)
[/os/unix/solaris]
permanent link
Thu, Nov 30, 2006 12:30 am
Printing Problem for Excel Workbooks with Multiple Worksheets Using Acrobat
If you are experiencing problems printing all of the worksheets
in a Microsoft Excel workbook to one PDF file using Adobe Acrobat,
the problem is likely caused by a variation in the "print quality"
setting for the worksheets in the Excel workbook.
You can verify this is the source of the problem by clicking
"File", then selecting "Page Setup" in Excel. With the "Page" tab
selected, you will see the "Print Quality"
setting for the currently selected worksheet. Let's say it
is "300 dpi". But if you select the second worksheet titled "Page 2", when
you take the same steps to view the print quality setting and don't see
the print quality specified or it is different, then the variation in
print quality settings is the source of the problem.
When the print quality settings vary between worksheets in the workbook,
Adobe Acrobat will attempt to create multiple PDF files, one for each
worksheet in the workbook, which is why it will prompt you multiple times
for a file name. If you enter different filenames at each prompt, it will
put each worksheet in a separate file.
To rectify the problem, make the print quality settings the same for each
worksheet. In the case above, you could specify a print quality setting
of 300 dpi for the "Page 2" worksheet as well.
You can change the print quality settings one by one for each worksheet
in the workbook or you can select all of the worksheets at once by
holding down the Ctrl key while clicking on the tabs at the bottom of the Excel
window for the other worksheets one by one to select all of them, if you are working on
a Windows system (you would use the Shift key on an Apple system).
When all the worksheets are selected,
you can release the Ctrl key then click on "File" and "Page Setup"
to specify the print quality settings for all of the worksheets at once.
The minimum dpi for a laser printer is normally 300 dpi and is
probably adquate for most spreadsheets you will print. Adobe uses
600 dpi as the default setting for Adobe Acrobat and Distiller and
recommends that setting, but you can make the setting whatever you
like. The output you will get when printing will depend on whether
the printer selected can actually support the dpi value you've
selected, though.
Once, you have set the print quality settings to be the same for
all worksheets, take the following steps to print the workbook.
- Click on "File".
- Select "Print".
- Select "Adobe PDF" as the printer.
- In the "Print what" section, select "Entire workbook".
You should now have one PDF file containing all of the worksheets.
References:
-
More than one PDF file is created from an Excel workbook (Acrobat 5.0-6.x on Windows or Mac OS)
Adobe Systems Incorporated
[/os/windows/software/pdf]
permanent link
Wed, Nov 29, 2006 9:01 pm
remsh and rsh
The remsh and rsh commands, which are shorhand for "remote shell", can be used
to login to a remote system or execute a command on a remote system. The syntax
for the commands is as follows:
     rsh [-n] [-l username] hostname command

     rsh hostname [-n] [-l username] command

     remsh [-n] [-l username] hostname command

     remsh hostname [-n] [-l username] command

     hostname [-n] [-l username] command
On Solaris systems, rsh and remsh can be used
equivalently. If you are using a Linux system, the rsh command
may be available, but not the remsh command. The Remote Shell
service is even available for Windows systems from Microsoft's Resource
Kit (see
Adding R* to Windows NT by Robert Flannigan). Or commercial
versions are available for Windows 95 and later from
Denicomp Systems (you can download
a time-limited evaluation version).
The following options are supported for rsh and remsh:
     -l username
           Uses username as the remote username instead  of  your
           local  username.  In  the  absence of this option, the
           remote username is the same as your local username.

     -n    Redirects the input of rsh to /dev/null. You sometimes
           need  this  option  to  avoid unfortunate interactions
           between rsh and the shell which invokes it.  For exam-
           ple,  if  you  are running rsh and invoke a rsh in the
           background without redirecting its input away from the
           terminal, it will block even if no reads are posted by
           the remote command.  The -n option will prevent this.
The remsh and rsh commands connect to the specified hostname and
execute the specified command. If no command is entered, i.e.
you use rsh hostname or remsh hostname, you will
be logged into the remote system. The type of remote shell (bash, sh, rsh, or
other) is determined by the user's entry in the file /etc/passwd on the
remote system.
If you have an account on the remote system with the same userid as the
account you are currently using on the local system, you will be prompted
for the password for the remote system and, when the correct password is
supplied, will receive a shell prompt on the remote system where you can enter
commands on the remote system.
bash-2.03$ remsh 192.168.1.6
Password:
Last login: Tue Oct 10 17:07:07 on console
Sun Microsystems Inc.   SunOS 5.10      Generic January 2005
You have new mail.
-bash-3.00$
If you include a command to be executed, then you must have permission to
remotely execute commands. Otherwise you will get a "permission denied"
response from the remote system.
bash-2.03$ remsh 192.168.1.6 uname -a
permission denied
To grant permission for the remote command execution, you can create a
.rhosts file in the home directory of the user account on the remote
system that specifies the hostnames of the systems from which
remote commands can be submitted. For instance, you could put a line with the
hostname mypc.abcd.com in the .rhosts file, if you wanted
to allow commands to be remotely submitted from the system mypc.abcd.com. If
you want to allow connections from multiple systems, put them on separate lines.
-bash-3.00$ cat .rhosts
mypc.abcd.com
mac2.abcd.com
With the above .rhosts file on the remote system, you will be able
to login to the remote system from either mypc.abcd.com or mac2.abcd.com or
submit commands remotely with rsh remotesys or remsh
remotesys given that the remote system you want to log into is named
remotesys and you have the same userid on both systems. You won't need to
enter a password, even if the password on the local system differs from
the password for the remote system.
You can also execute commands on the remote system and see the output on
the local system.
E.g.
bash-2.03$ remsh 192.168.1.6 uname -a
SunOS hofud 5.10 Generic i86pc i386 i86p
Be sure to use the command chmod 600 .rhosts after you
create the .rhosts file so that others can not view its contents.
Shell
metacharacters that are not quoted are interpreted on the local host;
quoted metacharacters are interpreted on the remote host.
E.g.
remsh remotehost cat remotefile >> localfile
will append the remote file remotefile to the local file
localfile, while the command line
remsh remotehost cat remotefile ">>" otherremotefile
appends remotefile to the remote file otherremotefile.
If you wish to login using a different userid, e.g. jsmith on the remote system,
then you can use the -l option to specify a userid other than
the one you are logged in under on the local system. You will be prompted for
the password for that account.
# remsh -l jsmith 192.168.1.6
Password:
You won't be able to remotely execute commands, however, if you are using
an account that doesn't match the userid on the remote system even with the
-l option, if that account is not listed in the
.rhosts file. You will get a "permission denied" error.
# remsh -l jsmith 192.168.1.6 uname -a
permission denied
You can fix that problem by adding the account to the rhosts file. For instance,
suppose I am logged into the root account on the local system, but I want to
execute a command on the remote system as the user jsmith. I can edit the
.rhosts file on the remote system to contain the following 2 lines.
-bash-3.00$ cat .rhosts
mypc.abcd.com
mypc.abcd.com root
Now, supposing I have a userid jsmith on both systems that is my regular
user account, I can execute commands while logged into the local system as
jsmith or root. The first line in the .rhosts file doesn't have
any username specified, so it will cover instances where the userid matches
on both systems. The second line will allow me to specify commands to be
run under the jsmith account on the remote system while I am logged into
the local root account as shown below.
# remsh -l jsmith 192.168.1.6 pwd
/home/jsmith
As an alternative to using an .rhosts file in the home directory
of an individual account on the remote system, you can create a
hosts.equiv account in the /etc directory of the remote
system, if you have root access on that system. Again, you should change
the protection on the file after you have created it with
chmod 600 /etc/hosts.equiv, so that not everyone on the system
can read its contents.
You would use the same type of entries in that file as in the .rhosts
file. E.g., to allow user jsmith to connect from mypc.abcd.com, you would
would have the following /etc/hosts.equiv file.
# cat /etc/hosts.equiv
mypc.abcd.com jsmith
When you use rsh or remsh to remotely login to
a system, you will be connected to
TCP port 513.
E.g., if you issued the command
remsh 192.168.1.6 from the system with IP address 192.168.1.1,
you would see the following connection established.
-bash-3.00$ netstat -an | grep 51[34] | grep ESTABLISHED
192.168.1.6.513      192.168.1.1.1023      8760      0 49640      0 ESTABLISHED
The source system is 192.168.1.1 and it has a connection to port 513 on
192.168.1.6. The source port on 192.168.1.1 is 1023.
If you are specifying a command with the rsh or remsh
commands, then a TCP connection is established to port 514 on the remote system.
You can confirm that connection by using the sleep command.
# remsh -l jsmith 192.168.1.6 sleep 180
The above command will execute the sleep command on the remote
system using the jsmith account to execute the command. The argument of
180 tells the sleep command to suspend execution for 180 seconds. I.e. it
justs pauses for 3 minutes.
If you were logged into the remote system in another window, you could then
check network connections. This time, instead of a connection to port 513,
there is one to TCP port 514. Again the source system from which the
sleep command was submitted is 192.168.1.1 and the remote system is 192.168.1.6.
bash-3.00$ netstat -an | grep 51[34] | grep ESTABLISHED
192.168.1.6.514      192.168.1.1.1023      8760      0 49640      0 ESTABLISHED
Keep in mind that rsh and remsh don't encrypt
any of the data flows. Though you may not be entering passwords when you
have access permitted through an .rhosts or /etc/hosts.equiv
file, the input and output is in clear text, i.e. can possibly be viewed by
others on the network. The SSH
and scp commands
are secure alternatives, since they encrypt userids, passwords, and all data
between the remote and local systems.
References:
-
rsh or remsh Command
-
Unix Manual Page for remsh
-
Configuring .rhosts
-
hosts.equiv, rhosts
-
remsh(1)
-
hosts.equiv(4)
-
remsh and the port number ?
-
UNIX Shell
Metacharacters
-
Adding R* to Windows NT
By Robert Flanagan
[/os/unix/commands]
permanent link
Tue, Nov 28, 2006 10:08 pm
Creating a Socks Proxy Server with SSH
If you would like to browse the web without revealing your actual IP address
to the websites you visit, you can use
SSH to set up a
SOCKS proxy server.
Many web browsers, e.g. Internet Explorer, Mozilla, etc., can be configured
to use a SOCKS proxy server. Other network applications which support the
SOCKS protocol can also be configured to route their communications through
a SOCKS proxy server.
By tunneling the SOCKS connections through an SSH connection, though, you can
encrypt network traffic between the applications using SOCKS on your client
system and the SOCKS proxy server so that others on the same network as your
client system can not observe the traffic.
To set up a SOCKS server tunnel with SSH, issue the command ssh -ND
n user@server where "n" is the port number you wish to use and
"user@server" is a userid for your account on "server", which is an SSH
server. For instance, ssh -ND 1080 jsmith@abcd.com would
establish a SOCKS proxy server on
TCP
port 1080 on the SSH server abcd.com where you are logging in with the account
jsmith. When you issue the command, you will be prompted for the password for
the jsmith account. After you enter the password, you won't get a shell
prompt from abcd.com, but you should then be able to configure your web
browser to use the SOCKS proxy server running on abcd.com on port 1080. Port
1080 is the default port for the SOCKS protocol, but you can use any port
(it will have to be a port above 1024, if you are not the root user). For
instance ssh -ND 5555 jsmith@abcd.com would work just as well.
You simply have to specify the selected port when configuring the applications
that will use the SOCKS connection, such as your web browser. When the SOCKS
proxy server is set up on abcd.com, only you will be able to use it through
your tunneled SSH connection.
Configuring Browsers to Use SSH SOCKS Proxy Server
Internet Explorer 6.0
Firefox 2.0
Mozilla 1.7
If you want to verify that your web browser is now routing its communications
through the SOCKS proxy server you can go to a website that will show the
IP address websites are seeing for your system. For instance,
www.showmyip.com will show your IP
address. It should now show the IP address of abcd.com.
When you want to stop routing your browsers communications through the
SOCKS proxy server, you can simply revert to the previous browser configuration.
Note: though your browser will now be receiving content from websites you visit
through the SOCKS proxy server running on abcd.com and transmitting any input
you provide to those websites through the SOCKS proxy server also, your
client system, i.e. the system on which you ran the ssh -ND 1080
jsmith@abcd.com will still be looking up IP addresses for the websites
you visit through the DNS servers specified on the client system when the
SOCKS version 4 protocol is used. E.g., if
you run the ssh command from mypc.mycompany.com, if you visit www.xyz.org, any
content on the website www.xyz.org will be encrypted
between the client system, mypc.mycompany.com and the SOCKS server, abcd.com,
so no one else at mycompany.com will be able to observe the traffic using
a sniffer. All that any
network administrator will know is that you have a connection to abcd.com.
However, mypc needs to translate the name www.xyz.org to its IP address. So
mypc will need to query a local name server, e.g. mycompany.com name servers,
to perform that translation. So someone sniffing traffic from/to mypc would
see it perform a lookup of the IP address for www.xyz.org.
I've found this procedure works when the SSH server is running
OpenSSH, even
OpenSSH for Windows.
It also worked when I tried connecting to a Sun Solaris 2.7 system running
Sun_SSH_1.1.
References:
-
SOCKS
Wikipedia
-
Tunnel Everything through SSH
By Julius Plenz
March 2, 2006
[/network/proxy]
permanent link
Tue, Nov 28, 2006 7:13 pm
Determine Microsoft Office Version Via Script
I needed to determine which version of Microsoft Office is present on multiple
computers in order to determine whether the systems have Microsoft Access
installed on them. Access is present in the "Professional" and "Premium"
versions of Microsoft Office, but not the "Small Business Edition".
I used a VBScript,
office_versions.vbs to query the systems
to determine which version of Office is installed on them. A limitation of
the script is that it can only be expected to work on Windows XP systems.
[ More Info ]
[/os/windows/office]
permanent link
Tue, Nov 21, 2006 3:18 pm
HP Color LaserJet 3500 Doesn't Support Postscript
I wanted to be able to print from my Solaris system to an HP Color LaserJet
3500 printer. HP's website states that the HP Color LaserJet 1500, 2600n,
3500, and 3550 series printers are "host based" printers and don't support
HP's
PCL nor the
postscript language. What this means is that HP has simplified the design
of the printers to reduce their cost by not incorporating support for those
common printer languages in those printers. Instead, the host is expected
to rasterize the output of applications so that those printers essentially
receive an image, i.e. a bitmapped or raster image, of what is to be printed.
Thus most of the processing needed to print information is expected to be done
in the host, i.e. the system sending the print job to the printer, rather
than in the printer itself.
HP states the following in regards to host-based printing:
Host-based printing requires a software print engine in the host operating
system, and unlike a PDL (Printer Description Language) printer, cannot accept
ASCII text direct from a computer. This means that the Host based printer will
only work in the Windows and Macintosh environments that are specifically
supported with the print engine written for that environment. Users of
unsupported Windows and Macintosh environments, as well as users of Linux, Unix,
OS/2 should consider a PDL printer like the HP Color LaserJet 2550 or CLJ3700.
The HP Color LaserJet 3500 printer I wanted to use belongs to someone else.
When I looked at it, it appeared to be a hefty printer; I didn't realize it
was a low-end printer until I checked on whether it supported postscript.
On its
HP Color LaserJet 1500, 2600n, 3500 and 3550 Series Printers -
Host-based Printing Strategy webpage, HP states in the "Limitations of
Host-Based Printing" section that "Host-based printers are
excellent small workgroup printers suitable for Windows and limited Mac printing
to include internet and typical office printing but NOT EPS file printing."
References:
-
HP Color LaserJet 1500, 2600n, 3500, and 3550 Series Printers - PCL and
Postscript Printer Language Support on Host Based Printers
-
HP Color LaserJet 1500, 2600n, 3500 and 3550 Series Printers -
Host-based Printing Strategy
[/os/unix/solaris]
permanent link
Thu, Nov 16, 2006 5:52 pm
Resetting the Root Password on a Solaris System
If you have forgotten the password for the root account on a Solaris system, as
I did, you can hit the
Stop and
A keys to get to the Open
Boot Prompt (OBP) and then use
boot cdrom -s to boot from
a Solaris boot CD. You can then mount the root partition of the boot disk and
edit the /etc/shadow file to temporarily remove the password from the
account.
[ More Info ]
[/os/unix/solaris]
permanent link
Sat, Nov 11, 2006 2:35 pm
Backup Failure Because of 4 GB File Size Limitation
I found this morning that a backup I had run to backup the Exchange
Information Store on a Windows server had failed because I was backing
up the data to an external
USB
drive that was formatted with the
FAT32 filesystem rather than the
NTFS filesystem. The Exchange
Information Store .edb file was about 18 GB in size, but FAT32 volumes don't
support files sizes greater than 4 GB.
[ More
Info ]
[/os/windows/utilities/backup/ntbackup]
permanent link
Tue, Nov 07, 2006 10:56 am
Palm Won't HotSync
I periodically have problems HotSyncing my Palm
PDA with my Windows
Small Business (SBS) 2003 server via a
USB connection. I plug the USB
charging/synchronizing device into a USB port on the system and plug the
Palm into the other end of the cable. The green light on the Palm lights and
it charges, but it won't synchronize. It is as if the Palm wasn't really
connected when I try to synchronize it.
I've found I can get synchronization to work again by going into the Device
Manager and then disabling the Standard Enhanced PCI to USB Host
Controller and then re-enabling it. You can do so by the following
procedure:
- Click on Start.
- Type devmgmt.msc and hit enter.
- Within the Device Manager, scroll down to the Universal Serial
Bus controllers section and click on the "+" sign to the left of
that section to expand it.
- Right-click on Standard Enhanced PCI to USB Host Controller
and choose Disable.
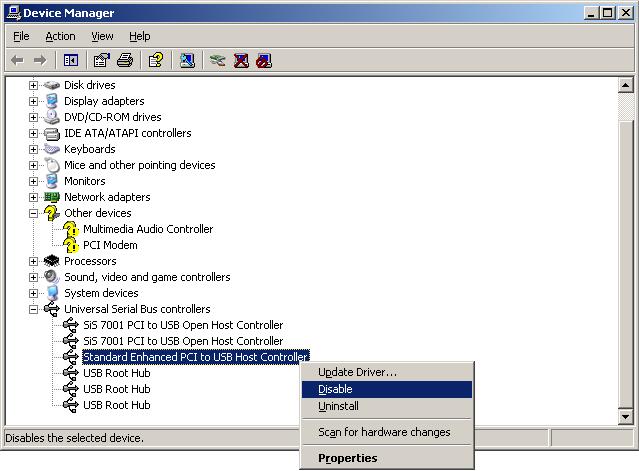
- You will see a warning that "Disasbling the device will cause it to
stop functioning." Click on Yes to disable it.
- After the entry shows a red "X" through it indicating it is disabled,
right-click on it again and select, Enable.
I've found that once I've disabled and re-enabled the USB controller, I can
then successfully HotSync from the Palm.
[/pda/palm]
permanent link
Sun, Nov 05, 2006 10:55 pm
Displaying the Modification Time for a Webpage with PHP
You can display the last time a webpage was modified by including the
following PHP code on a webpage:
<?php

$thisfile = pathinfo($_SERVER['PHP_SELF']);

echo "Last modified: ".date("l jS F Y g:ia",
filemtime($thisfile["basename"]));

?>
Note: your webpage must have a .php extension rather than .htm or .html
and your webserver must provide
PHP support in order for the code to work.
The above code would display the date and time the webpage was modified in
the format below:
Last modified: Sunday 5th November 2006 8:57pm
The options to the PHP date function above are encluded in parentheses.
Within the parentheses the first argument is the date format to be used,
which is followed by a comma and then the time value to be formatted. In this
case the time value to be formatted is the file modification time,
filemtime of the webpage.
The lowercase "L" will display the day of the week, e.g. "Sunday". The lowercase
"j" displays the day of the month without leading zeros, e.g. "5". Putting the
"S" immediately after it displays two characters for the English ordinal suffix
for the day of the month. In the case above it causes the "th" to be put after
the "5". The "F" displays the full month name, e.g. "November" and the "Y"
displays the year as 4 digits, e.g. "2006". The "g" displays the hour in 12
hour format without leading zeros, e.g. "8" in the above case. It is followed
by a colon and then the "i" displays the minutes with leading zeros, e.g.
"07" or in this case "57". The "a" displays a lowercase "am" or "pm" as the
case may be.
The characters you can use to control the display of the date are as
follows:
| a |
'am' or 'pm' |
| A |
'AM' or 'PM' |
| B |
Swatch Internet time |
| d |
day of the month, 2 digits with leading zeros; i.e. '01' to
'31' |
| D |
day of the week, textual, 3 letters; i.e. 'Fri' |
| F |
month, textual, long; i.e. 'January' |
| g |
hour, 12-hour format without leading zeros; i.e. '1' to '12' |
| G |
hour, 24-hour format without leading zeros; i.e. '0' to '23' |
| h |
hour, 12-hour format; i.e. '01' to '12' |
| H |
hour, 24-hour format; i.e. '00' to '23' |
| i |
minutes; i.e. '00' to '59' |
| I (capital i) |
'1' if Daylight Savings Time, '0' otherwise. |
| j |
day of the month without leading zeros; i.e. '1' to '31' |
| l (lowercase 'L') |
day of the week, textual, long; i.e. 'Friday' |
| L |
boolean for whether it is a leap year; i.e. '0' or '1' |
| m |
month; i.e. '01' to '12' |
| M |
month, textual, 3 letters; i.e. 'Jan' |
| n |
month without leading zeros; i.e. '1' to '12' |
| r |
RFC 822 formatted date; i.e. 'Thu, 21 Dec 2000 16:01:07 +0200'
(added in PHP 4.0.4) |
| s |
seconds; i.e. '00' to '59' |
| S |
English ordinal suffix, textual, 2 characters; i.e. 'th',
'nd' |
| t |
number of days in the given month; i.e. '28' to '31' |
| T |
Timezone setting of this machine; i.e. 'MDT' |
| U |
seconds since the epoch |
| w |
day of the week, numeric, i.e. '0' (Sunday) to '6' (Saturday) |
| Y |
year, 4 digits; i.e. '1999' |
| y |
year, 2 digits; i.e. '99' |
| z |
day of the year; i.e. '0' to '365' |
| Z |
timezone offset in seconds (i.e. '-43200' to '43200'). The
offset for timezones west of UTC is always negative, and for those east
of UTC is always positive. |
For another example, using the following code woulld display
the same date as above as Sunday November 5, 2006 8:57 PM
instead.
<?php

$thisfile = pathinfo($_SERVER['PHP_SELF']);

echo "Last modified: ".date("l F j, Y g:i A",
filemtime($thisfile["basename"]));

?>
You can put the code in a PHP file that can be included in every webpage,
so that if you decide to change the format of the displayed date, you don't
have to modify every web page that you have on your website. For instance,
I include a "footer.php" file in webpages using
incfile.
References:
-
php displaying last modification time
thescripts developer community
July 17, 2005
-
PHP:date - Manual
The PHP Group
September 28, 2006
-
PHP Date()
W3Schools
-
Date Format php for month day year and time formatting
Plus2net
-
Including Files in a Web Page with PHP
MoonPoint Support
February 8, 2006
[/languages/php]
permanent link
Mon, Oct 30, 2006 9:22 pm
WinAmp Not Playing Some Wav Files
A family member was unable to play some WAV files on two Windows XP
systems using Winamp, though other WAV files played without problem in Winamp
and the ones that would not play in Winamp would play in Windows Media Player
(WMP). When I checked the codec used in those that would not play, I found that
it was MPEG Layer-3 (MP3), while the ones that would play were encoded with
PCM. I was able to resolve
the problem by associating Winamp's DirectShow codec with WAV files.
[ More
Info ]
[/os/windows/software/audio/winamp]
permanent link
Sun, Oct 29, 2006 9:48 pm
Backing Up Exchange Information Store
Microsoft Exchange stores users' email in an "Information Store". You can
use the
Backup Utility that comes with Microsoft Windows systems
to backup the data in the Information Store. The utility can be run by
clicking on
Start,
Run, and then typing
ntbackup
and hitting enter.
[ More Info ]
[/network/email/exchange]
permanent link
Sat, Oct 28, 2006 11:24 pm
Malware Zoo
I've created a database to track information about files associated with
malware I've found while scanning systems. The information includes the
filename, the SHA-1 and MD5 checksums for the file, the file size, and the
designation given it by various antivirus and antispyware programs. The malware
includes adware, spyware, viruses, trojans, and worms.
[ More Info ]
[/security/zoo]
permanent link
Fri, Oct 27, 2006 7:29 pm
Locating QuarkXPress 4.1 Serial Number
You can find the serial number for your Windows copy of QuarkXPress
in QuarkXPress 4.1 by clicking on
Help then selecting
About QuarkXPress while holding down the Ctrl key.
A
QuarkXPress (tm) Environment window will be
displayed that lists the serial number and other information
listed below:
XPress Version
Patch Level
Serial Number
Processor Type
Windows Version
ATM Version
TrueType Enabled
Free memory
Language
Keyboard Type
Number of Colors
Display Driver
Display Driver Version
Default Printer
Printer Driver
Network

Note: The serial number shown has been altered
[/os/windows/software/quarkxpress]
permanent link
Wed, Oct 25, 2006 12:05 am
Exchange Store Database Size Exceeded
I've had to restart the Microsoft Exchange Information Store service on
a Windows Small Business Server (SBS) 2003 on a couple of occasions over
the last few days due to the .edb file that holds email for Exchange
users reaching its 18 GB maximum size.
[ More
Info ]
[/network/email/exchange]
permanent link
Sun, Oct 22, 2006 10:03 pm
htdig Not Indexing Site
I installed ht://Dig 3.2.0b5 on one of my Solaris 10 servers. When I ran htdig
on the server, it did not appear to be indexing my website. I used
/usr/localbin/rundig -s -c /usr/local/conf/htdig_support.conf to
see statistics on what it was doing. It was only opening one connect and making
just two HTTP requests rather than indexing the whole site. When I ran
htdig -vvv, I could see that it was stopping after reading
robots.txt. When I looked at robots.txt, it appeared to be configured to allow
any robot to index all files on the website. It had only the two lines below:
User-agent: *
Disallow:
After experimentation, I found that if I specifed some value for "Disallow",
I could get htdig to index the site. I put in a dummy value, i.e.
Disallow: /abcde12345, a directory
I would never actually use on the site to resolve the problem.
[ More Info ]
[/os/unix/solaris]
permanent link
Sun, Oct 22, 2006 7:16 pm
Finding Hard Links and Symbolic Links
On a Unix or Linux system, you can find symbolic links by utilizing
options with the
find command. To find symbolic links,
aka symlinks, use
find <path> -type l.
E.g.
find / -type l will find every symbolic link on
the system. To find hard links, you can use
find <path> -type
f -links +1
. The
-links +1 option tells find to look
for files with more than one link to them. E.g.
find / -type f -links
+1
would search for every hard link on the system.
If you just want to find all symbolic links pointing to a particular file,
e.g. search.html, you can use the find command with the -lname
option.
# find / -lname 'search.html' 2>/dev/null
/usr/share/htdig/index.html
In the above example, the -lname option tells find to look
only for symbolic links to a file named search.html.
Using 2>/dev/null discards
error messages by sending them to /dev/null. Otherwise, you could
a lot of " No such file or directory" messages as well as the symbolic link
information for which you are looking.
If you wish to see full details returned regarding the file, you can use
the -ls option.
# find / -lname 'search.html' -ls 2>/dev/null
146567    0 lrwxrwxrwx   1 root     root           11 Nov  8  2003 /usr/share/htdig/index.html -> search.html
References:
-
Using find to locate files
Mo Budlong's UNIX 101 Sunworld column
-
Ln - LQWiki
May 26, 2006
[/os/unix/commands]
permanent link
Sat, Oct 21, 2006 6:27 pm
Calculating an MD5 Checksum Using digest on Solaris
If you need to calculate an MD5 checksum for a file under Solaris,
you can use the
digest command.
usage: digest -l | [-v] -a [file...]
You specify the algorith you wish to use to generate the digest or
checksum with the -a option. One of the algorithms is
md5. You can see a list of available algorithms with digest
-l.
# digest -l
sha1
md5
sha256
sha384
sha512
Use all lower case letters for the selected algorithm as they are
case sensitive.
Example:
# digest -a md5 htdig-3.2.0b5-sol9-intel-local.gz
12834a33e31135131bd5c5f0083860b1
You can have the file name and the algorithm used included in the output
by using the -v option.
# digest -a md5 -v *
md5 (idea-c.html) = 3f9f5e884189acec870c8044de11e044
md5 (idea.c.gz) = 374536bb2cdd68f5c0dce961ace26959
[/os/unix/solaris]
permanent link
Mon, Oct 09, 2006 10:09 pm
F-Secure Anti-Virus for DOS
F-Secure offers a free antivirus program
for DOS. This can be run from a command line within windows or you can boot
the system from a DOS floppy or CD when you can't get Windows to start properly
or want to run an antivirus program from outside of Windows. The program is
available from F-Secure at
Free Virus
Removal Tools, which provides a link for downloading the software
from F-Secure's FTP site at
ftp://ftp.f-secure.com/anti-virus/free/.
[ More Info ]
[/security/antivirus/f-secure]
permanent link
Sat, Oct 07, 2006 11:25 pm
Clamav Detected Trojan.Dropper.Small-8
When I ran a scan on a system with
ClamWin, which provides a version of
clamav for Windows, it reported that it found Trojan.Dropper.Small-8
in
42odhr0b.exe.
[ More Info ]
[/security/trojans]
permanent link
Thu, Oct 05, 2006 4:49 pm
Steps to Add a Printer Under Solaris 7
The steps below will allow you to add a printer on a Solaris 7 system
running the Common Desktop Environment (CDE).
- Right-click on the desktop.
- Select "Tools".
- Select "Admintool".
- Click on "Browse".
- Select "Printers".
- Click on "Edit".
- Select "Add".
- Select "Access to Printer".
- In the "Admintool: Add Access to Printer" window fill in the fields.
For "Printer Name" type some name by which you wish to designate the printer.
For "Print Server" you can enter the Fully Qualified Domain Name (FQDN) of the
printer, e.g. hp-printer.mycompany.com. For description, you can put in whatever
descriptive information you wish for the printer, e.g. "HP LaserJet 5".
If you wish the printer to be your default printer, check the "Default
Printer" checkbox.
- Click on "OK"
- Click on "File" then "Exit" to exit from the Admintool.
If you don't make the printer the default printer, i.e. the one Solaris
will use by default when you select "File" and "Print" in an application,
but later wish to make it the default printer, you can do so by the following
steps:
- Open the Admintool as above.
- Click on "browse" and select "printers"
- Select the printer.
- Click on "Edit" and select "Modify".
- Check the default printer checkbox and click on "OK.
- Click on "File" then "Exit" to exit from the Admintool
[/os/unix/solaris]
permanent link
Mon, Sep 25, 2006 11:35 pm
Saving and Restoring Windows File Associations
To be able to restore Windows file associations, you need
to make a copy of two areas in the Windows registry:
HKEY_CURRENT_USER\Software\Classes and
HKEY_LOCAL_MACHINE\Software\Classes. Windows
stores information on what application should be used
to open a particular type of file, e.g. a file with
a .jpg association in those two areas. If you have made
a backup and some applications makes changes that you
would like to reverse, you can use your backup files
for those two branches of the registry to restore the
file associations to what they were previously.
[
More Info ]
[/os/windows/registry]
permanent link
Sat, Sep 23, 2006 7:26 pm
Adobe Photoshop CS2 Saving Files in Incorrect Format
I encountered a problem with Adobe Photoshop CS2 version 9.0 on a system
where Photoshop would not correctly save a file when the "Save As" option
was used. You could pick whatever format you chose, but Photoshop would always
save the file as a Photoshop PSD file. Oh, you could have it put on the
extension for the desired format, e.g. somefile.jpg, but the contents of
the file would be in
PSD format.
If you chose "Save for Web" instead of "Save As" you could save the file
correctly in the chosen format, e.g. JPG.
I was finally able to resolve the problem by holding down the Ctrl, Alt,
and Shift keys while starting Photoshop to have it wipe out its stored
settings
[ More Info ]
[/os/windows/software/graphics/adobe/photoshop]
permanent link
Sat, Sep 23, 2006 1:55 pm
Removing a Spybot Teatimer Block
If you have inadvertenly blocked a process or registry change with the
teatimer application that comes with
Spybot Search & Destroy, you can take
these steps to remove the block.
[/security/spyware/spybot/teatimer]
permanent link
Fri, Sep 22, 2006 4:44 pm
Running StarOffice 7 for the First Time
Sun's Solaris 10 operating system comes with the StarOffice 7 office package,
which I've found handles Microsoft Office documents I've created on Windows
systems or that I receive from others.
When I first started one of the StarOffice applications to read a Microsoft
Word document, I was asked to install it and then was presented with the
option of a "workstation" install or a "local" install.
Select Installation Type
| | |
| Choose the type of installation. |
| |
| (*) | Workstation Installation |
| | This installation will be carried out so that
the programs can be
started directly from the network. 1.5 MB are needed for the local
files. |
| | |
| ( ) | Local Installation |
| |
Installs all StarOffice 7 components locally on the workstation.
This installation requires 284.3 MB memory; temporary 284.3 MB. |
The choices weren't entirely clear to me. It seemed to me that the first was
suggesting that I might be loading the software from another system, either
a server of my own or one of Sun's servers. I expect to use the office package
a lot and want to run it locally not over the network. However I wasn't sure
that I was correctly understanding the options presented. It seemed to me I
should select the "local installation" option, but I wasn't sure, so I did
some searching online.
It seems I'm not the only one confused by the options presented. In a February
2004 posting to his blog on the O'Reilly
Network website,
John Adams voiced a similar complaint:
Sun's choice of office suite is a no-brainer: StarOffice 7. I find one
thing to be rather weird about Star Office, and also OpenOffice, and that's
that you need to install them once for each user. Furthermore, the choice of
installation options is confusing. I was given a choice between Workstation
Install and Local Install. I want both! I consider my computer to
be a workstation, and I want the software installed locally. The correct, and
completely counterintuitive choice here is the Workstation Install, which
is described as the install to use when running the StarOffice software from
a network location, except that I'm not running it from a network location,
I'm running it locally. Had I not already been through this a time or two in
the Windows world, I'd have made the wrong choice. In fact, under Windows, it's
always a frustration to get OpenOffice configured so that it can be used by
multiple users, but I digress.
From his posting I concluded that perhaps the local installation makes a copy
of most of the StarOffice files for each user rather than allowing users on
the same system to share the application.
I also found a thread at
Nomenclature change on installer: "Workstation" and "Local" ins
on the OpenOffice website where others
complained the nomenclature was confusing. From that thread, I concluded that
the workstation install was best for a multi-user system, so I chose that
option.
I love the software and think it is a great alternative to Microsoft
Windows, but I'm afraid most users would find those installation choices
confusing also.
References:
-
Seasonal Revenue for Webloggers? Or, Digital Democratic Fundraising
By John Adams
February 18, 2004
-
Nomenclature change on installer: "Workstation" and "Local" ins
May 12, 2004
-
StartOffice on Sun Ray Terminals at UD
University of Delaware IT Help Center
October 3, 2005
[/os/unix/solaris]
permanent link
Mon, Sep 18, 2006 9:40 pm
Forwarding an Exchange User's Email to an External Address
It is possible for email that comes into an Exchange mailbox to be forwarded to
another email address as well. The other address does not have to be another
email address on the Exchange server, but can be a Yahoo mail, Hotmail, or other
email address.
[ More Info ]
[/network/email/exchange]
permanent link
Sat, Sep 16, 2006 12:23 pm
Fake FDIC Email
E-mails fraudulently claiming to be from the Federal Deposit Insurance
Corporation (FDIC), which insures deposits in banks and thrift
institutions, are attempting to trick recipients into installing unknown
software on personal computers or into accessing a spoofed website. These
e-mails falsely indicate that recipients should install software that was
developed by the FDIC and other agencies or provide personal information
at a spoofed, i.e. fake, website. The software may be a form of spyware or
malicious code and may collect personal or confidential information. The
spoofed website attempts to gain confidential information.
The subject line of such e-mail messages may include any of the following:
Online Access Agreement Update
SON Registration
Urgent Notification - Security Reminder
IMPORTANT: Notification of Federal Deposit Insurance Corporation
The e-mail may request that recipients click on a hyperlink that appears
to be related to the FDIC, which directs recipients to an unknown
executable file to be downloaded, or may direct recipients to a webpage
requesting personal information. While the FDIC is working with the United
States Computer Emergency Readiness Team (CERT) to determine the exact
effects of the executable file, recipients should consider the intent of
the software as a malicious attempt to collect personal or confidential
information, some of which may be used to gain unauthorized access to
on-line banking services or to conduct identity theft.
The FDIC is attempting to identify the source of the e-mails and disrupt
the transmission. Until this is achieved, consumers and financial
institutions are asked to report any similar attempts to obtain this
information to the FDIC by sending information to alert@fdic.gov.
For further information on these "phishing" email messages, see the FDIC
Consumer Alerts webpage at
http://www.fdic.gov/consumers/consumer/alerts/index.html.
[/security/scams]
permanent link
Tue, Sep 12, 2006 12:07 pm
Adding a Program to Corel Photo Album "Open With" Menu
Corel's Photo Album program assists you with
downloading and organizing photos. It also assists with backing up photos to
CDs.
If you wish to open a photo in one of your collections with a particular
program while working in Corel Photo Album 6, you can take the following
steps.
[ More Info ]
[/os/windows/software/graphics/corel/photoalbum]
permanent link
Tue, Sep 05, 2006 12:01 pm
OpenSSL Vulnerabilities up to Version 0.9.7c
OpenSSL is an
Open Source toolkit which
implements the
Secure
Sockets Layer (SSL v2/v3) and
Transport
Layer Security (TLS v1) protocols and provides a full-strength general
purpose cryptography library. Versions of OpenSSL prior to 0.9.6k and 0.9.7c are
vulnerable to Denial of Service (DoS) attacks or could theoretically allow
remote execution of arbitrary code.
OpenSSL
version |
Applicable
advisories
|
Effect |
0.9.6d and
earlier |
30-Jul-2002
|
Practical to run arbitrary code remotely |
0.9.6e-h and
0.9.7 |
19-Feb-2003
|
Practical (LAN) attack to recover frequently repeated plaintext such
as passwords |
0.9.6i and
0.9.7a |
17-Mar-2003
19-Mar-2003 |
Practical (LAN) attacks to obtain or use secret key |
0.9.6j and
0.9.7b |
30-Sep-2003
|
Denial of Service, and theoretically possible run arbitrary code
remotely |
0.9.6k and
0.9.7c |
|
Clean at present |
Some attacks may not be feasible except from systems on the same
LAN as the attacked system,
since a very fast connection between the attacker and target may be needed
to make the attack practicable. If a webserver is in a datacenter with
perhaps dozens or even hundreds of other systems, a compromised system within
the datacenter could be used by an attacker to exploit these vulnerabilities
on other servers within the same datacenter, however.
If you need to determine which version of OpenSSL you are running, you
can use the command openssl version. You may need to specify
the full path to the command if it isn't in your default path. For a Solaris
10 system, you can use the following path:
# /usr/sfw/bin/openssl version

OpenSSL 0.9.7d 17 Mar 2004
For Solaris 7, use /usr/local/ssl/bin/openssl version.
References:
-
Vulnerable versions of OpenSSL apparently still widely deployed on commerce
sites
Netcraft
November 3, 2003
-
ESB-2003.0871 -- Sun Alert Notification -- OpenSSL Vulnerabilitiyes in Sun
Grid Engine 5.3
Australian Computer Emergency
Response Team (AusCERT)
December 24, 2003
[/security/vulnerabilities/multios]
permanent link
Tue, Sep 05, 2006 7:44 am
Showrev Command
The showrev command displays revision information for the current
hardware and software of a system running the Solaris operating system. With
no arguments, showrev shows the system revision information including
hostname, hostid, release, kernel architecture, application architecture,
hardware provider, domain, and kernel version.
Example for a Sun Sparc system running Solaris 7:
bash-2.03$ showrev
Hostname: pluto
Hostid: 80b11bbd
Release: 5.7
Kernel architecture: sun4u
Application architecture: sparc
Hardware provider: Sun_Microsystems
Domain:
Kernel version: SunOS 5.7 Generic 106541-39 Jan 2005
Example for an Intel-based PC running Solaris 10:
-bash-3.00$ showrev
Hostname: saturn
Hostid: 15db9095
Release: 5.10
Kernel architecture: i86pc
Application architecture: i386
Hardware provider:
Domain:
Kernel version: SunOS 5.10 Generic
If you use the -c option, showrev shows
the PATH and LD_LIBRARY_PATH and finds out all the directories
within the PATH that contain it. For each file found,
its file type, revision, permissions, library information,
and checksum are printed as well.
-bash-3.00$ showrev -c /usr/local/bin/mboxgrep

PATH is:
/usr/bin:/usr/ucb:/etc:.

PWD is:
/home/jsmith

LD_LIBRARY_PATH is not set in the current environment
________________________________________________________________________

File: /usr/local/bin/mboxgrep
=============================
File type: ELF 32-bit LSB executable 80386 Version 1, dynamically linked, stripped
Command version: GNU C crt1.s

GNU C crti.s

    SunOS 5.10 Generic January 2005

GCC: (GNU) 3.4.2

GCC: (GNU) 3.4.2

GCC: (GNU) 3.4.2

GCC: (GNU) 3.4.2

GCC: (GNU) 3.4.2

GCC: (GNU) 3.4.2

GCC: (GNU) 3.4.2

GCC: (GNU) 3.4.2

GCC: (GNU) 3.4.2

GCC: (GNU) 3.4.2

GCC: (GNU) 3.4.2

GCC: (GNU) 3.4.2

GCC: (GNU) 3.4.2

GNU C crtn.o
ld: Software Generation Utilities - Solaris Link Editors: 5.10-1.477
File mode: rwxr-xr-x
User owning file: root
Group owning file: root
Library information:
        libbz2.so.1 =>   /usr/lib/libbz2.so.1
        libz.so.1 =>     /usr/lib/libz.so.1
        libpcre.so.0 =>  (file not found)
        libc.so.1 =>     /lib/libc.so.1
        libm.so.2 =>     /lib/libm.so.2
Sum: 28300
________________________________________________________________________
The -p option will show patch information.
-bash-3.00$ showrev -p
Patch: 116299-08 Obsoletes:  Requires:  Incompatibles:  Packages: SUNWxsrt, SUNWjaxp, SUNWxrgrt, SUNWxrpcrt
Patch: 116303-02 Obsoletes:  Requires:  Incompatibles:  Packages: SUNWxrpcrt
The -a option prints all available revision information, including
Window system and patch information.
-bash-3.00$ showrev -a
Hostname: saturn
Hostid: 15db9095
Release: 5.10
Kernel architecture: i86pc
Application architecture: i386
Hardware provider:
Domain:
Kernel version: SunOS 5.10 Generic

OpenWindows version:
Solaris X11 Version 6.6.2 15 December 2004

Patch: 116299-08 Obsoletes:  Requires:  Incompatibles:  Packages: SUNWxsrt, SUNWjaxp, SUNWxrgrt, SUNWxrpcrt
Patch: 116303-02 Obsoletes:  Requires:  Incompatibles:  Packages: SUNWxrpcrt
[/os/unix/solaris]
permanent link
Sun, Sep 03, 2006 8:20 pm
FunWebProducts Malware
When I updated Spybot 1.4 on a system and then scanned the system, Spybot found
FunWeb, FunWebProducts, MyWay.MyWebSearch, and MyWebSearch, all of which appeared
to be related. This particular malware appears to be associated with
iWon.
[ More Info ]
[/security/spyware/funwebproducts]
permanent link
Sun, Sep 03, 2006 5:50 pm
Viewing DWF Drawings in Buzzsaw
When you are viewing a
DWF drawing, you will see a toolbar at the top of the
drawing.

To zoom in or out of the drawing, click on the icon of the magnifying
glass on the toolbar, which will change the cursor to a magnifying glass.
Move the cursor into the drawing. To zoom in, while holding the left mouse
button down (or the right mouse button, if you have the mouse configured
for left-handed use), move the cursor left in the drawing. To zoom out,
move the cursor right.
To zoom into a particular section of the drawing, click on the "zoom
rectangle" tool. It has an icon that looks like a magnifying glass with a
rectangle in it. It is immediately to the right of the magnifying tool
that allows you to zoom in and out. Move the cursor into the drawing then
click the mouse button and while holding down the mouse button drag the
cursor to form a rectangle. When you release the mouse button, you will
zoom into the area of the drawing you have defined by the rectangle you
drew.
To pan the drawing, i.e. move to different sections of the drawing, click
on the hand icon on the toolbar, which will change the cursor to a hand.
Then move the cursor into the drawing. While holding the left mouse button
down (or the right mouse button, if you have the mouse configured for
left-handed use), move the cursor in the direction you wish to pan.
[/os/windows/software/cad/buzzsaw]
permanent link
Thu, Aug 24, 2006 10:12 pm
Creating an Email Filter for a Blackberry
Note: The following applies if you are using the BlackBerry Desktop Manager
Version 4.0.1.10 (Apr 27 2005). A different process may be needed for
other versions - see
BlackBerry Email Filters for instructions for
version 4.2.2.14 (Apr 26 2007).
To create an email filter to stop some email from going to a Blackberry,
e.g. messages that have been tagged as spam, take the following steps:
-
Open the BlackBerry Desktop Manager on the PC. If you don't see a
shortcut for it, look under Start, All Programs, then
BlackBerry.

- Double-click on Redirector Settings.
- Click on the Filters tab.
- Click on the New button.
-
In the Filter Name field, type a name for the filter, e.g. "Spam".
Check the Subject checkbox and type the text that will appear in the
subject field that identifies spam. In the case where SpamAssassin marks
probable spam with "[SPAM]", you would put
[SPAM] in that field.
If, instead, you did not want to forward messages from a particular email
address, you would check the From checkbox. If you didn't want
to forward messages from multiple senders, you could put all of their
email addresses in the From field, separating the addresses by
semicolons. You can also use an asterisk as a wildcard to block multiple
sending addresses. For instance if you wanted to block all email from
xyzcorp.com senders, you could put *@xyzcorp.com in the
From field.
When you have specified the filter you want, check "Don't forward messages to the
handheld.
- Click on OK.

- Click on OK again.
[/network/email/blackberry]
permanent link
Sun, Aug 20, 2006 10:19 pm
Barclays Banking Scam Pointing to Russian Website
I received a message this evening purportedly from Barclays Bank, a bank
in the U.K. The message is shown below:
Dear Sir/Madam,

As part of our security measures, we regularly screen activity in the
Barclays Online Bank system. we recently contacted you after noticing an
issue on your account. We requested information from you for the
following reason:

Our system requires further account verification.

Due to the recent update of the servers, you are requested to please
restore your account info at the following link.


https://update.barclays.co.uk/olb/p/LoginMember.do

*Important*
We have asked few additional information which is going to be the part of
secure login process. These additional information will be asked during
your future login security so, please provide all these info completely
and correctly otherwise due to security reasons we may have to close your
account temporarily.


J. S. Smith
Security Advisor
Barclays Bank PLC.


Please do not reply to this e-mail. Mail sent to this address cannot be
answered.
For assistance, log in to your Barclays Online Bank account and choose
the "Help" link on any page.

Barclays Email ID # 1009
But the URL was clearly pointing to
http://www.spain-soccer.net.ru//administrator/components/ibank.barclays.co.uk/olb/p/LoginMember.do/.
I don't reside in the U.K. nor do I have a Barclays bank account, but I went
to the webpage and put in dummy information. There were several pages of
questions to answer with questions about one's Barclay bank account, spouse's
information,and credit card information. After submitting the information I
was taken to a valid Barclays Bank webpage. Anyone foolishly completing the
questionnaire with valid information would not only allow the scammer to access
his Barclays Bank account, but also commit identity theft.
I forwarded the information to internetsecurity @ barclays.co.uk, the email
address listed at Barclays Bank scam email
page.
HTML
version of Scam Email
[/security/scams/phishing/barclays]
permanent link
Thu, Aug 03, 2006 8:54 pm
AOL Cuts 5,000 Jobs
AOL plans to cut about 5,000 jobs within 6 months as it tries to move away from
its dwindling subscription dial-up service. AOL is planning to offer its
services for free to broadband users, counting on advertising revenues to
sustain it.
AOL's user base has been dwindling as users move to broadband services. Those
that don't have access to broadband services or don't want to pay for
broadband services are also likely to choose cheaper dial-up services
rather than pay a premium price for AOL's ad-saturated dial-up service.
References:
-
AOL to slash 5,000 jobs
CNNMoney.com
August 3, 2006
-
AOL Tells Broadband Customers to Find New ISP
MoonPoint Support
November 12, 2004
[/network/Internet/ISP]
permanent link
Sat, Jul 29, 2006 4:20 pm
Cannot Connect to Domain
I encountered a problem with a Windows XP Professional system no longer being
able to authenticate with the domain controller after I replaced the disk
drive in the system and restored the system from a backup. Whenever the
user tried logging into the domain or I tried logging in as the domain
administrator, the following message appeared:
| Logon Message |
Windows cannot connect to the
domain, either because the domain controller is down or otherwise unavailable,
or because your computer account was not found. Please try again later. If this
message continues to appear, contact your system administrator for assistance.
|
The problem went away on its own, but only for a couple of days, then recurred.
I took the system out of the domain and put it in a workgroup, rebooted,
then put it back in the domain to correct the problem. Apparently there
are a variety of causes for such a problem.
[ More Info ]
[/os/windows/domain]
permanent link
Tue, Jul 25, 2006 7:35 pm
Who Is Linking to My Site?
If you want to find what links to your site exist on the web, some search
engines provide a
linkdomain operator. For instance, if I wanted
to find links to
support.moonpoint.com
, I could search using
linkdomain:support.moonpoint.com to find
out who else is linking to my site.
Linkdomain Operator Supported
MSN Search
AltaVista
AlltheWeb
Linkdomain Operator Not Supported
Google
AOL Search
Ask.com
Gigablast
LookSmart
With MSN Search you can also use "links to",
e.g. links to support.moonpoint.com. See
Search Builder and advanced search options for other MSN Search
operators.
Google does not provide a linkdomain operator, but I could
search on "
support.moonpoint.com" to find pages that contain pages that contain
the "support.moonpoint.com", though that will find only instances where
the website name appears on a page, not instances where a link points to the
site.
References:
-
Who is linking to my website?
By Raghavendra Prabhu, a developer in Microsoft on the MSN/Windows Live Search
backend team
[/network/web/search]
permanent link
Tue, Jul 25, 2006 12:12 pm
Account Acces Via Remote Web Workplace
If you try to log into a system in a domain remotely using Remote Web Workplace,
but get a message that "The local policy of this system does not permit you to
logon interactively", the following steps can be taken at the domain controller
to resolve the problem and provide remote access to the system for a domain
account.
- Open "Server Management" by clicking on Start, All
Programs, Administrative Tools, then Server Management.
- Click on Client Computers.
- Select the computer for which the user needs remote access by right-clicking
on it then selecting Manage Computer.
- Double-click on Local Users and Groups.
- Click on Groups.
- Double-click on Remote Desktop Users in the right pane.
- Click on the Add button to add a new user to the Remote Desktop
Users group.
- In the "Enter the object names to select" field, place the user's domain
account. Put the domain name followed by a "\" and then the account name. E.g.
Acme\jdoe. Or you can use the form jdoe@acme.com.
- Click on Check Names to verify the account.
- Click on OK.
- Click on OK again to close the "Remote Desktop Users
Properties" window.
- Close the
Computer Management window.
Or you can resolve the problem by logging into the computer for which the
user needs access and then taking the following steps, if that system is a
Windows XP Professional system.
- Click on Start.
- Click on All Programs.
- Click on Control Panel.
- Click on Performance and Maintenance, if the system is set for
"category view". If it is set for "classic view", go to the next step.
- Click on Administrative Tools.
- Click on Computer Management.
- Click on Groups.
- Double-click on Remote Desktop Users in the right pane.
- Click on the Add button to add a new user to the Remote Desktop
Users group.
- In the "Enter the object names to select" field, place the user's domain
account. Put the domain name followed by a "\" and then the account name. E.g.
Acme\jdoe. Or you can use the form jdoe@acme.com.
- Click on Check Names to verify the account.
- Click on OK.
- Click on OK again to close the "Remote Desktop Users
Properties" window.
- Close the
Computer Management window.
[/os/windows/software/remote-control]
permanent link
Mon, Jul 24, 2006 3:02 pm
Fixing Passwords Plus Entry Display Problem
The
Dataviz Passwords Plus program
may sometimes not display any of the entries in a category in the left-hand
pane of its window. To get the entries to reappear, you can edit the
HKEY_CURRENT_USER\Software\DataViz\PasswordsPlus\List View Info
registry key.
[ More Info ]
[/os/windows/software/security/password]
permanent link
Sat, Jul 15, 2006 7:27 pm
PC Hardware in Garage
I need to start cleaning my garage, so I can at least walk around in it
without knocking things over unless I watch my every step. So I've
started posting information on items that I plan to sell on eBay.
Items to sell
[/pc/hardware]
permanent link
Fri, Jul 14, 2006 1:23 pm
Solaris Prtdiag Command
The
prtdiag can be used on Solaris systems to display system
diagnostic information.
/usr/sbin/prtdiag [-v] [-l]
The following options are supported:

-l       Log output. If failures or errors exist in the
         system, output this information to syslogd(1M) only.

-v       Verbose mode. Displays the time of the most  recent
         AC  Power  failure,  and  the  most recent hardware
         fatal  error  information,  and   (if   applicable)
         environmental  status.  The  hardware  fatal  error
         information is useful to repair  and  manufacturing
         for detailed diagnostics of FRUs.

The following exit values are returned:

0        No failures or errors are detected in the system.

1        Failures or errors are detected in the system.
If you are running Solaris 10 on an x86-based PC, the prtdiag command does
not work on some earlier releases of Solaris 10. I have two PCs running
Solaris 10. I installed the 3/05 release of Solaris 10 on the first and
the 6/06 release of Solaris 10 on the second. On the first system I see
"prtdiag: not implemented on i86pc" when I try to run prtdiag.
On the system with the 6/06 release, prtdiag works and shows me
the information below. You can determine which release you are using by
looking at the contents of the /etc/release file.
# prtdiag
System Configuration: System manufacturer System Product Name
BIOS Configuration: American Megatrends Inc. 0501 08/26/2005

==== Processor Sockets ====================================

Version                          Location Tag
-------------------------------- --------------------------
AMD Athlon(tm) 64 Processor 3000+ Socket 939

==== Memory Device Sockets ================================

Type    Status Set Device Locator      Bank Locator
------- ------ --- ------------------- --------------------
DDR     in use 0   DIMM0               BANK0
DDR     in use 0   DIMM1               BANK1
DDR     empty  0   DIMM2               BANK2
DDR     empty  0   DIMM3               BANK3

==== On-Board Devices =====================================
 Onboard Ethernet

==== Upgradeable Slots ====================================

ID  Status    Type             Description
--- --------- ---------------- ----------------------------
0   in use    PCI-X            PCIEX16
3   available PCI              PCI_1
4   available PCI              PCI_2
5   available PCI              PCI_3
1   available PCI-X            PCIEX1_1
2   available PCI-X            PCIEX1_2
[/os/unix/solaris]
permanent link
Mon, Jul 10, 2006 9:22 pm
Adding Users with Solaris Management Console
After installing Solaris 10 onto a home system, I clicked on the Launch
button and looked for a tool to set up a user account. I was surprised
that I could not find one. Sure, I could run
useradd from the
command line, but I expected to find some graphical tool readily available as a
menu option from the root account as well. I had put Solaris 10 on an
office system previously, but couldn't remember if I had used useradd
to do so. I couldn't find admintool on the Solaris 10 system
There is a GUI tool,
available under Solaris 10, the Solaris Management Console (SMC), but it wasn't
a menu option accessible from the Launch button. You can start it from a
command prompt by typing smc, however.
[ More Info ]
[/os/unix/solaris/smc]
permanent link
Mon, Jul 10, 2006 12:01 pm
Is Solaris Running on a Sparc or 32-bit or 64-bit I386 System?
You can determine whether Solaris is running on a Sparc system or
an x86-based system from the command line using
uname -a.
Examples
| Architecture | "uname -a" output |
|---|
| Sparc | SunOS beetle 5.7 Generic_106541-39 sun4u sparc
SUNW,Ultra-5_10 |
| 32-bit x86 | SunOS mantis 5.10 Generic i86pc i386 i86pc |
| 64-bit x86 | SunOS bee 5.10 Generic_118855-14 i86pc i386
i86pc |
It isn't apparent from the uname output whether in the case of an x86-based
system the system is a 32-bit or 64-bit system. But you can use the
isainfo command to get that information.
Examples
| Architecture | "isainfo" output |
|---|
| Sparc | sparcv9 sparc |
| 32-bit x86 | i386 |
| 64-bit x86 | amd64 i386 |
You can get more information using the -v option for
isainfo.
# isainfo -v
64-bit amd64 applications
        sse3 sse2 sse fxsr amd_3dnowx amd_3dnow amd_mmx mmx cmov amd_sysc cx8
        tsc fpu
32-bit i386 applications
        sse3 sse2 sse fxsr amd_3dnowx amd_3dnow amd_mmx mmx cmov amd_sysc cx8
        tsc fpu
[/os/unix/solaris]
permanent link
Sun, Jul 09, 2006 9:32 pm
Solaris 10 Installation Notes
I installed Solaris 10 on on a PC with an Asus A8S-X motherboard and an
nVIDIA GeForce 7 series NX7300GS video card. I encountered a problem
installing the 6/06 version of Solaris 10, because I had installed a
previous version of Solaris 10 on the system, but apparently not wiped out
the partitions created during that installation as I thought. I also
enountered a problem getting the video resolution set the way I wanted.
Resolving the first problem meant wiping out the existing Solaris partition
during the reinstall process. I was able to resolve the second problem by
running
xorgconfig after the installation process completed.
[ More Info ]
[/os/unix/solaris]
permanent link
Sat, Jul 08, 2006 10:08 pm
Numbers to Dial for Information Associated with a Phone Number
If you need to determine the telephone number associated with a phone,
you can call your own phonemail number, leave a message and then
check your messages and, if the system provides callers' numbers, get the
number you called from or you can dial MCI's 1-800-444-3333 number. An
automated system will read the number you are calling from to you.
If you need to know the long distance carrier associated with
a phone line, you can dial 1-700-555-4141 from the telephone you wish to check.
You will hear an announcement telling you the name of the carrier.
And according to the
sprint gives out customers data when you call article posted on
digg, you can call 1-877-785-8414,
which is a Sprint customer service line, put in any Sprint customer's phone
number and get the full name and street address of the account holder.
The number you are calling from doesn't matter.
[/phone]
permanent link
Fri, Jul 07, 2006 1:41 pm
Dxdiag - The DirectX Diagnostic Tool
Microsoft provides a DirectX Diagnostic Tool,
dxdiag.exe
, with Windows systems.
The tool is designed to help you troubleshoot DirectX-related issues. You can
run the tool from a command prompt by typing
dxdiag or you can
click on the
Start button, select
Run, type
dxdiag,
and hit Enter.
[ More Info ]
[/os/windows/utilities/diagnostic]
permanent link
Tue, Jul 04, 2006 7:46 pm
cm1.dll
When I scaned a system on July 1, 2006 with Norton AntiVirus 2005, Norton AntiVirus identified the
cm1.dll file in
c:\windows\system32 as malware associated with
Spyware.ClientMan. I submitted the file to
Jotti's Online Malware Scan, a
site that scans uploaded files with multiple antivirus programs; 7 of the 15
antivirus programs with which it scanned the file reported
cm1.dll
as malware.
[ More Info ]
[/security/spyware/ClientMan]
permanent link
Sat, Jul 01, 2006 9:36 pm
Restarting Services with svcadm on Solaris 10 Systems
On systems running Solaris 10, you can restart services using the
svcadm command. For instance, to restart the SSH daemon on Solaris
10 systems, from the root account use
svcadm restart ssh.
# svcadm
Usage: svcadm [-v] [cmd [args ... ]]

        svcadm enable [-rst]  ...      - enable and online service(s)
        svcadm disable [-st]  ...      - disable and offline service(s)        svcadm restart  ...            - restart specified service(s)
        svcadm refresh  ...            - re-read service configuration
        svcadm mark [-It]   ... - set maintenance state
        svcadm clear  ...              - clear maintenance state
        svcadm milestone [-d]        - advance to a service milestone
        Services can be specified using an FMRI, abbreviation, or fnmatch(5)
        pattern, as shown in these examples for svc:/network/smtp:sendmail

        svcadm  svc:/network/smtp:sendmail
        svcadm  network/smtp:sendmail
        svcadm  network/*mail
        svcadm  network/smtp
        svcadm  smtp:sendmail
        svcadm  smtp
        svcadm  sendmail
[/os/unix/solaris]
permanent link
Sat, Jul 01, 2006 9:27 pm
Writing An ISO File to CD or DVD with Solaris
Solaris, at least version 10, provides the cdrw utility that can be used to
write information to CDs or DVDs. To list all of the CD or DVD writers
available on the system, you can use the
cdrw -l command.
When I used the command on an x86-based Solaris system without any media
in the drive, I saw the following:
# cdrw -l

Looking for CD devices...

No CD writers found or no media in the drive.
I placed a blank DVD in the DVD writer and tried again. I then saw the DVD
writer listed.
# cdrw -l
Looking for CD devices...
    Node                   Connected Device                Device type
----------------------+--------------------------------+-----------------
 cdrom0               | DVDRW    IDE 16X          A188 | CD Reader/Writer
You can also use the command iostat -En to see information
on the CD or DVD writers in a system.
# iostat -En
c0t1d0           Soft Errors: 21 Hard Errors: 3 Transport Errors: 0
Vendor: DVDRW    Product: IDE 16X          Revision: A188 Serial No:
Size: 0.00GB <8192 bytes>
Media Error: 0 Device Not Ready: 2 No Device: 1 Recoverable: 0
Illegal Request: 21 Predictive Failure Analysis: 0
If you have an .iso file, i.e. an image of a CD or DVD that you wish to
write to a CD or DVD, you can use the command cdrw -i someimage.iso
to write an image to a blank disc in a CD or DVD writer as in the
example below.
# cdrw -i sol-10-u2-companion-ga.iso
Looking for CD devices...
Initializing device...done.
Writing track 1...done
Finalizing (Can take several minutes)...done.
If you wish to specify the device to use for writing, such as in the case
where a system may have multiple devices capable of writing to CDs or DVDs, e.g.
one CD writer and one DVD writer, you can use the -d option to
specify the device to use for writing.
cdrw -i -d cdrom0 sol-10-u2-ga-x86-dvd.iso
The cdrw command supports the following options:

     -a       Creates an audio disk. At least one audio-file name
              must  be  specified. A CD can not have more than 99
              audio tracks, so no more than 99 audio files can be
              specified. Also, the maximum audio data that can be
              written to the media  by  default  is  74  minutes,
              unless -C is specified.

     -b       Blanks CD-RW or DVD-RW media. The type  of  erasing
              must  be  specified  by  the  all, fast, or session
              argument. DVD+RW media does not  support  blanking,
              but can be rewritten without the need for blanking.

     -c       Copies a CD. If no other argument is specified, the
              default  CD  writing  device  is  assumed to be the
              source device as  well.  In  this  case,  the  copy
              operation  reads  the source media into a temporary
              directory and prompts you to place  a  blank  media
              into the drive for the copy operation to proceed.

     -C       Uses stated media capacity.  Without  this  option,
              cdrw  uses  a  default value for writable CD media,
              which is 74 minutes  for  an  audio  CD,  681984000
              bytes for a data CD, or 4.7 Gbytes for a DVD.

     -d       Specifies the CD or DVD writing device.

     -h       Help. Prints usage message.

     -i       Specifies the image file for creating data  CDs  or
              DVDs. The file size should be less than what can be
              written on the media.  Also,  consider  having  the
              file  locally  available instead of having the file
              on an NFS-mounted file system. The CD writing  pro-
              cess  expects  data  to  be  available continuously
              without interruptions.

     -l       Lists all the CD or DVD writers  available  on  the
              system.

      -L       Closes the disk. If the media was left in  an  open
              state  after the last write operation, it is closed
              to prevent any further writing. This operation  can
              only be done on re-writable CD-RW media.

     -m       Uses an alternate temporary  directory  instead  of
              the  default  temporary directory for storing track
              data while copying a CD or DVD. An  alternate  tem-
              porary  directory  might  be  required  because the
              amount of data on a CD can be  huge.  For  example,
              the amount of data can be as much as 800 Mbytes for
              an 80 minute audio CD and 4.7 Gbytes for a DVD. The
              default  temporary  directory  might  not have that
              much space available.

     -M       Reports media status. cdrw reports if the media  is
              blank  or  not,  its  table  of  contents, the last
              session's start  address,  and  the  next  writable
              address  if  the disk is open. DVD+RW does not sup-
              port erasing and always has  some  content  on  the
              media.

     -O       Keeps the disk open. cdrw closes the  session,  but
              it  keeps the disk open so that another session can
              be added later on to create a multisession disk.

     -p       Sets the CD writing speed. For example, -p  4  sets
              the  speed  to 4X. If this option is not specified,
              cdrw uses the default speed of the  CD  writer.  If
              this  option  is  specified,  cdrw tries to set the
              drive write speed to this value, but  there  is  no
              guarantee  of  the actual speed that is used by the
              drive.

     -s       Specifies the source device for  copying  a  CD  or
              DVD.

     -S       Simulation mode. In this mode, cdrw  operates  with
              the  drive  laser turned off, so nothing is written
              to the media. Use this option to verify if the sys-
              tem  can  provide data at a rate good enough for CD
              writing.

     -T       Audio format to use for extracting audio  files  or
              for  reading audio files for audio CD creation. The
              audio-type can be sun, wav, cda, or aur.

     -v       Verbose mode.

     -x       Extracts audio data from an audio track.
[/os/unix/solaris]
permanent link
Wed, Jun 28, 2006 5:59 pm
Determining the Memory and Disk Space on a Solaris System
If you need to determine the amount of memory in a Solaris system,
you can use the
prtconf command. The second line of output will
show the amount of memory in the system.
# prtconf
System Configuration:  Sun Microsystems  sun4u
Memory size: 384 Megabytes
System Peripherals (Software Nodes):

SUNW,Ultra-5_10
...
Or you can use prtconf | grep Memory to get just the amount of
memory in the system.
If you need to determine the disk space in the system you can use this
soldiskspace
BASH script to display the disk
space in GigaBytes (GB). You may need to modify the first line in the script to
point to the actual location of bash on your system, e.g. /usr/local/bin/bash on
Solaris 2.7 systems. The script uses the prtvtoc command and is based on the
BASH script provided by Sandra Henry-Stocker, ITworld.com in an article
titled
Calculating overall disk space
published on December 23, 2004 on ITworld.com
. A full explanation of how the script works is available in the article.
The script must be run as root. To use the script, issue
the command chmod 700 soldiskspace to make the script executable.
# ./soldiskspace
Disks:
    /dev/rdsk/c0t0d0s2: 8 Gbytes
    TOTAL: 8 GB
Zip file for script:
soldiskspace.zip
An alternative method of determing the disk space on a system is to use
iostat -En. Using that command on the same system as used in
the example above shows the disk space in the second line of output below.
The command also shows the manufacturer and model number for the CD-ROM
drive in the system. The size value should be ignored for the CD-ROM drive.
# iostat -En


c0t0d0          Soft Errors: 0 Hard Errors: 0 Transport Errors: 0
:  Size: 8.62GB <8622415872 bytes>
Media Error: 0 Device Not Ready: 0  No Device: 0 Recoverable: 0
Illegal Request: 0

c0t2d0          Soft Errors: 0 Hard Errors: 52 Transport Errors: 0
Vendor:    LG    Product: CD-ROM CRD-8322B Revision: 1.05 Serial No: ºÝþºÝþºÝþ
Size: 18446744073.71GB <-1 bytes>
Media Error: 0 Device Not Ready: 52 No Device: 0 Recoverable: 0
Illegal Request: 0 Predictive Failure Analysis: 0
References:
-
Calculating overall disk space
Sandra Henry-Stocker
ITworld.com
December 23, 2004
[/os/unix/solaris]
permanent link
Sun, Jun 25, 2006 3:41 pm
Emprex DVDRW 1116IM Drive
I installed an
Emprex
DVDRW 1116IM dual 16x double layer
drive in a system that I'm setting up with Fedora Core 5.
[/hardware/pc/dvd]
permanent link
Thu, Jun 22, 2006 4:30 pm
World Time Zones
If you need to know the local time somewhere else in the world or the current
UTC, aka
GMT or Zulu, time,
a useful site is,
www.timeanddate.com.
From
The World Clock - Time
Zones page, you can see current times throughout the world and GMT time.
[/reference]
permanent link
Sat, Jun 17, 2006 3:14 pm
Maintaining Wikipedia's Accuracy
There was an article on
The New York Times
website today, titled
Growing Wikipedia Revises Its 'Anyone Can Edit' Policy that discusses
the way Wikipedia maintains the accuracy of its contents.
Wikipedia is an online encyclopedia
maintained by volunteers, which provides information on a multitude of
topics. It is a free alternative to other online encyclopedia's, such
as Encyclopedia Britannica.
Wikipedia allows anyone to edit most articles. So how does Wikipedia
prevent articles being defaced by online vandals who can think of no productive
way to spend their time or those with an axe to grind. It does so through
volunteer administrators who help maintain the quality of the information
on the website.
[ More Information ]
[/reference]
permanent link
Thu, Jun 15, 2006 11:17 pm
John Glenn Versus Howard Metzenbaum
I received an email that was purportedly based on comments by Senator John
Glenn of Ohio comparing the lives lost in the war in Iraq to casualties in
previous wars fought by America. At the end of the message was an exchange
between Glenn and Howard Metzenbaum, which purportedly occurred
on the floor of the U.S. Senate.
Unlike some such email messages, there was some truth in this message, but
also a fair amount of distortion and misattribution of comments.
[ More Info ]
[/security/hoaxes]
permanent link
Mon, Jun 12, 2006 12:38 pm
PBS Distribution of TV Programming over the Internet
Robert Cringely's June 8 column,
Local Heroes: Could the Key to Successful Internet Television Be...PBS?
suggests that
PBS might be
a good conduit for distributing television programming over the Internet, i.e.
IPTV, for not only their own programming, but for commercial programming as
well.
He suggests that PBS affiliates could establish relationships with the
ISPs in their area,
colocating servers at the ISPs, which would distribute the programming
to the ISPs' subscribers.
[/tv]
permanent link
Fri, May 26, 2006 11:29 pm
Google Calendar
Google now offers a calendar service, Google Calendar, which can be accessed
using
http://www.google.com/calendar or
calendar.google.com. You can schedule events on a calendar, mark them
as public, and then have Google Calendar notify guests of the events.
Some may use this service as an alternative to Microsoft Outlook's calendaring
feature. It certainly would make sharing a calendar easier, if you need to
share a calendar with others outside your office or with non-Outlook users.
According to the Wall Street Journal, Google has also recently
negotiated a deal with Dell where Google will pay Dell
up to a billion dollars to preinstall Google Desktop on Dell PCs.
References:
-
Google and Dell in $1 billion Microsoft busting deal
By Stan Beer
Friday, 26 May 2006
[/network/web/services/google]
permanent link
Sun, May 21, 2006 7:40 pm
ClamWin 0.88.2.3 Reports Proxy.Exe is Worm.Bobax.AA
I installed ClamWin 0.88.2.3 on a user's system and scanned the system for
viruses. ClamWin reported
AnalogX's
proxy.exe file as Worm.Bobax.AA. I had installed version 4.14 of AnalogX's
Proxy
program on the system almost a year ago to have proxy server capabilities
on the system for troubleshooting. I suspect ClamWin is simply looking
at the file name and making its determination solely on that criteria
resulting in a false positive report of Worm.Bobax.AA. The virus
definitions on the system were updated on 09:18 21 May 2006 and the
virus DB version is main: 38, daily: 1474.
Arcabit, which produces the ArcaVir
antivirus software, states that
Worm.Bobax.AA is a mass mailing worm that attempts to email itself
to others from an infected computer. Arcabit's page states the worm
creates services.exe on the hard drive. However, there is a
legitimate services.exe file in C:\Windows\system32 on Windows
XP systems that is produced by Microsoft.
Symantec's
W32.Bobax.AA@mm webpage states that the services.exe file created by the
worm is placed in %Windir%, which will usually be
C:\Windows on Windows XP systems. You can determine the value
for %Windir% by typing echo %WINDIR% at a command
prompt. On this system, the only services.exe file was in
C:\Windows\system32 and appeared to be the legitimate services.exe
file. The Symantec webpage also states the worm creates %Windir%\msdefr.exe, which
I did not find on the system. Nor did I find a C:\autorun.inf,
which the Symantec webpage on the worm states is created by it.
McAfee, which produces antivirus software,
states on its
AnalogX-Proxy that the AnalogX proxy software is a legitimate tool, though
it may sometimes be used by malware to set up proxy servers on a system without
a user's knowledge. For instance, McAfee's antivirus software may report
AnalogX-Proxy.ldr
when a particular trojan file uses the AnalogX proxy program.
It isn't unusual for malware authors to use legitimate
tools for their own nefarious purposes.
I submitted the proxy.exe file to
www.virustotal.com, which provides a free service where you can submit
files for automatic analysis by quite a few antivirus programs. ClamAV is
one of the antivirus programs running on that system. It reported
Worm.Bobax.AA. Seventeen of the twenty-four antivirus programs used
on that system reported "no virus found", though. Kaspersky reported
"not-a-virus:Server-Proxy.Win32.AnalogX.414" while the McAfee scan
reported "potentially unwanted program AnalogX-Proxy". Panda reported
"Application/AnalogX-Proxy.A". Symantec did not report that it found
anything amiss with the file. TheHacker reported "Aplicacion/AnalogX.414".
UNA reported "I-Worm.Win32.virus" and VBA32 reported
"RiskWare.Proxy.AnalogX.414". For the full report see
VirusTotal Proxy.Exe.
The file may be identified as a potential risk by some antivirus software,
because it is possible for it to be misused, but since I installed the
software on the system for troubleshooting purposes, I don't want ClamWin
identifying it as malware every time it scans the system. If the user reports
a problem accessing a website from her system, I can attempt to make
a connection myself from the system by activating the proxy server software. So
I configured ClamWin to ignore the proxy.exe file when it checks the system.
You can exclude proxy.exe from ClamWin's scans by taking the following steps
in ClamWin:
- Click on Tools.
- Select Preferences.
- Click on the Filters tab.
- Click on the "new" button under "Exclude Matching Filenames". It is the
second one to the right of "Patterns", between the "ae" and "X" butons. Type
proxy.exe and then click on OK.
I submitted a "false positive" report for ClamAV, which is used by
ClamWin to
www.clamav.net/sendvirus.html
References:
-
Vir News - Bobax.AA
ArcaBit
-
7/5: Bobax-AA a Mass-Mailing Worm
eSecurity Software & Internet
Security Product Information News Articles, Advice
July 5, 2005
-
W32.Bobax.AA@mm
Symantec Corporation
-
services - services.exe - Process Information
Uniblue
-
Start-Up Applications - All
-
AnalogX-Proxy
McAfee
[/security/worms]
permanent link
Sun, May 21, 2006 4:33 pm
Determining an Image File's Dimensions with Command Line Tools
If you are working on a Unix or Linux system and need to determine the
dimensions for an image, there are a number of command line tools that may be
available to you on the system. If you are including an image on a webpage, if
you specify the file's dimensions, then visitor's to your website can
view other information on your webpages while potentially large images
are still being downloaded for viewing by the visitor's browser. If you
specify the dimensions of the image files within your webpages, the browser
will allocate the space needed to display the image and then display other
parts of the webpage while it is still downloading large image files.
You can specify the image dimensions in pixels like this:
<img src="banana.jpg" alt="A banana" width="320" height="378">
One command line tool that can be used to determine a
JPEG
file's size is rdjpgcom. The
utility is used to display comments that can be embedded in
JPG files (you can insert comments with wrjpgcom), but
you can also display the dimensions for a JPG file with the --verbose
option.
$ rdjpgcom -verbose banana.jpg
JPEG image is 921w * 592h, 3 color components, 8 bits per sample
JPEG process: Baseline
If you have ImageMagick installed
on the system, you can also use the identify command to determine
the dimensions of an image file. Note: if you are using RedHat Linux, or
another version of Linux that uses
RPM to manage
software on the system, you can issue the command rpm -qi ImageMagick
to see whether it is installed.
$ identify banana.jpg
banana.jpg JPEG 921x592 DirectClass 8-bit 87kb 0.0u 0:01
The identify utility displays the width followed by the height.
Another command that may be available to you is imgsize.
$ imgsize banana.jpg
imgsize banana.jpg
width="921" height="592"
[/graphics]
permanent link
Sun, May 21, 2006 3:24 pm
WindUpdates.MediaGateway (Adware) - May 21, 2006
Microsoft AntiSpyware Beta1 found WindUpdates.MediaGateway on a user's
computer when I scanned it, but the adware did not actually appear to be
active on the system. Microsoft AntiSpyware appeared to be detecting
only remnants of the adware that had previously been removed with
Microsoft AntiSpyware.
[
More Info]
[/security/spyware/windupdates_mediagateway]
permanent link
Tue, May 16, 2006 11:36 pm
Turning Display of Paragraph Markers On and Off in Microsoft Word
If you are seeing paragraph marker symbols, ¶, in your Microsoft Word
documents, as in the above example, and want to turn off the display of these
markers, which indicate the end of a paragraph, click on Tools and then
Options. Under the View tab, you will see Paragraph
marks checked. Uncheck that field and click on OK.
The paragraph markers should disappear from your document.
Reference:
-
Rules for typing in Word
[/os/windows/office/word]
permanent link
Tue, May 16, 2006 11:26 am
Barclays Bank Customer Scam
I received a
scam
email message today, purportedly from the technical service
department of Barclays Bank, a UK-based bank, asking that I confirm my
membership details. I don't have a Barclays Bank account and the link in
the message, which supposedly pointed to
https://ibank.barclays.co.uk/olb/p/LoginMember.do/confirm, actually pointed
to http://www.zoze.org/files/ibank.barclays.co.uk/olb/p/LoginMember.do/index.htm
.
The website appeared to be out of service when I checked it and the scam
webpage was inaccessible. I reported the scam anyway to
doshelp@doshelp.com, which is an
address associated with a site that tracks
phishing scams, such as the one I received. The site lists examples
of other Barclays Bank scams at
Barclays Bank Fraud Websites. I also reported the scam to the abuse
address at earth.nocserver.net and insidepool.com, since those domains were
associated with the orgination point for the email message.
[/security/scams/phishing/barclays]
permanent link
Sat, May 13, 2006 4:40 pm
Another Peachtree User is Using the Same Serial Number
After I had to kill a running instance of Peachtree Complete Accounting 2002,
because it was producing an error message that I couldn't stop from constantly
repeating, whenever I tried opening a company file, I got the message
"Another Peachtree user is using the same serial number". The window
where that message appeared had a
Register button. When
I clicked on it the correct serial number appeared, but the registration
number field was blank. Putting in the correct registration number did not
stop the problem from repeating whenever I tried opening the company file.
I found instructions on dealing with the problem at
an Abacus Plus Services,
Inc. FAQ page. However, I found that I did not have to take all of the
steps suggested on that page to eliminate the problem. I only had to kill
the W32MKDE.EXE process, which is a process associated with Peachtree accounting
which remained running after I killed the Peachtree application. The steps
to alleviate the problem are as follows:
- Hit the Ctrl-Alt-Del keys simultaneously.
- Select Task Manager.
- Click on the Processes tab.
- Click on the column header Image Name to put the processes
in alphabetical order.
- Look for a process with the image name of W32MKDE.EXE. Click on it to
select it and then click on the End Process button.
- When you receive a warning about terminating the process, click on
Yes to terminate it anyway.
I was then able to open the company file without any problems.
The additional steps listed on the
Abacus Plus Services,
Inc. FAQ page are provided below, in case the steps above are not
sufficient for you to resolve the problem should the information become
unavailable on that website.
- Look in the directory where your data is stored for files with names
beginning with "Conn". If you don't know where Peachtree stores company data
on your system, you can click on the Start button and then
select Search to search for the files. Search for
files beginning with "conn", i.e. conn*. Or you can look in
pcw90.ini which will be in your Windows directory, usually
C:\Windows or C:\Winnt. You can double-click
on the file to open it in notepad. Then look for the "DATAPATH=" line, which
will tell you the location of your data files. Note: the number after "pcw"
in the ini filename may be different for other versions of Peachtree
Accounting
- Select all connco and conndp files from the data path and delete them.
- Look for
ShowStartup= in the ini file mentioned above, which
is pcw90.ini for Peachtree Complete Accounting 2.0, but may have a different
number after "pcw" if you are using a different version of Peachtree. If the
value for the parameter is No, change it to Yes (a
capital "Y" followed by lowercase "es").
- Look for the
LastCompanyOpen= line in the ini file. Delete
everything after the equal sign.
- Save the ini file (click on File and then
Save).
- Open Peachtree in a sample company. After the company opens, select
File then Open Company and open your company
data.
References:
-
Abacus Plus Services,
Inc. FAQ
[/os/windows/software/financial]
permanent link
Sat, May 13, 2006 3:54 pm
Location of Peachtree Complete Accouting 2002 Data Files
I wanted to move the location of PeachTree Accounting 2002's data
files to a new location. In order to have Peachtree find the files
in their new location, you need to edit pcw90.ini. It will be in
your Windows directory, which will usually be
c:\windows or
c:\winnt. Note, if a nonstandard location is used for Windows,
you can find out the location by typing
echo %windir% at
a command prompt.
You can double-click on pcw90.ini to open it in your default editor for
ini files, which will normally be notepad. Change the DATAPATH=
line to point to the new location and reopen Peachtree Accounting.
[/os/windows/software/financial]
permanent link
Mon, May 08, 2006 5:45 pm
Exchange 2003 Reached 16 GB Mailbox Store Limit
I found a Microsoft Exchange 2003 server was no longer transmitting email
nor was it providing access to shared calendars and contact lists for users
due to the database store, which is maintained in the file
priv1.edb reaching the limit of 16GB. Unless you upgrade to
Service Pack 2, the size of this file can't grow beyond that limit and
Exchange will shut down when it reaches that size.
[ More Info ]
[/network/email/exchange]
permanent link
Wed, May 03, 2006 11:45 pm
Eudora Crashing at Startup
Eudora 4.2 was crashing a user's system shortly after it was opened.
When it was reopened, it would prompt regarding rebuilding the table
of contents as shown below:
| Damaged Mailbox |
Mailbox has a damaged table of
contents. Shall I build a new one for
you?
[ Please do ] [ Cancel ]
|
Or the message below would appear:
| Corrupt Mailbox |
Mailbox In has been changed since its table of
contents was created. Do you wish to use the
old table of contents, or create a new one?
[ Create new ] [ Use old ] [ Cancel ]
|
If I instructed Eudora to rebuild the table of conents, it would do so, printing
a message like the one below, but then would crash shortly after opening again.
| Eudora |
2971 of the 2971 summaries in the old table of contents used; 0 new
summaries were created.
[ OK ]
|
When I opened Eudora's in.mbx where it stores mail for a user's inbox, I found
several instances of the following lines at the end of the file:
From ???@??? Mon May 01 08:29:15 2006

Return-Path: <info@minoritywealth.com>
There was no message body for the messages, just the header information.
Eudora starts each message it stores in a mailbox file with "From ???@???".
Since the message I was seeing was the last entry and it appeared multiple times
it appeared to be the cause of the problem.
I used the Windows notepad program to edit the in.mbx file, since it is just
a regular text file. I removed the lines for what appeared to be the problem
message and restarted Eudora. But the same behavior as before occurred, i.e.
Eudora crashed. I checked the server, but the message was no longer there,
since the user had used Outlook Express to check her email when Eudora started
crashing at startup. If you encounter this behavior, you may need to find an
alternative means of deleting the problem message from the server, e.g.
using another email client, a web interface to check email, or by using
the telnet command to connect to the mail server on port 25 and then
finding and deleting the problem message through
SMTP commands.
Though the message was no longer on the email server, it was in Eudora's
"spool" directory, which you can find underneath the directory where Eudora
stores mailbox files, such as in.mbx. Eudora apparently uses the spool
directory as a temporary holding area as it processes incoming messages.
If it crashes while processing a message, the message as well as other
yet to be processed messages remain in the spool directory. When it restarts,
it again tries to process the messages in the spool directory. If there is
a corrupt or malformed message in the spool directory, it will again crash
until you have deleted that particular message. The messages are stored in .rcv
files. You can open RCV files with notepad. When you select "File" and "Open"
in notepad, simply tell notepad to look for "All Files" instead of using
"Text Documents" only in the "Files of type" field. You can then look
for the corrupt one. Or you can simply move all of the RCV files out of the
spool directory into some other directory temporarily and then move
individual files back until you find the one that causes Eudora to crash
on startup.
Note: Eudora will likely complain that another copy of it may be
running when you open it, because it creates a 0 KB OWNER.LOK file in the
directory where in.mbx is stored when it starts. The presence of that
file allows Eudora upon starting to detect whether another instance of
Eudora may be using the user's mailbox files. If multiple instances tried
to manipulate those files at the same time, the files would likely become
corrupted. But, if Eudora crashes, the OWNER.LOK file remains instead,
of being deleted as it would be if you exited from Eudora normally. You
can manually delete it.
References:
-
Case Story: Eudora vs. "Toxic" Messages
-
Crashes When Opening
-
FAQ: Eudora crashing immediately upon start?
[/network/email/clients/eudora]
permanent link
Wed, May 03, 2006 11:15 pm
Restoring Eudora's Toolbar

If the toolbar, which contains icons for checking your inbox and outbox,
checking email, replying to messages, forwarding messages, etc.,
disappears from the top of your Eudora window, you can take the
following steps to bring it back.
- Inside Eudora, click on Tools.
- Click on Options.
- Scroll down the Category and select
display.
- Make sure Show toolbar is checked, then click on
OK

You should now see the Eudora toolbar as shown below.

Note: these instructions apply to Eudora 4.2 and 6.2, but may not apply to all
other versions of Eudora.
[/network/email/clients/eudora]
permanent link
Sat, Apr 29, 2006 1:24 pm
PHP - Exec
The PHP
exec function can be used to call external programs.
For instance, if I wish to create a webpage that displays the
MD5 checksum for a file, I can call the md5sum program that is present
on Unix and Linux systems. If I called the program from a shell prompt on the
system, I would see something like the following:
# md5sum file.txt

529dc67dde9486a1af8353915ab94870  file.txt
Using PHP, I can get the MD5 checksum with the following code:
<?php


$filename="mboxgrep-0.7.9-1.i386.rpm";

$md5sum = exec('md5sum '.$filename);

$md5sum = substr($md5sum,0,strpos($md5sum,' '));


?>
The results of the call to the external md5sum program are
stored in a variable named md5sum. The md5sum
program returns the MD5 checksum followed by a space and then the filename.
The filename can be stripped away by using strpos to determine
the position of the space in the string and then substr can
be used to remove all of the charcters from the string starting with the
space to the end of the string.
Since I need to calculate the MD5 checksum, aka hash, regularly, I can
create a function that calls the external md5sum program to do so.
function md5sum($filename) {

  $hash = exec('md5sum '.$filename);
  // The md5sum command returns the MD5 hash followed by a space and the
  // filename. Remove the space and filename.
  $hash = substr($hash,0,strpos($hash,' '));
  return($hash);

}
But what if you call an external program that returns multi-line output.
If you just store the results obtained by using exec to call
the program, you will get only the last line of output for the program.
For instance, I can use the command rpm -qp --requires file.rpm
to determine what other software is required by a
RPM file. If I call that
program with PHP's exec function and assign the results to a
variable, requires, however, I get just the last line of the
results of calling rpm -qp --requires, which produces multiline
output.
<?php

$filename="mboxgrep-0.7.9-1.i386.rpm";

$requires = exec('rpm -qp --requires '.$filename);

?>
What I need to do instead, is put the output of the external command
into an array. When using the exec function, I can
specify an array to be used to hold the output, by putting a comma
after the command to be called and then specifying an array to hold
the output of the command.
<?php exec(external_command, $output_array); ?>
For instance, to obtain the output from the rpm command above, I could
use the following code:
<?php

$filename="mboxgrep-0.7.9-1.i386.rpm";
exec('rpm -qp --requires '.$filename, $requires);

for ($i = 0; $i < count($requires); $i++) {
   print "$requires[$i]<br>\n";
}

?>
The
exec function is used to call the program, storing
the output from the
rpm command in the array
$requires. I can then use a
for loop to
print each of the lines in the array, putting a
<br>
tag at the end of each line, so that the HTML output is more readable
and matches that of the program. I also use
/n to create
a new line at the end of each line of output so the source HTML code is
more readable, also.
References:
-
PHP: exec - Manual
-
MD5
-
Programming PHP: Chapter 5: Arrays
[/languages/php]
permanent link
Sun, Apr 23, 2006 8:40 pm
Report of SORBS listing to EarthLink
I filed a trouble report with
EarthLink
regarding email from an EarthLink email server being rejected, because the
EarthLink server, pop-gadwall.atl.sa.earthlink.net [207.69.195.61], is on
the
Spam and Open Relay Blocking System
(SORBS) spam blacklist. Within minutes I received a response. However, just
like the
response I received from AOL regarding a similar problem report regarding
two AOL email servers on the SORBS blacklist, the response was totally
irrelevant to the actual problem. Instead it was a bolierplate reponse on how
one can deal with a situation where EarthLink filters are blocking email
from another server.
The SORBS entry for the EarthLink server is shown below:
Address: 207.69.195.61
Record Created: Fri Mar 10 09:30:02 2006 GMT
Record Updated: Fri Mar 10 09:30:02 2006 GMT
Additional Information: Received: from pop-gadwall.atl.sa.earthlink.net
(pop-gadwall.atl.sa.earthlink.net [207.69.195.61]) by desperado.sorbs.net
(Postfix) with ESMTP id 52E7111471 for <[email]>; Fri, 10 Mar 2006 19:06:10
+1000 (EST)
My Problem Report
I provide PC and network support to small businesses in my area and am trying
to resolve an email problem for a client who has not been able to receive email
from his daughter, who uses EarthLink as her ISP. Her email is being
blocked on the server handling his incoming email because it is coming through
an EarthLink email server with the IP address 207.69.195.61
(pop-gadwall.atl.sa.earthlink.net), which is on the Spam and Open Relay
Blocking System (SORBS) blocklist (see
http://www.dnsbl.us.sorbs.net). Will EarthLink contact SORBS about removing
the address from the SORBS list?
EarthLink's Response
Thank you for contacting us.
We understand that one of the EarthLink client in your area is unable to
receive email from his daughter who uses EarthLink as his ISP.
In addressing the issue we would like to inform you that the issues you're
having will require active troubleshooting that can only be accomplished by
working with someone in real time. In order to help you efficiently as
possible, we recommend that you contact Open Relay department at:
"openrelay @ earthlink.net"
Open relay is a term used to describe an email server that is not secured
against unauthorized access in order to send email. Spam is often generated
from such servers, either knowingly or unknowingly.
EarthLink blocks open relay servers from delivering mail to EarthLink. This
prevents a great deal of spam from arriving in our customer's email boxes. If
someone is trying to send you email, and are being denied for this reason, they
will have to speak to the administrator of their email server.
The administrator can choose to secure the server, or contact our Abuse
department and prove that their server is in fact secured. If the administrator
has secured the server, they need to email openrelay@abuse.earthlink.net and
provide the server's IP address or name. Once verified that the relay is
closed, the server will be removed from the block list, and EarthLink will
begin to accept mail from them.
Please be advised that not all matters may be resolved via email for security
reasons or due to the complexity of the issue.
We appreciate your understanding in this regard.
I sent a reply to that message. I'm curious as to whether I can get a relevant
response from either ISP
within two messages or even at all. I also wonder how many others may have
reported the same issues to AOL and EarthLink and gotten the same canned
non-germane responses. It is no wonder why an email server may stay on a
blocklist for a long time, if one has to get someone at the ISP of the
offending server to request a delisting.
[/network/email/spam]
permanent link
Sun, Apr 23, 2006 7:37 pm
SORBS Blocking AOL and EarthLink Servers
A user reported today that his daughter had sent email to him today which had
been rejected. I obtained her email address from him and then searced the
maillog file for that address. I found that her email was rejected because
it was coming from an EarthLink email server, pop-gadwall.atl.sa.earthlink.net
[207.69.195.61] whose IP address, 207.69.195.61, is on the
Spam and Open Relay Blocking System (SORBS)
spam blacklist. I submitted a report of the problem to EarthLink's
technical support group. Hopefully, the response I get will be better than
the response I got from AOL when I reported the presence of two of their
servers on the SORBS list recently.
A few weeks ago I found that email from AOL users was being blocked by the
SORBS list, because two AOL servers were on the list. Those AOL servers
are listed below:
Name: imo-d05.mx.aol.com
Address: 205.188.157.37
Name: imo-m25.mx.aol.com
Address: 64.12.137.6
I reported the problem to AOL then, using an AOL account I keep just for
assisting AOL users, and received a response on April 3. However,
the response was irrelevant to the problem I reported. I've included my
message and AOL's response below:
My Problem Report
User comments = Two AOL email servers are in the Spam and Open Relay
Blocking System (SORBS) blocklist (see www.http://www.dnsbl.us.sorbs.net).
Their IP addresses are 64.12.137.6 and 205.188.157.37.
Because those IP addresses are in the SORBS blocklist, whenever email is
sent through those AOL servers, it is rejected by other email servers which
use the SORBS blocklist.
I am hoping AOL will address the issue with SORBS.
AOL's Response
From: SPIncomingMail
To: <snipped>
Sent: Mon, 3 Apr 2006 11:24:32 PM Eastern Daylight Time
Subject: Re: I have a problem sending or receiving email in AOL
Dear Jim,
Hi! My name isácille from America Online. I would like to thank you for
writing and making us aware of your concern.
I understand that you have questions with AOL blocking e-mail coming from Sorbs
domain.
I apologize for the inconvenience this has caused you, Jim.
AOL has developed Solicited Bulk Mailing Guidelines to both aid 'netizens' with
their online marketing campaigns and to protect our member base from e-mail
abuse.
To learn about AOL's Unsolicited Bulk Mail Policy, please visit
http://postmaster.info.aol.com/guidelines/bulk_email.html.
If you believe that Sorbs organization's e-mail provider can adhere to AOL
guidelines provided at
http://postmaster.info.aol.com/guidelines/index.html,
please ask their e-mail provider to call our Postmaster Hotline at 703-265-4670
or 1-888-212-5537 and the Postmaster group will evaluate your mailing patterns
and resolve any outstanding issues with their server or domain.
AOL has developed a site for Internet users who are experiencing problems
sending e-mail to AOL or for people who have questions about AOL's e-mail and
junk e-mail policies at
http://postmaster.info.aol.com/index.html.
If they would like to test their e-mail server against our database, enter the
IP address at
http://postmaster.info.aol.com/tools/duls.html.
I hope that I have sufficiently provided you with useful information about your
inquiry.
If you have other concerns or questions regarding AOL, please do not hesitate
to contact us in the future.
You can chat online with a technical support specialist by going to AOL Keyword:
Live Help. My colleagues there are available
24 hours a day to assist you in a secure, one-on-one session.
If you prefer to be assisted via phone, you may call us at our toll-free number:
1-800-827-6364. Calling early in the day usually reduces the waiting time to
speak to a consultant.
We are always ready to answer questions and do whatever we can to make your
online experience even more enjoyable.
Again, thank you for your patience and understanding on this matter.
Cecille
AOL Customer Care Consultant
I replied to the AOL message today, since I found the two AOL servers
are still on the SORBS list, requesting AOL address the issue with
SORBS. The 64.12.137.6 address appears to have been on
the list since December 15, 2005. And for the other address I see the following:
Address: 205.188.157.37
Record Created: Sun Apr 25 22:36:02 2004 GMT
Record Updated: Thu Feb 23 04:29:58 2006 GMT
Additional Information: Received: from imo-d05.mx.aol.com (imo-d05.mx.aol.com [205.188.157.37]) by server (8.10.2/8.10.2) with ESMTP id k1N2Krh14751 for ; Wed, 22 Feb 2006 20:20:53 -0600
I would not be surprised if I get a similar non-germane response again,
though. There was a time when I recommended America Online (AOL) - I
think Ads Online would be a more appropriate name - to novice
computer users, but now I wouldn't recommend it to anyone and reports that
its membership has been significantly declining don't surprise me.
[/network/email/spam]
permanent link
Mon, Apr 17, 2006 8:49 pm
Burst.Com Filed A Patent Infringement Suit Against Apple
Burst.com has filed a patent infringement suit
today against
Apple Computer, claiming that
Apple is infringing on Burst patents for video and audio delivery with
Apple's iPod and iTunes products. Apple filed suit against Burst in
January seeking to have Burst's patents declared invalid.
Burst and Microsoft wrangled over
Burst's patents also. Microsoft eventually capitulated and paid Burst 60
million dollars.
References:
-
Burst.com Files Patent Infringement Suit Against Apple Computer
April 17, 2006
-
Burst vs Apple
January 16, 2006
[/software/patents]
permanent link
Sun, Apr 16, 2006 10:59 pm
iRows and Opera
I've been using
iRows, which is a free
online service for creating and storing spreadsheets, to store some
spreadsheets so that I can access the information from any system with
a web browser. However, I've found that, though the service works fine
with Firefox, it is not usable with Opera 8.54. With Opera 8.54, when you try to
save a spreadsheet, edit tags, etc. windows open behind the spreadsheet
you are working on and it isn't possible to fully access them. I've been
able to drag some of the windows to areas on the screen where I can access
part of them, but I would not consider the service usable with Opera.
When I checked the FAQ
at the iRows website, I found a statement indicating that iRows doesn't
work well with the beta 9 version of Opera either. The FAQ states
"On Opera-9 not all features work well. We are waiting for Opera to fix a few
issues in the beta version."
[/network/web/services]
permanent link
Fri, Apr 14, 2006 5:42 pm
Moving ClientApps Folder
There are a number of steps you can take to free disk space on a Windows
Small Business Server (SBS) 2003 system drive, if you are running low
on disk space. You can remove the uninstall folders for hotfixes, compress
folders, etc. A step that may give you back 750 MB to a GB of space is
to move the ClientApps folder.
[ More Info ]
[/os/windows/server2003]
permanent link
Thu, Apr 13, 2006 4:32 pm
Blosxom Calendar Plugin on a Solaris System Using Apache
I installed the
calendar plugin for the
Blosxom blogging software on a Solaris 10 system. I put the following
line in Blosxom's
head.html file, so that a calendar with links
to entries made on particular dates would appear at the top of the blog's
webpages:
$calendar::calendar
When I then tried to view the blog, I received the message below:
Internal Server Error


The server encountered an internal error or misconfiguration and was unable
to complete your request.
When I created a state subdirectory beneath the Blosxom
plugins directory where I extracted the calendar Perl script
and then changed the owner and group for the calendar file to those under
which the Apache webserver software on the system runs, the problem ended.
By default, on a Solaris 10 system running Apache, Apache runs with a
userid of webservd and a group of webservd, so you can change those values
for the calendar file with the commands below:
chown webservd apache; chgrp webservd apache
[/os/unix/solaris]
permanent link
Mon, Apr 10, 2006 9:46 pm
Tuttle City Manager Threatens CentOS Developer
I came across a reference in an
InfoWorld column by Robert Cringeley,
Okie
calls cops, Dell's Ditty flops, to an amusing exchange between
the city manager for Tuttle, Oklahoma and a CentOS developer, today.
The server on which the Tuttle website resided
crashed. It was rebuilt by the city's hosting provider, but the server was not
configured properly afterwards to display the city's webpage, leading to
a default page being displayed instead of the city's homepage.
The city manager, Jerry Taylor, who claims to have twenty-two years
in computer systems engineering and operations, but appears to know very little
about webservers or operating systems, saw the default Apache
webpage one would see on a webserver running the
CentOS operating system and contacted
a CentOS developer, Johnny Hughes. But, with absolutely no understanding
of what he was seeing, he demanded that the CentOS software be removed from
his website.
In one email message sent to CenOS he railed "Who gave you permission to invade
my website and block me and anyone else from accessing it??? Please remove your
software immediately before I report it to government officials!! I am the City
Manager of Tuttle, Oklahoma." Mr Hughes tried to explain the situation to
him, but Mr. Taylor was apparently incapable of understanding the
explanations and replied by threatening to sic the FBI on CentOS. Mr. Hughes
took the time to research the problem instead of just ignoring the city
manager at that point and did eventually get the city manager to contact
his hosting provider. But even then, the city manager did not seem to
understand, or at least appreciate, that Mr. Hughes had made an
extra effort to solve the city's website problem for the city. Instead he
still stated he did not regret threatening Hughes with FBI action, since
he believes that was what prompted Hughes to start treating him seriously.
The city has a article on the issue at
City manager misunderstanding prompts international response and
even has a link
to the email transcript of the exchange, which Mr. Hughes posted
after getting exasperated with the city manager's behavior and threats.
Comments on the article in the city's paper are available in a
forum for the paper.
References:
-
Okie calls cops, Dell's Ditty flops
-
City manager misunderstanding prompts international response
-
OR ... why every city council needs at least one geek
Transcript of the email exchange
[/os/unix/linux/centos]
permanent link
Tue, Apr 04, 2006 10:07 pm
Installing Opera 9.0 on Solaris 10
A preview version of the
Opera
web browser is available for Solaris on x86, i.e. Intel or AMD based
PCs. The preview can be downloaded from
http://snapshot.opera.com/unix/. There
are several files available for download for Solaris on Intel systems. I prefer
to use a pkg file, so that I can install the software with a
pkgadd -d command.
If you download the pkg.gz version, you can install it with the following
steps.
-
Uncompress the .gz file you downloaded.
# gunzip opera-9.0-20060206.1-static-qt-sol10-intel-local-en.pkg.gz
-
Use the pkgadd command to install the package on your system. The
following command assumes that your current directory is the
directory into which you downloaded the package.
# pkgadd -d ./opera-9.0-20060206.1-static-qt-sol10-intel-local-en.pkg

The following packages are available:
  1  SCopera     opera
                 (i386) 9.0

Select package(s) you wish to process (or 'all' to process
all packages). (default: all) [?,??,q]: 1

Processing package instance <SCopera> from </home/sysadmin/opera-9.0-20060206.1-static-qt-sol10-intel-local-en.pkg>

opera(i386) 9.0
Opera Software ASA
Using </usr/local> as the package base directory.
## Processing package information.
## Processing system information.
## Verifying disk space requirements.
## Checking for conflicts with packages already installed.

The following files are already installed on the system and are being
used by another package:
  /usr/local/bin <attribute change only>

Do you want to install these conflicting files [y,n,?,q] y
## Checking for setuid/setgid programs.

Installing opera as <SCopera>

Installing part 1 of 1.
/usr/local/bin/opera
/usr/local/etc/opera6rc
/usr/local/etc/opera6rc.fixed
/usr/local/lib/opera/9.0-20060206.1/missingsyms.so
/usr/local/lib/opera/9.0-20060206.1/opera
/usr/local/lib/opera/9.0-20060206.1/spellcheck.so
/usr/local/lib/opera/9.0-20060206.1/works
/usr/local/lib/opera/plugins/libnpp.so
/usr/local/lib/opera/plugins/operaplugincleaner
/usr/local/lib/opera/plugins/operapluginwrapper
/usr/local/share/bug/opera/bugreport
/usr/local/share/doc/opera/LICENSE
/usr/local/share/man/man1/opera.1
/usr/local/share/opera/chartables.bin
/usr/local/share/opera/html40_entities.dtd
/usr/local/share/opera/images/blank.gif
/usr/local/share/opera/images/drive.gif
/usr/local/share/opera/images/file.gif
/usr/local/share/opera/images/folder.gif
/usr/local/share/opera/images/link.gif
/usr/local/share/opera/images/opera.xpm
/usr/local/share/opera/images/opera_16x16.png
/usr/local/share/opera/images/opera_22x22.png
/usr/local/share/opera/images/opera_32x32.png
/usr/local/share/opera/images/opera_48x48.png
/usr/local/share/opera/images/operabanner.png
/usr/local/share/opera/ini/dialog.ini
/usr/local/share/opera/ini/fastforward.ini
/usr/local/share/opera/ini/filehandler.ini
/usr/local/share/opera/ini/pluginpath.ini
/usr/local/share/opera/ini/spellcheck.ini
/usr/local/share/opera/ini/standard_keyboard.ini
/usr/local/share/opera/ini/standard_menu.ini
/usr/local/share/opera/ini/standard_mouse.ini
/usr/local/share/opera/ini/standard_toolbar.ini
/usr/local/share/opera/ini/unix_keyboard.ini
/usr/local/share/opera/ini/xmlentities.ini
/usr/local/share/opera/java/opera.jar
/usr/local/share/opera/java/opera.policy
/usr/local/share/opera/jsconsole.html
/usr/local/share/opera/lngcode.txt
/usr/local/share/opera/locale/en/default.adr
/usr/local/share/opera/locale/en/license.txt
/usr/local/share/opera/locale/en/lngcode.txt
/usr/local/share/opera/locale/en/search.ini
/usr/local/share/opera/locale/english.lng
/usr/local/share/opera/opera6.adr
/usr/local/share/opera/search.ini
/usr/local/share/opera/skin/standard_skin.zip
/usr/local/share/opera/skin/windows_skin.zip
/usr/local/share/opera/styles/about.css
/usr/local/share/opera/styles/cache.css
/usr/local/share/opera/styles/certinfo.css
/usr/local/share/opera/styles/config.css
/usr/local/share/opera/styles/contentblock.css
/usr/local/share/opera/styles/dir.css
/usr/local/share/opera/styles/drives.css
/usr/local/share/opera/styles/email.css
/usr/local/share/opera/styles/error.css
/usr/local/share/opera/styles/history.css
/usr/local/share/opera/styles/im.css
/usr/local/share/opera/styles/image.css
/usr/local/share/opera/styles/images/bar.png
/usr/local/share/opera/styles/images/center.png
/usr/local/share/opera/styles/images/opera.png
/usr/local/share/opera/styles/images/root.png
/usr/local/share/opera/styles/images/top.png
/usr/local/share/opera/styles/info.css
/usr/local/share/opera/styles/mime.css
/usr/local/share/opera/styles/mimehead.css
/usr/local/share/opera/styles/plugins.css
/usr/local/share/opera/styles/user/accessibility.css
/usr/local/share/opera/styles/user/contrastbw.css
/usr/local/share/opera/styles/user/contrastwb.css
/usr/local/share/opera/styles/user/debugwithoutline.css
/usr/local/share/opera/styles/user/disabletables.css
/usr/local/share/opera/styles/user/hidecertainsizes.css
/usr/local/share/opera/styles/user/hidenonlinkimages.css
/usr/local/share/opera/styles/user/imageandlinkonly.css
/usr/local/share/opera/styles/user/nostalgia.css
/usr/local/share/opera/styles/user/showstructure.css
/usr/local/share/opera/styles/user/textonly.css
/usr/local/share/opera/styles/user/userstyle.ini
/usr/local/share/opera/styles/wml.css
/usr/local/share/opera/svg-mo.dat
/usr/local/share/opera/svg-mobd.dat
/usr/local/share/opera/svg-sa.dat
/usr/local/share/opera/svg-sabd.dat
/usr/local/share/opera/svg-se.dat
/usr/local/share/opera/svg-sebd.dat
[ verifying class <none> ]

Installation of <SCopera> was successful.
You should then be able to run Opera with /usr/local/bin/opera &
or just opera &, if /usr/local/bin is in your path.
But when I logged off as root and tried to run Opera from my
nonprivileged user account, I received an error message.
# exit


bash-3.00$ /usr/local/bin/opera

ld.so.1: /usr/local/lib/opera/9.0-20060206.1/opera: fatal: libstdc++.so.6: open failed: No such file or directory

Killed
Since I encountered an error message indicating that libstdc++.so.6 could
not be found I su'ed to the root account again and looked for the file.
bash-3.00$ su - root
Password:
Sun Microsystems Inc.   SunOS 5.10      Generic January 2005
# find / -name libstdc++.so.6 -print
/usr/sfw/lib/amd64/libstdc++.so.6
/usr/sfw/lib/libstdc++.so.6
/opt/sfw/lib/libstdc++.so.6
So the file existed on the system in several places, but Opera was not
finding it. From my regular user account, I tried specifying the library
search path by setting
LD_LIBRARY_PATH to first
/usr/sfw/lib and then /opt/sfw/lib, but I
still got the same results when I tried to run Opera.
bash-3.00$ LD_LIBRARY_PATH=/opt/sfw/lib
bash-3.00$ echo $LD_LIBRARY_PATH
/opt/sfw/lib
bash-3.00$ /usr/local/bin/opera
ld.so.1: /usr/local/lib/opera/9.0-20060206.1/opera: fatal: libstdc++.so.6: open failed: No such file or directory
Killed
When I tried to list all of the libraries Opera might use with the
ldd command, it did not work for the Opera binary.
bash-3.00$ ldd /usr/local/bin/opera

ldd: /usr/local/bin/opera: unsupported or unknown file type
But I then realized I had failed to export LD_LIBRARY_PATH
When I took that step, I was then able to run Opera successfully.
bash-3.00$ export LD_LIBRARY_PATH
Using the above method would require that you reissue the commands to
set the library path and then export it the next time you logged into
the system again. And, if different programs require different library
paths, you might have to reset LD_LIBRARY_PATH for particular programs.
Alternatively, you can add the applicable library path to your system
default search paths with the crle command on a Solaris
system. On a Linux system, you would edit /etc/ld.so.conf and run
ldconfig.
I prefer Opera over FireFox, since, if the system crashes or I have
to restart the browser for any reason, I can return to the state I was
in previously within the browser. I understand that a FireFox extension
can be installed to provide that capability on FireFox, but that
session restoral capability is built into Opera. And Ive never seen
Opera wildly consume resources as FireFox seems prone to do on Windows
systems where it often gobbles up huge amounts of memory or shoots CPU
utilization close to 100%. But when I finally got Opera 9.00 Preview 2
working on my x86-based Solaris 10 system, I was disappointed to
discover it doesn't support the SOCKS protocol. I access
the Web from that system through a SOCKS proxy server.
References:
-
Share Library Search
Paths
[/os/unix/solaris]
permanent link
Tue, Apr 04, 2006 6:12 pm
Obtaining a List of the Libraries Required by a Program
You can use the
ldd command on a Unix or Linux system
to determine what libraries a program requires. E.g. checking
the libraries required by the
mboxgrep binary yields
the following information:
# ldd /usr/local/bin/mboxgrep
        libbz2.so.1 =>   /usr/lib/libbz2.so.1
        libz.so.1 =>     /usr/lib/libz.so.1
        libpcre.so.0 =>  (file not found)
        libc.so.1 =>     /lib/libc.so.1
        libm.so.2 =>     /lib/libm.so.2
On Solaris systems, you can use the -s option to show the
full library search path.
# ldd -s /usr/local/bin/mboxgrep

   find object=libbz2.so.1; required by /usr/local/bin/mboxgrep
    search path=/lib:/usr/lib  (default)
    trying path=/lib/libbz2.so.1
    trying path=/usr/lib/libbz2.so.1
        libbz2.so.1 =>   /usr/lib/libbz2.so.1

   find object=libz.so.1; required by /usr/local/bin/mboxgrep
    search path=/lib:/usr/lib  (default)
    trying path=/lib/libz.so.1
    trying path=/usr/lib/libz.so.1
        libz.so.1 =>     /usr/lib/libz.so.1

   find object=libpcre.so.0; required by /usr/local/bin/mboxgrep
    search path=/lib:/usr/lib  (default)
    trying path=/lib/libpcre.so.0
    trying path=/usr/lib/libpcre.so.0
        libpcre.so.0 =>  (file not found)

   find object=libc.so.1; required by /usr/local/bin/mboxgrep
    search path=/lib:/usr/lib  (default)
    trying path=/lib/libc.so.1
        libc.so.1 =>     /lib/libc.so.1

   find object=libc.so.1; required by /usr/lib/libbz2.so.1
    search path=/lib:/usr/lib  (default)
    trying path=/lib/libc.so.1

   find object=libc.so.1; required by /usr/lib/libz.so.1
    search path=/lib:/usr/lib  (default)
    trying path=/lib/libc.so.1

   object=/lib/libc.so.1; filter for /usr/lib/ld.so.1

   object=/lib/libc.so.1; filter for libm.so.2

   find object=libm.so.2; required by /lib/libc.so.1
    search path=/lib:/usr/lib  (default)
    trying path=/lib/libm.so.2
        libm.so.2 =>     /lib/libm.so.2

   find object=libc.so.1; required by /lib/libm.so.2
    search path=/lib:/usr/lib  (default)
    trying path=/lib/libc.so.1
References:
-
Share Library Search
Paths
[/os/unix/commands]
permanent link
Sun, Apr 02, 2006 11:25 pm
Furl Meta Tags
Furl allows you to archive webpages
you visit. With Furl you can have all of your bookmarks online and
available from whatever system you happen to be using at the moment
wherever you may be as long as you can access the Internet from that
system. When you bookmark webpages with Furl, Furl archives a copy
of the webpage for you. Unless you mark bookmarks as private, you
can share bookmarks with others, but only you can access the copy
of a webpage that has been archived for you when you bookmarked the
webpage.
When Furl bookmarks a page for you, you can have an area you have
highlighted on the webpage added to a "clipping" field. You can add
your own comments on the webpage to a "comment" field. You can pick
a category or multiple categories for the webpage. You can create
whatever categories you choose. The title for the webpage will also
be stored with the bookmark for the page.
Furl will also look for "author" and "date"
meta tags on the webpage.
If you are creating webpages that others may Furl, you can have Furl
automatically fill its "Author" and "Publication Date" fields by adding
meta tags like the following to your webpages. The date should be in the
form YYYY-MM-DD, i.e. year, month, day form with a leading zero added to
one-digit months or days.
<META NAME="author" content="Jane Doe">

<META NAME="date" content="2006-04-02">
[/network/web/archiving/furl]
permanent link
Sun, Apr 02, 2006 11:07 pm
Why Was My Email Blocked
I use the following blocklists on my email server:
Blitzed Open Proxy Monitor List
Open Relay Database
Composite Blocking List
McFadden Associates E-Mail Blacklist
SORBS
Passive Spam Block List
I also download the jwSpamSpy
Spam domain blacklist, which is available from
http://www.joewein.de/sw/blacklist.htm once a week and update sendmail's
/etc/mail/access file with it to block email from domains on that list.
Recently, I was notified by a couple of users that some of their email
correspondents are reporting that email to the users is being rejected.
I created a Perl script,
find-recipients, to check sendmail maillog files
for a specified sender's email address to determine if email from that
sender was successfully delivered or rejected.
I found one BellSouth sender's email was being rejected because the
IP address of a
server handling his outgoing email, 205.152.59.72 [imf24aec.mail.bellsouth.net]
is on the SORBS blocklist.
I submitted a report on the matter to BellSouth by completing their
support request form at
http://services.bellsouth.net/footer/feedback.html, but I am not a
BellSouth customer, so don't know whether my report will prompt them to
address the matter. I also notified the sender of why the message was
rejected and provided the URL for the support request form to him, but
I would be surprised if the sender reported the problem to
BellSouth, his
email server provider.
I'm afraid most senders will conclude, if they
can send email to most of their correspondents that the problem is not on
their end, no matter what explanation I might provide about spam blocklists
and why their email was rejected. It is difficult just to get a sender to
provide the exact rejection message they get when their email is bounced.
Most feel they only need say that email they have sent has bounced, ignoring
the cause listed in the bounced messages they receive. And when users on
my system pass on reports of email to them not getting through, they often
don't even provide me with the email address of the sender or a
date when the problem occurred making it virutally
impossible to immediately isolate the cause of a particular message being
bounced.
I found that email from another sender, whose email was coming from
Network Solutions' email servers, was rejected four times on March 8, 2006
and once on March 17, because three Network Solutions email servers
were on the SORBS blocklist
and one server was on the Passive Spam Block
List. Two email messages from him were accepted on March 8 and one on
March 29, however.
March 8, 2006 Rejections
SORBS: 205.178.146.53 [omr3.networksolutionsemail.com]
PSBL: 205.178.146.50 [mail.networksolutionsemail.com]
SORBS: 205.178.146.55 [omr5.networksolutionsemail.com]
SORBS: 205.178.146.55 [omr5.networksolutionsemail.com]
SORBS: 205.178.146.55 [omr5.networksolutionsemail.com]
March 17, 2006 Rejections
SORBS: 205.178.146.52 [omr2.networksolutionsemail.com]
When I checked the PSBL list, I found the Network Solutions server had
been detected as sending spam on March 6, but had been removed from that list
on March 8, but apparently after the sender had sent his email on that date
when one of his messages was rejected, because of the presence of the
server's address on that list.
When I checked the SORBS blocklist, I found that all of the Network
Solutions server addresses had been removed from that list also, so it
appears his email service provider, Network Solutions, has already
addressed the problem.
I added both senders to the list of those for whom no blocklist checks should
be made by adding their email addresses to /etc/mail/access with lines
like the following:
someone123a@bellsouth.net       OK
someone456b@example2.com        OK
I then rebuilt the access database with the command
makemap hash /etc/mail/access </etc/mail/access
Note: In order to bypass blocklist checks for a sender by adding the
sender's email address to /etc/mail/access, delay_checks
has to have been specified in the sendmail configuration file, e.g.
/etc/mail/sendmail.mc. This can be done by adding the line below to
sendmail.mc and then rebuilding sendmail.cf from sendmail.mc.
FEATURE(delay_checks)dnl
You can regenerate the sendmail.cf file with the m4 command. You
need to restart sendmail afterwards for the change to take effect.
m4 /etc/mail/sendmail.mc > /etc/mail/sendmail.cf

/etc/init.d/sendmail restart
[/network/email/spam]
permanent link
Thu, Mar 30, 2006 11:00 pm
ClamWin Virus Defintions Not Updating
If you try to update the virus defintions for ClamWin by selecting
"Download Virus Database Update" and then see "Completed" immediately
without new definitions being downloaded, the problem may be due
to an incompatibility with the cygwin1.dll required by ClamWin and
the cygwin1.dll file in use by some other application on the system,
such as
OpenSSH for Windows.
See
Incompatibility between OpenSSH for Windows and ClamWin for instructions
on how to fix the problem.
You can determine which processes have the cygwin1.dll
DLL loaded with the
tasklist command on a Windows XP system.
C:\Program Files\ClamWin\bin>tasklist /m /fi "modules eq cygwin1.dll"

Image Name                   PID Modules
========================= ====== =============================================
sshd.exe                    5276 ntdll.dll, kernel32.dll,
                                 cygcrypto-0.9.7.dll, cygwin1.dll,
                                 ADVAPI32.DLL, RPCRT4.dll, cygz.dll,
                                 ws2_32.dll, msvcrt.dll, WS2HELP.dll,
                                 mswsock.dll, hnetcfg.dll, GDI32.dll,
                                 USER32.dll, wshtcpip.dll, wsock32.dll,
                                 DNSAPI.dll, winrnr.dll, WLDAP32.dll,
                                 Secur32.dll, mpr.dll, uxtheme.dll
switch.exe                  2336 ntdll.dll, kernel32.dll, cygwin1.dll,
                                 ADVAPI32.DLL, RPCRT4.dll, Apphelp.dll,
                                 user32.dll, GDI32.dll
sh.exe                      1192 ntdll.dll, kernel32.dll, cygwin1.dll,
                                 ADVAPI32.DLL, RPCRT4.dll, user32.dll,
                                 GDI32.dll
sh.exe                      3836 ntdll.dll, kernel32.dll, cygwin1.dll,
                                 ADVAPI32.DLL, RPCRT4.dll, Apphelp.dll,
                                 VERSION.dll, user32.dll, GDI32.dll
[/security/antivirus/clamav]
permanent link
Wed, Mar 29, 2006 12:39 am
Installation of CDisplay with wpkg
I wanted to configure
wpkg for a silent
install of
CDisplay, which is a free comic reader program. It allows images of pages
that have been scanned from comics and stored in an ace, zip, rar, or tar file
to be viewed by loading JPEG, PNG and static GIF images which are automatically
ordered and presented for viewing one at a time or two at a time allowing one
to read the electronic version in a manner similar to the paper copy.
I needed to have the program installed on a couple of PCs in my
household and wanted to be able to install it on a system along with
other software we commonly use by running wpkg.js from the server.
My wife has scanned a good portion of her extensive comics collection
and wants to be able to view them from any PC in the house.
I looked at the setup.exe file with
FileAlyzer.
When I listed strings in the file, I saw "Inno", so I
knew it used Inno Setup
an open source installer.
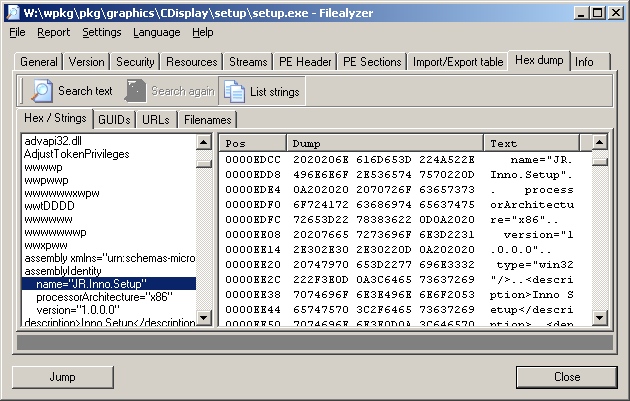
That installer allows you to perform a silent install
with the "/silent" or "/verysilent" options.
/SILENT, /VERYSILENT

Instructs Setup to be silent or very silent. When Setup is silent the
wizard and the background window are not displayed but the installation
progress window is. When a setup is very silent this installation progress
window is not displayed. Everything else is normal so for example error
messages during installation are displayed and the startup prompt is
(if you haven't disabled it with DisableStartupPrompt or the '/SP-'
command line option.
If you don't specify the "/SP-", option a window will appear with the
question "This will install CDisplay. Do you wish to continue?", which
will require a "yes" or "no" response.
You can specify the installation directory with the
"/Dir=dir" option. So I put the following lines in the
wpkg packages.xml file to install the software in
"C:\Program Files\comics\CDisplay". If you specify a directory in which
to install the program, rather than taking the default one, you do not need
to ensure that higher level directories exist first. E.g., in the example
below, the directory "c:\program files\comics" does not have to already exist,
if %PROGRAMFILES% corresponds to "C:\Program Files". Both the "Comics"
and "CDisplay" directory beneath it will be created.
The package section below, which should be placed in packages.xml,
assumes version 1.8 of CDisplay is being used.
<package
  id="CDisplay"
  name="CDisplay"
  revision="1"
  reboot="false"
  priority="1">

  <check type="uninstall" condition="exists" path="CDisplay 1.8" />
  <install cmd='\\server\wpkg\pkg\comics\CDisplay\setup.exe
    /VerySilent /SP- /Dir="%PROGRAMFILES%\Comics\CDisplay"'>
    <exit code="0" />
  </install>
  <remove cmd='"%PROGRAMFILES%\Comics\CDisplay\unins000.exe"' />
The remove command above will uninstall the software, but a prompt
will appear on the system asking for confirmation. When I tried
the "/silent" or "/verysilent" options for the unins000.exe command,
the uninstall failed. It was successful when I did not use either of those
options.
References:
-
Unattended, A Windows deployment system: Unattended/Silent Installation
Switches for Windows Apps
-
Inno Setup Command Line Parameters
[/os/windows/software/wpkg]
permanent link
Wed, Mar 22, 2006 11:56 pm
Compressing ClientApps Folder on an SBS 2003 Server
I found the free space on the C: drive on a Windows Small Business
Server (SBS) 2003 system was almost depleted. By compressing the
ClientApps folder I was able to gain another 300
MB of space.
I found the C:\ClientApps folder was taking about 1 GB of disk space,
so I chose to compress it, which you can do by the following procedure.
- Right-click on "ClientApps" folder.
- Select "Properties".

- Click on the "Advanced" button and select "Compress contents to
save disk space.

- Click on "OK".
- Click on "OK" again to close the "ClientApps Properties" window.
- When the "Confirm Attribute Changes" window appears, leave "Apply
changes to this folder, subfolders and files checked and click on "OK".

When I started the compression, Windows estimated the process would take
23 minutes, but it actually only took a few minutes. It gave me about 300 MB
more of disk space. When I right-clicked on the folder afterwards and selected
"Properties", the file size was still listed as about 1 GB, but the size on
disk was only 751 MB.
For other steps for freeing disk space, see
Freeing Disk Space.
[/os/windows/server2003/free-disk-space-sbs2003]
permanent link
Mon, Mar 20, 2006 7:38 pm
Changing an Account Password from the Command Line
On a Windows 2000 or later system, you can use the
net use
command to change the password for any account from the command line,
if you are logged into an account that is a member of the Administrators
group on the system.
If you issuse the command net use username *,
you will be prompted for a password and then asked to confirm the password.
The password will not be echoed.
C:\Documents and Settings\administrator>net user jsmith *

Type a password for the user:

Retype the password to confirm:

The command completed successfully.
Alternatively, you can specify the new password following the account
name on the command line. You will not be asked to confirm the password
in that case. This method allows you to change the password for an
account with a script.
C:\Documents and Settings\administrator>net user jsmith MyPaSs999
The command completed successfully.
If you attempt to use the command to change the password for another account
when you are not logged in as a member of the administrator's group,
you will receive a "System error 5 has occurred. Access is denied" error
message.
References:
-
How to Change User Password at Command Prompt
Microsoft Help and Support
May 7, 2003
[/os/windows/commands]
permanent link
Sun, Mar 19, 2006 6:56 pm
RPC Server Unavailable Because of XP Firewall
If you get an "RPC server unavailable" error message when attempting
to remotely query or administer a Windows XP
SP 2 system, even though the
RPcSs service is running on the remote XP system, you may need to
adjust the group firewall policy for the domain.
[ More Info ]
[/os/windows/xp/firewall]
permanent link
Thu, Mar 16, 2006 8:21 pm
FileType
Unix and Linux systems will likely have the
file command
to help you identify the type of the command. A C program,
FileType, is also available to aid with that task.
The developer, Paul L. Daniels, lists the following reasons why you might
want to use FileType instead of the file command:
- file does not work so well for loosely defined filetypes ( ie, vCards )
- file uses a text-based type database which can impose unwanted delays in
frequently invoked processes
- file does not have a heirachial type tree (ie, executable->MSDOS->EXE
)
- file is not designed to be incorporated at a source level into existing
projects
- Simpler and broader type detection engine ( 'file' is very good at pulling
out every detail about a file, ie, the resolution of an image, however we do
not wish to seek out such fine details )
[ More Info ]
[/languages/c]
permanent link
Wed, Mar 15, 2006 7:08 pm
Solaris Make Errors
The default path for the root account on Solaris 10 is
/usr/sbin:/usr/bin. But the make utility is in
/usr/ccs/bin/. If you get the error "make: not found"
when you attempt to run make, you will need to adjust the path
or specify it when you run the make command.
You can view the default path with echo $PATH.
# echo $PATH

/usr/sbin:/usr/bin
You can use /usr/ccs/bin/make to run the make
command, or you can add the directory that holds the make
command to the end of the existing path with
PATH=$PATH:/usr/ccs/bin.
Make needs a C compiler to compile the source code.
Sun would prefer to sell you one, so you may not have one on your
system. If you run make and see "cc: not found",
then you don't have a C compiler on the system or make can't
find it.
If instead, you see "language optional software package not installed", then
the directory /usr/ucb is in your path. That directory holds a script named
cc, which is the name for the C compiler, but it is pointing make
to a location where the C compiler doesn't actually reside. Again, you either
don't have a C compiler or make can't find it.
# /usr/ccs/bin/make
cc -Wall -Werror -g  -c pldstr.c
/usr/ucb/cc:  language optional software package not installed
*** Error code 1
make: Fatal error: Command failed for target `pldstr.o'
If you have Solaris 10, you should have the Gnu C compiler, gcc, in
/opt/sfw/bin. If so, you can set up a symbolic link
to point to it as shown below.
# ln -s /opt/sfw/bin/gcc /usr/bin/cc
If you don't have gcc, which is free, on the system, you can get it from
sunfreeware.com or
gcc.gnu.org.
References:
-
Solaris Forums - What is "language optional software package not
installed"???
March 31, 2001
-
Various problems with building anything under Solaris, especially "/usr/ucb/cc: language optional software package not installed".
By: Alan J. Rosenthal
June 15, 2004
[/os/unix/solaris]
permanent link
Mon, Mar 13, 2006 11:03 pm
XP Service Pack 2 Install Problems
When I tried to upgrade a user's home system running Windows XP
Professional from Service Pack 1 to Service Pack 2, I encountered a
number of problems which took me a considerable amount of time to resolve.
First I encountered an "Access is denied" error message, which I
resolved by resetting the permissions on a registry key. Then I
encountered an "The requested section was not present in the activation context"
error message, which I resolved by running the command below.
secedit /configure /cfg %windir%\repair\
secsetup.inf /db secsetup.sdb /verbose /areas regkeys
[ More Info ]
[/os/windows/xp]
permanent link
Sun, Mar 12, 2006 9:17 pm
Freeing Disk Space
If you are running low on disk space on a Windows XP system, there
are a number of steps you can take that may allow you to reclaim
a considerable amount of disk space.
Some steps that you can take to reclaim space include the following:
- Run Microsoft's Disk Cleanup utility
- Remove hotfix backup files
- Remove the service pack uninstall folder
- Remove files in the Software Distribution folder
- Remove folders in the Downloaded Installations folder
- Remove System Restore points
[ More Info ]
[/os/windows/xp]
permanent link
Fri, Mar 10, 2006 8:37 pm
Thu, Mar 09, 2006 7:01 pm
Microsoft AntiSpyware Expired Error
If you see a window with the following error message when you log into
a PC, check on whether Microsoft AntiSpyware Beta 1 is installed and has
expired.
| Error |
Unexpected error; quitting
[ OK ] |
If the message is due to an expired version of Microsoft AntiSpyware
attempting to start, you should see the Microsoft AntiSpyware bullseye
icon with "Error" next to it in the taskbar at the bottom of the screen.

You will see the same error if you try to start Microsoft Antispyware manually,
if it has expired.
[/security/spyware/MS-Antispyware]
permanent link
Mon, Mar 06, 2006 11:58 pm
Copying Signatures from one PC to Another
Outlook signatures are stored at
C:\Documents and Settings\
username\Application Data\Microsoft\Signatures.
For each signature there will be an RTF, HTM, and .TXT file. To copy signatures
from one PC to another, simply copy the 3 files to the appropriate directory
on the second system.
[/network/email/clients/outlook]
permanent link
Mon, Mar 06, 2006 6:04 pm
ClamWin Outlook Integration Problem
A user was receiving an error message when she tried to send email
with attachments:
ClamWin

An Error occured reading clamscan report: [Errno 2] No such file or
directory:
u'c:\\docume~1\\beth\locals~1\\temp\\tmpafm-hj\\client_setup_wi
zard_err_jpg - Virus Deleted by ClamWin.txt
ClamWin 0.88 was installed on her system and integrated with Outlook so
that it was checking incoming and outgoing email for viruses. I had to
disable the Outlook integration to stop the error from occuring.
[
More Information ]
[/security/antivirus/clamav]
permanent link
Sun, Mar 05, 2006 11:59 pm
Installation of Advanced Registry Tracer (ART) with wpkg
I wanted to configure
wpkg for a silent
install of
Advanced Registry
Tracer (ART) from
Elcomsoft.
ART is a utility designed for analyzing changes made to the Windows Registry.
I couldn't find any information on the developer's site or elsewhere on
configuring it for a silent installation, so I looked at the setup.exe file with
FileAlyzer.
When I listed strings in the file, I saw "Nullsoft" and "NSIS", so I
knew it used the Nullsoft Scriptable Install System (NSIS).

That installer normally allows you to perform a silent install
with the "/s" option and to specify the installation directory with the
"/D=dir" option. So I put the following lines in the
wpkg packages.xml file to install the software in
"C:\Program Files\Utilities\SysMgmt\ART"
<package
  id="ART"
  name="Advanced Registry Tracer"
  revision="1"
  reboot="false"
  priority="1">

  <check type="uninstall" condition="exists" path="Advanced Registry Tracer" />
  <install cmd='\\server\wpkg\pkg\utilities\sysmgmt\advanced_registry_tracer\setup.exe
    /S /D=%PROGRAMFILES%\Utilities\SysMgmt\ART'>
    <exit code="0" />
  </install>
  <remove cmd='"%PROGRAMFILES%\Utilities\SysMgmt\ART\uninstall.exe" /S' />
</package>
References:
-
Unattended, A Windows deployment system: Unattended/Silent Installation
Switches for Windows Apps
[/os/windows/software/wpkg]
permanent link
Sun, Mar 05, 2006 10:53 am
BASH Variables
Some useful variables available in the
BASH shell.
- $$ = The PID number of the process executing the shell.
- $? = Exit status variable.
- $0 = The name of the command you used to call a program.
- $1 = The first argument on the command line.
- $2 = The second argument on the command line.
- $n = The nth argument on the command line.
- $* = All the arguments on the command line.
- $# The number of command line arguments.
Example:
#!/bin/bash

if [ $# -eq 0 ]
then
  echo "Usage: $0 filename"
else
  wc -l $1
fi
The script first checks for whether any argument has been entered on the
command line, i.e. whether $# equals zero. If no arguments are present
on the command line, the script prints a usage message. The $0 variable
holds the name of the script itself. If an argument is entered on the
command line, it is presumed to be a filename and the wc command is called
to count the number of lines in the file.
So, if the script is named "example", and is called without any options,
then the following output would be printed.
# ./example

Usage: ./example filename
If a filename is entered on the command line and that file has 21 lines in
it, the following would be printed.
# ./example sample.txt
     21 sample.txt
References:
-
Linux Shell Programming
[/os/unix/bash]
permanent link
Fri, Mar 03, 2006 4:55 pm
Proxying the LPD Port with Balance
I have a Solaris 10 system that is connected to one network card in a
Solaris 7 system. A second network card in the Solaris 7 system connects
to the
LAN. The Solaris 10
system has no other network connectivity. Its web access is obtained through
a SOCKS proxy server running on the Solaris 7 system. I needed to be able
to print to an HP laserjet printer on the network, so I needed some way
to proxy connections to the Line Printer Daemon (LPD) port, TCP port 515,
on which the network printer is listening, through the Solaris 7
system. The
balance load
balancing and proxy program works well for such situations. In this
case I didn't need to use the load balancing features of the program,
just its proxying feature.
[ Solaris 10 ] <-----> [ Solaris 7 ] <-----> ( Network )
The network interface on the Solaris system that faces the Solaris 7
system has an IP address of 192.168.1.1. So on the Solaris system, I issued the
following command:
# balance -b 192.168.1.1 -f 515 laserjet.moonpoint.com:515
I needed to run the command as root, since I was using a
well known port,
i.e. a port between 0 and 1023. To set up a process to use a well known
port requires root privilege, since those are commonly used by server processes.
The -b option specifies the IP address on which the system
should listen for connections. In this case I want the Solaris 7 system
to only listen for connections on the network card facing the Solaris 10
system, i.e. on IP address 192.168.1.1. Otherwise, by default, it would listen
on all network interfaces in the system. Also, normally, balance will run in the
background, but in this case I chose to keep it in the foreground with
the -f option; normally I would not use that option. I then
specify the local port on the Solaris 7 system on which it should listen
for incoming connections. In this case the port for printing is the LPD
port, TCP port 515 (balance only handles TCP ports). I then specify the
system and port to which balance should route the data. I can specify
a host, such as laserjet.moonpoint.com, or its IP address, such as 10.0.0.8,
followed by a colon and the port number to be used on the destination system,
which is the HP LaserJet printer with a network card in it.
Other options for balance are shown below.
bash-2.03$ balance

balance 3.19
Copyright (c) 2000-2003,2004 by Inlab Software GmbH, Gruenwald, Germany.
All rights reserved.

usage:
  balance [-b host] [-t sec] [-T sec] [-dfp] \
          port [h1[:p1[:maxc1]] [!] [ ... hN[:pN[:maxcN]]]]
  balance [-b host] -i [-d] port
  balance [-b host] -c cmd  [-d] port

  -b host   bind to specific host address on listen
  -B host   bind to specific host address for outgoing connections
  -c cmd    execute specified interactive command
  -d        debugging on
  -f        stay in foregound
  -i        interactive control
  -H        failover even if Hash Type is used
  -p        packetdump
  -t sec    specify connect timeout in seconds (default=5)
  -T sec    timeout (seconds) for select (0 => never) (default=0)
   !        separates channelgroups (declaring previous to be Round Robin)
   %        as !, but declaring previous group to be a Hash Type

example:
  balance smtp mailhost1:smtp mailhost2:25 mailhost3
  balance -i smtp
According to the developer, Balance successfully runs at least on
Linux(386), Linux(Itanium), FreeBSD, BSD/OS, Solaris, Cygwin, Mac-OS X, HP-UX and
many more. Since it runs under Cygwin, you should be able to
get it to work on a Microsoft Windows system using Cygwin. It
is free Open Source software released under the GPL license. It
is available from
http://www.inlab.de/balance.html or
here.
On the Solaris 10 system, I'm using the Java Desktop System. I
clicked on "Launch", "Preferences", "System Preferences", and then
"Add/Remove Printer". I put in the root password when prompted, since
I was logged in under a normal user account. When the Solaris Print
Manager opened, I clicked on "OK" to use the default and only value
of "files" for the "Naming Service". I then clicked on "Printer"
and "New Network Printer". I gave the printer a name of "laserjet" and
specified "192.168.1.1" for the "Printer Server" value and selected
"TCP" for the "Protocol" value.
References:
-
RFC 1179 - Line Printer Daemon Protocol
-
Print Server Port Numbers for Netcat
by Jeff Liebermann jeffl (@) comix.santa-cruz.ca.us
Version 1.04 05/17/00
-
Setting up Sun Solaris 2.6, 7, and 8 to print to Canon Networked Printers
using LPD
-
Port Numbers
[/os/unix/programs/network/proxy]
permanent link
Thu, Mar 02, 2006 10:50 pm
Creating a Personal Distribution List in Outlook 2003
I created instructions for someone to use to build
a mailing list from a subset of the individual's in her contact list,
but I haven't yet figured out how she can add addresses from the contact
lists of others in her office, which have been shared and so can be accessed
by selecting them from under "Other Contacts" or by "Open Shared Contacts", but
which don't seem to be accessible when adding members to the personal distribution
list.
[
More Info ]
[/network/email/clients/outlook]
permanent link
Wed, Mar 01, 2006 8:45 pm
Obtaining Information About the Windows XP Firewall from the Command Line
If you wish to check the state of the Microsoft Windows XP firewall software,
you can issue the following command from a command line prompt.
C:\Documents and Settings\Administrator>netsh firewall show state

Firewall status:
-------------------------------------------------------------------
Profile                           = Standard
Operational mode                  = Enable
Exception mode                    = Enable
Multicast/broadcast response mode = Enable
Notification mode                 = Enable
Group policy version              = None
Remote admin mode                 = Disable

Ports currently open on all network interfaces:
Port   Protocol  Version  Program
-------------------------------------------------------------------
10243  TCP       IPv4     (null)
10280  UDP       IPv4     (null)
10281  UDP       IPv4     (null)
10282  UDP       IPv4     (null)
10283  UDP       IPv4     (null)
10284  UDP       IPv4     (null)
20099  TCP       IPv4     C:\Program Files\Network\SSH\OpenSSH\usr\sbin\sshd.exe
3389   TCP       IPv4     (null)
42599  TCP       IPv4     C:\Program Files\Network\pcAnywhere\awhost32.exe
42600  UDP       IPv4     C:\Program Files\Network\pcAnywhere\awhost32.exe
2869   TCP       IPv4     (null)
1900   UDP       IPv4     C:\WINDOWS\system32\svchost.exe
The command also shows the open ports and applications that have opened
particular ports.
You can also request information just on open ports with netsh
firewall show portopening as below.
C:\Documents and Settings\Administrator>netsh firewall show portopening

Port configuration for Domain profile:
Port   Protocol  Mode     Name
-------------------------------------------------------------------
10280  UDP       Enable   Windows Media Connect
10281  UDP       Enable   Windows Media Connect
10282  UDP       Enable   Windows Media Connect
10283  UDP       Enable   Windows Media Connect
10284  UDP       Enable   Windows Media Connect
10243  TCP       Enable   Windows Media Connect
1900   UDP       Enable   SSDP Component of UPnP Framework
2869   TCP       Enable   UPnP Framework over TCP

Port configuration for Standard profile:
Port   Protocol  Mode     Name
-------------------------------------------------------------------
20099  TCP       Enable   SSH
10280  UDP       Enable   Windows Media Connect
10281  UDP       Enable   Windows Media Connect
10282  UDP       Enable   Windows Media Connect
10283  UDP       Enable   Windows Media Connect
10284  UDP       Enable   Windows Media Connect
10243  TCP       Enable   Windows Media Connect
1900   UDP       Enable   SSDP Component of UPnP Framework
2869   TCP       Enable   UPnP Framework over TCP
3389   TCP       Enable   Remote Desktop
You may notice that the second example doesn't list the two ports
opened by pcAnywhere, TCP port 42599 and UDP port 42600 (the system is
using non-standard pcAnywhere ports), which are listed in the first
example. That is because those ports were allowed to be open in the
firewall not by designating the specific ports as allowed, but by
specifying the program that opens them as an "allowed program". You
can see the allowed programs by using the command netsh firewall
show allowedprogram.
C:\Documents and Settings\Administrator>netsh firewall show allowedprogram

Allowed programs configuration for Domain profile:
Mode     Name / Program
-------------------------------------------------------------------
Enable   Remote Assistance / C:\WINDOWS\system32\sessmgr.exe

Allowed programs configuration for Standard profile:
Mode     Name / Program
-------------------------------------------------------------------
Enable   Remote Assistance / C:\WINDOWS\system32\sessmgr.exe
Enable   pcAnywhere Main Executable / C:\Program Files\Network\pcAnywhere\Winaw32.exe
Enable   pcAnywhere Host Service / C:\Program Files\Network\pcAnywhere\awhost32.exe
Enable   pcAnywhere Remote Service / C:\Program Files\Network\pcAnywhere\awrem32.exe
Enable   proxy / C:\Program Files\Network\Proxy\proxy.exe
In the above example, the AnalogX
Proxy program, proxy.exe, is allowed to open ports, though it was not running
at the time the command was issued and therefore hasn't opened any ports.
If you just want to know whether the firewall is enabled, you can use
the netsh firewall show service command.
C:\Documents and Settings\Administrator>netsh firewall show service

Service configuration for Domain profile:
Mode     Customized  Name
-------------------------------------------------------------------
Enable   No          UPnP Framework

Service configuration for Standard profile:
Mode     Customized  Name
-------------------------------------------------------------------
Enable   No          UPnP Framework
Enable   No          Remote Desktop
Other firewall "show" commands that are available are listed below.
C:\Documents and Settings\Administrator>netsh firewall show

The following commands are available:

Commands in this context:
show allowedprogram - Shows firewall allowed program configuration.
show config    - Shows firewall configuration.
show currentprofile - Shows current firewall profile.
show icmpsetting - Shows firewall ICMP configuration.
show logging   - Shows firewall logging configuration.
show multicastbroadcastresponse - Shows firewall multicast/broadcast response configuration.
show notifications - Shows firewall notification configuration.
show opmode    - Shows firewall operational configuration.
show portopening - Shows firewall port configuration.
show service   - Shows firewall service configuration.
show state     - Shows current firewall state.
[/os/windows/xp/firewall]
permanent link
Tue, Feb 28, 2006 10:12 pm
Importing a Public Key with GPG
You can import someone's public key into your
GPG keyring in a number of ways.
Suppose you have received the following key by email or see it on a webpage.
(the key below is from the
The Linux Kernel Archives OpenPGP Signature webpage.
-----BEGIN PGP PUBLIC KEY BLOCK-----
Version: GnuPG v1.0.3 (GNU/Linux)
Comment: For info see http://www.gnupg.org

mQGiBDnirDkRBADCTL/iUTeZKb0tiAcKdZdsUP/KSnrGGjlinolUAsUC0D6/hUB1
RdCpJOOERTIEr1yvehqDM7veRhNMoxJNQxa/sSrkywey5qc8uaskUNEqenimq/70
bahWJeoWXjad68mQFh65lULnHQrrioeJnh9UpyGJppNb/yIjdnymH9aYEwCglgP7
UegBzH22h8NVQEK2PWWbyUUD/jQA4lI0wRWcL9HpkYkHcH0LTKRB9zYpQYtyvzJi
yTGwJyFMfYNXy0RT11dICeLkf3HMR84hkPERKMhALobLxVUbfc7j2AygmzGphWGy
DH/xjptQP/zrsq87ylYRONK18w1J42cm+yZa4XThMDPJMrb9/l8qnxU1JnW7W1al
HKTpBACbs+91KLqrnIGcF44TMwxgUj5CUrayPoEnLU+ZMBqfSjmu8RqEYmTxJCKv
7erBFSuazBGj5X7twunrtrW3bxO63MbLbHjfXSRrMnKOb8dRULIg6eWAnoAx8VVZ
YjrOpwAntU3WxYOpbiCHt9kLbb+N5rvNtFcmOqRRQaCIUFOOaLQ8TGludXggS2Vy
bmVsIEFyY2hpdmVzIFZlcmlmaWNhdGlvbiBLZXkgPGZ0cGFkbWluQGtlcm5lbC5v
cmc+iFUEExECABUFAjnirDkDCwoDAxUDAgMWAgECF4AACgkQyGugalF9Dw4MNACe
JiQTyCmQzPGou2cl/RyOXj79kYYAnAsT6xt72hp/PFiywYM9vBsDVv9niQEVAwUQ
OeKwNWx5eAAqlgcFAQEdZgf/Vn2dMKrn8021NhavP0uA3pHGRmdKQ2WJBdLiN2tv
LkpAioZtho+op+xBz8j1zdIJQ/7XWko869KHge2BAFwA8rWDzjtaAWdE0Jo/NiAR
epUwV2FdRRwSxIcNG2CCPyJnfPokRqjdl2z9k2PkwidHSq+2k6JxCWnOcIXChSKf
kHnemtA65ixAlhuxvyN3MPuYs1jAHyDGcyMfomp1qH9tXFQhhyXRrG2eMAfslstC
XGXLcoLN3O2BMR/fG2GlV6kOqGOvoMIW3clVeQLQ9B1yyekKiVY6Vg+CgK5qhg8z
9tjH4f33zzNDwsx1WSCOU/1LIPzFBNbR9QtTF2XmOUfRs4hGBBARAgAGBQI54rBc
AAoJEH2d7s4ry8YhmjsAoMUW9RxfXBSos0A6LwGd+5pXv/MRAKCYFLG2T4GSV+qf
iRsXnrgDHQHD04hGBBARAgAGBQI54rOZAAoJEPKlddweGoeC/+sAoL5f7JF21mRe
Z8VV4nhh7prm+idSAKCMXDWW/tBOeJDYpiEhgyGSGgJJWrkEDQQ54q+cEBAAjRmb
txamcZ9EYsQTnQvVL2l6vY5Rnbc1JDdcyHEV1kH5OwZWqvckL4QgKKBbTQwyB9pC
o0nGK4PkBbrwL0outfHQ5jl9DUzTKIu+asWUyf3fxfUV6j2A6BMo59KNnJzUyJ2+
B5na6NN8nEqEtmogROtjT8LkOvYwqD4A/5re2vwtie+h5yU6A+JbyGQF6lFxThZj
4WGctBgCcDBqRkPAG8DFFAdeN5SMAArktCYuUGXi2q88EDoOs3Ykw0kB8+ZFECz/
4/b93so5Wt2hC15cxAJoXFfR3mXHm40EHzMdEublWV4blB2KvFocQC74/H74QPUk
cWlc6EhPodKvcuOfTimDxXaiGNFONUPgNAmCXeVoOapdWpb3x7iOHPwSaXeJSrO9
fc4GtVjDv90DT2ekK7cvYk8s6B3t7p7W21Xi+hRgrw63B3HElr01gdMZY5XA5ey/
WmnyBS6LOxXlnVBE+2uSQ+aZHqrLpXcRvq2ZonOziDSE0i940ZvIwlSzn0U5BQWl
9hBDQw78RacYqaFvlpcGiPj75bScB4eemxV6Wdo9mtK0Vrr+9bWScXHEv7did4X+
7tBWKbA8M+g290OSzjeQBGLuPmbjxzEKH9jcUumzBzzC5x5GFh7On9TLXQ4K/oRT
6QQpS93YrTVbR60G4MKsePWLJmg7IgYUtNdLGjsAAwUP/0aAAq8CmWtourj1XxNY
pFmOAU45d65fPWVadKyF++B+uDyRNYN7HQCqrJ7ddn0sH7OBtlE8yaBYgR0TFly9
9+LqQO4r4IGCw2TBgA5tKnOWoPGEzvrLeoxR3SnPrKBlDvx6Rr9h3OJ9UV5u/NLh
mCP9iN10gWCGzsWbONc6qD6PugbTur44D6s4CRK9xfliSrtG3GBHW914UKjJeB9s
e3oc1rkmNv39kKcu33w4XVETAj4qpXnwoJvy639dfvnQt1TWFjIt20iP7m+jkT3B
b526uJ5GuJl6r8sm5OYYRs5cLigvUzRZVgYnjjqlRRACx0WcinKK55Li2Pq4qcRV
vSE5Tr3kTUTGxdmy113FbscrhLhesGALv3Hb7jeeWC8jviGEaHppgUumR6v0hsI1
rZ3K8kCjFRAYV8OKtcEeMqjouArGi5dn0ClmG4lwH4SEdqC/TRNWGG+iVpWf5yCj
9mvtvUhLtl6QjXHLrJdSGyafvqR1EQMJadFt4URvx0M7tqZIcwPUnb+7Oc+J96po
e/EQmnm6rFnTpWz0BbY4mbJC7vUH4JyLs0nlxiKrBjaO9C1DSAKBpjqaga8dQe1Z
kLOI2F7IWFeKV2LaMl+ZvvfWMECNcqNW2fkCuP9Fpz5K+xg21TwovVy93aWKgFL6
06jK51oQp3fW86xXK9ZGKYqQiEYEGBECAAYFAjnir5wACgkQyGugalF9Dw5M9QCg
hhmHalzWf8B3AVrjPrtrRHA1vlgAn3YRlU5l0V5W1iXvHXQCUHIESpgm
=SZZb
-----END PGP PUBLIC KEY BLOCK-----
- Copy and Paste
- Copy the entire block from the "BEGIN PGP PUBLIC KEY BLOCK" line
to the "END PGP PUBLIC KEY BLOCK" line (get the dashes on those
lines as well).
- At a shell prompt, type
gpg --import. The gpg program
will start awaiting your input.
- Paste the PGP key and then hit enter followed by Ctrl-D to terminate the
program.
- You should then see something like the following (the email address
has been altered to preclude spam spiders picking it up).
gpg: key 517D0F0E: public key "Linux Kernel Archives Verification Key
<ftpadmin@kernel69296.org>" imported
gpg: Total number processed: 1
gpg: imported: 1
- Import File
- Save the PGP public key above to a file. The file should contain
the entire block from the "BEGIN PGP PUBLIC KEY BLOCK" line
to the "END PGP PUBLIC KEY BLOCK" line (get the dashes on those
lines as well).
- If you saved the file as ftpadmin.txt you would issue the command
gpg --import ftpadmin.txt
- Obtain from a Keyserver
- Public keys are normally available from a key server, but you
need to know which key server or key servers have the key. In
this case the key is available from wwwkeys.pgp.net, so
you could issue the command
gpg --keyserver wwwkeys.pgp.net
        --recv-keys 0x517D0F0E
presuming you know the key
id is the hexadecimal value 517D0F0E.
After you have imported a key, you can verify it is on your keyring
using the command gpg --list-keys. You can delete a key
with the command gpg --delete-keys. E.g., suppose I have
the ftpadmin@kernel69296.org public key on my keyring, but wish to delete it.
I can issue the command gpg --delete-keys ftpadmin@kernel69296.org
to remove it from the public keyring. It is possible that you may have
multiple public keys for the same email address. Perhaps you have one that
is no longer used by the person to which it belongs and want to delete
that specific one. You can use the key id associated with that one,
e.g. gpg --delete-keys 517D0F0E in this case.
The key id is the sequence of numbers and letters after the slash that
you see when you list the keys on the keyring. E.g. for the
Linux Kernel Archives Verification Key, I see the following, if I
issue the command gpg --list-keys when it
is on my public keyring:
pub  1024D/517D0F0E 2000-10-10 Linux Kernel Archives Verification Key
<ftpadmin@kernel69296.org>
sub  4096g/E50A8F2A 2000-10-10
In this case, the key ID is 517D0F0E
References:
- The GNU Privacy Guard (GnuPG)
[/security/encryption/gnupg]
permanent link
Tue, Feb 28, 2006 12:20 am
Using ScanOST to Repair OST Files
Sometimes an Outlook Offline Folder file, i.e. an outlook.ost file, will
become corrupted. In such cases you can use Microsoft's OST Integrity
Check Took, scanost.exe, to analyze and, hopefully, repair any corruption
in the file.
[
More Info ]
[/network/email/clients/outlook]
permanent link
Mon, Feb 27, 2006 6:02 pm
Suspending An Errant Process with PsSuspend
Quite often I will find some process, usually Internet Explorer or Firefox,
will go amuck and start consuming most of the CPU cycles. I usually have
to kill the process through the Task Manager, which can be run by hitting
the Ctrl, Alt, and Del keys simultaneously and selecting "Task Manager".
You can then select the misbehaving application by clicking on it and kill
it by then clicking on "End Task". Another alternative for killing a
misbehaving task is to get a command prompt and use the taskkill
command, which is available on Windows XP and 2003 systems.
There are occasions, though, where I only want to suspend the errant
process, not kill it. For instance, if Internet Explorer is the errant
application, but you have multiple copies of Internet Explorer open, killing
the one that is not responding through the Task Manager will result in all
of the other copies of Internet Explorer closing as well.
An alternative is to use the free Sysinternals utility
PsSuspend, which allows you to suspend a process temporaily and
then resume it when you choose. The PsSuspend command is run from a
command prompt. With it you can suspend a process on the system on
which you run it or you can even suspend a process on a remote system,
if you have administrator access to that system. By using PsSuspend,
I can suspend just the one errant Internet Explorer process allowing
me to continue working with other open copies of Internet Explorer or
other applications without the system being bogged down so much by the
errant process consuming 95% to 100% of the CPU's cycles, making working
on the system aggravating.
[ More Info ]
[/os/windows/software/utilities/sysinternals]
permanent link
Sun, Feb 26, 2006 10:17 pm
Installing and Uninstalling digestIT 2004 with WPKG
I installed
digestIT 2004, a
program that can generate an MD5 sum for a file, with
WPKG, a software deployment, upgrade and removal script
for Windows. I had never tried removing a program from a system before with
WPGK, so I decided to test a deinstallation of digestIT 2004. You can remove a
program from a system using WPKG by removing the program's entry from the
appropriate section or sections of WPKG's
profiles.xml file. When
I initially tried to remove the digestIT 2004, the uninstall failed. I realized
I had an incorrect removal section for it in WPKG's
packages.xml file, which
I then corrected. But even after I made the correction, WPKG was still trying
to use the incorrect removal instruction from the previous version of packages.xml.
I then discovered that WPKG creates a c:\windows\system32\wpkg.xml file on the
systems where you install software using WPKG. Even though I was updating
the packages.xml file on the server from which I was installing the software,
WPKG was not looking at it for the uninstall instruction. Instead it was checking
the wpkg.xml file in the c:\windows\system32 directory on the system on which I had
installed digestIT 2004. The instruction for removing digestIT 2004 in that file
was the one placed in the file when I installed the software, so it was the
incorrect version. I made the correction in the wpkg.xml file as well and then
was able to uninstall the program using WPGK.
[
More Info ]
[/os/windows/software/wpkg]
permanent link
Sat, Feb 25, 2006 8:55 pm
Installation of RealPopup 2.6 Build 167
When I installed
RealPopup 2.6 Build 167
on a new system at a site that uses RealPopup for communications among users on the
LAN at the site, I received the error
message below:
| Error |
C:\WINDOWS\system32\mfc71.dll
The existing file is marked as read-only.
Click Retry to remove the read-only attribute and try again, Ignore to skip this file,
or
Abort to cancel installation.
[ Abort ] [ Retry ] [ Ignore ] |
I copied the existing file to another location and chose "Retry" to remove the
read-only attribute on the existing file and replace it. I checked the version numbers of
the one that had been on the system and the one that RealPopup placed on the system
afterwards by right-clicking on the files and choosing "Properties" then "Version". The
one placed on the system by RealPopup was a later version, though they are the same
size. The system has Windows XP Professional Service Pack 2 installed.
mfc71.dll
| | Previous | New |
| File version |
7.10.2292.0 |
7.10.3077.0 |
| Date modified | Wednesday, January 29, 2003, 11:34:40 PM |
Wednesday, March 19, 2003, 6:19:59 AM |
| Size | 1.01 MB (1,060,864 bytes) |
1.01 MB (1,060,864 bytes) |
| MD5 Sum | dee7a82b7ebe7ae2b21d611580bcb911 |
f35a584e947a5b401feb0fe01db4a0d7 |
The mfc71.dll is a Dynamic Link Library (DLL) file with a description of
"MFCDLL Shared Library - Retail Version". It is is the module that contains the Microsoft
Foundation Classes (MFC) functions used by applications created in Microsoft Visual
Studio.
References:
-
MFC71 - MFC71.dll - DLL Information
WinTasks DLL Library
[/os/windows/software/network/chat]
permanent link
Fri, Feb 24, 2006 6:37 pm
Fuser
You can use the
fuser command on Unix or Linux systems to determine
if any process has a file open or determine the specific process that has
the file open. The
fuser program is usually locate in /sbin,
so you will need to spcificy /sbin/fuser if it isn't in your path.
The output of the command may differ somewhat depending on the operating system
you are running. I've found that on a Solaris 7, Solaris 10, and SGI IRIX64
system that a command like fuser somefile.txt will return the
filename followed by a colon and then the process ID (PID) of the process
that has the file open with a letter code indicating how the file is being used.
The letter code will be an "o", if the process is using the file as an open
file. Fuser will still return the filename followed by a colon
even if no process has the file open.
fuser somefile.txt

somefile.txt
However, on a Linux system, specifically a Redhat Linux 9 system,
nothing is returned, if no process has the file open. You have to use a
"-a" option if you want the same response as on the Unix systems mentioned
above. If you use the "-a" option, you will see the filename followed by a
colon and nothing else, but then you will also see "no process references;
use -v for the complete list" on a line below.
$ /sbin/fuser -a somefile.txt

somefile.txt:

No process references; use -v for the complete list
I also don't see a letter code appended to the end of the PID when I run
fuser on a Linux system and some process has the file open.
If you run fuser from a regular user account, you may get an indication
that no process has a file open when a process owned by another account
has the file open. E.g. I know that the /var/log/maillog file is open,
but checking it with fuser from a user account doesn't show that the
file is open. But, if I rerun fuser from the root account, I do see
which PID has the process open and can issue a ps -p
command followed by that PID to see the name of the process that has
the file open.
$ /sbin/fuser /var/log/maillog
$ /sbin/fuser -a /var/log/maillog
/var/log/maillog:
No process references; use -v for the complete list
$ su - root
Password:
# fuser /var/log/maillog
/var/log/maillog:     2599
# ps -p 2599
  PID TTY          TIME CMD
 2599 ?        00:00:14 syslogd
You can kill a process that has a file open with the "-k" option, e.g.
fuser -k somefile.txt
[/os/unix/commands]
permanent link
Thu, Feb 23, 2006 7:44 pm
Mboxgrep Installation on Solaris 10
Mboxgrep is a nifty
little utility for finding particular messages in a mailbox on a
Unix or Linux system. It allows you to scan an entire mailbox file
for messages using a regular expression. Its features include
the following:
Features:
-
support for mbox (either plain or compressed), MH, nnmh, nnml and
maildir folders
-
ability of reading mbox folders and out from another mboxgrep
process from standard input
-
support for basic and extended POSIX regular expressions, and
optionally, Perl-complatible regular expressions (if linked with
the
PCRE
library)
-
ability of limiting the search to message body or headers
(although the whole message is scanned by default)
-
message counting
-
recursive search through directories
-
ability to invert the sense of matching
-
ability to write found messages to another mailbox
-
filtering duplicate messages
But if you have a default Solaris 10 installation, you may have to set
path variables appropriately to compile and run it.
[
More Info ]
[/os/unix/solaris]
permanent link
Wed, Feb 22, 2006 11:00 pm
NicTech.BM2 guard.tmp file
Microsoft AntiSpyware reported the presence of NicTech.BM2 on a Windows XP
system. It did not report any other files or registry keys associated
with the malware. I did not find any processes running that appeared to
be related to that file, which I removed.
I submitted the file for analysis by 14 different antivirus programs to
Jotti's Online Malware Scan.
One half of the antivirus programs reported the file as being associated
with malware.
| BitDefender | Adware.Look2me |
| Dr. Web | Adware.Look2me |
| Fortinet | Adware/Look2me |
| Kaspersky Anti-Virus | not-a-virus:Adware.Win32.Look2Me.u |
| NOD32 | Win32/Adware.Look2Me application |
| Norman Virus Control | Look2Me.U |
| VBA32 | AdWareLook2Me.u |
[ More Info ]
[/security/spyware]
permanent link
Wed, Feb 22, 2006 11:48 am
Oracle Acquires Sleepycat
Oracle has acquired database
developer
Sleeycat Software, Inc.,
which produces open-source database software and will add Sleepycat's
Berkeley DB to its line of embedded databases.
Sleepycat's Berkeley DB may be the most sidely used open-source database
software with an estimated 200 million deployments. Bekeley DB is a
programmatic toolkit that provides fast, reliable, scalable, and
mission-critical database support to software developers. I use it
for makemap hash support for Sendmail.
References:
-
Oracle Pounces on Sleepycat
By John G. Spooner
eweek.com
February 14, 2006
-
Installing Sendmail on Solaris
[/software/database]
permanent link
Sat, Feb 18, 2006 10:12 am
Spam from 211.32.91.234
Looking through email logs for this week, I noticed someone attempted
to send email from IP address 211.32.91.234 to an email list on the
system that I invalidated over a month ago. The email was coming from
an IP address that appears to belong to a South Korean Internet Service
Provider (ISP), which was suspicious, sine the address was only supposed
to be known by 4 to 5 people in an office of an organization in the U.S.
The office was closed down at the end of last year.
The email was blocked because the sending IP address was on a blacklist that I
use to curtail spam coming into the email server. When I checked the IP
address against other blacklists, I found it was present on several lists.
The system may be running an open SOCKS proxy service.
[ More Info ]
[/network/email/spam/blocklists]
permanent link
Mon, Feb 13, 2006 11:05 pm
Incompatibility between OpenSSH for Windows and ClamWin
When I attempted to scan a directory with 83 .exe files with
ClamWin, the
scan completed almost instantly and I saw the message below.
-------------------

Completed

-------------------
I was skeptical that any scan had actually been conducted. I suspected
a cygwin.dll incompatibility, since I also had installed
OpenSSH for Windows
to set up the Windows 2000 Professional system as an SSH server. So I
got a command prompt and attempted to run clamscan on one of the files
in the directory. The ClamWin application uses clamscan.exe to do the
actual scanning for viruses. Sure enough, when I ran clamscan, I
received a message, which is shown below, informing me that there
was a likely cygwin.dll compatibility problem instructing me to
search for multiple versions of cygwin1.dll on the system.
C:\Program Files\Security\AntiVirus\ClamWin\bin>clamscan \zips\11700.exe
C:\Program Files\Security\AntiVirus\ClamWin\bin\clamscan.exe (1356): *** system
shared memory version mismatch detected - 0x75BE0074/0x75BE0084.
This problem is probably due to using incompatible versions of the cygwin DLL.
Search for cygwin1.dll using the Windows Start->Find/Search facility
and delete all but the most recent version.  The most recent version *should*
reside in x:\cygwin\bin, where 'x' is the drive on which you have
installed the cygwin distribution.  Rebooting is also suggested if you
are unable to find another cygwin DLL.
I looked at the versions of cygwin1.dll which came with each application
and found the versions shown below. The cygwin1.dll files are in the
Clamwin\bin and OpenSSH\bin subdirectories underneath \Program Files,
if you installed the applications in the default directories. You
can check the version number for the dll files by right-clicking on
them and selecting "Properties" and then clicking on the "Version"
tab of the window that opens. You will see "File Version" listed near
the top of the window then. You will also see "Product Version" listed
under the "Item name" section of the version window. You will need to
click on "Product Version" to see the value for it. The timestamps
on the files also showed the ClamWin version of cygwin1.dll to be
a later version.
| Program | Program Version | Cygwin1.dll File Version |
Product Version | Timestamp |
| ClamWin | 0.88 | 1005.18.0.0 | 1.5.18 |
July 03, 2005, 11:30:52 AM |
| OpenSSH | 3.8.1p1-1 | 1005.10.0.0 | 1.5.10-cr-0x5e6 |
Tuesday, May 25, 2004, 9:07:50 PM |
Obviously, ClamWin 0.88 has a later version of the
DLL file cygwin1.dll
than OpenSSH for Windows 3.8.1p1-1. I shouldn't have had a problem
if the later version was loaded into memory, so OpenSSH must have
started first. Windows won't load another version of a DLL file with
the same name as one already loaded.
You can resolve such a problem by overwriting the older version with
the newer version. In this case, since OpenSSH for Windows had its
copy of cygwin1.dll loaded in memory already, I couldn't overwrite
its copy of the dll file without stopping it first. Otherwise I would
get an error message "Cannot copy cygwin1: There has been a sharing
violation. The source or destination file may be in use." So I stopped
OpenSSH with the command net stop opensshd, copied the
newer version of the cygwin1.dll file from Clamwin's bin directory
to the OpenSSH bin directory, overwriting the existing version, and
then restarted OpenSSH with net start opensshd. Note:
if you have any SSH connections open, you will need to close those
as well in order to overwrite the cygwin1.dll file in the OpenSSH
bin directory.
I then rescaned the directory I had been trying to scan with ClamWin
earlier. This time it took considerably longer to finish and produced
a report at the end indicating the number of directories and files it
had scanned. It found 3 infected files in the directory.
[/security/antivirus/clamav]
permanent link
Sun, Feb 12, 2006 7:15 pm
Site Not Present in the Wayback Machine
Due to a power outage at the facility where I house my web server, I was
unable to access it today. There was some PHP code I wanted to retrieve
from one of my webpages. I had obtained the code from another site,
but was unable to relocate the information with a
Google search. I had posted the
information relatively recently and didn't think I had it on a server
where I keep a backup of the website files. I thought I would check the
Wayback Machine to see
if the information was archived there, but found that there was no
archive of this website, which I've maintained for about two years now.
The Wayback Machine aka Internet
Archive is an attempt to preserve a historical record of the Web, just
as libraries perserve written materials for posterity.
In the words of its maintainers:
The Internet Archive is a 501(c)(3) non-profit that was founded to build an
.Internet library,. with the purpose of offering permanent access
for researchers, historians, and scholars to historical collections that exist
in digital format. Founded in 1996 and
located in the
Presidio of San Francisco, the Archive has been receiving data donations
from Alexa Internet and others. In late 1999,
the organization started to grow to include more well-rounded collections. Now
the Internet Archive includes
texts,
audio,
moving images, and
software as well as
archived web pages in our
collections.
I've encountered instances where I or someone else had a bookmark to
a site with needed information that was once there, but when I attempted
to visit the bookmarked webpage again, the site no longer existed or
the relevant information was no longer there. And I couldn't find
it anywhere else on the web. But in several such instances I've been able
to go to the Wayback Machine, type in the site's address and locate
the information in an archive of the website within the Wayback Machine.
The Wayback Machine will often have snapshots of the site at various
points in time. So, if the site existed two years ago, but is no longer
present, you may still be able to retrieve information it contained from
the Wayback Machine.
Since this site wasn't there, I wanted to add it.
The FAQ for the site
states that you can go to
Alexa
Web Search -- For Webmasters to submit your site to an Alexa search,
which will result in it being incorporated into the Internet Archive.
The FAQ states "Sites are usually crawled within 24 hours and no more then 48.
Right now there is a 6-12 month lag between the date a site is crawled and the
date it appears in the Wayback Machine."
I submitted my site, but then realized I probably should have waited until
power is restored to the facility where the webserver is housed, since I
don't know what will occur if the Alexa webcrawler tries to access it, but
finds it isn't accessible. Will it try again later or just discard the request?
I suppose I should resubmit the request once the site is available again.
Some of you may recall another "Wayback Machine". There was a cartoon,
"Peabody's Improbable
History", which I used to watch as a boy. In it a boy, Sherman, and his
erudite talking dog, Mr.
Peabody would travel back in time each episode
using Mr. Peabody's time machine, which was called the "Wayback Machine".
They would then fix problems to make sure history would turn out the way
we know it.
References:
-
Internet Archive
Universal Access to Human Knowledge
-
Peabody's Improbable History
Don Markstein's Toonopedia
-
Mr. Peabody
Wikipedia
-
Hollywood on Shakespeare and Bacon
Sir Francis Bacon's New
Advancement of Learning
[/network/web/search]
permanent link
Sat, Feb 11, 2006 8:52 pm
PWS.Bancos.A (Password Stealer) False Positive
When I remotely logged into a user's system this morning to check an FTP
transfer log on it prior to running a backup of the system, I saw Microsoft
AntiSpyware's scan report indicated it had detected one item during its nightly
scan of the system. The spyware it detected was
"PWS.Bancos.A (Password Stealer)".
Item Details
PWS.Bancos.A
Type: Password Stealer
Threat Level: Severe
Description: A Trojan that captures or transmits passwords to an
attacker.
Advice: Severe-risk tiems have an extreme potential for adverse effect,
such as a security exploit, and should be removed.
When I looked at the registry key values detected, I saw they referred to
"Intel\Landesk\VirusProtect6"
(see
Scan Results).
The Intel LANDesk software allows enterprises to manage client
PCs1,
so I thought this might be a false positive.
The spyware definitions on the system were version 5805 (2/11/2006 8:12:18 AM).
Microsoft AntiSpyware Version:  1.0.701

This version expires on: 7/31/2006

Spyware Definition Version: 5805 (2/11/2006 8:12:18 AM)
After finding PWS.Bancos.A Password Stealer on the user's system, I checked
the Microsoft Antispyware results from its early morning run on my wife's
PC. I found the same report of PWS.Bancos.A being detected with references
to the same registry entries. And a short time later, I received an email
from the vice president of the company where I had found the first report
of the problem. She had also found the same scan results when she came in
to the office to work on her system.
After extensive searching for any postings regarding this detection, I did find
an indication that it was a false positive in a February 10, 2006
posting at
Siljaline's IE &
Security Blog, where I found the following posted.
Definitions "5807" released to address a false-positive detection some essential
components of several Symantec Corporate Antivirus versions are being identified
as PWS.Banco.A
The 3 systems in question are all running
Symantec AntiVirus Corporate Edition 8.0. I monitor the installation of
programs on systems with
Inctrl.
Inctrl2
can record the file and registry changes that occur during software
installation. Looking at an installation report for
SAV 8.0, I found that the
Software\Intel\Landesk registry keys were created during the installation of
that software.
According to Trend Micro, the
company was one of the original developers of the Intel LANDesk Virus
Protect (LDVP) technology
3.
But in 1998, Symantec purchased
Intel Corporation's anti-virus business and
also licensed Intel systems management technology which it combined with its own
antivirus technology4.
Inside Microsoft Antispyware, I went to "File" and selected "Check Updates".
Newer spyware definitions were downloaded and I then saw the version number
listed as 5807 when I selected "Help" and "About Microsoft AntiSpyware".
Microsoft AntiSpyware Version:  1.0.701

This version expires on: 7/31/2006

Spyware Definition Version: 5807 (2/11/2006 8:12:18 AM)
When I ran a full scan with those definitions nothing was detected. I updated
the definitions on my wife's system and ran a scan of her system also.
Likewise, this time nothing was detected.
For anyone who finds Microsoft AntiSpyware is reporting a false positive,
Microsoft provides a
False Positive Report Form.
Reference:
-
LANDesk Management Suite 8.6
Network America
-
Stay in Control
PC Magazine
By Neil J.
Rubenking
-
Trend Micro Offers Free Upgrades And Support to Intel Landesk Virus Protect
Customers Worldwide
Trend Micro
1998 Press Release
-
Symantec buys Intel's Anti-Virus Business
Symantec Corporation
September 28, 1998
-
MS Anti-Spyware Defs. "5807" now available
Siljaline's IE &
Security Blog
Posted Friday, February 10, 2006 3:41 PM by
siljaline
-
Microsoft AntiSpyware False Positive Report Form
Microsoft Corporation
[/security/spyware/MS-Antispyware]
permanent link
Sat, Feb 11, 2006 3:46 pm
RTF Converter
If you need a utility to convert
RTF files to
HTML,
you can use
rtf-converter.
The program won't put in the <html>, <body>, etc. tags,
so you will have to add those manually. I've also found it doesn't
deal well with underlining in the RTF file and, though it will put
in <br> tags for line breaks, it doesn't break the line at those
spots in the output, so you'll have to do some editing to the resultant
HTML output files. To put in line feeds, I use the following vi command
to insert them after the <br> tags.
:1,$ s/<br>/<br>\r/g
You will need a C++ compiler to compile the source code into an
executable file.
[/languages/c++]
permanent link
Sat, Feb 11, 2006 12:36 pm
Passive Spam Block List (PSBL) Added
I added the
Passive Spam Block
List (PSBL) to the spam blacklists I employ on my email server.
I now am using six different blacklists on the system to combat spam.
The ones I'm now using are as follows:
Blitzed Open Proxy Monitor List
Open Relay Database
Composite Block List (CBL)
McFadden Associates E-Mail Blacklist
Spam and Open Relay Blocking System (SORBS)
Passive Spam Block List (PSBL)
To add the PSBL to the blacklists queried by sendmail, I added the
following line to /etc/mail/sendmail.mc.
FEATURE(`dnsbl', `psbl.surriel.com', `"550 Mail from " $`'&{client_addr} " refused - see http://psbl.surriel.com/"')dnl
I then regenerated the sendmail.cf file from the sendmail.mc file and restarted
sendmail with the commands below.
m4 /etc/mail/sendmail.mc > /etc/mail/sendmail.cf

/etc/init.d/sendmail restart
[/network/email/spam/blocklists]
permanent link
Fri, Feb 10, 2006 11:15 pm
Who Is Logged On?
If you need to determine who is logged into a Windows system, there are several
alternatives for collecting that information from a command line interface. One
of method is to use a
Visual Basic
script to determine who is logged on, such as the
WhoLogon.vbs
script by
Guy Thomas.
Or you can use the free
PsLoggedOn utility by Mark Russinovich at
Sysinternals.
There is also a whoami utility within the
Native Win32 ports of some GNU utilities, which contains ports of some
common GNU utilities to native Win32.
[ More Info ]
[/languages/vbs/sysadmin]
permanent link
Thu, Feb 09, 2006 11:24 pm
Why Is Email From a Hotmail.Com or MSN.Com Account Rejected?
I have received reports from three users recently that email addressed to the
users from either a hotmail.com or msn.com email address is not getting
through. The reason is that the hotmail.com servers, which handle email from
hotmail.com and msn.com accounts, are currently on the
SORBS blacklist.
[ More Info
]
[/network/email/spam/blocklists]
permanent link
Thu, Feb 09, 2006 6:25 pm
Creating an ISO File From a CD on Solaris 10
Insert the data CD from which you wish to create an ISO file in the CD-ROM
drive. Then issue the command below when the CD is mounted.
mkisofs -r -R -J -l -L -o /dirname/filename.iso /cdrom/cdname
You specify the name of the ISO-9660 output file with the -o
parameter. You can include the full path name prior to the filname.
The last argument on the line is the location of the CD you wish to
use. When you insert the CD, you should see a File Browser window
open with this information. E.g., if I was copying a Slax Linux CD,
I might see /cdrom/slax.
You can see the meaning of the other parameters by issuing the
command mkisofs -help or by going to
YoLinux Tutorial: Burning a CD.
Note: you may have a problem copying CDs using the Joliet format
rather than the standard ISO-9660 format. The Joliet format is
a Microsoft extension to ISO-9660. It uses Microsoft Windows 95 like
8.3 file names with translation to 64 character names. If you create
an ISO file from the CD and get a .iso file that is only a few hundred
kilobytes in size, that is likely the cause of the problem.
References:
-
YoLinux Tutorial: Burning a CD
[/os/unix/solaris]
permanent link
Wed, Feb 08, 2006 11:15 pm
Pcal
If you need to generate a calendar in
HTML,
Pcal will allow
you do generate one. To generate an HTML file you specify
the
-H parameter. You specify the output file
with the
-o parameter. Otherwise output will
go to standard output, e.g. the screen. You can specify
that a calendar be created for an entire year by putting
a two digit representation of the year at the end of the
command line. You can specify text to be used for both
the title of the webpage, i.e. what you commonly see in the top
line of your browser, and for the webpage heading by using
the
-C parameter. E.g. to create a file /tmp/mycalendar.html
for 2006 with a title and heading of "My 2006 Calendar", you
could use the command below. Remember, the case of the letters
you use for the parameter is significant. A
-O
is not the same as a
-o.
pcal -H -o /tmp/mycalendar.html -C "2006 Calendar" 06
2006 Calendar
created by the above command. The program can also produce postscript
output.
If a file exists by that name in the specified directory,
it will be overwritten. I've created a simple
BASH
script,
generate-calendar, that takes 3 parameters, two of
which are optional, that will check if the output file exists.
If it does, it will prompt as to whether it should be overwritten.
Usage: generate-calendar -o output_file [-t title]  [-y yy]

The script takes optional title and year arguments

-o specifies the HTML output file, e.g. /example/index.html
-t specifies the title and heading for the HTML file
   If there is a space in the title enclose it in double quotes
-y specifies the year for the calendar, e.g. 06
   If no year is specified, the calendar will be created only
   for the current month
A companion program for pcal is
Lcal, which generates a graphical "lunar phase" calendar for an entire
year.
[/os/unix/programs/utilities]
permanent link
Wed, Feb 08, 2006 12:09 pm
Including Files in a Web Page with PHP
If you want to pull in code from other files into your webpages, you can
use the
PHP
include function.
Suppose you want to include a header and footer file in each webpage you
create so that you don't have to type the same HTML code into each webpage
to get a standard header and footer for each webpage. You can create a
template directory beneath the root directory of your website and put two
files there: header.php and footer.php. The files can contain standard
HTML code, though of course you just have the snippets of code you need
not the <html>, <body>, and other tags you would have in a
complete webpage.
For instance, suppose you just want to include a logo for your site
at the top of every page. You could create a header.php file with just
the following code.
<div id="header" align="center">

<img src="/images/mplogo-white.jpg" alt="MoonPoint Support Logo">

</div>
Let's suppose that you have two directories called examples and template
beneath the root directory for your website. You place all template files,
such as header.php, footer.php, menu.php, etc. in the template directory.
You want to place those in every webpage on your site. In the examples
directory you have a webpage titled mywebpage.php. To include the header
file in the page you could insert the following line at the appropriate place
in mywebpage.php. You would insert similar lines for any other files you
wished to include.
<?php include("../template/header.php"); ?>
Now, whenever you want to change the header file, you don't have to edit
every webpage on the site and make the needed changes. You just edit
header.php.
But one caveat to this approach is that you have to keep in mind the
directory structure for the site every time you use the include function.
For instance you may have 8 levels of directories beneath the root directory
of your website. For a particular dirctory you might need to use
<?php include("../../../../../template/header.php"); ?>.
Keeping track of the number of dots and slashes you need can be a little
cumbersome. And, if you rearrange the directory structure for the site,
you may have to edit every webpage in the affected directories to put in
the appropriate number of dots and dashes for the new directory structure.
However, you could also insert the following code provided by
Paul Whitrow at
PHP
Include File Path Finder in the webpages instead.
<?php


function incfile($file,$d=""){

 while(!is_file($d.$file)){$d.="../";}

 include ($d.$file);

}


?>
Then instead of using PHP's include function to insert the header
file, you could place the incfile function in your webpages where you
want the header to appear, as below. Make sure you have inserted
the incfile function code shown above prior to the point where you call
it.
<?php incfile("template/header.php"); ?>
You could use either incfile("template/header.php"); or
just incfile("header.php");. The incfile function will check the
current directory, i.e. the one in which the webpage is located, for a
subdirectory named template with header.php within it if
you use the first form or will look for header.php within the current
directory if you use the second form. If it doesn't find the requested file,
then it will put a "../" in front of the directory path and try again.
If it still doesn't find header.php, it will prepend another "../" and try
again and so on.
So using including the incfile function in your webpages and calling it
to look for files you want to include will save you from figuring out
how many sets of dots and slashes you need to locate the file you want
to include and from having to edit webpages to modify the number of dots
and slashes should you alter the directory structure of your website.
One note of warning, though. The file you include must exist. Otherwise
your website visitors may see many repetitions of lines like the following
when they visit your webpages where you used incfile.
Warning: stat failed for ../../../../../../../../../../../../../../../../../../../.

in /www/mysite/examples/linux/test.php on line 22
References:
-
PHP Include File Path Finder
By Paul Whitrow
September 28, 2005
[/languages/php]
permanent link
Tue, Feb 07, 2006 10:05 pm
Lists of Blacklists
One way to combat spam at the email server level is to use blacklists,
aka blocklists, which are lists of
IP addresses of systems
known to regularly transmit spam or at least to have recently transmitted
spam. Various organizations and companies throughout the Internet
create their own lists and then, frequently, to help other email
server administrators combat spam, will provide access to those
lists to others on a real-time basis.
To find out whether your IP address is on such a list or to see
what lists you might use for your own email server, I've created
a
list of sites that provide links to multiple blocklists from one
webpage and also
my own
list of sites.
[/network/email/spam/blocklists]
permanent link
Tue, Feb 07, 2006 9:34 pm
Setting up Apache on a Solaris 10 System
First you need to create an httpd.conf configuration file.
There is an example configuration file, httpd.conf-example in
/etc/apache2. You can use it as a starting point.
# cd /etc/apache2

# cp httpd.conf-example httpd.conf
Apache will run with the username of webservd
and the group of webservd when using the default configuration
provided when Solaris 10 was installed, which means you will
find the following two lines in the httpd.conf file.
User webservd

Group webservd
With the default setup, you should also have the following
entries in /etc/passwd and /etc/group.
# grep webservd /etc/passwd

webservd:x:80:80:WebServer Reserved UID:/:

# grep webservd /etc/group

webservd::80:
You should find the following line within httpd.conf and modify
the email address to be the email address which you would like
to use to receive email related to problems with the web server.
ServerAdmin you@yourhost.com
Next find the following line.
ServerName 127.0.0.1
ServerName is the name that the server uses to identify
itself. It should be set to a valid DNS name for your
host, e.g. www1.example.com, or, if no DNS name is
available, then the IP address for the system. Note: this
does not preclude having multiple domain names handled
by one server through virtual hosts. This name should
be the primary name for the system if you will have
multiple websites hosted on the system with unique
domain names. You can also include a port number
after the name, e.g. www1.example.com:80.
Next find the following line.
DocumentRoot "/var/apache2/htdocs"
This specifies the directory out of which you will
serve your documents. If instead, you would like
to place your website under /home/www, you would
change the line accordingly. Don't put a slash
at the end of the directory name.
With the default configuration, if someone visits
your website, the IP address of her system will
be stored in Apache's log files. If you want the
Fully Qualified Domain Name (FQDN) stored as well,
change the following line from "Off" to "On". E.g.,
if you would like www.apache.org as well as
204.62.129.132, you would change the value to
"On".
HostnameLookups Off
Changing the value to "On" means it is more
apparent from the log files where your visitors
are coming from, but adds additional bandwidth
usage, because every time someone visits the
website, the server must perform an IP address
to name lookup. If you are likey to get only
a few hundred or less hits on the websites on
the server per day, then the name lookups
will be adding little traffic, but if you
expect hundreds of thousands of hits a day,
it might be preferable to leave HostnameLookups off.
If someone tries to access a webpage on the
server, but it doesn't exist or there is
some other problem accessing the webpage,
errors will be logged in the log file
specified below by default. You can have
the error log somewhere else on the system
by changing the ErrorLog value.
ErrorLog /var/apache2/logs/error_log
A web server can tell browser clients the
language that is used for webpages on the
server when one is not listed specifically
on webpages residing on the server. With
the default configuration, the DefaultLanguage
value is commented out, i.e. there is a "#" at
the beginning of the line.
#DefaultLanguage
If you know all of the pages on your
web server will be in one language,
you can change this line. E.g., to
indicate that all pages on the server
are in English, I could change the
DefaultLanguage line
to the one below.
DefaultLanguage en
When you start Apache, it records its process
identification number, aka Pid, in a
specified location. The location is
controlled by the value of PidFile.
Make sure the directory exists. If
you use the default value of /var/run/apache2/httpd.pid,
you will need to create the /var/run/apache2 directory.
PidFile /var/run/apache2/httpd.pid
I use /var/run/httpd.pid, instead, since
the /var/run directory already exists and is used to store
other pid files and I don't see a need to have a separate
directory under it just for Apache's httpd.pid file,
so I have the following line in httpd.conf.
PidFile /var/run/httpd.pid
You will also need to remove the "#" from the beginning
of the following line, so that it is no longer
commented out.
#LockFile /var/apache2/logs/accept.lock
Otherwise, Apache may not start and you may see
lines like the following in error_log
[Tue Feb 07 17:57:40 2006] [emerg] (2)No such file or directory: Couldn't create accept lock
If you want to have multiple websites
residing on your web server with each
pointing to a different set of documents,
then you need to set the VirtualHost
configuration parameters. E.g., you
might wish to have www.example.com
and www.someother.com accessible on
the same web server. To have
such virtual hosts, first remove
the comment from the line below.
#NameVirtualHost *:80
Then copy the "VirtualHost example" section below
that line and make whatever chanes you desire.
You don't need to specify a unique ErrorLog and CustomLog,
but I would normally recommend having separate log files
for each website hosted on the server, rather than having
all log entries go into an access and error log shared
by all sites hosted on the server. An example VirtualHost
section is shown below.
<VirtualHost example.com>

ServerName example.com

ServerAlias www.example.com example.com

ServerAdmin webmaster@example.com

DocumentRoot /home/jsmith/www

ErrorLog /home/jsmith/www/logs/example-error_log

CustomLog /home/jsmith/www/logs/example-access_log common

</VirtualHost>
You can have aliases for a particular website by specifying
names after ServerAlias. E.g.
in the example above, someone could put either
http://www.example.com or http://example.com in
his browser and be taken to the same website.
Be sure the directores where the log files will
be stored have been created before you start
the Apache web server. And the DocumentRoot
directory should exist also.
Once you have finished editing the /etc/apache2/httpd.conf
file, you can start the Apache web server with the command
below. Be sure you are logged in as root before issuing the
command.
# /usr/apache2/bin/apachectl start
If you made a mistake in the httpd.conf file or want
to modify the file for another reason, you can edit
it and then restart Apache with the following command.
# /usr/apache2/bin/apachectl restart
Note: if you use the apachectl command to start Apache,
it won't restart automatically when you reboot the system, unless you
have enabled it as a service or have a script on the system that starts
Apache which gets executed at system startup. To enable Apache to run
as a service and have it restart when the system reboots, use the command
svcadm enable apache (See
Using the svc and svcadm Commands
).
Where do you look if Apache won't start?
Look in the default error_log file. For instance,
if you left the value of ErrorLog for the
primary site in /var/apache2/logs, check the
error_log file there.
For instance, when I first tried starting Apache
it wasn't starting. I looked in the error_log
file and saw the following.
[Tue Feb 07 17:38:15 2006] [error] httpd: could not log pid to file /var/run/apache2/httpd.pid
I realized the /var/run/apache2 directory didn't exist and
changed the PidFile value in httpd.conf to be /var/run/httpd.pid,
instead. When I then tried starting Apache again, as before I didn't
get any error message on the terminal indicating it had failed to
start, but it wasn't running. I looked in the error_log again.
This time I didn't see any additional entries for the above error
message, but did see the one below.
[Tue Feb 07 17:57:40 2006] [emerg] (2)No such file or directory: Couldn't create accept lock
So I looked through httpd.conf for any references to "lock". I found
#LockFile /var/apache2/logs/accept.lock. I removed the "#" at the
beginning of the line and attempted to restart Apache. It then
started successfully.
Some additional problems you might encounter
Perhaps you get Apache running successfully, but then
attempt to access a website on the server and get the
following error message.
Forbidden
You don't have permission to access /
on this server.
Additionally, a 403 Forbidden
error was encountered while trying to use an ErrorDocument to handle the request.
Apache/2.0.52 (Unix) DAV/2 Server at example.com Port 80
Check the permissions on the directory that contains the root
of the website. Suppose that the website is housed under /home/jsmith/www.
If you see permissions like the following, then
the permissions are the cause of the problem.
# ls -ld /home/jsmith/www

drwxr-xr--   4 jsmith staff        512 Feb  7 18:24 /home/jsmith/www
In this case you would need to change the permissions on the
www directory from 754 to 755 so that everyone has execute
permission for the directory. And not only do you have to
change it for the www directory, but for the directory above it
as well, i.e. the user's home directory.
# chmod 755 /home/jsmith

# chmod 755 /home/jsmith/www
[/os/unix/solaris]
permanent link
Tue, Feb 07, 2006 9:06 pm
Verizon Tech Support Phone Numbers
If you need technical support from Verizon for dial-up access, DSL service, or
ISDN
support, you can use the telephone numbers below:
| Company | Number | Description |
|---|
|
Verizon |
1-800-567-6789 |
Dial-up Access/ISDN (24 hours-a-day, 7 days-a-week) |
| | 1-800-567-6789 | Consumer DSL (Dynamic IP) |
| | 1-888-649-9500 | Business DSL (Static IP) |
[/network/Internet/ISP]
permanent link
Tue, Feb 07, 2006 12:02 am
Foxconn 661M03-G-6L Motherboard Memory
If you have a motherboard with a BIOS ID string of
10/28/2004-SiS-661-6A7I4FK9C-00, then you have a
Foxconn 661M03-G-6L motherboard. The Foxconn 661M03-G-6L Motherboard has
two 184-pin
DIMM slots.
You can use PC 3200, PC 2700, or PC 2100 memory in the slots. The
motherboard manual states that it supports 128 MB, 256 MB, or 512 MB
modules for a maximum capacity of 2 GB, but if it only supports upt to 512 MB
per slot, then the maximum memory you can support is 1 GB.
[ More
Info ]
[/pc/hardware/motherboard]
permanent link
Mon, Feb 06, 2006 6:31 pm
SORBS Blocking Hotmail.Com and MSN.Com Email
I had reports from two users who were informed by inviduals
using hotmail.com and msn.com addresses that mail was
being rejected when sent to the users. The senders were
not able to provide me with the reason for the email being
rejected. When I used my own hotmail.com test account, I
discovered that was because Hotmail hides that informaton
from the Hotmail account holder by default, but Hotmail's
settings can be changed to reveal the reason a message is
rejected.
When I used my own test account, I found that email from
hotmail.com and msn.com accounts was being rejected because
the hotmail.com email servers are on a
SORBS blocklist.
I resolved the problem by adding the relevant hotmail.com and msn.com
email addresses to sendmail's /etc/mail/access file.
[ More Info ]
[/network/email/spam/blocklists]
permanent link
Mon, Feb 06, 2006 11:44 am
Yahoo and AOL Postage Charge
Yahoo and AOL will provide email senders the capability to bypass spam filters
on the Yahoo and AOL email servers, if the sender pays a postage fee that would
range from 1/4 of a cent to one cent per email address. AOL and Yahoo will use
the services of a company called Goodmail Systems to provide the postage-based
email service.
By providing the capability to bypass spam filters on their servers, if the
sender pays a fee for each email sent, the two companies will be providing
mass mailers the capability to ensure that their email reaches recipients
rather than perhaps being identified as spam and automatically discarded.
The email senders using the service must pledge to send email ony to those who
have agreed to receive it. In return they will be able to bypass spam filters
and their messages will arrive in recipients' inboxes with a seal indicating
that the mesages are legitimate.
References:
-
Yahoo, AOL to Charge Some E-Mail Senders
By Dan Goodin AP Technology Writer
ABCNews.com
Date: February 6, 2006
[/network/email/spam]
permanent link
Sun, Feb 05, 2006 11:00 pm
Logical Disk Manager Not Responding
I removed an external 120 GB USB disk drive from a Windows Server 2003 for Small
Business Server (SBS) system. The drive in the external USB 2.0 enclosure was
full and I replaced it with a new 200 GB drive I just purchased. I plugged
the USB external drive enclosure back into the server. I then tried to
create a partition on the drive. But when I chose
Manage Computer
and then selected
Disk Management, I got the message below:
Logical Disk Manager
The service did not respond to the start or control request in a timely fashion.
When I tried diskpart from the command line, I got the message
The disk management services could not complete the operation.
When I checked the Services on the system, I saw the following:
| Name | Description | Status | Startup Type |
|---|
| Logical Disk Manager | Detects and monitors new hard disk drives and sends disk volume information to Logical Disk
Manager Administrative Service for configuration. If this service is stopped, dynamic disk status and configuration information
may become out of date. If this service is disabled, any services that explicitly depend on it will fail to start. |
Started | Automatic |
| Logical Disk Manager Administrative Service | Configures hard disk drives and volumes. The service only runs for
configuration processes and then stops. |
Stopped | Manual |
| Virtual Disk Service | Provides software volume and hardware volume management service. |
Stopped | Manual |
All of the above service states appear to be normal
The last entry I saw in the System Event Log is shown below:
Event Type:	Error
Event Source:	Service Control Manager
Event Category:	None
Event ID:	7000
Date:		2/5/2006
Time:		7:00:18 PM
User:		N/A
Computer:	S
Description:
The Logical Disk Manager Administrative Service service failed to start due to the following error:
The service did not respond to the start or control request in a timely fashion.

For more information, see Help and Support Center at http://go.microsoft.com/fwlink/events.asp.
I also saw the following entry appearing several times during the period I
was trying to set up the new drive:
Event Type:	Error
Event Source:	Service Control Manager
Event Category:	None
Event ID:	7000
Date:		2/5/2006
Time:		7:13:02 PM
User:		N/A
Computer:	S
Description:
The Virtual Disk Service service failed to start due to the following error:
The service did not respond to the start or control request in a timely fashion.

For more information, see Help and Support Center at http://go.microsoft.com/fwlink/events.asp.
I stopped and started the Logical Disk Manager service, but still got the same results.
The system does not have Service Pack 1 installed. I see a lot of diskpart
related fixes listed for Service Pack 1 at
Windows Server 2003
Service Pack 1 as well as references to fixes for Logical Disk Manager
problems.
I rebooted the system and the problem no longer existed afterwards.
References:
-
You receive an error message when you use the Diskpart.exe command-line tool to perform storage management on a Windows Server
2003-based computer
Only4Gurus
Date: August 20, 2004
-
You receive an error message when you use the Diskpart.exe command-line tool to perform storage management on a Windows Server 2003-based computer
Microsoft Help and Support
Date: August 20, 2004
-
Windows Server 2003 Service Pack 1 list of updates
Microsoft Help and Support
Date: February 3, 2006
[/os/windows/server2003]
permanent link
Sat, Feb 04, 2006 5:17 pm
Adding a Domain Account to the Power Users Group
To add a domain account to the "Power Users" group on a Windows XP system,
take the following steps:
- Click on "Start".
- Click on "Control Panel".
- Click on "Performance and Maintenance". If you don't see it, then you
are in Windows XP's "classic" view and you can skip to the next step.
- Click on "Administrative Tools".
- Double-click on "Computer Management".
- Click on "Local Users and Groups" in the "Computer Management" window.
- Double-click on "Groups".
- Double-clik on the "Power Users" group in the right pane of the window.
- Click on the "Add" button.
- In the "Enter object names to select" field, put in the domain account
name. E.g. if the domain was "example" and the user name was "Beth", you would
put in "example\beth".
- Click on "Check Names" to verify the name you entered.
- Then click on "OK", if it was accepted. A "name not found" window will
open if it wasn't accepted.
- Click on "OK" to close the "Power Users Properties" window, which should
now show the name you added.
[/os/windows/domain]
permanent link
Wed, Feb 01, 2006 6:49 pm
Get ARP Table
I needed to be able to get the ARP table from Cisco devices, so I
created
get_arp, a
Perl script which will query a router, switch, etc. via
SNMP
and obtain the ARP table from the device. There are two mandatory arguments for
the script, the hostname or IP address for the device and the read-only
community string for the device. If given only those two arguments, the
script will produce output similar to what is shown below:
% ./get_arp 192.168.220.76 tViSoN1a
ARP table for 192.168.220.76 on Wed Feb  1 22:21:38 2006

192.168.220.65 = 0:30:f2:ec:17:fc
192.168.220.66 = 0:30:f2:ec:8b:fc
192.168.220.67 = 0:30:f2:ec:17:ff
192.168.220.68 = 0:30:f2:ec:8b:ff
192.168.220.69 = 0:90:b1:81:e9:0
192.168.220.70 = 0:60:3e:7e:c7:40
192.168.220.75 = 0:9:b7:7d:e6:0
192.168.220.76 = 0:60:3e:7e:1e:a0
192.168.220.77 = 0:f:f7:5b:b:0
192.168.220.78 = 0:f:f7:5d:64:f0
An optional argument "--nomac" will cause the script to only display
the IP addresses in the ARP table, not the
MAC addresses associated
with the IP addresses as shown below:
% ./get_arp --nomac 192.168.220.76 tViSoN1a
ARP table for 192.168.220.76 on Wed Feb  1 22:21:49 2006

192.168.220.65
192.168.220.66
192.168.220.67
192.168.220.68
192.168.220.69
192.168.220.70
192.168.220.75
192.168.220.76
192.168.220.77
192.168.220.78
To use the script,
download the
script and use chmod 744 to make the script executable by
the owner. Modify the first line, if Perl is located somewhere else
on your system, which you can determine by the command which perl.
The script relies on the snmpwalk utility, which is available from
http://www.net-snmp.org/. You
can determine if it is available on your system already by issuing the
command which snmpwalk.
[/network/snmp]
permanent link
Tue, Jan 31, 2006 11:04 pm
QF File Found After Crash
A user sent an email message with a substantial number of large attachments,
which exhausted the free space in the /var partition of a Linux
email server, which was running low on space because of other large messages
queued on the system and some large log files. That particular message
proved to be the proverbial last straw on the camel's back. The system crashed
and rebooted. In addition to the df file containing the message's body and
attachments, I found a QF file, instead of the normal qf file, in the
/var/spool/mqueue directory. The qf file contains the message's headers and
other information.
# ls -lh *fk0PJ0eqI021438
-rw-------    1 root     smmsp         49M Jan 25 14:04 dfk0PJ0eqI021438
-rw-------    1 root     smmsp         948 Jan 25 14:04 Qfk0PJ0eqI021438
After clearing space on the partition, I didn't see the message associated
with the two files when I used the mailq command, apparently
because there was a QF file rather than a qf file.
So I renamed the Qf file changing the "Qf" to "qf" and then sent the message
with sendmail -v -qIk0PJ0eqI021438. You can have sendmail
manually process a queue by using a "-qI" option followed by the queue ID,
which is the sequence of letters and digits after the "qf" in the filename.
Adding a "-v" as well provides verbose information on what is happening as
the queued message is processed.
The message was then processed by the server. It was addressed to two
hotmail.com addresses. The hotmail server didn't like its size either, though,
and rejected it. Apparently, though Microsoft now offers 250 MB of free
storage with their free hotmail.com accounts, there is a limit on the size of
any individual email message and the Hotmail email server regarded a 49 MB
message as too large and bounced it back to the sender.
[root@example mqueue]# sendmail -v -qIk0PJ0eqI021438

Running /var/spool/mqueue/k0PJ0eqI021438 (sequence 1 of 1)
<mollychanged2@hotmail.com>,<danielchanged2@hotmail.com>... Connecting to mx1.hotmail.com. via esmtp...
220 bay0-mc1-f16.bay0.hotmail.com Sending unsolicited commercial or bulk e-mail
to Microsoft's computer network is prohibited. Other restrictions are found at http://privacy.msn.com/Anti-spam/. Violations will result in use of equipment located in California and other states. Tue, 31 Jan 2006 19:19:37 -0800
>>> EHLO example.com
250-bay0-mc1-f16.bay0.hotmail.com (3.1.0.18) Hello [192.168.0.26]
250-SIZE 29696000
250-PIPELINING
250-8bitmime
250-BINARYMIME
250-CHUNKING
250-AUTH LOGIN
250-AUTH=LOGIN
250 OK
>>> MAIL From:<laura3@example.com> SIZE=51191604
552 Message size exceeds fixed maximum message size
Service unavailable
<laura3@example.com>... Connecting to local...
<laura3@example.com>... Sent
Closing connection to mx1.hotmail.com.
>>> QUIT
221 bay0-mc1-f16.bay0.hotmail.com Service closing transmission channel
References:
-
[Chapter 23] 23.3 A Bogus qf File (V8 only): Qf
-
Hotmail to offer 250MB of free storage
By Jim Hu
Staff Writer, CNET News.com
Published: June 23, 2004
[/network/email/sendmail]
permanent link
Tue, Jan 31, 2006 9:51 pm
Messages File Too Large
I needed to make some more free space in the /var partition on
a Linux system and found that the largest file in /var/log was the
messages file, which had grown to 75 MB, because it was no longer
being rotated. I moved the current messages file to another partition
and then used
/etc/init.d/syslog restart, which restarts
syslogd, which was the process that had the messages file open. Restarting
syslogd leads to the creation of a new messages file
[/os/unix/syslog]
permanent link
Tue, Jan 31, 2006 9:16 pm
PowerPoint Animation Schemes Grayed Out
If you find that the entries under "Animation Schemes" in Microsoft PowerPoint
2003 are grayed out, you may need to change a PowerPoint option setting. For
instance, if you click on "Slide Show" and select "Animation Schemes", but see
that the Animation Schemes entries are
unavailable, i.e. they are grayed out, then the "New animation effects" option
may be set to "disabled". To re-enable the Animation Schemes effects, within
PowerPoint, click on "Tools", then "Options" and then make sure that "New
animation effects", under "Disable new features", is not checked.
[ More
Info ]
[/os/windows/office/powerpoint]
permanent link
Tue, Jan 31, 2006 9:00 pm
Windows Security
Center.AntiVirusOverride
If you run
Spybot Search &
Destroy 1.4 and find that it detects
Windows Security
Center.AntiVirusOverride, that is not necessarily anything to
worry about and, in fact, you may want to deselect this item as one
that Spybot will "fix".
[ More Info ]
[/security/spyware/spybot]
permanent link
Fri, Jan 27, 2006 2:34 pm
File Export
I wanted to view the files within an
MSI file, i.e. a
.msi
file. I found a VBScript, called
File Export
at
Export File List to Excel From MSI Using VBScript, which will
create an Excel spreadsheet, i.e. a .xls file that lists the contents of
an MSI file.
' File Export v 1.0

' Export File Table from a given MSI Database to an Excel Spreadsheet
' J.Loomes Nov 2000


Option Explicit

Const msiOpenDatabaseModeReadOnly = 0


On Error Resume Next
Dim installer : Set installer = Nothing
Dim szMSI

szMSI = InputBox("Enter MSI File (including full path)", "Select MSI", "")
DIM folder : folder = InputBox("Enter Folder to Write Table to...", "Select Export Folder","")

Set installer = Wscript.CreateObject("WindowsInstaller.Installer") : CheckError

Dim database : Set database = installer.OpenDatabase(szMSI, msiOpenDatabaseModeReadOnly) : CheckError

Dim table, view, record

        table = "File"

        Set view = database.OpenView("SELECT 'Name' FROM _Tables")
        view.Execute : CheckError
        Do
            Set record = view.Fetch : CheckError
            If record Is Nothing Then Exit Do
            Export table, folder : CheckError
        Loop
        Set view = Nothing


        Export table, folder : CheckError


Wscript.Quit(0)

Sub Export(table, folder)
    Dim file :file = table & ".xls"
    database.Export table, folder, file
End Sub


Sub CheckError
    Dim message, errRec
    If Err = 0 Then Exit Sub
    message = Err.Source & " " & Hex(Err) & ": " & Err.Description
    If Not installer Is Nothing Then
        Set errRec = installer.LastErrorRecord
        If Not errRec Is Nothing Then message = message & vbNewLine & errRec.FormatText
    End If
    Wscript.Echo message
    Wscript.Quit 2
End Sub
If saved as File-Export.vbs, the script can be run by double-clicking on it in
Windows Explorer or typing File-Export.vbs, or cscript
/nologo File-Export.vbs.
The script will prompt for the MSI file to process. Enter the full path to the
file and the filename at the prompt. Make sure you type it correctly as
you may see no error message and no output otherwise.

You will then be prompted for the export folder. A file named File.xls will be
created in the directory you specify.

An examination of the MSI file contained within the whoami_setup.exe setup file
for Microsoft's Windows 2000 Resource Kit utility
Whoami,
produced this File.xls, which can be
viewed here.
If you would like further information on how an
MSI file is structured,
see
Inside the MSI file format by
Rob Mensching.
References:
-
File Extension Details for .MSI
FilExt - The File Extension Source
-
Export File List to Excel From MSI Using VBScript
By John Loomes
December 7, 2000
-
Whoami
Microsoft Corporation
March 8, 2001
-
Inside the MSI file format
Rob Mensching's blog
November 25, 2003
[/os/windows/msi]
permanent link
Wed, Jan 25, 2006 8:04 pm
Google and Government Control
MSNBC.com has an article today titled
Google Vs. the Government
where David Vise, author of 'The Google Story', discusses how Google has dealt with
censorship in China and the recent attempt by the U.S. government to monitor what
U.S. citizens are searching for on the Internet by demanding that search engine
companies turn over massivive amounts of search records to the government, ostensibly
so the government can protect children from pornography. China and Singapore also
claim they must control their citizenry's web browsing to protect citizens from
pornography.
The interview with David Vise also mentions that the former chef for the Grateful
Dead was the executive chef for Google for awhile, but has since left to start
his own restaurant.
References:
-
Google Vs. the Government
MSNBC.com
Date: January 25, 2006
-
Internet Filtering in Singapore in 2004-2005: A Country Study
-
Censorshipo in Singapore
From Wikipedia, the free encyclopedia
-
Internet Censorhip - China
[/network/web/search]
permanent link
Tue, Jan 24, 2006 9:04 pm
Environmental Impact of Hardware Disposal
Most people blithely dispose of old electronic equipment without any thought
to the environmental impact. But, if such equipment ends up in a landfill
or an incinerator, toxic chemicals can be released into the environment.
Electronic equipment, such as computers and monitors, may contain lead,
mercury, cadmium, and hexavalent chromium. A Cathode Ray Tube (CRT) monitor
may contain 4 to 5 pounds of lead4. Even the newer flat panel Liquid
Crystal Display (LCD) monitors will contain hazardous materials, though they
don't need the large amounts of lead required in the heavier CRT monitors,
which require the lead to shield the user from X-ray radiation generated by the
monitor. Mercury and lead have long been known to cause neurological damage.
Some have speculated that the lead in wine storage vessels, food, and plumbing
used by the Roman ruling classes was a major contributing factor in the
downfall of the Roman empire. Though the Romans were aware of the serious
health problems that could be caused by lead, they used it for many
purposes and didn't consider the long-term implications of everyday
use. Modern Americans use 10 times as much lead per person per year than the
ancient Romans did before the downfall of Rome5.
Mercury, too, can have devastating effects on the human body. Many may
be familiar with the Mad Hatter in Lewis Carroll's
Alice in Wonderland.
The reason madness was associated with hatters is that mercury was commonly
used in the fur, felt, and hat industries of a few centuries ago7.
When Lewis Carroll published Alice in Wonderland in 1865, mercury was
widely used in the creation of the felt hats worn in England at that time and
the phrase "mad as a hatter had been in common use for almost
3 decades. The effects of mercury poisoning on hatters included erratic,
flamboyant behavior, excessive drooling, mood swings, and various debilities.
A hatter might developer what were known as "hatter's shakes", which were
characterized by severe and uncontrollable muscular tremors and twitching
limbs. Hatters with advanced cases of mercury poisoning sufferred from
hallucinations and other psychotic symptoms8.
Of the other harzardous substances in computers,
hexavalent chromium (trivalent Chromium is actually an important
component of a human diet) has been shown to cause high blood pressure, iron-poor
blood, liver disease, and nerve and brain damage in animals. The movie
Erin Brockovich is based on a true story of how Ms. Brockovich brought
to public attention the environmental contamination in the town of Hinkley in
the Mojave Desert resulting from the use of hexavalent chromium as an
anti-corrosive in the cooling tower of a gas compressor station in the town.
Residents of the town had been experiencing an array of health problems, such
as liver, heart, respiratory and reproductive failure, Hodgkin disease,
frequent miscarriages, and cancers of the brain, kidney, breast, uterus,
and gastrointestinal systems at an alarming rate. As a result of Ms.
Brockovich's actions, the town's residents were successful in seeking damages
from PG&E, which was responsible for the gas compressor station9.
But no amount of money can bring a loved one back from the dead or restore
lives ruined by devastating health problems.
Cadmium, also found in computers, is a known carcinogen and chronic exposure
to dust or fumes containing cadmium can irreversibly damage the lungs. Eating
food or drinking water contaminated with high levels of cadmium severely
irritates the stomach, causing vomiting and diarrhea. An accumulation of
cadmium in the body can lead to kidney failure. Cadmium stays in the body
a long time and can build up in the body to dangerous levels through many years
of low level exposure10. For further information on the health risks
posed by exposure to cadmium, see the
Cadmium
entry at the Corrosion Doctors
website.
So, if you don't want to contaminate your own or
someone else's air or water, you should not just dump your outdated computers,
monitors, and other electronic equipment in the trash.
The Your Planet section of an article,
Is Your Computer Killing You?, lists a number of alternatives
to simply throwing the equipment in the trash. An 800 number, 1-800-CLEANUP,
is listed for state-specific information for the U.S. on how to safely
discard such equipment. You can also visit
Earth 911 for general
recycling information as well as information specifically related to the
disposal of cell phones and computers.
The
InformationWeek article also lists steps you can take to minimize health
problems, such as carpal tunnel syndrome and eyestrain, associated with
prolonged computer use.
Some computer manufacturers, such as
Dell, have their own recycling programs. Dell will recycle your unwanted
PC or computer electronics for a flat fee per item. If you buy a new Dell
desktop or laptop, you can select the free recycling option at the time of
purchase to recycle your old PC and monitor.
References:
-
Is Your Computer Killing You?
By Lee Hamrick
Small Business Pipeline
January 18, 2006
-
Earth 911
-
Dell Recycling
-
Disposal of Old Computer Equipment
A Mounting Environmental Problem
By Michael J. Meyer, Waleed Abu El Ella, and Ronald M. Young
The CPA Journal
A Publication of the New York State Society of CPAs
-
Lead Poisoning: A Historical Perspective
By Jack Lewis
EPA Journal - May 1985
United States Environmental Protection
Agnecy (EPA)
-
Lead in history
Corrosion Doctors
-
Mercury Toxicology
Corrosion Doctors
-
Mad as a hatter
Corrosion Doctors
-
Chromium health and environment
Corrosion Doctors
-
Cadmium health and environment
Corrosion Doctors
[/hardware/recycling]
permanent link
Tue, Jan 24, 2006 7:40 am
GCN Interview of Vinton Cerf
Vinton Cerf is often referred to as the “father of the Internet”,
though he modestly declines the title, crediting Bob Kahn with starting the
internetting project at
DARPA
in late 1972 or early 1973. He later joined with Bob Kahn to work on network
ideas after joining the Stanford University faculty. But Mr. Cerf
certainly is one of the fathers of the Internet.
Government Computer News (GCN) has an
interview with Mr. Cerf, who now works for
Google, at
The search
continues. In it he states, when asked what Internet developments
have most impressed him over the years, that "The massive sharing of
information among individuals who offer their expertise and knowledge
has been stunning in its scope." I think that is the most important
benefit of the Internet. I've benefitted enormously from the information
others have been willing to freely share on the Internet and I hope that
information I provide will also benefit others.
I believe the impact of the Internet will be comparable to the impact
the invention of the printing press had on civilization in helping to
eradicate ignorance and disseminate knowledge. Just as the printing
press sparked the Reformation and the Enlightenment, the Internet will
spark new ways of looking at the world. The Internet, though at last
enjoying wide popularity, is still in its infancy and its full impact
has not yet been realized.
Reference:
-
The search
continues
By Brad Grimes
GCN Staff
January 23, 2006
[/network/Internet]
permanent link
Mon, Jan 23, 2006 11:12 pm
CDT Asks FTC to Stop Adware Developer 180solutions
The Center for Democracy and Technology (CDT), a nonprofit technology group, has
asked the U.S. Federal Trade Commission (FTC) to stop 180solutions, Inc. from
distributing software deployed using "deceptive and unfair" methods to generate
pop-up ads.
180solutions develops adware products such as Zango Search Assistant and Seekmo Search
Assistant, which generate pop-up ads. Like most adware distributors, the company
asserts that users have consented to be bombarded with such ads.
The CDT asserts that 180solutions isn't aggressive enough in policing its distribution
partners. Often adware/spyware developers will rely on other companies or individuals
to distribute their products. Some of those distribution partners will use surreptitious
means to install the adware on a system. When confronted about such nefarious practices,
the developer can blame the distributor and claim it doesn't countenance such
practices. The CDT cites CJB Management, Inc., which provides free web hosting services,
as an example of how a 180solutions distributor misleads consumers who visit CJB
websites. People who visit CJB websites are notified to expect advertising, but
aren't told software will be installed on their systems that continuously monitors
their Internet activities in order to send targetted ads to them.
References:
-
Group Asks FTC to Stop Software Developer
By Anick Jesdanun AP Internet Writer
January 23, 2006
[/security/spyware]
permanent link
Fri, Jan 20, 2006 8:03 pm
Internet Explorer JavaScript Support
JavaScript
is often used to create dynamic webpages. However, when designing webpages
you can't be certain that all users will visit your webpages with a browser
capable of handling JavaScript code. Very old browsers or text-only browsers
won't process the JavaScript code. Or an Internet Explorer user may have
JavaScript support disabled. You can include code on a webpage to test
whether JavaScript is supported and enabled.
[ More
Info ]
[/network/web/browser/javascript]
permanent link
Wed, Jan 18, 2006 1:07 pm
Network Solutions DNS Outage on January 18, 2006
A short while ago I found that I couldn't access my website. I then
discovered that I couldn't retrieve IP addresses for any of my domain
names for which I have
DNS
service from
Network Solutions.
Network Solutions is probably the largest domain name registrar in the world.
I've been using
GoDaddy primarily for
registering domain names for quite some time, since their service is as good
or better than Network Solutions service and they are a lot cheaper, but I still
have some domain names registered with Network Solutions.
At the Internet Storm Center (ISC), I found
a posting from
Swa Frantzen at 2006-01-18 17:14:32 UTC regarding reports that Network Solutionsworldnic DNS servers are not responding to name queries. Network Solutions
name servers have names of the form nsxx.worldnic.com, where xx is some number.
I called the Network Solutions customer support number. I heard a recorded
message stating that they are experiencing a widespread outage and are working
diligently to resolve the problem, which is their highest priority at the
moment. There was no estimated time for restoring service.
The 24 x 7 Network Solutions support numbers are as follows:
In the U.S. and Canada call:
1.888.642.9675 (General Support)
1.866.391.HELP (Technical Assistance)
Outside the U.S. call:
1.570.708.8788
I first noticed the problem at noon US
EST. At 12:55 PM EST, the
problem was resolved. I could then successfully lookup IP addresses for
domain names hosted with Network Solutions. I don't know when the problem
first started, but it appears to have taken at least an hour to resolve
(I'm presuming I didn't see it at the exact moment it started).
[/network/dns]
permanent link
Wed, Jan 18, 2006 11:09 am
Auotmatically Starting Apache When the Server Reboots
If you wish to have the Apache web server software start
automatically when a Solaris 2.7 system reboots, you can
create a script with root ownership in /etc/rc3.d. Start the script's file name
with Sxx where xx is a number not already being used in a filename
for an existing script in the directory. For instance, if you
have S34dhcp already in the /etc/rc3.d directory, you shouldn't
use S34httpd, but you could use S88httpd, if S88 wasn't already used
as the start of some other script name. The text that comes after the Sxx
part of the name is arbitrary. You could call it S88httpd, or S88apache, or
whatever else you choose.
You then need only the following line in the file to have Apache start
automatically, presuming apachectl is located in /usr/local/apache2/bin.
/usr/local/apache2/bin/apachectl start
You can then change the permissions on the file to make it executable, though
I found Apache was still started with permission settings of 644, i.e.
"-rw-r--r--".
chmod 744 /etc/rc3.d/S88httpd
[/os/unix/solaris]
permanent link
Tue, Jan 17, 2006 9:57 pm
Allowing Authenticated Senders From Otherwise Blocked IP Addresses
I had a user who uses
Verizon's wireless broadband service report that he could not send email
from his laptop. I had Outlook on his laptop configured to use sender
authentication when sending email, i.e. I had "My outgoing server (SMTP)
requires authentication" and "Use same settings as my incoming mail server"
checked for his email account properties. Yet when Outlook attempted to send
email, he would see messages similar to the following:
Task 'rberry1@moonpoint.com - Sending' reported error (0x800CCC78) : 'Unable
to send the message. Please verify the e-mail address in your account
properties.

The server responded: 550 5.7.1 Mail from 70.195.76.138 refused - see
http://www.dnsbl.us.sorbs.net/'
The IP address assigned to his laptop by the Verizon network was in a range
listed on the Spam and Open Relay Blocking
System (SORBS) blocklist as being a dynamically assigned address range.
I would expect a fair amount of spam to come from spammers using infected
home users' systems as spam distribution points with most home users having
dynamically assigned IP addresses, so I wanted to keep the SORBS blocklist in
place on the server, but I did need to allow the user to send email through
the server.
In order to allow the user to send email via the email server, but keep
the SORBS blocklist, I maintained the sender authentication on his system,
but modified /etc/mail/sendmail.mc on the email server. I "uncommented" the
delay_checks line in the sendmail.mc file as below:
Original line
dnl FEATURE(delay_checks)dnl
New line
FEATURE(delay_checks)dnl
I then regenerated the sendmail.cf file and restarted sendmail with the
following commands:
m4 /etc/mail/sendmail.mc > /etc/mail/sendmail.cf

/etc/init.d/sendmail restart
I was then able to send from his laptop while connected to the Verizon
broadband wireless service without a problem.
The delay_checks feature
delays checks of the IP address of the sender against blocklists, aka
blacklists, until after sender authentication. If sender authentication
succeeds the presence of the sender's IP address on a blocklist won't
matter. His email will still be accepted.
References:
-
Anti-UBE FEATUREs in Sendmail 8.10/8.11
[/network/email/sendmail]
permanent link
Mon, Jan 16, 2006 12:01 pm
Burst Versus Apple
Last year,
Burst.Com, got
Microsoft to agree to settle
Burst's patent and antitrust suit against Microsoft for $60 million.
Microsoft agreed to license Burst's technology. Burst then threatened
Apple with litigation. In turn,
Apple is attempting to have Burst patents for audio and video software
declared invalid. Burst claims that its patents apply to
Apple's popular iPod player and iTunes software and service.
References:
-
Jobs' Apple Locks Horns With Burst.com
By Chris Noon
January 9, 2006
-
Win Some, Lose Some
By Robert X. Cringely
January 12, 2006
-
Burst.com vs Microsoft
September 9, 2004
-
Bursts's lawsuit against Microsoft
By BurstInvestors.com
-
Burst.Com, Inc.: Company Snapshot
By the Winthrop Corporation
-
BRST.PK: Summary for Burst.Com Inc.
Stock Price
[/software/patents]
permanent link
Thu, Jan 12, 2006 12:47 am
Controlling a Windows System from a Linux System
If you need to remotely control a Windows system from a Linux or Unix system,
you can use
rdesktop. Rdesktop is an
open source client for Windows NT Terminal Server and Windows 2000/2003 Terminal
Services, capable of communicating with a Windows system using the Remote Desktop
Protocol (RDP).
With rdesktop you get an X Window display on your Linux/Unix system that looks
very similar to what you would see if you were sitting at the Windows system. It
works much like Windows remote desktop software that allows you to control one Windows
system with another.
If you are using a Linux system, rdesktop may already be present. You can check
by issuing the command rdesktop. If it isn't present,
installing rdesktop is easy. Download the file from
www.rdesktop.org,
SourceForge.net:rdesktop, or
here and then
issue the following commands on your Linux
or Unix system, subsituting the particular version number you have downloaded:
tar -xvzf rdesktop-1.4.1.tar.gz

cd rdesktop-1.4.1

./configure

make

make install
You can then run the software with the rdesktop command. E.g., if I wanted
to connect to a Windows system with IP address 192.168.0.3, I could issue the command
rdesktop 192.168.0.3. If the Windows system is behind a firewall, you
will need to open TCP port 3389.
I often boot a Windows system with a Knoppix Linux
Live CD when I am working at
a site, so that I can be sure that I am working on a secure system rather than a
system that may have been compromised by viruses, trojans, spyware, etc. If I need
to access a server at the site, such as a Windows Small Business Server (SBS) 2003
server, I can still access it from the system booted into Knoppix Linux with a Live CD
by using rdesktop. Knoppix Linux comes with rdesktop, but you may have another
Linux Live CD, which doesn't already provide rdesktop. Since you are booting from a
Live CD and can't alter its contents, you need to specify a directory that is
stored in memory rather than on the CD when
you are installing rdesktop. You can do so by using "--prefix" to specify the
directory into which you wish to install it. Otherwise, you will get the following
error when you attempt to install it.
$ make install

mkdir -p /usr/local/bin

mkdir: cannot create directory `/usr/local/bin': Permission denied

make: *** [installbin] Error 1
To eliminate the problem, you can use the following commands after you have downloaded
the software into a virtual disk Live CDs will typically set up in memory. Suppose
you have /ramdisk/tmp as such an area and you have made that your working directory.
tar -xvzf rdesktop-1.4.1.tar.gz

cd rdesktop-1.4.1

./configure --prefix=/ramdisk/tmp

make

make install

./rdesktop 192.168.0.3
Unless you specify otherwise, a new logon session will be established to the system.
The current one won't be terminated. But, perhaps a user is already logged onto the
system and you wish to connect to the current console session on the system, to see
exactly what you would see if you were sitting at the system. Then you should use
the -0 option to attach to the console, e.g. rdesktop -0
192.168.0.3. You can specify the userid to use with the -u option,
e.g. rdesktop -0 -u administrator 192.168.0.3. You may also want to
change the color depth with the -a option. The default value is 8-bit
color, which gives you only 256 colors. If you use -a 16, you will
get 16-bit color, which is 2 raised to the power of 16 colors, i.e. 65,536 colors.
If you use rdesktop alone with no options, you will get a list of other
available options for the command.
References:
-
Administer Windows from Linux with rdesktop
-
Using Rdesktop To Access Windows Terminal Services from A GNU/Linux Client
[/os/windows/software/remote-control/rdp]
permanent link
Tue, Jan 10, 2006 10:56 pm
Windows Vulnerability in Embedded Web Fonts
Microsoft released a patch today, which is January's "Patch Tuesday", for a
vulnerability in the way Windows handles fonts embedded in a webpage. The vulnerability
could allow a malicious webpage developer, or someone who has compromised a website, to
install an embedded font on a webpage such that when a user views the webpage the user's
system could be compromised, potentially even allowing a remote attacker to take
complete control of the user's PC.
[ More Info ]
[/security/vulnerabilities/windows]
permanent link
Sun, Jan 08, 2006 11:48 pm
Attempted SpyAxe Installation
SpyAxe is
suspect antispyware that, through deceptive and agressive deployment
techniques, may be installed on a PC. If you see the message below,
some malware is likely trying to install SpyAxe on the system.
Your computer is infected!
Dangerous malware infection was detected on your PC
The system will now download and install most efficient
antimalware program to prevent data loss and your private
information theft.
Click here to protect your computer from the biggest malware
threats.
The software should not be installed. You can use the
smitRem tool to remove the software which is attempting to set up SpyAxe
on the system.
[ More
Info ]
[/security/spyware/spyaxe]
permanent link
Sat, Jan 07, 2006 6:02 pm
ClamAV Error While Loading Shared Libraries
I wanted to run the current version of the
ClamAV antivirus software with a
PLoP Linux boot CD.
PLoP Linux provides a
LiveCD
that can be used to boot a Windows system and scan it for viruses.
This can be useful when a Windows system is badly infected and you wish to
avoid even booting into Windows to check the system. The version of PLoP Linux
I downloaded from the developer's website at
http://www.plop.at/page_en_0.html included ClamAV, but it was the 0.86.2
version rather than the current 0.87.1 version. I put the most current version
of clamscan on a Zip disk, which I mounted after booting from the PLoP Linux
CD, but when I tried to run the
current version I got the message "error while loading shared libraries:
libbz2.s0.1: cannot open shared object file: No such file or directory."
I used the ldd command on a Linux system where I had clamav
working to find out what
shared libraries it needed.
# ldd `which clamscan`
        libclamav.so.1 => /usr/lib/libclamav.so.1 (0x40022000)
        libz.so.1 => /usr/lib/libz.so.1 (0x4006e000)
        libbz2.so.1 => /usr/lib/libbz2.so.1 (0x4007c000)
        libgmp.so.3 => /usr/lib/libgmp.so.3 (0x4008b000)
        libpthread.so.0 => /lib/tls/libpthread.so.0 (0x400b8000)
        libnsl.so.1 => /lib/libnsl.so.1 (0x400c6000)
        libc.so.6 => /lib/tls/libc.so.6 (0x42000000)
        /lib/ld-linux.so.2 => /lib/ld-linux.so.2 (0x40000000)
I then copied all of those files to the same directory on the Zip disk
where I had the clamscan program. But I got the same error message when
I ran clamscan. So clamscan wasn't able to find the libraries it needed in
the current directory.
After reading the article
CLI Magic: ldconfig and friends by Joe Barr, I realized I need only
add the directory where I had stored the libraries to /etc/ld.so.conf file.
So I added /mnt/zip to the end of /etc/ld.so.conf.
/lib

/user/kerberos/lib

/usr/lib

/opt/multimedia/lib

/media/pluspacks/antivir

/mnt/zip
I then issued the
ldconfig
command. That allowed the newer
version of clamscan I had on the Zip disk to look in the /mnt/zip
directory while searching for the shared libraries it needed, when it
couldn't find them in the other directories listed as locations for shared
library files. I was then able to use /mnt/zip/clamscan to
run the newer version on the Zip disk rather than the older version on the CD.
If you don't want to add a directory permanently to the list of directories
searched for libraries, then you can issue the ldconfig command
followed by the directory, e.g. ldconfig /mnt/zip would specify
that the /mnt/zip directory be searched for libraries as well,
but only until the system is rebooted.
References:
-
CLI Magic: ldconfig and friends
By Joe Barr
May 16, 2005
-
What is ldconfig used for?
By Nathan Wallace, Kim Shrier
August 3, 1999
-
Shared Libraries
By David A. Wheeler
April 11, 2003
-
Building and Using Static and Shared "C" Libraries
By Guy Keren
2002
-
LDD Library Dependencies
By Karsten M. Self
April 8, 2005
-
Automatic Dependencies
By Red Hat, Inc.
2000
[/security/antivirus/clamav]
permanent link
Tue, Jan 03, 2006 8:17 pm
Disabling the FTP Service
If you wish to disable the FTP service on a Solaris 2.7 system, you can
take the following steps while logged in as root.
- Edit /etc/inetd.conf, since the ftp daemon is started through inetd
and comment out the ftp line.
Old
ftp stream tcp nowait root /usr/local/etc/tcpd /usr/sbin/in.ftpd
New
#ftp stream tcp nowait root /usr/local/etc/tcpd /usr/sbin/in.ftpd
-
Send a "-HUP" signal to the inetd process, which will cause inetd to restart
using the new contents of inetd.conf.
# pkill -HUP inetd
If you issue the ps -e | grep inetd commands before and after
the pkill command, you may see
the same PID for the inetd process, but if you now try connecting to
the system with FTP, you should get a "connection refused" message, since
the ftp daemon will no longer be started by the inetd service.
[/os/unix/solaris]
permanent link
Mon, Jan 02, 2006 11:45 pm
WMF Vulnerability Could Allow Remote Code Execution
Code that will allow attackers to compromise a Windows-based PC using
a vulnerability in the way such systems handle images has been posted
online over the holidays. Exploitation of this vulnerability by attackers
could allow them to install spyware on a system or take complete control
of it.
The vulnerability is within software that is part of the Windows operating
system distribution. The affected software processes Windows MetaFile (WMF)
images, but an attacker need only rename an infected WMF file with a JPG, GIF,
PNG, or other common graphic file format extension to avoid any block on all
WMF files, since a Windows system will examine the contents of files with those
extensions and execute the code in them, if they are really WMF files.
An attacker can send infected images by email or put them on a website.
The mere presence of an infected file on a system can lead to the system's
infection, if file indexing software, such as Google's desktop search utility
is presence. When the file is indexed, the exploit is triggered.
[
More Info ]
[/security/vulnerabilities/windows]
permanent link
Sun, Jan 01, 2006 6:33 pm
Adding a Domain Account to the Administrators Group
To add a domain account to the local "Administrators" group on a Windows XP
system, take the following steps:
- Click on "Start".
- Click on "Control Panel".
- Click on "Performance and Maintenance". If you don't see it, then you
are in Windows XP's "classic" view and you can skip to the next step.
- Click on "Administrative Tools".
- Double-click on "Computer Management".
- Click on "Local Users and Groups" in the "Computer Management" window.
- Double-click on "Groups".
- Double-clik on the "Administrators" group in the right pane of the window.
- Click on the "Add" button.
- In the "Enter object names to select" field, put in the domain account
name. E.g. if the domain was "example" and the user name was "Sally", you would
put in "example\sally".
- Click on "Check Names" to verify the name you entered.
- Then click on "OK", if it was accepted. A "name not found" window will
open if it wasn't accepted.
- Click on "OK" to close the "Administrators Properties" window, which should
now show the name you added.
[/os/windows/domain]
permanent link

Privacy Policy
Contact

